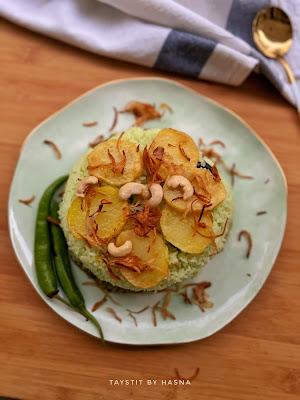
Search This Blog

Taystit by Hasna

Food, Recipes, and Beyond

  • Home
  • About Me
  • Recipes
    • Main Course
    • Snacks
    • Desserts
  • Uncategorized
    • Chicken
    • Meat
    • Vegetarian
    • Rice
    • Malabar Food
    • Baking
    • Breakfasts
    • Snacks
    • Fish
    • Pasta
    • Drinks
    • Soups
    • Desserts
  • Contact Me

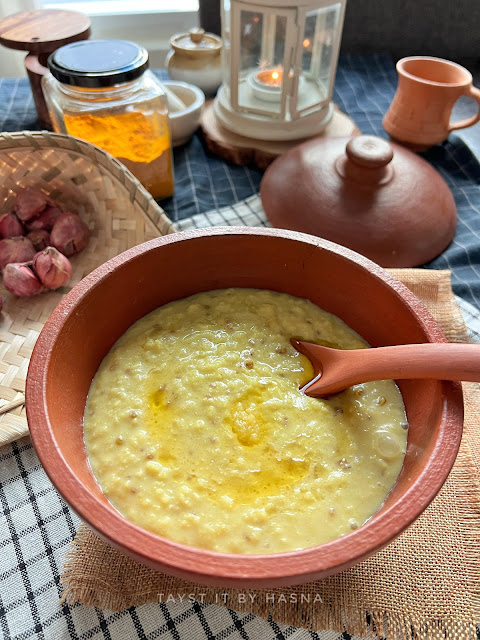
 Jeeraka Kanji


Jeeraka Kanji is a staple during ramadan. During my childhood, my mom would bring a big bowl of this Jeeraka Kanji to the table during Ramadan and the feeling of that warmth can't be describedutnil you actually try it. The leftover Kanji is usually had for suhoor. It is filling and the medicinal properties of garden cress seeds are immense. Garden cress seeds, also known as ashali in Malayalam is more like the brown/red cousin of basil seeds/ tuk malenga :D

I made the Jeeraka Kanji in the pressure cooker, you may cook the kanji/rice porridge in any pot. Then, a ground paste of coconut, shallots and cumin seeds are added to the kanji. The comfort that this rice porridge gives after breaking fast is just so soothing. Cumin and Fenugreek seeds has many benefits too.

Without further ado, let's see how the Jeeraka Kanji is made.

Ingredients : (makes for 4 people)


  • 1 cup Jerakashala rice
  • 1/2 tsp Fenugreek seeds 
  • 1 tsp Garden Cress Seeds
  • 1/4 tsp Turmeric powder
  • 4-5 Shallots
  • 1/2 cup Shredded Coconut
  • 1 tsp Cumin Seeds
  • 1/2 cup water
  • Ghee/ clarified butter, to garnish

Instructions:

  • Cook the rice in a pressure cooker with Fenugreek seeds, garden cress seeds, salt and turmeric and water double the quantity of the rice, for 1 whistle and let it stay for 5 minutes before releasing pressure manually, (you may also cook in a normal pot and allow the rice to cook until well cooked and thick).

  • In a mixer grinder, add the shredded coconut, cumin seeds, shallots, water and grind.

  • Add the ground coconut paste to the cooked rice porridge and add more water, salt and turmeric, if required.
  • Allow the kanji to come to a simmer, before the kanji boils, switch off the flame.
  • Serve the Jeeraka kanji warm, in bowls and serve with ghee/ clarified butter.


Do try this recipe and don't forget to share your experience/feedback with me here in the comments or feel free to send me a mail. Also, do tag me at #taystedit if you try out my recipes on Facebook, Instagram etc so that I can see when you make it. ♡♡♡♡

 Varutharacha Kallumakaya Curry


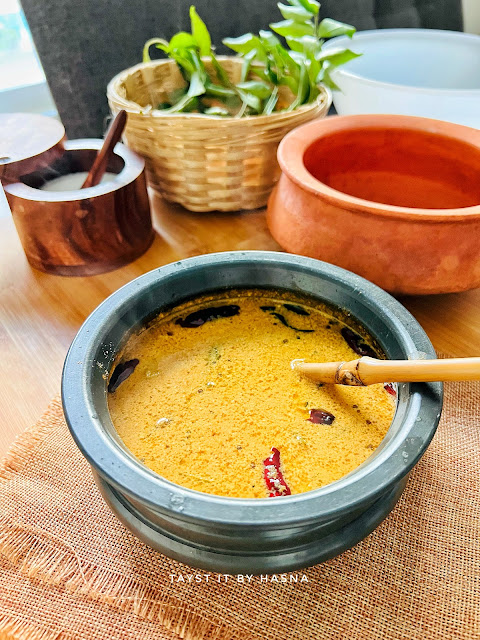
One seafood that I simply can't get enough are Mussels. This delicious seafood made in any way makes the most delicious food. This curry, which is a traditional curry was introduced to me by my ummama (grandmother ), when I went to visit India this year. The aroma from the roasted spices filled the air. I immediately went to have a glance to check how the curry is made.

The curry, though it may look complicated, the recipe is very simple and a delicious curry perfect for rice, chappathi or Ari orotti. The spice powders are dry roasted which is then added to the main curry. The main gravy consists of green Mango slices, you may use Tamrind water and/ tomatoes for sourness too. My grandmother said in olden times, tomatoes were not available much or it was a seasonal fruit/ vegetable that was very expensive and hence was not used much in our traditional cooking.

Let's see how thw curry is made,

Ingredients:


  • 500 gms Kallumakaya/ Mussels (cleaned*)
  • 3 tsp Coriander powder
  • 1 1/2 tsp Kashmiri Red Chilli powder 
  • I/2 of one small Green Mango, sliced/ 1/2 of a Tomato 
  • 5-6 Shallots
  • 1/2 cup Grated Coconut 
  • Water, as required for grinding 
  • Curry leaves
  • 1/4 tsp Turmeric
  • Salt, as required 

Tadka:

  • Coconut oil 
  • Mustard seeds
  • Curry leaves 
  • Dry Red Chilli 

Instructions:

  1. In a pan, dry roast coriander powder and red Chilli powder for around a minute or two and set aside.
  2. Make a paste of grated coconut, shallots, and water. Set aside.
  3. In a pot, add the cleaned mussels with the residual water that oozed from the mussels. 
  4. Add curry leaves, sliced green mango or tomato, roasted spices, turmeric and salt as required. 
  5. Allow to cook for 3-4 minutes. 
  6. Next add the coconut ground paste and allow to come to a boil. Switch off the flame.
  7. Now make a tadka/tempering of coconut oil, mustard seeds, curry leaves and dry red Chillies.
  8. Add the tadka to the prepared curry and enjoy hot with rice, chappati or Ari orotti.

Notes:

*Clean the Kallumakaya and the water that drains from the clean Kallumakaya is used in the curry to enhance the flavor.

 You may also make this recipe using prawns too 


Do try this recipe and don't forget to share your experience/feedback with me here in the comments or feel free to send me a mail. Also, do tag me at #taystedit if you try out my recipes on Facebook, Instagram etc so that I can see when you make it. ♡♡♡♡


 Yemeni Mutton Haneeth


Yemeni Mutton Haneeth is a popular dish where lamb meat, preferably ribs cut/ shoulder cut is marinated in a blend of spices with butter and slow roasted until the meat is so tender that it falls off the bone. So the meat is usually cooked for many hours until tender. Since, we live a fast life, it's preferable to cook the meat using the pressure cooking method. But if you have the time, I would suggest to prepare the Haneeth using the slow cook method. The meat becomes so tender either way, that it just melts in the mouth. To give it extra texture, the cooked meat is then roasted in the oven, for the skin to develop a juicy crust.

Since the meat is rubbed with spice rub, you do not want the spice rub to come off completely whilst the meat cooks, so I use a rack/ trivet that helps the meat not to be completely in direct touch with the water, hence the masala stays intact and the meat gets cooked well and also the juices from the meat drops in the water which is used to cook the rice, this helps to make the rice extra flavorful.

Mutton Haneeth is something that I can't have enough of, my husband says that I have an extra tummy when we go and eat haneeth/ mandi from restaurants! xD I am that much of a fan of the flavorful Yemeni dish. I used Basmati Sella rice here, you may use the usual basmati rice too, but I fee texture and flavorwise, sella rice stands out in Haneeth. Let's make this scrumptious main course right away! Or at least it's Fridayyy tomorrow :D Without further ado, let's get started!


 Ingredients :

  • 1 kg Mutton ribs/ shoulder *
  • 50 gms Butter
  • 1 tsp Garlic powder
  • 2 tsp Paprika powder
  • 1 tsp Freshly crushed Black pepper
  • 1 tsp Cumin powder
  • 1/4 tsp Turmeric Powder
  • 2 tsp Arabic Spice powder (store bought), optional
  • 1 tsp Rock salt
  • 1 MAGGI Chicken cube (less salt)
  • 2 tbsp warm Water
  • 1 cup Water

For Rice:

  • 1/2 cup oil 
  • 2 tbsp Cashews
  • 2 tsp Raisins
  • 2 Onion, 1 sliced and 1 chopped
  • 3 cups Sella Basmati Rice
  • 2 tsp Cumin seeds
  • 1 tsp Coriander Seeds
  • 2-3 Bay leaves
  • 2 Cinnamon sticks
  • 3-4 Cardamom pods
  • 4-5 Garlic, slightly pound  
  • 1 tsp Whole Peppercorns
  • 1 Dry Lemon
  • 1 Chicken Cube
  • 1/2 Capsicum, sliced
  • 4 1/2 Boiling water
  • 1/2 cup mutton broth 
  • Salt, as required
  • 3 whole Green Chillies, Large
  • A pinch of Saffron strands, soaked in warm water

Instructions:

  1. In a blender, blend all the spices, rock salt, chicken cube along with room temperature butter and warm water.

  2. Poke the mutton ribs using fork and rub the marinade well onto the ribs.
  3. In a pressure cooker, place a trivet or a stand that helps elevate the meat from the water.
  4. Place the marianted meat over the trivet and pour water and allow to pressure cook for 7-10 whistles depending on how tender the meat is, allow the pressure to release naturally.
  5. To make the rice, fry the sliced onions in the oil until golden and crisp, drain and set aside. 
  6. To the same oil, add in your cashews and raisins, drain and set aside.
  7. Now add the whole spices to the oil, along with lightly pound garlic, dry lemon, Maggi chicken cube and capsicum. Mix everything well and now add in the washed and drained rice.

  8. Check the mutton ribs, once the pressure is released naturalluy, set aside the broth water and roast the ribs in oven at 180 Deg C for around 10 minutes, or until the skin is golden and crisp.
  9. Pour water and the mutton broth water. Place lid and allow the water to evaporate.
  10. Open the lid, give the rice a good mix, place whole green chillies and pour the saffron soaked water. Close the lid and allow the rice to cook well on simmer for 20-25 minutes. *

  11. Check tenderness of the rice and transfer to a large platter and place the oven roasted mutton ribs and sprinkle the crispy Fried onion, raisins and cashews.
  12. Serve Haneeth piping hot, super tender ribs with Shatta** (tomato chutney).


** Shatta recipe - Blend tomato, green chilli, salt, paprika powder and set aside. 
Prepare the Shatta early, as the blending makes teh tomato chutney frothy, so when done eariler, helps the bubbles and foam to settle on its own. 
 

Notes:

  • You may soak the sella basmati rice, but it is not necessary .
  • Rock salt is preferred to use when marinating in the spice rub, as rock salt helps to marinate the meat thoroughly, (I did not keep the marinated meat overnight or even a few hours, yet the meat was perfectly marinated)
  • Do not open lid in between the cooking process, allow the heat to cook the rice really well. 
  • *I used mutton racks in this, you may choose any cut that is tender. 
  • Please note that different brand rice require differ amounts of water, but to stay on the safer side I take the ratio 1: 1 1/2 ratio for rice and water respectively and add an extra 1/2 cup water, and the additional broth water makes it perfect.
  • You may smoke the rice by adding a hot piece of charcoal and pouring oil over it in a small disposable aluminum/ steel container and closing the lid. But I prefer otherwise, without doing this step, as I feel the flavors feel very artificial whenever I smoke the rice and gives me a very bad headache, so you may do it if you like smoking the rice 👍🏼

Ps: This may not be the authentic recipe, but it definitely is the best!


Do try this recipe and don't forget to share your experience/feedback with me here in the comments or feel free to send me a mail. Also, do tag me at #taystedit if you try out my recipes on Facebook, Instagram etc so that I can see when you make it. ♡♡♡♡

 Puzhungapathil/ Meen vecha pathil (Steamed Rice Pancakes stuffed with Fish Masala)


Here I am sharing the recipe of puzhungapathil, something I despised until few years ago. Never did I imagine Iwould actually be posting the recipe of puzhungapathil, or aka meen vecha pathil, it's more like a Kerala version of stuffed pizza, at least that's how it is popularly known among kids. :D

This pathil is one of the most popular dinner dishes originating from Thalassery, where a dough is made of rice flour and spread with a layer of fish masala made using ground coconut, over which fried fish is placed and finally a similar layer of rice flour dough is smeared with the fish masala and placed over the fried fish layer, the masala smeared side facing downwards. The sides of the pathil are pressed slightly to close the edges which might leave finger impression son the edges.

The process might seem tedious and may look like huge task, but when the work is divided, and done in advance, it's easier to assemble and prepare the final product. The rice need to be soaked and ground and made into a dough adding roce flour and set aside. Prepare the fish masala and fish fry and set aside and assemble them and steam them, when required for around 20 minutes each. The name puzhungapathil comes as the pathil (roti) is made using the steaming method (puzhungal) so we call it puzhungapathil, puzhungalarotti, meen vecha pathil, etc. The same pathil is made into a crescent shape and stuffed with the masala and fried fish and is called Meen ada. Some people like to make the masala like dry fry, I prefer the more moist version, and also in some versions, the fried fish is pulled apart and the flesh is added to the masala. No matter what fish you choose for the masala, adding prawns always takes the flavor of the masala to a next level. Puzhungapathil with a glass of Sulaimani (black tea) is a must. It always tastes the best the next morning..mmmm.. Yummmm!!

Here I have used kingfish and prawns. I am sure you will love this TRADITIONAL Malabar dinner! Without further a do, let's see how it's done!


Ingredients : (makes around 7-8 medium pathils)

For Pathil:

  • 3 cups ready made rice powder/ 2 cups Puzhungalari (par boiled rice) soaked in medium hot water for 4-5 hours
  • 1/2 box Shredded Coconut
  • 1 tsp Fennel seeds
  • 1/2 tsp Garam masala powder
  • 1/2 Onion, roughly chopped
  • Salt, as required

For Frying fish:

  • 100 gms Prawns, cleaned and deviened (marinated in turmeric, chilli powder and salt)
  • 250 gms King Fish slices (marinated in turmeric, chilli powder and salt)
  • Coconut oil, for frying
  • 2 sprigs curry leaves

For the masala/ filling:

  • 1/2 + 3 tbsp box Shredded coconut
  • 1 tsp Fennel seeds
  • 1/2 cup warm water
  • 1 1/2 Onions, sliced
  • 1 tbsp ginger garlic, freshly pound 
  • 2 sprigs Curry leaves
  • 1 Tomato, chopped 
  • 1/4 tsp Turmeric powder
  • 2 tsp Kashmir red chilli powder
  • 1 tsp Coriander powder
  • 3 Green chillies, slit
  • Salt, as required

Instructions :

  1. You may prepare the pathil using two method - either by soaking the Puzhungalari in warm water for 4-5 hours and tightening the dough using rice powder or only using rice powder and adding water according to package and adding a mixture of ground paste that consists of coconut, fennel seeds, garam masala powder and onion and preparing a rice dough. Cover the bowl and set aside.
  2. To prepare the filling, first fry the king fish and prawns in coconut oil with curry leaves (3-4 minutes) and set aside.
  3. In an earthern pot or any pot of your choice, pour the residual coconut oil that was used for frying the fish.
  4. Add the sliced onion, curry leaves and add salt and saute until translucent .
  5. Next add in the pound ginger garlic paste, saute until raw smell disappears.
  6. Add in the chopped tomatoes, mix and place lid and allow to cook for 1-2 mins, until mushy.
  7. Next, add in the spices like turmeric powder, red chilli powder, and coriander powder, sauté well.
  8. Add salt, if required and allow the ingredients to combine, you can know this when the oil starts separating from the masala.
  9. Now, add in the slit green chillies and mix.
  10. In a mixer grinder, add in the coconut and fennel seeds and grind to a coarse paste.
  11. Add water and salt as required, allow to come to a boil.
  12. Now add the fried fishes and allow to simmer on low for 2-3 minutes. Allow the masala to cool before filling the pathil.

  13. The dough that has been resting has to be made into balls of same quantity.
  14. On a banana leaf/ Aluminum foil sheet, rub a good amount of coconut oil and place a ball and spread the rice dough ball using your fingers or using the back of a flat lid. (oiled) and flatten well, not as thin thin as a roti 

  15. Onto the flattened rice dough, spread the masala and place the fried fish (kigh fish and 3-4 prawns) and similarly repeat the process for another piece of dough ball, but this time only spread the filling and don't place the fried fish.

  16. Now flip the flattened pathil with only the masala filling and slowly hovering it above the pathil with fried fish with the masala side facing down, slowly place one end of the pathil one the oathil with the fish and slowly slide the banana leaf off, and seal the edges using your finger impressions .

  17. Now to a pre boiling steamer, place the prepared pathil and allow to steam for 20- 25 minutes depending upon the size of the pathil.

  18. Once taken out, allow to cool, slice to desired sizes, and enjoy with a hot cup of sulamani (black tea).


Notes:

Make sure the filling isn't too dry or too watery.
The rice dough should be too hard, if it's hard, the dough will have cracks and if the dough is too loose, it will not hold its shape.
Prepare the filling in advance, so that the preparation becomes easier.


Do try this recipe and don't forget to share your experience/feedback with me here in the comments or feel free to send me a mail. Also, do tag me at #taystedit if you try out my recipes on Facebook, Instagram etc so that I can see when you make it. ♡♡♡♡

Punjabi Rajma Masala


Rajma masala is most commonly known as a comfort food. The flavors are subtle yet very fulfilling. Usually paired with boiled rice, also known as Rajma Chawal is quite popular throughout India. Rajma/ red kidney beans are known to have been brought to India from Mexico. This North Indian dish is a staple on weekends, weddings etc.

The recipe doesn't involve many ingredients, mostly basic ingredients that are available in every Indian kitchen. If you reduce the amount of ghee used, it becomes a healthy dish too. This is such an energy packed dish. Red kidney beans are an excellent source of protein. Soaking the kidney beans, helps the beans to cook faster and helps our body to absorb the minerals more easily.

I like my gravy in a fine paste form, but here I demonstrate the onions being chopped, if you like Rajma masala with a fine texture, you may blend the onions too. I have paired the Rajma masala with Jeera rice, you may enjoy with boiled rice, roti etc.


Ingredients : (2 people)

  • 1/2 cup Rajma/ red kidney beans, soaked for 6-8 hours or overnight (Reserve stock water)
  • 1 tbsp Ghee/ clarified butter
  • 1 tsp Ginger garlic, crushed using mortar and pestle
  • 1 medium Onion, chopped finely or pureed 
  • 1 1/2 Tomatoes, pureed
  • 1 tsp Kashmiri Chilli Powder
  • 1/4 tsp Cumin powder
  • 1/4 tsp Turmeric powder
  • 1 tsp Coriander powder
  • 3/4 tsp Garam masala powder
  • Salt, as required
  • 1/2 tsp Dried Fenugreek leaves
  • Coriander leaves, chopped
  • 1/2 tsp Sugar/ honey
  • Lemon wedges, garnish

Instructions:

  1. Wash and soak the rajma/ red kidney beans for 6-8 hours or overnight.Pressure cook for 1 whistle, let the pressure stay for 5 minutes and place the cooker under running water and slowly remove whistle and lid.

  2. In a kadai, add in your ghee and crushed ginger garlic, Sautee until raw aroma disappears.
  3. Add cumin powder and sauté for 30 seconds. Add your finely chopped onions/ pureed onion and add salt, helps the onion to become translucent quickly.
  4. Add spices like turmeric powder, Kashmiri red chilli powder, coriander powder and garam masala powder, Sautee for few seconds.
  5. Next, add in the tomato puree and cook well, until water evaporates.

  6. Next add in the cooked kidney beans, add rajma stock water, salt, dried Fenugreek leaves, and chopped coriander leaves.
  7. Cover with lid and cook for 5-10 minutes on low flame, until all masala gets married with the Rajma well.
  8. Check if gravy requires more stock water or salt and add as required.
  9. Finaly serve the Rajma masala in a bowl, and garnish with chopped coriander leaves and lemon wedges.

Do try this recipe and don't forget to share your experience/feedback with me here in the comments or feel free to send me a mail. Also, do tag me at #taystedit if you try out my recipes on Facebook, Instagram etc so that I can see when you make it. ♡♡♡♡


 Hariyali Chicken Biryani


Hariyali Chicken Biryani/ Green Chicken Biryani is a recipe that I grasped/ learned from my in laws, basically my aunt-in-law, called Shabna. This is a special biryani that they make especially only during special celebrations like birthdays and anniversaries. So the last time I went to India my MIL and SIL was all praises about a special biryani that my aunt in law makes during such occasions. They said, the house smells amazing when she makes that biryani, and that unlike usual biryani, this had everything green in it and fried potatoes that made it extra special. I sooo wanted to try it. And finally I got a chance to taste it when it was their daughter's birthday and to my surprise I loved how flavorful the biryani was and of course it looked all green. Even the chicken, I was sure it was food color, and yes it was! That is why the biryani is only prepared during special occasions. So I wondered once in a while a little color won't hurt, but if preparing this biryani once every week, I'd suggest not to use the color.

Well, coming back to the flavors, one big mouthful and I could identify all the flavors, unlike in my recipe she had added capsicum pieces too. I didn't have capsicum/ bell pepper. Instead I added Spinach leaves (palak), this is totally optional, if you do not like the flavor of palak you can completely avoid it and still tastes sooo good*. Ever since I was back in Dubai, I wanted to replicate it, she was someone who found it difficult to explain the recipe like me. For me, I add spices and seasonings each time according to the flavor of the dish, so it will vary. So I almost made out the recipe in my head, noted down what I thought it would be like and it was a success. Just make sure you allow the green chicken masala and rice to stay in dum for some time .


Also, in the video I haven't allowed the onions to be translucent as to my liking, (as sun was setting and I wanted to finish filming in day light), so I pressure cooked the just the onion masala for 1 whistle, because we here like our biryani masala quite mushy, if you like the onions to stay without being smashy, just avoid this step. And that's it! Let's make this delicious Hariyali Chicken Biryani or as the kids call it, HULK Biryani! 😂

Ingredients : (makes for 3 people)

2 Large potatoes, sliced 

For the Masala:

  • 2 tsp Ghee/ Clarified Butter
  • 3 onions, sliced finely
  • 1 tbsp Garlic, crushed
  • 1 tsp Ginger, crushed
  • 2 medium Tomatoes, chopped
  • 1/2 bunch Spinach/ palak, blanched in salted hot water, cooled in ice water and pureed
  • Mint and Coriander leaves, as required, pureed
  • Salt, as required
  • 1 tsp Garam Masala 

Chicken Marination:

  • 1/2 cup oil for frying
  • 1/2 kg chicken  
  • 1 tsp ginger garlic paste
  • 1 tsp Lemon Juice 
  • Salt, as required
  • Green Food Coloring (optional)

For the Rice:

  • 3 tsp Ghee
  • 3 tbsp Vegetable Oil
  • 1 Onion, finely sliced
  • 8-10 Cashews
  • 3 Cloves
  • 1 inch piece Cinnamon Stick
  • 2 Cardamoms
  • 2 sprigs Curry leaves
  • 3 cups Jeerakashala Rice, washed and drained
  • 4 1/2 cups water
  • 2 Maggi Chicken Cube
  • 1 tsp Green Food Coloring (optional)
  • Salt, as required
  • Lemon juice, as required
 

Instructions:

  1. Marinate chicken as per the ingredients mentioned below chicken marination and set aside.
  2. Slice Potatoes, sprinkle salt and fry them in oil, set aside.
  3. Fry the chicken pieces for around 15- 20 minutes , drain and set aside.
  4. Now to make the masala, blanch the spinach and cool with ice water, puree along with coriander and mint leaves.
  5. In a large pot, pour the oil that was used to fry chicken and ghee.
  6. Next, saute the sliced onions with some salt until translucent.
  7. Next add the crushed ginger garlic and saute until raw aroma disappears.
  8. Now add your chopped tomatoes, allow to cook well.
  9. Next add in the pureed leaves and herbs, saute with salt and garam masala. Pressure cook the masala for 1 whistle if not mushy enough.
  10. In a large non stick rice pot, fry the onion until golden brown and crispy for the rice in ghee and vegetable oil and set aside.
  11. Now add in the whole spices like cloves, cinnamon stick and cardamom, add in your washed and drained rice and Sautee for a couple of minutes, to that add in the curry leaves, Maggi chicken cube, green food color ( if required) and salt, as required .
  12. Pour water and allow to cook for 15 minutes and gently turn the rice over to check if cooked.
  13. To the cooked masala, add in your fried chicken pieces and allow to boil on simmer for 5 minutes.
  14. Squeeze lemon juice as required, check for seasonings, put on dum by putting the rice as a layer over the masal over which some fried onion and cashews are sprinkled.
  15. Place the fried potatoes.
  16. Cover the pot with aluminum foil, place lid and allow to be on dum for 1/2 hour at least.
  17. Mix everything together. Serve hot and enjoy!


Notes:

  • If using palak make sure to add a lot of lemon juice to balance out the bitter flavor of palak.
  • You will only require half a bunch of palak.  
  • The video shows recipe made for 6 people.

Do try this recipe and don't forget to share your experience/feedback with me here in the comments or feel free to send me a mail. Also, do tag me at #taystedit if you try out my recipes on Facebook, Instagram etc so that I can see when you make it. ♡♡♡♡

Nasi Goreng


May peace and blessings be upon you all.

One of the first recipes that I tried in my initial stages of experimenting was Indonesian cuisine and always the best. It is the super easy, delicious and tummy filling... *drum roll* - Nasi Goreng. 

As gorgeous as the sunny side up on the rice looked I was curious to try this at home years ago. And one fine afternoon when my mom asked what to cook for lunch, I asked her to go take some rest while I tried nasi Goreng. After like going through a couple of recipes, I tried my hands on Nasi Goreng on my own idea, as I did not have all the ingredients on hand that was required in the authentic recipe. And bam! It was soooooper hit.! 

All I would say is that the fish sauce is a bit unpleasant but when everything comes together, the umami flavor is just next level! 😋 You may use a dash of oyster sauce too 👌

And it is generally served with a fried egg/Sunnyside up, a few slices of Cucumber and tomato. Imagine the half done egg yolk oozing onto the flavorful rice. Oooooh soooo good!

One of my absolute favorite lunch/ dinner. The Kecap Manis is what takes this fried rice to a next level. Just make double the quantity of the mentioned kecap Manis and store in the refrigerator to use the next time you prepare nasi Goreng. Super easy and convenient yet such a wholesome meal. This one is such a keeper! 


Ingredients :

  • 3 cups day old Basmati rice (or cooked and cooled completely) 
  • 1 onion chopped, and fried (for topping) 

For rice:

  • 4 tbsp vegetable oil 
  • 1 onion chopped
  • 2 garlic cloves, finely chopped
  • 1 green chilli, low heat
  • 1/4 tsp Red Chilli Flakes 
  • 250 gms chicken breast, sliced (or any protein like shrimps), marinated in 1 tbsp kecap manis
  • 4 eggs (2 for scrambling and 2 for bullseye topping) 
  • 2 tsps fish sauce
  • Cucumber and tomato slices, to garnish
  • Lime wedges, to garnish

Kecap Manis (sweet soy sauce) :

  • 6 tbsp Soy sauce 
  • 1-2 red bird's eye chilli or 1/2 tsp Red Chilli Flakes 
  • 1-1 1/2 tbsp brown sugar

Instructions :

Kecap manis:
In a pan, add the ingredients under kecap manis and bring to a simmer. Reduce until slightly thickened (for about 2 minutes). The more it sits, the more it thickens. 

Rice:
  1. To a large skillet/wok , pour some oil. 
  2. Once heated, add in your chopped onion, garlic and green chilly. 
  3. Saute until raw smell disappears or until the onion has become translucent. 
  4. Next add in the marinated chicken strips and sautee well until cooked for around 5 minutes. 
  5. Shift the chicken to a side and pour a tsp of oil and drop in your eggs to scramble them. 
  6. Next add rice, little by little, adding in 2 tbsp or more of the prepared or store bought kecap Manis. Add in your fish sauce now, if you are using. 
  7. Now stir constantly on high flame, mostly by tossing the wok, so that the rice doesn't break down further. 
  8. Season with salt if required. 
  9. Garnish by placing a fried egg on the top, Sprinkle the fried onions and place sliced tomatoes and cucumbers on the side of the plate (traditional way of plating). Also place a lemon wedge* and enjoy! 
  10. Bon appétit. 


Note: 

  • You may use Jasmine rice too
  • If you do not like fish sauce you may omit it, but the fish sauce is what brings in its different, umami flavor.
  • You may use store bought shrimp paste as a substitute for fish sauce.
  • After a minute on high heat, add in your marinated protein
  • Topping suggestions : chopped spring onions and chopped red bird eye's chilli.
  • *The lemon wedge plays a great role in enhancing the flavor of the rice (my favorite part). 

Do try this recipe and don't forget to share your experience/feedback with me here in the comments or feel free to send me a mail. Also, do tag me at #taystedit if you try out my recipes on Facebook, Instagram etc so that I can see when you make it. ♡♡♡♡

Sindhi Biryani


Good evening folks!

Who doesn't love biryani yea? I love our classic Thalassery Biryani the most, but once in a while, a change could do. Ever wondered that no matter how detailed of a recipe of a biryani is given to a person, no one comes up with the same flavors. Almost every biryani made by each one of us has a different taste to it, even if it's the same recipe. This is because everyone prepares biryani with so much love and care. 

For us every Friday it is Biryani day in here. So how about we try a different type of biryani this week that consists of meat, rice and potatoes with a special spice blend that goes into the making of the dish. Yes, you guessed it right! It's Pakistan's most beloved Sindhi Biryani. 


Sindhi biryani originates from the Sindh Province of Pakistan, it is known to be the most popular biryani in Pakistan. The main ingredients that makes this biryani stand out is the use of dried plums or prunes and potatoes. 

It is a very delicious biryani that can be prepared with chicken or meat. It is said that the Persian Travellers passed on their recipe, and the chefs took over and added their authentic flavors to it. And that pretty much sums up how this aromatic and indulgent Sindhi Biryani was born. What makes the Sindhi biryani distinct is also the fact that the biryani masala is cooked in caramelized onion. 


Ingredients :

Sindhi Biryani Spice Mix from scratch :

  • 1 tbsp Kashmiri Red Chilli powder 
  • 1/2 tbsp Coriander powder
  • 1/4 tsp Turmeric Powder
  • 10 pcs whole Black Pepper
  • 5 pcs Cloves
  • 2 black cardamom (optional) 
  • 4 dried Bay leaves
  • 1 tsp Cinnamon 
  • 3 pcs Green Cardamom
  • 2 pcs Star Anise (optional) 
  • Salt, as required 
  • Sugar, a pinch

Masala:

  • 3 cups Basmati rice, soaked for half an hour and drained
  • 4 1/2 cups water
  • 2 cinnamon sticks
  • 4 cloves 
  • 2 cardamom pods
  • 500 gms Fresh Chicken/Meat
  • 2 tbsp Vegetable oil
  • 1 tbsp Ghee
  • 3 large onions, sliced
  • 2 tsp Ginger-Garlic paste 
  • 5 Green Chillies, slit
  • 1 large Tomato, chopped
  • 4 pcs prunes or dried plum
  • 4 tbsp Curd, whipped
  • 3 tbsp Prepared spice mix
  • Handful of Coriander and Mint leaves, chopped
  • 2 large Potato, peeled and cut into cubes. 
  • 2 strands of saffron soaked in warm milk


Instructions:

  1. Grind all of the spices mentioned above to make sindhi biryani spice mix . 
  2. Into a pressure cooker pour in your oil and /ghee and Sautee your onions until caramelized and not burnt. 
  3. Next add in your ginger garlic paste. 
  4. Drop in your cleaned and drained chicken/ meat which has been marinated in salt and allow to fry for around 10 minutes. 
  5. Next add in your tomatoes, green chillies and your chopped herbs*. Sautee well and finally add in your cubes of potatoes. 
  6. Next add in your prunes and curd.
  7. Add in your spice powder mix and salt as required. 
  8. Cook the chicken with 2 cups of water with a closed lid without the weight of the pressure cooker for 5 minutes and you are done. *
  9. While the chicken gets done, let's prepare the rice. Into a large non stick pot add in your rice, water, spices and 1 tsp cooking oil and switch on your flame. *Click here to know the cooking instructions for the perfect, fluffy Basmati rice. Switch off the flame once it is 80% done,open lid and fluff up the rice. 
  10. If the chicken masala has too much gravy, remove the chicken pcs and allow to reduce by boiling on high and stirring occasionally. 

  11. Next, put the biryani on Dum by putting the first layer as the chicken masala and then top it with the 80% cooked rice and smoothen lightly. 
  12. Gently sprinkle your saffron milk and allow to stay on dum for at least 10 minutes on simmer.
  13. Slowly fluff up and toss your rice, very gently. Keep in mind not to over do this just a couple of times. You don't want mushy rice. 
  14. Finally garnish with fried onions, cashews and chopped Coriander leaves. 
  15. Serve hot with raita. 


Notes:

  • If using other meat like mutton or beef cook for around 6-7 whistles depending on the tenderness of the meat. 
  • Authentically, You may add your tomatoes, green chillies and Coriander leaves in the dum process after the layer of the masala. 
  • If using meat, do not add the potatoes along with the meat as meat needs more time to cook compared to chicken, and the potatoes in turn can become super mushy. You may boil the potatoes separately and add too. 

Do try this recipe and don't forget to share your experience/feedback with me here in the comments or feel free to send me a mail. Also, do tag me at #taystedit if you try out my recipes on Facebook, Instagram etc so that I can see when you make it. ♡♡♡♡

Street Food Style Easy Thai Stir-Fried Rice 


Who doesn't like easy recipes to cook for weeknights or a spontaneous late lunch when you feel like it. I love such recipes. This is definitely one among the lot that I cook often to content my Thai cravings. Thai food has a special place in my heart, I would explain it as the amalgamation of my native Kerala cooking and my favorite Chinese cuisine. And when it combines, it is simply the best. 

I say it has some connection to do with Kerala cooking because of the coconut milk (which is used predominantly in most of the Keralite dishes), then the palm sugar (which is pretty much the same as Jaggery (bellam), then the bird's eye chili which our very own Kanthari mulaku which is super hot and has many health benefits which is commonly used both in Keralite dishes as well as Thai food. And Indo-Chinese food I just lurrrveeee. So now you know how much I love Thai food. Its a flavor explosion in your mouth. No kidding!

I have always longed to try Thai food, like I said if you have been following me being bought up in Dubai I have been able to try and blend with all the varieties of cuisines in the world. Always very blessed for that. Alhamdulilah. 

So one fine day, years back, me and my family were on a wait to go to our favorite family restaurant "Emirates Seafood". Noticing the queue we were totally disappointed and we were really hungry. Right next to this restaurant we find an eatery saying Thai food. We were muddled if it was the best time to try a totally new cuisine. As a very ardent food lover, I very well knew the renowned items to order. Oh boy! Was I super delighted to try the food? Finally found food for the soul, it was so heartwarming, so homely, so DELICIOUS! Ever since I never missed a chance to have Thai food.


Okay, enough of the intro! Moving along now. Thai rice is normally cooked using Jasmine rice, but here since I was craving Thai food so badly and didn't have any Jasmine rice in the pantry Basmati rice was my go-to solution. It pretty much did the job, which means you guys may try it this recipe with Basmati but Jasmine is the authentic one.

Thai Street food comes with a parcel of a flavor-boosting condiment called the 'Prik Nam Pla' (Chillies in Fish Sauce). This is the BOMB that you have to try with this fried rice, it simply takes you on a flavor ride and makes you want for more. It is a combination of garlic, fish sauce, red chilly and lemon. The tangy spiciness is out-of-the-world good.

Disclaimer: This isn't the authentic Thai fried rice recipe, adapted to my choices and resources available. So please make sure, even if you don't have any Thai ingredients you must have the fish sauce in your pantry which is the main ingredient that gives the amazing flavor. If you don't have one, go get one! It is super useful. 

I was so hesitant to buy fish sauce initially, wish someone told me earlier, wondered what I could do with it, but Thai food is all about fish sauce, you can make Tom Yum soup which is the bestest soup (will post the recipe once I make it soon), Thai Rice noodles (recipe is sitting in the drafts will post soon in sha Allah), etc.

For the protein in this dish, you may use chicken/ prawns, I have used both. This rice has an orange-pinkish brown shade to it because of the oils from the prawn.

This Thai fried rice is not only delicious, but it is also super easy, as it is a stir fried rice it is done so fast on high heat, within minutes your lunch is served. All you need is some fish sauce and all the other ingredients, I am sure pretty much all the households must have it! This rice smells amazing, I am already drooling thinking about it.

A plate of this Thai Stir-fried rice right from the wok with a squeeze of lemon and a drizzle of Prik Nam Pla.. is DELECTABLE.😋

Let's get started!


Ingredients:

For the Thai Stir-Fried Rice:


  • 2 cups day-old/ 2 cups cooked Basmati rice/ Jasmine rice
  • 2+1 garlic cloves chopped finely (2 for sauteeing and 1 for the sauce mixture)
  • 200 gms tender chicken breasts sliced and marinated in salt and pepper
  • 1/2 tsp white pepper powder
  • 10 -12 shrimps/ prawns deveined and cleaned
  • 2 eggs
  • 1 small carrot chopped
  • 10-12 french beans chopped
  • 1/3 cup sweet corn
  • 2 tsp sriracha sauce (optional)
  • 1 tsp soy sauce
  • 1 tsp fish sauce
  • 1 garlic clove (chopped finely)
  • A pinch of sugar
  • 2 tbsp green spring onions chopped
  • 1/2 tsp Black Pepper Powder
  • Salt as required

For Prik Nam Pla (Red chilis in Fish sauce):


  • 1-2 tsp sriracha sauce (optional)
  • 3/4 tsp red chili flakes / Red bird's eye chili 3-4 (I substituted red bird's eye chili with red chili flakes)
  • 3 tbsp fish sauce
  • 1/2 lemon juice
  • 1 tsp soy sauce


Instructions:


  1. Cook 2 cups basmati rice (cooking method here - tips for cooking Basmati Rice at the end of the page) and set aside to cool.
  2. Combine the ingredients under Prik Nam Pla in a bowl and set aside for the end.
  3. In a bowl mix together soy sauce, fish sauce, sriracha sauce, garlic cloves, and sugar.
  4. In a wok or skillet, pour vegetable oil and saute the garlic cloves until fragrant.
  5. Now, add the sliced chicken pieces that have been marinated and sautee for about 4 minutes and add the prawns and saute for about 3 minutes.
  6. Next, add 1/2 cup rice to the sauteeing chicken and prawns so that the rice soaks up all the juices from them.
  7. Move aside the rice mixture and add the eggs one at a time and scramble them adding some salt.
  8. Now set aside this egg mixture and in the same pan stir fry the veggies- carrot, beans, sweet corn and lastly the green onions on high heat for about 2-3 minutes or until just done. The veggies should be crisp. 
  9. Combine the egg, chicken, prawn, and veggies and add the rice in batches and pour in the sauces prepared earlier (soy sauce, fish sauce and sriracha sauce) and stir everything on high heat. 
  10. Serve hot with the Prik Nam Pla condiment, a lemon wedge and sprinkle a pinch of pepper powder. 
  11. Your delicious Street Food Style Easy Thai Stir-Fried Rice is ready! Enjoy!


Do try this recipe and don't forget to share your experience/feedback with me here in the comments or feel free to send me a mail. Also, do tag me at #taystedit if you try out my recipes on Facebook, Instagram etc so that I can see when you make it. ♡♡♡♡
Koshari/ Kosheri - An Egyptian Delight


Being bought up in Dubai, I know a long list of dishes from different cuisines which I am yet to try. I always like to experiment once I try the authentic homemade ones so that I can figure out the real taste, which is not always practical for all the dishes I try. I have always seen this dish where ever I go in Dubai, a place where you have access to all sorts of cuisines. Alhamdulilah. We were neighbors to Egyptians a decade ago, they used to serve us their delicacy; stuffed grapevine leaves. But I never got to taste Kosheri, yet their whole house smells of this dish. When I cooked this I felt nostalgic of the childhood memories, when they used to open their door this smell used to gush into our noses. I was not too much into food when I was a child, always a picky eater. Don't ask when I developed a fondness towards food. 😄

So recently when I went for a gathering where all sorts of nationalities were assembled, a dear friend introduced me to Koshari. Was I delighted to try the authentic, homemade Koshari? I loved it! Couldn't wait to try it at home already. My dear friends helped me with the type of rice to look for in stores. I bought it the same day and tried it for Friday lunch. It was awesome indeed. I made a salmon side dish to go along with it.

Now lets come back to Koshari. Koshari is not only fun to say, but it is also definitely fun to cook too, with basic pantry ingredients, this dish defines how basic ingredients can form into a delicious and scrumptious meal. This humble bowl of comfort food might not seem very TASTY to the sight but the flavors that come from combining the tomato gravy and fried onions that has a vinegar hint to it (which I am usually not fond of) is out-of-the-world good.


Like I said, was I veracious when I said I wanted to try authentic Kosheri, I definitely said that because it-is-a-big-deal! Story ahead... Last week when I was roaming around Carrefour and I was dead hungry I came across Koshari and I bought it expecting it to be okayish. But when I tasted I felt so bad since the taste was not even up to the mark to say an okay. It was bitter. So next time you try from such stalls etc don't expect you can get the authentic taste. Here I have tried my take to replicate the one I tried from the gathering and I must say, it is very light on the tummy and addictive. 👌👌😋 Try my version and let me know what you think of it in the comments below.


Ps: My hubsy cannot have anything vegetarian on its own, hence the salmon with coriander-butter sauce happened to show up🤣

Ingredients:

For the Rice:
1 Tablespoon Vegetable Oil
2 Cups Calrose Rice
2 cup Dark Brown Lentil
1/2 cup angel hair pasta
1 small onion diced
1/4 cup oil
3 cup water 
1 chicken/veg stock cube
Salt

For the sauce:
2 cups crushed tomatoes
1 cup water
1 tbsp Oil
1 tsp Cumin Powder
1 tsp Coriander Powder
2 garlic cloves minced
1/2 cup diced tomatoes
1 tsp sugar
Salt as required

For the dressing :
1 cup water
1/4 cup vinegar
1 tsp Cumin Powder
1 tsp Coriander Powder
1 tsp paprika
1/2 tsp red chilli flakes
Salt as required
2 minced garlic

Assembling Ingredients:
2 cups small elbow pasta cooked
1 cup chickpeas cooked
1/2 kg Onions sliced
Salt
1-2 tbsp white vinegar

Instructions:


  • Immerse the 1/2 kg sliced onions in white vinegar. Cover and set aside for 1 hour.
  • Now in the 2 cups crushed tomatoes add the ingredients mentioned under *for the sauce*. Mix, cover and put them on a medium flame till it boils and once boiled, put them on simmer for 10 mins.

  • To make the dressing, in a different bowl, mix the ingredients under the sub *for the dressing*. Give a good mix and set aside.
  • Rinse the onions soaking in vinegar in cold water and drain off excess water. Now fry them in a deep pan with oil, check if the oil is hot enough and fry until the onion becomes a little more than golden brown but not dark brown.

  • While the onions are frying, in a deep bottom vessel boil the dark brown lentil with some salt. 
  • Next, boil the elbow pasta and check the tomato sauce in between and give a stir.
  • In another vessel, let's boil the water with salt and Chicken/Veg stock (Optional) which will be used for boiling the rice and angel hair pasta.
  • Next, sautee the diced onions in little oil and some salt, and once translucent add the angel hair pasta and stir fry for about a minute and add the calrose Egyptian rice and stir fry for a couple of minutes. Now add the boiling stock water to it. Once the water is bubbling, put the flame on simmer and let it get cooked covered for about 10-12 minutes.

  • It's now time to plate! The most interesting part. First onto a serving plate put the rice and angel hair pasta mix first, top it with the boil dark brown lentils. Unto that add the cooked chickpeas and pour in the yummy tangy sauce and sprinkle the crispy fried onions on top.
  • When serving, drizzle the dressing over the Kosheri and you are ready to feast on!😋

PS: The recipe might seem a bit complicated, rather a lot of dishes to do but all that effort was well worth in the end. My family approved! 😃


Do try this recipe and don't forget to share your experience/feedback with me here in the comments or feel free to send me a mail. Also, do tag me at #taystedit if you try out my recipes on Facebook, Instagram etc so that I can see when you make it. ♡♡♡♡

Older Posts

Search This Blog

My name is Hasna Haneef, a mommy to a toddler, hailing from Thalassery, Kerala. Welcome to my humble abode on the Internet; wherein I share all my recipes and experiments. I am glad to have you on board!

TRENDING POSTS

  • Kerala Style Squid Roast
  • Chicken Steak with Creamy Mushroom Sauce
  • Emirati Chebab
  • Regag - Emirati Flat bread
  • Copy Cat Caesars Mini Pizza
  • Kerala Beef Fry/ Nadan beef dry fry

About Me

May peace be with you!

Welcome to my blog.

I am delighted to have you on board. My name is Hasna Haneef, a mommy to a toddler, hailing from Thalassery, Kerala. My homeplace being Dubai, as I am born and brought up here and I am very influenced by the lifestyle and the variety of authentic cuisines I get to try from here, which has made me try anything that comes across me
, click here →

Stay Connected!

Join Our Madness!

Join with Thousands Of Subscribers ! Get Our Latest Recipes Delivered to Your email Inbox!

Powered by follow.it
  • Home
  • About Me
  • Recipes

    • Main Course
    • Desserts
    • Snacks

    Uncategorized

    • Chicken
    • Meat
    • Vegetarian
    • Rice
    • Malabar Food
    • Baking
    • Breakfasts
    • Snacks
    • Drinks
    • Pasta
    • Fish
    • Soups
    • Desserts
  • Contact Me

Featured Post

Triple Chocolate Hazelnut Skillet Cookie

Blog Archive

  • ▼  2025 (4)
    • ▼  April (2)
      • 1 minute Chocolate Mug Cake
      • Grilled Cheese California Burrito
    • ►  March (1)
    • ►  February (1)
  • ►  2024 (36)
    • ►  October (4)
    • ►  September (5)
    • ►  July (1)
    • ►  June (2)
    • ►  May (4)
    • ►  April (3)
    • ►  March (10)
    • ►  January (7)
  • ►  2023 (47)
    • ►  December (3)
    • ►  September (2)
    • ►  August (6)
    • ►  July (6)
    • ►  June (9)
    • ►  May (4)
    • ►  April (5)
    • ►  March (6)
    • ►  February (3)
    • ►  January (3)
  • ►  2022 (69)
    • ►  November (4)
    • ►  October (6)
    • ►  September (7)
    • ►  August (9)
    • ►  July (12)
    • ►  June (5)
    • ►  May (5)
    • ►  April (12)
    • ►  March (4)
    • ►  February (2)
    • ►  January (3)
  • ►  2021 (24)
    • ►  November (1)
    • ►  October (2)
    • ►  July (1)
    • ►  June (4)
    • ►  May (6)
    • ►  April (4)
    • ►  February (4)
    • ►  January (2)
  • ►  2020 (82)
    • ►  December (5)
    • ►  November (6)
    • ►  October (4)
    • ►  September (2)
    • ►  August (5)
    • ►  July (10)
    • ►  June (10)
    • ►  May (13)
    • ►  April (12)
    • ►  March (8)
    • ►  February (4)
    • ►  January (3)
  • ►  2019 (22)
    • ►  December (1)
    • ►  November (2)
    • ►  October (6)
    • ►  September (1)
    • ►  August (1)
    • ►  February (3)
    • ►  January (8)
  • ►  2018 (15)
    • ►  December (4)
    • ►  November (6)
    • ►  October (3)
    • ►  September (2)

Subscribe Us

Labels

Bake Biscuits Breakfast Brown rice Burger Cheese Chocolate Dal Egg Emirati Fish Iftar Indonesian Japanese Jeerakashala rice Kerala Keto Kuwait food Lunch Milk Mutton Thai food UAE food afghan cuisine arabic beef biryani bread burnt cheesecake cake chicken cream dessert dinner greek healthy indo chinese lamb malabar prawns pudding puffs quick dinner ideas recipe refreshing drink rice salad sandwich stir fry vegetables vegetarian veggies yemeni

Contact Form


POPULAR POSTS AND PAGES

Kerala Style Squid Roast

Kerala Style Squid Roast

June 18, 2020
Chicken Steak with Creamy Mushroom Sauce

Chicken Steak with Creamy Mushroom Sauce

November 05, 2018
Emirati Chebab

Emirati Chebab

June 01, 2023
Regag - Emirati Flat bread

Regag - Emirati Flat bread

December 02, 2020
Copy Cat Caesars Mini Pizza

Copy Cat Caesars Mini Pizza

March 12, 2024

Pages

  • Home
  • About Me
  • Privacy Policy
  • Contact Me

Copywrite © 2023 TermsFeed®. All rights reserved.

Created By Sora Templates | Distributed By Gooyaabi Templates

Back to top