Search This Blog

Taystit by Hasna

Food, Recipes, and Beyond

  • Home
  • About Me
  • Recipes
    • Main Course
    • Snacks
    • Desserts
  • Uncategorized
    • Chicken
    • Meat
    • Vegetarian
    • Rice
    • Malabar Food
    • Baking
    • Breakfasts
    • Snacks
    • Fish
    • Pasta
    • Drinks
    • Soups
    • Desserts
  • Contact Me

Mango Mousse Float


It is Mango season here and to be frank this is the only time I splurge on mangoes because you get the finest, juiciest, tastiest mangoes in season time. Mango is called the king of fruits, no wonder why! I just love it! It instantly mingles with anything you add it to, be it juices, cakes, ice creams, etc, and uplifts its flavor profile instantly. Mango Mousse float is a dessert that can be easily be prepared even by kids.

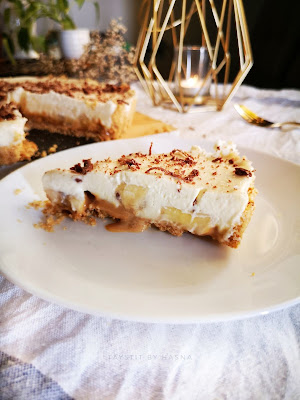
When you get hold of ripe, juicy preferably Alphonso mangoes, look no further, try my mango mousse float. Basically, this was an experiment to try a technique that had dawned on me a few days earlier. Since I had ripe mangoes in hand, I had to make my delicious mango mousse float. This dessert is more like an ice cream cake, the biscuits give you that cake texture and the whipping cream gives you the ice cream feel. I have used Digestive biscuits here to make my technique build up easier, I would suggest you use thinner biscuits like ulker tea biscuits, graham crackers, or Marie biscuits. And for the mousse layer, I had used dream whip sachets as I had run out of whipping cream, I would recommend using fresh whipping cream for better taste, to give that ice cream feel.


Mangoes are a fruit that is loved worldwide. Mango float also called mango royale is basically a Filipino dessert that consists of biscuit layers with whipped cream, condensed milk, and mangoes. In the actual recipe, you have pieces of mangoes going in between the layers, instead, I added a mango mousse layer. Also as the recipe is an easy one, I tried the technique of round desserts. Since I did not have ring molds, I used a plastic mineral water bottle alternatively and cut it in the shape of a ring, then cut it lengthwise and taped it, filled it with the dessert, and set in the fridge. Once set, you just have to remove the tape and pull off the plastic bottle mold and voila! You have your round looking dessert. This is a technique that I came up with, solely something that came up in my mind. If you will not be consuming the dessert immediately use gelatin or china grass to get that perfection without melting.
I haven't used it here as I completely dislike using gelatin for a regular dessert session unlike for parties.


This is the easiest dessert recipe one can make, a perfect recipe where you can ask your kids to join in for some fun making this dessert. I am someone who is very anxious when it comes to allowing my little one to help me! There was a time when she used to ask me if she could help me. That is around 2 years old, Allahumma Baarik; I know you might be thinking that she is too small for that, but I have noticed she grasps everything quickly maa sha Allah. So now when she is 3 and a half years old, I see a little grown up in her, she just pushes the chair to me and helps me in my chores. I just can't accept the fact of how fast kids grow. 

Basically, this dessert involves no cooking, so what is better than involving your little stars in such recipes. Like I said when she saw me prepping this dessert she just pushed the chair and start helping me with the process, It felt so good to have a fun kitchen session with my little one, even though it makes me uneasy. I urge you, you need to try easy recipes with your kids, it strengthens the bond between you and your kids.

Ingredients:


  • 1 old Mineral plastic bottle (for making ring molds)
  • 3 ripe Mangoes, preferably Alphonso
  • 12-15 Digestive biscuits (or any thin tea biscuits, preferably)
  • 2 cups whipping cream or 2 dream whip sachets
  • 1/2 cup condensed milk (1/4 cup each, for cream mixture and mango mousse)
  • 1 cup milk if using dream whip sachets*
  • 1 tsp vanilla essence
  • 10 gms Gelatin/ China grass (optional)
  • 3 tbsp cream (fresh or thick cream)
  • 1/2 cup milk (for dipping biscuits)

Instructions:


  1. Take an old mineral plastic bottle and cut two similar-sized discs, and cut vertically.
  2. Now tape the opening according to the size of your biscuits and set aside.
  3. In a bowl, whip 2 cups whipping cream separately, add 1/2 tsp vanilla essence each, and set aside.
  4. In one bowl of whipped cream, add puree of one mango and add fresh cream in the other bowl of whipped cream.
  5. Next add in 1/4 cup of condensed milk in each of the bowl if using dream whip or use 1/2 cup each if using whipping cream.
  6. Pour your mango mousse and cream mixture in two piping bags and place it in the freezer for 1 hour or 3 hours in the refrigerator for added stability. **


  7. Now dip your biscuits in milk for about 10 seconds and place in your ring molds and pipe in your mango mousse and next add in your dipped biscuit and pipe in your cream mixture. 
  8. Similarly, complete the process until done.
  9. Top the dessert with cube-shaped mangoes.

Notes:
  • Use ripe Alphonso mangoes, for best results use strandless mangoes (mangoes that have thin strands inside)
  • For added stability use 10 gms ( 5 gms each for 1 cup of whipping cream) of powdered agar-agar/china grass or gelatin. (I do not like to use gelatin for normal use, as we consume them immediately).**
  • Use thin tea biscuits if possible, like ulker tea biscuits etc. (I only had digestive biscuits so used them).
  • I used dream whip as I had run out of whipping cream, use fresh whipping cream if possible, whipping cream gives better taste and results.*


Do try this recipe and don't forget to share your experience/feedback with me here in the comments or feel free to send me a mail. Also, do tag me at #taystedit if you try out my recipes on Facebook, Instagram etc so that I can see when you make it. ♡♡♡♡


Marble Cake Pudding


One of the most nostalgic pudding/ dessert from my childhood is this delicious marble cake pudding. It is my mom's most popular dessert, and undoubtedly the best. It's so simple to make. The marble cake is store bought , you may use home made cake, but I usually make this pudding as a last moment dessert,so that it doesn't get complicated and saves time.

Similar to tiramisu, the marble cake pudding tastes better the more it sits in the fridge. The cake soaks up all the cream and the cocoa powder that is dusted gives it that chocolatey taste. This marble cake pudding is like the OG milk cake of my childhood. The marble cake is tightly layered over which a custard cream is prepared poured and make a couple of layers which is set overnight. The pudding can be topped up with fresh fruits, funfetti, chocolate sprinkles etc.
Whenever mama makes this dessert for a party at home, the dessert dish is always wiped clean.
 
This was a dessert that mama prepared from what a friend of hers was saying in their usual conversation, about a dessert she had at a party. In an Era when there was no google/ YouTube for her to check and try recipes. Basically she was not told the entire ingredients, she made out and made it on her own, voila ! The perfect dessert for parties. I need to try out more recipes from her recipe book, since it's in malayalam, I find it very difficult to read them, yet my sheer curiosity in cooking has helped me learn reading malayalam by reading her recipes. LOL .


Ingredients :

  • 400 gms Marble Cake, store bought
  • 2 Crème Caramel Sachet (prepare as per package instructions )
  • 500 ml + 500 ml milk (for the crème caramel)
  • 120 ml Milk (for the dream whip)
  • 1 Sachet Dream Whip (prepare according to package instructions)
  • 1 tsp Vanilla Essence
  • 1/2 can Sweetened Condensed Milk
  • 1/4 cup Thick Cream
  • Cocoa powder, for dusting 


Instructions:

  1. Slice the marble cake and layer the cake slices tightly without any gap.
  2. Next, prepare the Creme Caramel according to package instructions and allow to cool, set aside.
  3. Next prepare the cream mixture by beating the dream whip powder mix in some milk, according to package instructions, beat until thickens.
  4. Next add in your condensed milk and thick cream, mix well. 
  5. Finally add the cooled custard prepared earlier and combine well.
  6. Pour the prepared custard cream over the marble cake and make another layer with the same method.
  7. Seal and wrap well using a cling film and allow to set in the refrigerator overnight.*
  8. Finally, right before serving dust some cocoa powder and enjoy!

* Tastes best the more it sits in the fridge.
** The brand I used for the marble cake is Modern Bakery. It comes as 730 gms, you will only require around half of the cake.
  

Do try this recipe and don't forget to share your experience/feedback with me here in the comments or feel free to send me a mail. Also, do tag me at #taystedit if you try out my recipes on Facebook, Instagram etc so that I can see when you make it. ♡♡♡♡

Classic Bannoffee Pie


I made this yummilicious dessert last week to celebrate my win for a dessert competition where I attained 2nd prize from among 2000 entries and 30 contestants. Bannoffee pie is a dessert I like to make when I have some good just ripped bananas in my fruit basket. 

I always undermine the flavor of fresh banana fruit in dessert, somehow I cannot stand it. But this dessert and Magnolia Bakery's Banana Pudding are my favorites when it comes to bananas. 


The ingredients are basic and the method is simple that even kids can prepare this no Bake pie! The Toffee in Bannoffee is what gives the dessert the special flavor. The first layer consists of a crushed biscuits layer with melted butter, then a layer of dulce de Leche (cooked Condensed milk) is spread, after which sliced bananas are placed in a sequence and a layer of whipped cream is smothered, and finally garnished with grated chocolate or dusted with cocoa powder. 

This pie is done in no time as it doesn't require any cooking. My lil one and siblings always wipe the pie dish clean whenever I prepare Bannoffee pie. The more the banooffe pie sits in the fridge, the more delicious it becomes (but I never get a chance to do that). 


I am always a fan of light desserts and Bannoffee pie is one such dessert. It's a treat for everyone, even if you dislike bananas, definitely give this dessert a try, I am sure you will love it! 


Let's get started! 


Ingredients ;

1 can Condensed milk (cooked) *
2 bananas
10-12 Mcvities Digestive Biscuits, crushed
2 tbsp Butter, melted
200 ml whipped cream, unsweetened 
1 tsp Vanilla Essence/ extract
4 tbsp Icing sugar 
Chocolate, grated

Instructions:

Dulce de leche:

  1. Remove the label of the sweetened Condensed milk and place it in a pressure cooker with water that fills half the pressure cooker. Cook for 1 whistle and allow to simmer on low at least for 20 minutes. 
  2. Allow the cooker to release its pressure on its own and allow the pressure cooker and its contents to cool down at leat for 4 hours. **

Bannoffee Pie:

  1. In a food processor, crush the biscuits with melted butter or in a zip lock bag pound the biscuits using a rolling pin. 
  2. Now transfer the contents to a loose bottom pie dish and level using the back of a measuring cup. 
  3. Allow to refrigerate for at least 10 minutes. 
  4. Now whip the cream in a stand mixer or a hand held mixer, add in your vanilla essence and gradually add in your Icing sugar 1 tbsp at a time. 
  5. Allow to whip well. Do not over beat. 
  6. Now beat the dulce de Leche/Toffee in a bowl using a fork and spread the Toffee over the crushed biscuit layer. 
  7. Now layer the sliced bananas in a sequence (like in the image). 

  8. Spread the whipped cream, and level it using a spatula.

  9. Finally grate the chocolate as garnish or dust some cocoa powder. 
  10. Place in the refrigerator, allow to set. 


Notes :

  • *The steps to prepare dulce de Leche has been explained above. 
  • ** I like to prepare the dulce de Leche the night before 
  • I used a loose bottom pie pan, you may use a cheesecake pan too. 


Do try this recipe and don't forget to share your experience/feedback with me here in the comments or feel free to send me a mail. Also, do tag me at #taystedit if you try out my recipes on Facebook, Instagram etc so that I can see when you make it. ♡♡♡♡

Old fashioned Fruit Salad


One of my favorite summer dessert is this delicious yet so simple Fruit Salad. Especially for the weekends when you have had a heavy meal like biryani, this chilled fruit Salad is all that you want. Childhood memories were that of weekends where the fruit salad wouldn't be spared - Mama's way of getting some fruits into our tummies. Yes! You read that right we were a bunch of kids who hated fruits. Lol. Thinking back I know we should have eaten them fruits. So weekends were incomplete without finding a bowl of fruit salad in the fridge, and that made us so happy after all the play time with friends. Recently I happened to eat this at my bhabhi's place which brought back all the memories. Sometimes the easiest recipes are the best! 


My mom basically used to use the custard powder that came in a tin to make these oh-so-sophisticated dessert, pun intended! I promise you it's super easy! So while this scorching heat made me crave this dessert, to my horror, the custard powder was over. I was so desperate and depressed that I remembered I had stacks of the vanilla dessert mix that I had bought on offer and was waiting to be used. So I immediately thought of using the dessert mix for the custard.

The dessert mix is more Jelly like and may not come to the desired consisI thought to myself. So I decided to add my magic to it. Lol, just kidding! The magic is done by corn flour. I added corn flour slurry mixed in milk to the vanilla dessert milk that was coming to a boil (done as per package instructions), some extra sweetened Condensed milk and a dash of vanilla Essence! Transfered to a bowl, waited to cool and placed a cling film so that the pudding mix does not create a thin layer when it sets. Voila! To my surprise it came out the exact way I wanted. I hand whisked it and added in my chopped fruits, dry fruits, and nuts. (be careful not to add citric and acidic fruits like orange, pineapple). You may instead use canned fruits too, which may include pineapple.

Ingredients :

  • 575 ml full fat fresh milk
  • 1 pack vanilla dessert mix (pic inserted) 
  • 4 tbsp Corn Flour + 3 tbsp milk
  • 1/4 cup Condensed milk
  • 1 cup cut fresh fruits **
  • 1/2 cup dry fruits, chopped (dry Fig, dates etc)
  • 1/4 cup nuts, chopped


Instructions :

  1. In a saucepan (not steel, heavy bottom) , pour milk and the contents of the sachet and mix well.
  2. Before the mix comes to a boil add in your corn flour slurry (corn flour mixed in milk) while stirring constantly.
  3. Now once the mix comes to a boil, switch off the flame and add in your Condensed milk. Stir well.
  4. Now transfer to a bowl and allow to cool.
  5. Once almost cool, place a cling wrap touching the upper layer of the custard, so that a thin layer doesn't form in the top. 
  6. Allow to refrigerate at least for 3 hours or more depending on the consistency of the custard after 3 hrs. *
  7. Once the custard is set, hand whisk the custard well until you see no more lumps and then add in your fruits, dry fruits and nuts. 
  8. Mix well. 
  9. To decorate your serving bowl/glass, pour some hersheys strawberry syrup in your serving bowl/glass and add your prepared fruit salad to your decorated bowl.


Notes:
*To fasten the process of setting, I placed the custard in the freezer for 1/2 an hour and then left in the fridge for around 2 hrs.
** Do jot add in citrus and acidic in nature fruits like fresh orange, pineapple etc. 


Do try this recipe and don't forget to share your experience/feedback with me here in the comments or feel free to send me a mail. Also, do tag me at #taystedit if you try out my recipes on Facebook, Instagram etc so that I can see when you make it. ♡♡♡♡


Gajar Ka Halwa Lotus Trifle


Gajar Ka Halwa is one of my favorite Indian desserts.. (after Gulab jamun🙈). This is a dessert that I have been preparing since a very young age, whenever I felt like having desserts. So experimenting a dessert with my favorite gajar ka Halwa toh Banta hai! 😝

Well, lotus spread and their biscuit are now my biggest obsession.. I try adding them in everything knowingly and unknowingly.. If I say that I am going to make some dessert the hubster keeps pestering me asking if I weren't adding lotus biscuits in it! Haha
So now you know! How much I love them. Contradictory to my liking of these yum lotus biscoff, I do not like to have them plain. I specifically like to have them in dessert. Not even with tea or coffee.

Now coming back to the invention of the trifle, like I said I had been craving carrot halwa since a while, so I made it and it's been quite a while now that this recipe has been sitting in my drafts! It was high time I put to some use for our Eid dessert ideas. I am that person who lovesss cooking and experimenting, but if you ask me what are you making for Eid or any other special occasion I just go blank as if I haven't cooked my entire life. Is it just me? Or is some one able to relate? Let me know in the comments below.
So, coming back to the recipe, I wanted my dessert to be nutty (meaning with nuts and tastes like it). For that I added 1/2 tsp of Almond extract, you may add vanilla extract or completely omit the step.

This trifle is basically layers of rich carrot halwa and luscious Lotus biscoff cream piped in and the chopped almonds in the carrot halwa plays with the textures making it even more scrumptious. This recipe is so easy and so versatile. Well, one thing I can assure you is that gajar ka Halwa and biscoff flavors go hand in hand.


Basically this is a dessert that I prepared when cravinga were at its highest. And that feeling of satisfaction is heavenly. This is dedicated to all lotus biscoff lovers. Advance Eid Mubarak wishes to everyone who is reading this. May Allah accept all our Qiyaam, Siyaam, our duaas and all our good deeds. May Allah make us amongst those who witness the next holy month of Ramadan. Taqqabal Allahu minna wa minkum. 🌹🎀🌹

Ingredients :

Gajar Ka Halwa 
  • 500 gms Indian Young carrots*, grated
  • 2 tbsp pure ghee
  • 2 cups milk (or 1 cup milk and 1/2 cup condensed milk)
  • 1/2 cup sugar
  • 1 tsp cardamom powder
  • 4 tbsp chopped almonds
  • 1 tbsp ghee (optional)

Lotus Cream:
  • 1 Sachet dream whip (whipped according to package instructions)
  • 1/2 tsp vanilla/ almond extract (optional)
  • 3 tbsp lotus biscoff spread
  • 3 tbsp thick cream or fresh cream

Instructions:

  1. In a heavy bottom pan bring the milk to a boil. Keep stirring in between, be careful not to burn it.
  2. In a large skillet add 2 tbsp ghee and sautee the carrots until the color changes and water is evaporated .
  3. Next pour half the milk and cook slowly, mixing in between and add rest and aloow to combine while mixing.
  4. Now add 1/2 cup sugar and mix well and add condensed milk if adding.*
  5. Finally when little moisture is left, add your cardamom powder and garnish with chopped almonds and your gajar ka halwa is ready. 
  6. If your halwa doesn't come off your pan or you want that extra richness finish off by adding 1 tbsp ghee.
  7. Now to prepare the lotus biscoff layer, whip the dream whip sachet according to package instructions and vanilla or almond essence (optional)
  8. Add to it add melted and cooled lotus biscoff spread and add in your thick/fresh cream.
  9. Fold everything gently.
  10. Your lotus biscoff cream layer is ready!
  11. Now time to aseemble. Add a few spoons of carrot halwa at the bottom of the desset glass/jar.
  12. Next pipe the prepared lotus cream. Repeat the process until done.
  13. Garnish with almonds and/ leftover gajar ka Halwa. 
Notes: *
  • I could not get Indian carrots, but using Indian carrots is the best.
  • You may use 2 cups whole fat milk or 1 cup milk and 1/2 cup condensed milk.
  • You may sautee your almonds in ghee and add.
  • If you do not like whipped cream, you may use 200 ml thick cream/fresh cream and add 3 tbsp powdered sugar and fold in the melted lotus spread. 


Do try this recipe and don't forget to share your experience/feedback with me here in the comments or feel free to send me a mail. Also, do tag me at #taystedit if you try out my recipes on Facebook, Instagram etc so that I can see when you make it. ♡♡♡♡

Dried Fig Pudding adorned with Baklawa and Pistachios


Many years back, my dad's cousin had bought a dried Fig pudding for a thakkaram/ salkaram (party given to the groom and his family), and it tasted soo good! I vividly remember asking her for the recipe, but I can't recall the recipe now. So I thought to recreate it this Eid! 

While I tried experimenting with the recipe, I learnt that boiling milk with fig could couagulate the milk, causing it to curdle. So I added the fig paste at the end of the process, yielding the exact result I was looking for, Alhamdulilah ! So make sure not boil milk and fig paste together.

Having at least one dessert on the Eid table is mandatory and everyone waits for that bit. This melt in the mouth dessert is one of a kind! The dessert is made using China grass/ agar-agar. And is very calming on the tummy. The Baklawa sheets that is Smashed and added as a topping gives the dessert an added texture, with the white chocolate and pistachio, everything combined, marries well with each other.


Make this delicious dessert for your family and surprise them!

Ingredients :

  • 200 gms Dried Figs
  • 1/2 cup hot water
  • 10 gms China grass/ agar agar soaked in 4 tbsp water 
  • 1 liter Milk
  • 1/4 cup Sugar
  • 1/2 cup Condensed Milk
  • 2 tbsp Cream (optional)
  • Phyllo sheets
  • Ghee/ Butter
  • Pistachios, ground 
  • White chocolate, melted 

Instructions :

  1. In a deep bowl, add in your dried figs and pour in the hot water and cover and allow to soak at least for half an hour.

  2. At the same time, soak the China grass in water and set aside.
  3. Now grind the figs with little bit water used for soaking. 
  4. In a deep saucepan, pour the milk and allow to bring to a boil. 
  5. Now at the same time, melt the China grass that has been soaking. 
  6. Remove milk from stove. Now, to the boiled milk, add sugar, condensed milk, melted China grass, and beaten cream (optional).
  7. Finally add in the fig paste and combine well using a whisk.

  8. Now pour into individual moulds or a dessert tray. 
  9. Allow to set in the refrigerator (3-4 hours or overnight).
  10. For assembling, brush ghee or butter onto phyllo sheets and bake them for 2-3 minutes at 180 deg C, this step is optional, adds an extra crunchy texture.

  11. Now smash and crumble the baked phyllo sheets and sprinkle as required over the pudding and decorate with melted white chocolate and ground pistachios. 
  12. Serve immediately! 


Do try this recipe and don't forget to share your experience/feedback with me here in the comments or feel free to send me a mail. Also, do tag me at #taystedit if you try out my recipes on Facebook, Instagram etc so that I can see when you make it. ♡♡♡♡

Iles Flotantes - Floating Island 


It's International Egg day and which better day to try out this dreamy Classic French dessert called Floating Island. Yup! You read that right! Isn't the name of the dessert in itself so fascinating. It is basically a cloudy-pillowy meringue balls/oval shaped baby cakes that are floating on a rich creamy thick custard. 

I have been wanting to try this since a long time now. Though I wanted to try and experiment with different flavors other than vanilla, I stuck to the classic one this time as I wanted to know what the real flavors felt like. The meringue balls are usually made using the help of two Spoons and rolling a spoon full of meringue between two tablespoons till you get them ival shaped. But since the lazy girl in me did not want to go through the struggle, I literally grabbed an ice cream scooper and voila! My little island were scooped and dropped into the hot milk in no time. The meringue requires around 9-10 minutes of cook time, in between which you have to flip them to cook completely. The meringue is cooked well when you close the lid and beware of boiling the milk, you don't want a hot mess in here!


The recipe calls for cornstarch that has to be added to the whisked meringue, but I completely forgot to add it. But there was no issues in holding its shapes Coming to the flavor, practically speaking we all have vanilla essence at our homes, but I'd rather go for the vanilla pod next time I try the dessert. But guys I was literally amazed by the technique of poaching the meringue in the hot milk. Aaaahh! The inventions people come up with, truly genius! The rich creme anglaise and the meringue is a match made in heaven. It's unreal how a few ingredients like literally 4 ingredients and you can make an easy and delicious dessert in a jiffy.

Creme anglaise is basically egg yolks that are cooked along with hot milk and vanilla briefly without boiling, or else you might end up with a creme anglaise that is grainy.


Just a few points to be kept in mind and your classic French dinner dessert called Iles Flotantes with sugar basket is ready to serve! 😍 

Let's get started! 

Ingredients :


  • 2 cups Full Fat milk (plus extra to add on later) 
  • 1 tsp Vanilla extract or 1/2 vanilla bean paste
  • 4 large eggs, yolks and whites separated
  • 1/3 cup sugar (for meringue) 
  • 1/4 cup sugar (for creme anglaise) 
  • 1 tsp cornstarch /corn flour (optional) 

Instructions:

  1. Pour the milk into a wide skillet (you will be poaching your meringues here) and pour in your vanilla extract. Allow to heat on low flame whilst we prepare the meringue. 
  2. Whip the egg whites using a electric hand beater or a stand mixer on a high speed while gradually adding your sugar and continue to whip until the egg whites have stiff peaks when the beaters are lifted or spoon the meringue and turn the spoon and if the meringue stays intact without falling, the meringues are ready for poaching. Fold in the cornstarch at this stage. 
  3. Once the milk has heated to a point where there are no bubbles of boiling visible, using two large Spoons shaped the meringues to oval shape (I used uce cream scoop) and drop them into the hot milk carefully leaving space between each meringue ball. 
  4. Poach the meringues for 5 minutes uncovered, then flip and cook covered for around 4 minutes. 
  5. Using a slotted spoon, scoop the cooked meringues and set aside to cool on a tray. 
  6. Once cooked, allow to chill. 
  7. Into a clean saucepan, strain the milk that was used to cook the meringues and add extra milk if required (requires 2 cups/500 ml milk). Bring the milk to a Sim. 
  8. Whilst at that, whisk the egg yolks in a large bowl with sugar. Slowly pour the hot milk into the yolk mixture while whisking. 
  9. Transfer the custard mix to the saucepan again and using a wooden spoon mix well until the mix thickens lightly and coats the back of your wooden spoon (you can check this by wiping the back of your spoon with a finger and if it separates, then it is cooked and you may switch off the flame).
  10. Slowly strain the custard into a clean bowl and cover with a cling wrap directly covering the surface of the custard. Allow the custard to come to a room temperature and chill well before serving. 

  11. Finally, make caramel to garnish. (by bringing sugar to a boil and stiring occasionally until melted) 
  12. To serve, pour ladle fulls of the prepared and chilled creme anglaise into a flat serving dessert bowl and gently place the cooked and cooled meringue. Finally, drizzle the prepared caramelized sugar over the meringue, serve immediately and enjoy! 😍 


Do try this recipe and don't forget to share your experience/feedback with me here in the comments or feel free to send me a mail. Also, do tag me at #taystedit if you try out my recipes on Facebook, Instagram etc so that I can see when you make it. ♡♡♡♡

Rose Kunafa Cream Pudding


Eid is just around the corner and we are all going to witness for the first time in our lives, the most different eid. Who would have even thought that we wouldn't be going to the mosques on the morning of eid this year? That feeling of happiness after the eid prayer is simply bliss. Now after the eid prayers we often visit our relatives which is so much fun! I know we never expected this to happen, but Qadr Allahumaa sha faa'la (It is the decree of Allah and He does as He wills). But this does remind us to not take things for granted and to stay home and be safe.


What better way to cheer up our folks with some delightful dessert/ pudding experience?! On the eid day it is mandatory to have some sweet/ dessert after the 'mega eid lunch'.. and of course the star is always the mutta maala (traditional thread-like dessert made of eggs also called egg necklace). Mutta maala is customary to be made on eid. Now being a foodie, I like to serve a dessert too that is mostly indulged after a nap session, haha. (Come on! How much food can our tummies take in right after fasting for a month, teehee) So I thought to share a dessert recipe with you guys! I mean come on! How many of us do not like desserts? especially on Eid? 


Well, I am here to share the perfect show stopper for your eid spread! I couldn't wait to develop this recipe that has been in my mind. Now to put what is in your mind to action, is not easy! I looooove kunafa, I mean, who doesn't? Lately, I have been seeing a lot of rose dalgona which inspired me to try this! Thanks to @tableforfive for that! Also another inspiration was the popular mesh umm ali from @cleobuttera that made me try kunafa dough this way. They never cease to blow your mind with their food pictures! Now, coming back to the pudding, as I said I love kunafa, and rose dalgona in trending during ramadan too! So I wanted a bit of both; something crunchy at the same time creamy and with a hint of rose. So I immediately began working on the idea.
Basically, this was an experiment and alhamdulilah it tastes soooo good! Exaclty like I wanted it! Playing with textures is my thing. But the kunafa layer came out perfect and I forgot a huge step, to butter my baking dish, so the kunafa wouldn't budge! My initial plan was to make a rose cream and allow to set and place the sweetened kunafa as the second layer. Now since that the kunafa layer wouldn't budge, I had to pour the rose cream as the second layer. Tasted great! But I would prefer to keep the kunafa layer as the top layer, the next time I make these!
Now if you dont have kunafa you may do the same recipe, by frying the bread in some ghee+oil.
Without further a do, let's prepare this yumm Rose Kunafa Cream Pudding 🍨


Ingredients:

For baking Kunafa :
  • 1/2 package or less kunafa dough (as much as you can fit in one layer of your baking dish) 
  • 4 tbsp Pure ghee
  • 1/4 - 1/2 cup condensed milk
  • 1/4 cup Whipping cream

For the rose cream:
  • 1 cup Whipping cream
  • 2 tbsp rose syrup
  • 1/4 cup condensed milk

For Garnishing 

  • Slivered Pistachios
  • Dried Rose Petals

Instructions:

  1. Preheat your oven to 200°C and butter your baking dish, I used 9 by 7 inch baking dish. 
  2. Place the kunafa dough lengthwise and fill in as tightly as possible. 
  3. Apply ghee evenly over all areas using a brush. 
  4. Bake in a preheated oven 200°C for 20 minutes until golden and crisp. 
  5. Next, pour the condensed milk and heavy cream /Whipping cream over the baked Kunafa and bake again for 5 minutes until the kunafa becomes crisp again. 
  6. Now in a large bowl, whip the cream until medium stiff peaks and add the rose syrup and condensed milk and fold gently. 
  7. Pour this rose cream over the baked Kunafa layer and place it in the refrigerator for 2-3 hours until set or place in the freezer for 1/2 an hour. * (check notes) 
  8. Garnish with slivered pistachios and dried Rose Petals. 
Notes: 
  • I would recommend to set the whipped rose cream in a similar pudding dish and place the baked sweet Kunafa for better crunch and texture. I forgot to apply butter hence I had to pour the rose cream over the kunafa layer.
  • Once the rose cream is set, place the kunafa layer just before serving so that the crunchiness is retained.
  • If you want to use the rose cream as the top layer you may use sliced bread that is fried in ghee+oil for the base, also a great substitute for kunafa.
  • I used a glass baking dish to show the layers as this was an experiment. Use a ceramic baking dish if you have one. 
  • Line the dish with baking paper for easier handling of the sweet Kunafa. 
  • Be careful not to over pour Whipping cream while baking Kunafa, just a tad bit will do. 
  • You may alternatively crush the baked Kunafa slightly with clean and dry hands and layer in mini dessert bowls with slightly crushed Kunafa layer being the first then the cream and again the Kunafa layer. 
  • If you do not have rose syrup, you may use a dash of rose water and red food color, but I wouldn't recommend it coz the pudding would turn runny and also wouldn't taste as good. (had to put down since it's a FAQ)
  • Different ovens have different temperature, keep in mind not to bake for too long after you add Condensed milk to your baked Kunafa, this will result in a hard layer. 

Do try this recipe and don't forget to share your experience/feedback with me here in the comments or feel free to send me a mail. Also, do tag me at #taystedit if you try out my recipes on Facebook, Instagram etc so that I can see when you make it. ♡♡♡♡
Older Posts

Search This Blog

My name is Hasna Haneef, a mommy to a toddler, hailing from Thalassery, Kerala. Welcome to my humble abode on the Internet; wherein I share all my recipes and experiments. I am glad to have you on board!

TRENDING POSTS

  • Kerala Style Squid Roast
  • Chicken Steak with Creamy Mushroom Sauce
  • Emirati Chebab
  • Regag - Emirati Flat bread
  • Copy Cat Caesars Mini Pizza
  • Kerala Beef Fry/ Nadan beef dry fry

About Me

May peace be with you!

Welcome to my blog.

I am delighted to have you on board. My name is Hasna Haneef, a mommy to a toddler, hailing from Thalassery, Kerala. My homeplace being Dubai, as I am born and brought up here and I am very influenced by the lifestyle and the variety of authentic cuisines I get to try from here, which has made me try anything that comes across me
, click here →

Stay Connected!

Join Our Madness!

Join with Thousands Of Subscribers ! Get Our Latest Recipes Delivered to Your email Inbox!

Powered by follow.it
  • Home
  • About Me
  • Recipes

    • Main Course
    • Desserts
    • Snacks

    Uncategorized

    • Chicken
    • Meat
    • Vegetarian
    • Rice
    • Malabar Food
    • Baking
    • Breakfasts
    • Snacks
    • Drinks
    • Pasta
    • Fish
    • Soups
    • Desserts
  • Contact Me

Featured Post

Triple Chocolate Hazelnut Skillet Cookie

Blog Archive

  • ▼  2025 (4)
    • ▼  April (2)
      • 1 minute Chocolate Mug Cake
      • Grilled Cheese California Burrito
    • ►  March (1)
    • ►  February (1)
  • ►  2024 (36)
    • ►  October (4)
    • ►  September (5)
    • ►  July (1)
    • ►  June (2)
    • ►  May (4)
    • ►  April (3)
    • ►  March (10)
    • ►  January (7)
  • ►  2023 (47)
    • ►  December (3)
    • ►  September (2)
    • ►  August (6)
    • ►  July (6)
    • ►  June (9)
    • ►  May (4)
    • ►  April (5)
    • ►  March (6)
    • ►  February (3)
    • ►  January (3)
  • ►  2022 (69)
    • ►  November (4)
    • ►  October (6)
    • ►  September (7)
    • ►  August (9)
    • ►  July (12)
    • ►  June (5)
    • ►  May (5)
    • ►  April (12)
    • ►  March (4)
    • ►  February (2)
    • ►  January (3)
  • ►  2021 (24)
    • ►  November (1)
    • ►  October (2)
    • ►  July (1)
    • ►  June (4)
    • ►  May (6)
    • ►  April (4)
    • ►  February (4)
    • ►  January (2)
  • ►  2020 (82)
    • ►  December (5)
    • ►  November (6)
    • ►  October (4)
    • ►  September (2)
    • ►  August (5)
    • ►  July (10)
    • ►  June (10)
    • ►  May (13)
    • ►  April (12)
    • ►  March (8)
    • ►  February (4)
    • ►  January (3)
  • ►  2019 (22)
    • ►  December (1)
    • ►  November (2)
    • ►  October (6)
    • ►  September (1)
    • ►  August (1)
    • ►  February (3)
    • ►  January (8)
  • ►  2018 (15)
    • ►  December (4)
    • ►  November (6)
    • ►  October (3)
    • ►  September (2)

Subscribe Us

Labels

Bake Biscuits Breakfast Brown rice Burger Cheese Chocolate Dal Egg Emirati Fish Iftar Indonesian Japanese Jeerakashala rice Kerala Keto Kuwait food Lunch Milk Mutton Thai food UAE food afghan cuisine arabic beef biryani bread burnt cheesecake cake chicken cream dessert dinner greek healthy indo chinese lamb malabar prawns pudding puffs quick dinner ideas recipe refreshing drink rice salad sandwich stir fry vegetables vegetarian veggies yemeni

Contact Form


POPULAR POSTS AND PAGES

Kerala Style Squid Roast

Kerala Style Squid Roast

June 18, 2020
Chicken Steak with Creamy Mushroom Sauce

Chicken Steak with Creamy Mushroom Sauce

November 05, 2018
Emirati Chebab

Emirati Chebab

June 01, 2023
Regag - Emirati Flat bread

Regag - Emirati Flat bread

December 02, 2020
Copy Cat Caesars Mini Pizza

Copy Cat Caesars Mini Pizza

March 12, 2024

Pages

  • Home
  • About Me
  • Privacy Policy
  • Contact Me

Copywrite © 2023 TermsFeed®. All rights reserved.

Created By Sora Templates | Distributed By Gooyaabi Templates

Back to top