Search This Blog

Taystit by Hasna

Food, Recipes, and Beyond

  • Home
  • About Me
  • Recipes
    • Main Course
    • Snacks
    • Desserts
  • Uncategorized
    • Chicken
    • Meat
    • Vegetarian
    • Rice
    • Malabar Food
    • Baking
    • Breakfasts
    • Snacks
    • Fish
    • Pasta
    • Drinks
    • Soups
    • Desserts
  • Contact Me

Butter Egg Masala 


Out of ideas for breakfast/ dinner?! Try this luscious and delicious butter egg masala and Thank me later! It’s so easy to prepare, it’s like my go to curry when I am out of ideas and other ingredients 😁 

The steps are pretty much like a rich and India’s own Butter Chicken Masala (psst, my butter chicken parcels are always a hit! Try it out, and let me know how it goes!)

What I like about this recipe is that all those veggies are just roughly chopped, as they are anyways going to be made into a paste, so not precision chopping required. It’s all so quick and easy! Once the gravy is done, and in the your cream and crack in your eggs ( or add in your hard boiled eggs, that are slightly slit on the sides and fried in some turmeric, chilli powder and salt, if that’s how you like it, I like mine just cracked into the butter masala) and voila! Your Butter Egg Masala is ready! It’s that easy! 😍😋

Pair it hot with some chappati so, poori, bhatura etc and enjoy!!

Ingredients: (makes for two)

  • 1 medium Onion, roughly chopped
  • 1 medium tomato, roughly chopped
  • 1 garlic clove
  • 1 really tiny piece of ginger (you don’t want it to overpower)
  • 1 + 1 tbsp Butter 
  • 1 green Chilli
  • 8-10 Cashews
  • 8-10 Raisins
  • Ketchup (optional, as required)
  • 1 tsp Kashmiri Chilli powder
  • Dried Fenugreek leaves, a pinch 
  • A drizzle of fresh cream (any sugarless cream will do)
  • 2-3 Eggs
  • Coriander leaves, for garnish 

Instructions: 

  1. In a pan, add in your blob of butter and sauté your chopped onions and once translucent add in your chopped tomatoes, ginger garlic, green chilli, cashews and raisins and close the lid. 
  2. Add in a tbsp of water and allow them to get mushy on low flame. 
  3. Once mushy, allow to cool a bit, once touchable, add the sautéed veggies to a blender and blend to a smooth fine paste. 
  4. Next in the same pan, add in a blob of butter and add in a teaspoon of Kashmiri chilli powder for that extra color and mix well. 
  5. Next, add in the paste to the pan and pour some water or milk to adjust the consistency and add salt and ketchup as required.
  6. And add in a pinch of dried fenugreek leaves and allow to come to a slight boil.
  7. Finally pour in the cream and crack in the eggs and cook covered until desired consistency of egg and garnish with chopped coriander leaves. 
  8. Enjoy hot with chappati, poori, bhatura etc!


Do try this recipe and don't forget to share your experience/feedback with me here in the comments or feel free to send me a mail. Also, do tag me at #taystedit if you try out my recipes on Facebook, Instagram etc so that I can see when you make it. ♡♡♡♡

Mango Basbousa


Mango season has just begun and I loooove Mangoes in any form, be it fresh or as a dessert! We are all in search of different mango recipes to try when all we can see are mangoes around us and this recipe was a trial but was a super hit at home. The crusty semolina adds texture and mingles well with the flavors from the mango cream and the biscuit layer. 

Unlike the usual Basbousa recipes where the first layer is that of the Basbousa batter, here I am using a biscuit layer to make it much more easier and delicious!! 

The filling consists of mango purée, condensed milk and cream. Once the Basbousa is baked, allow it to cool to give you precision to cut, or you will end up with a liquidy mess, (if you have no patience like me, haha) 

Ingredients: Serves 4 people 

Layer 1:

  • 100 gms Milkbikis Biscuits (can use digestive biscuits too)
  • 50 gms Butter, melted

Layer 2:

  • 160 gms Cream 
  • 1 Ripened Sweet Mango (preferably fiber less ones), puréed 
  • 3 tbsp Condensed Milk

Layer 3:

  • 1/4 cup Semolina
  • 2 tbsp Sugar
  • 3 tbsp Milk powder
  • 1 tsp Baking powder
  • 2 tbsp Vegetable Oil
  • 3 tbsp Water
  • 1/2 tsp Vanilla extract 

Sugar Syrup :

  • 1/2 cup Sugar 
  • 1/2 cup Water 
  • A squeeze of lemon 

Instructions: 

  1. Mix biscuit powder with melted butter and press and level it in a baking dish.
  2. Combine the cream, mango purée and condensed milk and spread evenly on the biscuit layer.
  3. Mix every ingredient under the layer 3 list and pour gently over the cream layer.
  4. Bake at 180 deg C for around 15 minutes. Bake on the top rack for 10 minutes and the rest 5 minutes on the bottom rack. 
  5. Prepare the sugar syrup by boiling water, sugar and lemon juice. Once combined and starts bubbling keep timer for around 8 minutes, allow to cool and pour over the Basbousa.
  6. Enjoy warm or cooled.


Do try this recipe and don't forget to share your experience/feedback with me here in the comments or feel free to send me a mail. Also, do tag me at #taystedit if you try out my recipes on Facebook, Instagram etc so that I can see when you make it. ♡♡♡♡

 Easy Mushroom Omelette


Eid Al Adha 2023 is over and it's summer vacation, which calls for lazy mornings and this omelette recipe is all you want this summer! Super easy to prepare, the kids and adults will enjoy it alike. The creamy mushroom filling makes it a delicious treat right in the morning! I like to add steamed veggies along with this creamy omelette to make it a complete meal.

Omelettes are the easiest breakfasts one can prepare in the morning and if you have mushrooms rotting in the fridge, before they go bad, make this ummami packed omelette. The cheddar cheese slice adds this added creamy flavor to the mushroom filling.

Grab these ingredients, let's go!

Ingredients :

  • 2 eggs
  • Salt, as required
  • Freshly cracked black pepper 
  • 2 tbsps butter 
  • 1 small Onion, finely chopped
  • 1 small Garlic clove, minced
  • 6-7 white/ brown button mushrooms
  • 1 tbsp Water, to wet the mushrooms
  • 1 tbsp Heavy cream/ fresh cream
  • 1 Cheese slice
  • Steamed veggies
 

Instructions :


  1. Crack 2 eggs in a bowl, add salt and freshly cracked pepper and whisk well.
  2. In a small fry pan, add a tablespoon of butter and swirl the pan, add in the finely chopped onions and sauté well. Add in the minced garlic.
  3. Now add in the sliced mushrooms and wet the mushrooms with water and salt and pepper, as required.
  4. Now por the heavy cream and allow the sauce to thicken. Transfer to another bowl.
  5. Wipe the fry pan with a kitchen towel and add in butter and pour the whisked eggs. Pull from the sides, so that all the eggs cook well.
  6. Add in the mushroom filling and the cheese slice and flip over one side of the omelette over the mushroom filling and serve hot with your side of steamed veggies.


Do try this recipe and don't forget to share your experience/feedback with me here in the comments or feel free to send me a mail. Also, do tag me at #taystedit if you try out my recipes on Facebook, Instagram etc so that I can see when you make it. ♡♡♡♡

Creamy Pepper Chicken Curry


This is one curry that I love to make easy during Ramadan, as it goes well with nice pathiri, noolputtu/ idiyappam, puri, chappati, ghee rice, puttu… you name it! The curry is so versatile that it goes with almost every rice/ roti. 

The curry is so very easy to prepare yet bursts with flavor. The main ingredient being black pepper, the curry is a bit spicy, but when you add the cashew cream/ paste, the spiciness combined with the creaminess just elevates the flavors so well. 

Let’s see how the curry is prepared:

Ingredients: 

  • 10-12 Cashews, soaked in warm water 
  • 700 gms Chicken, curry cut pieces 
  • 1 tbsp Ginger garlic, crushed
  • 5 tbsp Coconut oil
  • Curry leaves
  • 3-4 Green Chillies, slit
  • 1 large Onion, finely chopped
  • Salt, as required
  • 1 medium Tomato, chopped
  • 1/4 tsp Turmeric powder 
  • 2-3 tsp Coriander powder
  • 1 tsp Garam masala
  • 1 tsp Black pepper, coarsely ground 
  • 1 tsp Black pepper powder
  • 1/2 cup water
  • 2-3 tbsp milk 
  • Coriander leaves, Finely chopped 

Instructions:

  1. Soak the cashews in warm water and after 10- 15 minutes, grind the cashews to a paste by using 2-3 tbsp milk.
  2. In a clay pot, pour coconut oil, add the crushed ginger garlic, sautee until aromatic and add curry leaves and green Chillies. Sauté well.

  3. Add the chopped onion, and add salt, sauté until translucent. Next add chopped tomatoes. Cover and cook for 2-3 minutes.
  4. Add in your spice powder, mix well and add the chicken pieces with salt, as required.
  5. Add the water and allow to cook covered for 20 minutes.
  6. Once chicken is cooked, add the cashew paste and garnish with chopped coriander leaves. 

  7. Enjoy with iddiyappam/ noolputtu, nice pathiri, chappati, ghee rice, etc!


Do try this recipe and don't forget to share your experience/feedback with me here in the comments or feel free to send me a mail. Also, do tag me at #taystedit if you try out my recipes on Facebook, Instagram etc so that I can see when you make it. ♡♡♡♡


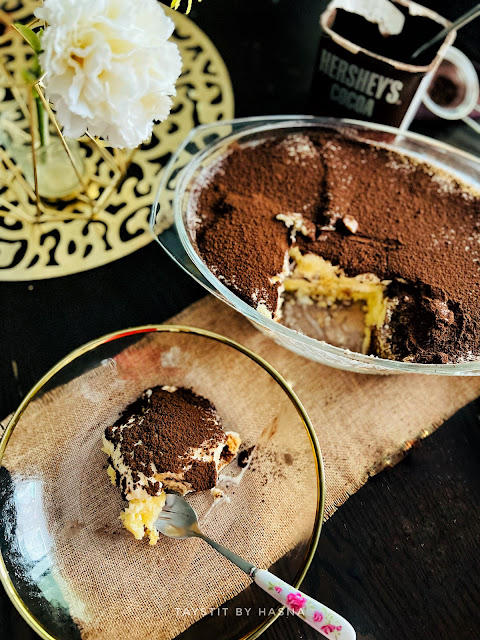
Marble Cake Pudding


One of the most nostalgic pudding/ dessert from my childhood is this delicious marble cake pudding. It is my mom's most popular dessert, and undoubtedly the best. It's so simple to make. The marble cake is store bought , you may use home made cake, but I usually make this pudding as a last moment dessert,so that it doesn't get complicated and saves time.

Similar to tiramisu, the marble cake pudding tastes better the more it sits in the fridge. The cake soaks up all the cream and the cocoa powder that is dusted gives it that chocolatey taste. This marble cake pudding is like the OG milk cake of my childhood. The marble cake is tightly layered over which a custard cream is prepared poured and make a couple of layers which is set overnight. The pudding can be topped up with fresh fruits, funfetti, chocolate sprinkles etc.
Whenever mama makes this dessert for a party at home, the dessert dish is always wiped clean.
 
This was a dessert that mama prepared from what a friend of hers was saying in their usual conversation, about a dessert she had at a party. In an Era when there was no google/ YouTube for her to check and try recipes. Basically she was not told the entire ingredients, she made out and made it on her own, voila ! The perfect dessert for parties. I need to try out more recipes from her recipe book, since it's in malayalam, I find it very difficult to read them, yet my sheer curiosity in cooking has helped me learn reading malayalam by reading her recipes. LOL .


Ingredients :

  • 400 gms Marble Cake, store bought
  • 2 Crème Caramel Sachet (prepare as per package instructions )
  • 500 ml + 500 ml milk (for the crème caramel)
  • 120 ml Milk (for the dream whip)
  • 1 Sachet Dream Whip (prepare according to package instructions)
  • 1 tsp Vanilla Essence
  • 1/2 can Sweetened Condensed Milk
  • 1/4 cup Thick Cream
  • Cocoa powder, for dusting 


Instructions:

  1. Slice the marble cake and layer the cake slices tightly without any gap.
  2. Next, prepare the Creme Caramel according to package instructions and allow to cool, set aside.
  3. Next prepare the cream mixture by beating the dream whip powder mix in some milk, according to package instructions, beat until thickens.
  4. Next add in your condensed milk and thick cream, mix well. 
  5. Finally add the cooled custard prepared earlier and combine well.
  6. Pour the prepared custard cream over the marble cake and make another layer with the same method.
  7. Seal and wrap well using a cling film and allow to set in the refrigerator overnight.*
  8. Finally, right before serving dust some cocoa powder and enjoy!

* Tastes best the more it sits in the fridge.
** The brand I used for the marble cake is Modern Bakery. It comes as 730 gms, you will only require around half of the cake.
  

Do try this recipe and don't forget to share your experience/feedback with me here in the comments or feel free to send me a mail. Also, do tag me at #taystedit if you try out my recipes on Facebook, Instagram etc so that I can see when you make it. ♡♡♡♡


Malai Mutton Biryani


Taqabbal Allahu minna wa minkum.. Eid Mubarak!! 💝

It was a beautiful 30 days,sad that Ramadan just flew away, now it is time to live by the life we have been living the past one month (reminding myself first). 

I love mutton, for how tender it is when slow cooked. The process of slow cooking mutton is a tedious job, but the flavors attained is worth the while. While I usually prepare mutton in the pressure cooker, I totally dislike it. I prefer slow cooking mutton (if it is a tender lamb, much easier to cook and is tender).

The recipe doesn't require tomatoes. The rice prepared in the oil that was used to fry the onions, takes the flavor of the rice to a whole new level. Even though I did not use saffron, the flavor from the fried onions gave the rice a very nice aroma and taste.

Malai/ cream when added to any dish makes the dish delectable. It does the same job here. You may use the same recipe for preparing malai chicken biryani, just keep track of the cooking time of chicken.

This is a delicious and easy biryani. Do try and let mem know how you liked it.

Ingredients: (makes for 4)


  • 500 gms mutton
  • 3 medium Onions, chopped
  • 2 tbsp ginger garlic paste
  • 7-8 green chillies, crushed
  • 1 tsp ginger garlic paste
  • 2 tbsp Yogurt
  • Chopped coriander
  • Chopped mInt
  • 1 tsp Garam Masala
  • 2 1/2 cups Basmati Rice, soaked and drained
  • 2 tsp ghee (clarified butter)
  • 1/4 Cup oil
  • 1 tsp Shahi jeera
  • Whole spices - 2 cardamom, 3 cloves, 2 cinnamon pieces, 3-4 Bay leaves
  • 3 3/4 cups Water
  • 3 tbsp Cream
  • Squeezed Lemon
  • Salt, as required
  • Turmeric water/ milk (you may use saffron)

Instructions:

 
  1. Marinate the mutton pieces with ginger garlic paste, yogurt, herbs (coriander & mint), garam masala, crushed ginger garlic paste, and salt as required.
  2. Soak Basmati rice at least for 25- 30 mins.
  3. In a large non stick pan, add ghee and oil and fry the onions, till golden and crisp.
  4. While the onions fry, in a medium non stick pan, add ghee and crushed ginger garlic paste, Shahi jeera, and your marinated mutton, allow to cook for at least 1/2 an hour on simmer and check if meat is cooked. Add the cream and half of the fried onions and mix well. 


  5. If the water has drained, add in 1/2 cup f water and allow to simmer for 15 minutes until the gravy thickens.
  6. Drain the fried onions once golden and crisp and set aside. Now, to the fried onion oil, add in your whole spices, and add your soaked and drained rice, mix and make sure the grains of rice are covered in oil and pour water and allow to cook for 25 mins until cooked. (for detailed instructions check here).
  7. To the cooked malai mutton masala, squeeze lemon and add salt as required, garnish with chopped coriander leaves.
  8. Transfer the rice to a large bowl, now start layering the rice as the first layer, then add in the mutton masala, then again add the rice layer and garnish with fried onions and coriander leaves and sprinkle turmeric water/ milk for added natural colour. 
  9. Cover with an aluminum foil and let it sit on dum at least for 1/2 an hr and serve with raita/ pickle.

Notes:
You may give the mutton masala a charcoal effect by heating a piece of charcoal and placing in a steel/ aluminum container that has oil and allow the fumes from the charcoal to seep into the rice by closing the pan with aluminum foil and lid. I am not a fan of this method, so did not do it here.


Do try this recipe and don't forget to share your experience/feedback with me here in the comments or feel free to send me a mail. Also, do tag me at #taystedit if you try out my recipes on Facebook, Instagram etc so that I can see when you make it. ♡♡♡♡

Bread Qatayef with Cream and Nuts


It's the last 10 day of Ramadan and I just can't believe how fast the Holy month is coming to an end. May we all reap the benefits of this Ramadan and May the Almighty forgive us for our shortcomings. 

Coming to the recipe of the day, it's QATAYEF. Who doesn't love a crunchy Qatayef filled with Cream and/ nuts drenched in sugar syrup? It's definitely a match made in heaven. With some basic ingredients you can create a magical dish for iftar that is going to wow everyone. 

Unlike the traditional Qatayef, the pancakes are not prepared from scratch instead, store bought bread is used as the Qatayef, which is filled with nuts, fried until golden and crunchy. Finally filled with Cream using a squeeze bottle. This step is preferably done after frying because you don't want a Qatayef firecracker due to cream leaking from the Qatayef while frying.  

I am all about these delicacies, you can find more on my blog, like these Cream Cheese Kunafa Rolls, Galaktoboureko , Tulumba etc. Nothing shouts Iftar more when delicacies like these are placed on the table for iftar. This is one easy recipe won't take much time and effort too. Let's make most out of these beautiful nights and do try these bread Qatayef and let me know your feedbacks.

Ingredients:

  • 1/4 cup Almonds, chopped
  • 1/4 cup Walnuts, chopped
  • 8-10 Bread slices
  • Water, for brushing 
  • Oil, for frying
  • Cream/ Ashta for filling
  • Dried Rose for Garnishing
  • Slivered Pistachios
  • Sugar Syrup

Instructions :

  1. Prepare the sugar syrup and set aside to cool.
  2. Chop almonds and walnuts and set aside.
  3. Using a large cookie cutter, make bread discs, brush some water, and roll using a rolling pin.
  4. Fill the chopped nuts and make a half moon shape and seal the edges using a fork.

  5. Fry the Qatayef until golden and crispy.
  6. Fill the Qatayef with Cream or ashta.
  7. Pour your prepared sugar syrup 
  8. Garnish with dried rose and silvered pistachios and enjoy!


Do try this recipe and don't forget to share your experience/feedback with me here in the comments or feel free to send me a mail. Also, do tag me at #taystedit if you try out my recipes on Facebook, Instagram etc so that I can see when you make it. ♡♡♡♡

Creamy Coconut Delight


Well well, Eid is right around the corner and this Holy month is coming to an end. May Allah SWT keep our faith intact and help us continue doing good deeds until the end. It is very saddening to think that this beautiful month just got over in a blink of an eye.

I wonder who doesn't like coconut? And it's very tropical flavor. I just love coconut in any form, it simply makes any dish rich and decadent. For the base I have used here lotus biscoff biscuits, not everyone likes its flavor, feel free to use any biscuits of your choice as the base, preferably that is less or non flavored ones. This pudding is just so easy that you do not require the use of any heating equipments, and gets done in 10 minutes. I love lotus biscoff and love love coconut flavor, so this pudding is basically a combination of my favorites! 😁

Super easy desserts are my favorite, especially when you have sudden plans for parties etc the lotus biscuits act as a base for the pudding, then the next layer is goodness of creams - dream whip is whipped in milk and coconut milk (preferably fresh coconut milk, I have used the tin ones, but nothing can beat freshly squeezed coconut milk) and to make it even more delicious and rich, Condensed milk, and thick cream /heavy cream is added. And finally dessicated coconut / toasted coconut is sprinkled for that final touch and texture.

Without further a do, let's get started.


Ingredients : ( Just use half the ingredients if you are 2-3 ppl) 

  • 2 Sachets Dream Whip
  • 1/2 cup cold milk 
  • 1/2 cup cold coconut milk (tin/fresh) + reserve 1/4 cup for biscuits 
  • 200 gm thick cream/ heavy cream
  • 4 tbsp Condensed milk
  • 20-22 Lotus Biscoff biscuits/ any of your choiche
  • 2-3 tbsp Lotus Biscoff spread 
  • Toasted coconut/ dessicated coconut for garnish.


Instructions :

  1. Whip up your dream whip sachets with milk and coconut milk.
  2. And fold in your thick cream and Condensed milk.
  3. Now to a flat bottom dish place your biscuits aligned and pour some of your reserved warm coconut milk*. 
  4. Now drop in your prepared coconut cream and spread out evenly using a spatula. And refrigerate for at least half an hour. 
  5. Finally garnish with some lotus biscoff spread or Sprinkle toasted coconut and/ dessicated coconut. 
  6. Refrigerate and enjoy! 😍 


Do try this recipe and don't forget to share your experience/feedback with me here in the comments or feel free to send me a mail. Also, do tag me at #taystedit if you try out my recipes on Facebook, Instagram etc so that I can see when you make it. ♡♡♡♡

Gajar Ka Halwa Lotus Trifle


Gajar Ka Halwa is one of my favorite Indian desserts.. (after Gulab jamun🙈). This is a dessert that I have been preparing since a very young age, whenever I felt like having desserts. So experimenting a dessert with my favorite gajar ka Halwa toh Banta hai! 😝

Well, lotus spread and their biscuit are now my biggest obsession.. I try adding them in everything knowingly and unknowingly.. If I say that I am going to make some dessert the hubster keeps pestering me asking if I weren't adding lotus biscuits in it! Haha
So now you know! How much I love them. Contradictory to my liking of these yum lotus biscoff, I do not like to have them plain. I specifically like to have them in dessert. Not even with tea or coffee.

Now coming back to the invention of the trifle, like I said I had been craving carrot halwa since a while, so I made it and it's been quite a while now that this recipe has been sitting in my drafts! It was high time I put to some use for our Eid dessert ideas. I am that person who lovesss cooking and experimenting, but if you ask me what are you making for Eid or any other special occasion I just go blank as if I haven't cooked my entire life. Is it just me? Or is some one able to relate? Let me know in the comments below.
So, coming back to the recipe, I wanted my dessert to be nutty (meaning with nuts and tastes like it). For that I added 1/2 tsp of Almond extract, you may add vanilla extract or completely omit the step.

This trifle is basically layers of rich carrot halwa and luscious Lotus biscoff cream piped in and the chopped almonds in the carrot halwa plays with the textures making it even more scrumptious. This recipe is so easy and so versatile. Well, one thing I can assure you is that gajar ka Halwa and biscoff flavors go hand in hand.


Basically this is a dessert that I prepared when cravinga were at its highest. And that feeling of satisfaction is heavenly. This is dedicated to all lotus biscoff lovers. Advance Eid Mubarak wishes to everyone who is reading this. May Allah accept all our Qiyaam, Siyaam, our duaas and all our good deeds. May Allah make us amongst those who witness the next holy month of Ramadan. Taqqabal Allahu minna wa minkum. 🌹🎀🌹

Ingredients :

Gajar Ka Halwa 
  • 500 gms Indian Young carrots*, grated
  • 2 tbsp pure ghee
  • 2 cups milk (or 1 cup milk and 1/2 cup condensed milk)
  • 1/2 cup sugar
  • 1 tsp cardamom powder
  • 4 tbsp chopped almonds
  • 1 tbsp ghee (optional)

Lotus Cream:
  • 1 Sachet dream whip (whipped according to package instructions)
  • 1/2 tsp vanilla/ almond extract (optional)
  • 3 tbsp lotus biscoff spread
  • 3 tbsp thick cream or fresh cream

Instructions:

  1. In a heavy bottom pan bring the milk to a boil. Keep stirring in between, be careful not to burn it.
  2. In a large skillet add 2 tbsp ghee and sautee the carrots until the color changes and water is evaporated .
  3. Next pour half the milk and cook slowly, mixing in between and add rest and aloow to combine while mixing.
  4. Now add 1/2 cup sugar and mix well and add condensed milk if adding.*
  5. Finally when little moisture is left, add your cardamom powder and garnish with chopped almonds and your gajar ka halwa is ready. 
  6. If your halwa doesn't come off your pan or you want that extra richness finish off by adding 1 tbsp ghee.
  7. Now to prepare the lotus biscoff layer, whip the dream whip sachet according to package instructions and vanilla or almond essence (optional)
  8. Add to it add melted and cooled lotus biscoff spread and add in your thick/fresh cream.
  9. Fold everything gently.
  10. Your lotus biscoff cream layer is ready!
  11. Now time to aseemble. Add a few spoons of carrot halwa at the bottom of the desset glass/jar.
  12. Next pipe the prepared lotus cream. Repeat the process until done.
  13. Garnish with almonds and/ leftover gajar ka Halwa. 
Notes: *
  • I could not get Indian carrots, but using Indian carrots is the best.
  • You may use 2 cups whole fat milk or 1 cup milk and 1/2 cup condensed milk.
  • You may sautee your almonds in ghee and add.
  • If you do not like whipped cream, you may use 200 ml thick cream/fresh cream and add 3 tbsp powdered sugar and fold in the melted lotus spread. 


Do try this recipe and don't forget to share your experience/feedback with me here in the comments or feel free to send me a mail. Also, do tag me at #taystedit if you try out my recipes on Facebook, Instagram etc so that I can see when you make it. ♡♡♡♡

Rose Kunafa Cream Pudding


Eid is just around the corner and we are all going to witness for the first time in our lives, the most different eid. Who would have even thought that we wouldn't be going to the mosques on the morning of eid this year? That feeling of happiness after the eid prayer is simply bliss. Now after the eid prayers we often visit our relatives which is so much fun! I know we never expected this to happen, but Qadr Allahumaa sha faa'la (It is the decree of Allah and He does as He wills). But this does remind us to not take things for granted and to stay home and be safe.


What better way to cheer up our folks with some delightful dessert/ pudding experience?! On the eid day it is mandatory to have some sweet/ dessert after the 'mega eid lunch'.. and of course the star is always the mutta maala (traditional thread-like dessert made of eggs also called egg necklace). Mutta maala is customary to be made on eid. Now being a foodie, I like to serve a dessert too that is mostly indulged after a nap session, haha. (Come on! How much food can our tummies take in right after fasting for a month, teehee) So I thought to share a dessert recipe with you guys! I mean come on! How many of us do not like desserts? especially on Eid? 


Well, I am here to share the perfect show stopper for your eid spread! I couldn't wait to develop this recipe that has been in my mind. Now to put what is in your mind to action, is not easy! I looooove kunafa, I mean, who doesn't? Lately, I have been seeing a lot of rose dalgona which inspired me to try this! Thanks to @tableforfive for that! Also another inspiration was the popular mesh umm ali from @cleobuttera that made me try kunafa dough this way. They never cease to blow your mind with their food pictures! Now, coming back to the pudding, as I said I love kunafa, and rose dalgona in trending during ramadan too! So I wanted a bit of both; something crunchy at the same time creamy and with a hint of rose. So I immediately began working on the idea.
Basically, this was an experiment and alhamdulilah it tastes soooo good! Exaclty like I wanted it! Playing with textures is my thing. But the kunafa layer came out perfect and I forgot a huge step, to butter my baking dish, so the kunafa wouldn't budge! My initial plan was to make a rose cream and allow to set and place the sweetened kunafa as the second layer. Now since that the kunafa layer wouldn't budge, I had to pour the rose cream as the second layer. Tasted great! But I would prefer to keep the kunafa layer as the top layer, the next time I make these!
Now if you dont have kunafa you may do the same recipe, by frying the bread in some ghee+oil.
Without further a do, let's prepare this yumm Rose Kunafa Cream Pudding 🍨


Ingredients:

For baking Kunafa :
  • 1/2 package or less kunafa dough (as much as you can fit in one layer of your baking dish) 
  • 4 tbsp Pure ghee
  • 1/4 - 1/2 cup condensed milk
  • 1/4 cup Whipping cream

For the rose cream:
  • 1 cup Whipping cream
  • 2 tbsp rose syrup
  • 1/4 cup condensed milk

For Garnishing 

  • Slivered Pistachios
  • Dried Rose Petals

Instructions:

  1. Preheat your oven to 200°C and butter your baking dish, I used 9 by 7 inch baking dish. 
  2. Place the kunafa dough lengthwise and fill in as tightly as possible. 
  3. Apply ghee evenly over all areas using a brush. 
  4. Bake in a preheated oven 200°C for 20 minutes until golden and crisp. 
  5. Next, pour the condensed milk and heavy cream /Whipping cream over the baked Kunafa and bake again for 5 minutes until the kunafa becomes crisp again. 
  6. Now in a large bowl, whip the cream until medium stiff peaks and add the rose syrup and condensed milk and fold gently. 
  7. Pour this rose cream over the baked Kunafa layer and place it in the refrigerator for 2-3 hours until set or place in the freezer for 1/2 an hour. * (check notes) 
  8. Garnish with slivered pistachios and dried Rose Petals. 
Notes: 
  • I would recommend to set the whipped rose cream in a similar pudding dish and place the baked sweet Kunafa for better crunch and texture. I forgot to apply butter hence I had to pour the rose cream over the kunafa layer.
  • Once the rose cream is set, place the kunafa layer just before serving so that the crunchiness is retained.
  • If you want to use the rose cream as the top layer you may use sliced bread that is fried in ghee+oil for the base, also a great substitute for kunafa.
  • I used a glass baking dish to show the layers as this was an experiment. Use a ceramic baking dish if you have one. 
  • Line the dish with baking paper for easier handling of the sweet Kunafa. 
  • Be careful not to over pour Whipping cream while baking Kunafa, just a tad bit will do. 
  • You may alternatively crush the baked Kunafa slightly with clean and dry hands and layer in mini dessert bowls with slightly crushed Kunafa layer being the first then the cream and again the Kunafa layer. 
  • If you do not have rose syrup, you may use a dash of rose water and red food color, but I wouldn't recommend it coz the pudding would turn runny and also wouldn't taste as good. (had to put down since it's a FAQ)
  • Different ovens have different temperature, keep in mind not to bake for too long after you add Condensed milk to your baked Kunafa, this will result in a hard layer. 

Do try this recipe and don't forget to share your experience/feedback with me here in the comments or feel free to send me a mail. Also, do tag me at #taystedit if you try out my recipes on Facebook, Instagram etc so that I can see when you make it. ♡♡♡♡

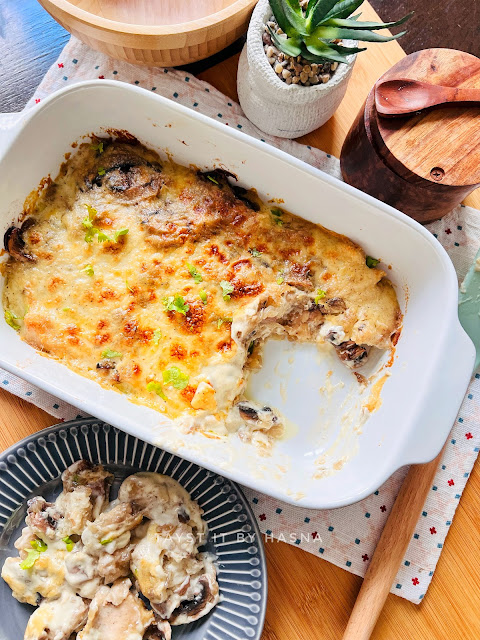
Creamy Chicken Casserole

Updated Picture of Casserole Chicken 


The name might sound cheesy, but trust me, this is one among the most requested recipes of all. For me, comfort food is all about my chicken casserole. Not boasting here, but this flavor-packed casserole is just insane. The main 3 stages of cooking for this casserole are a chicken layer, an onion-mushroom layer, and a creamy sauce layer. If you don't like mushrooms you are gonna love it after you make this. This is one dish that is a family favorite now. They keep asking for more. It is mouthwatering - finger lickin good.

The first layer of chicken is a base with strips of chicken floured and cooked in some olive oil. The next layer is what makes the dish so flavorful, the onion-mushroom layer. Then a sauce similar to the white sauce is made and heavy cream or any thick cream is added to the sauce and poured over the chicken and mushroom. The sauce helps combine all the flavors when kept in the oven. Since casserole is a deep dish used for baking in the oven and serving the dish on its own, the dish is called a casserole.

Updated picture of Casserole Chicken 


Don't have an oven? Don't fret. Just make the same in a deep non-stick dish instead of a casserole and keep a fry pan beneath the non-stick casserole-pan and cover the pan using a foil and place the lid on. When it gets done, the sauce mimics a cheese layer. So you don't have to add any extra cheese.

Have this hot with some pasta, rice or potatoes (in any form). I prefer warm mashed potatoes to go with the sauce. I will post the recipe of my mashed potatoes soon. It is utterly butterly delicious. I am already drooling while typing this. Try this and I am sure this will turn out to be your family favorite too. Believe me, IT IS THAT GOOD. *smack*


Ingredients: Recipe adapted from Natasha’s Kitchen 

  • 500 gm boneless chicken breasts, cut into 1 -inch thick strips
  • Salt to taste
  • 1/4 tsp black pepper plus more to taste
  • ½ tsp Garlic Powder
  • 1 cup all-purpose flour to coat the chicken
  • 6 Tbsp olive oil divided
  • 1 box about 12 - 15 white mushrooms thickly sliced
  • 1 tsp soy sauce
  • 1 medium onion finely diced
  • 3 garlic cloves minced

Ingredients for White Sauce

  • 2 Tbsp unsalted butter
  • 1 Tbsp Olive Oil
  • 3 Tbsp all-purpose flour for the sauce
  • 1 1/2 cups chicken broth
  • 1 cup milk + 1/2 cup heavy cream/ thick cream 

Instructions:


  1. Season chicken with salt and pepper and dip both sides in flour. Heat 3 Tbsp oil in a large skillet over medium/high heat. Once oil is hot, add chicken and saute until golden. Work in batches if needed so you don't crowd your pan. Don't worry about cooking the chicken through; it still needs to go in the oven. Transfer chicken to a 13x9 casserole baking dish/ a deep non stick pan. 

  2. Scrape off any debris from the skillet. Add 3 Tbsp oil along with sliced mushrooms and diced onions and saute until soft and golden. Add garlic and saute another 1-2 min. Add in the soy sauce. Sautee till the mushrooms get done. Spread mixture over the chicken.
  3. In the same pan you've been using, melt 3 Tbsp butter. Whisk in 3 Tbsp flour for a few seconds till the flour is cooked slightly. 
  4. Add 1 1/2 cups chicken broth, 1/4 tsp pepper, and whisk until smooth. Add 1 cup heavy cream/ molk and bring to a simmer. Season with salt and pepper to taste. 
  5. Pour sauce over the chicken and mushrooms. Cover with foil and bake at 350˚F for 45 minutes. If doing the same in a deep non stick pan, cover the pan with foil and place the deep pan on a fry pan and let it cook on simmer for 20-25 minutes. Serve warm or hot over mashed potatoes, pasta or rice.


Do try this recipe and don't forget to share your experience/feedback with me here in the comments or feel free to send me a mail. Also, do tag me at #taystedit if you try out my recipes on Facebook, Instagram etc so that I can see when you make it. ♡♡♡♡

Qatayef


Happy 47th UAE National Day folks! I discovered the taste of Qatayef during one of these recent Ramadans. I could not BELIEVE how sublime this looked as well it tasted even better. I always love a platter that not only looks good but tastes better. So, this time around I thought I would make Qatayef, which isn't originally an Emirati dish but happens to be of middle eastern cuisine; that plays the game for me. It has more of an Egypt origin.

The main essence is the taste of the rose water that simply gives it a nice definition to taste. Qatayef is prepared in two ways, the Qatayef batter is used to make similarly shaped pancakes and filled with nuts or cream and fried. The other way is to fill the Qatayef with a cream mixture or whipped cream halfway through, this one isn't fried, it is served with some rose water scented sugar syrup which is the main element of the dish; this version is also called Qatayef Asafiri.


This is commonly found at iftar tables during Ramadan. You can also find these small pancakes in supermarkets, ready to fill and fry. But I prefer homemade from scratch rather than store bought. It is so much fun to make this. I always find it very interesting to make this one. Doesn't take much time and effort yet it is nectarous and fit for a king.  We all love it here! Try it and let me know if your folks love it too in the comments below. Let's move on to the ingredients...


Qatayef

Pancake Batter: 

Ingredients: 

  • 1/2  cup warm water
  • 1/2 tsp active dried yeast
  • 1 tbsp sugar
  • 1 cup all-purpose flour
  • 1/2 tsp baking powder
  • 1 1/4 cup milk
Instructions: 
  1. In a large mixing bowl combine warm water with yeast and sugar. (Do not kill the yeast by pouring in hot water, it just needs to be warm) 
  2. Set aside for 10 minutes. Then add milk.
  3. In the meantime, combine the rest of the dry ingredients and whisk to combine.
  4. Add the dry ingredients into the milk mixture gradually and whisk creating the pancake batter without lumps.
  5. Set aside the batter for 15-20 minutes to give the yeast time to wake up.
  6. Preheat a non-greased non-stick skillet over medium-high heat.
  7. Pour ⅛ of a cup of batter into a preheated skillet and fry the pancake on one side until the top surface is no longer shiny about 2-3 minutes.
  8. The bubbles created during the frying process is a good indication that yeast in the batter is working properly.
  9. Once the surface is dry and no longer shiny remove the pancake onto a clean kitchen towel and cover to prevent it from drying out. Continue with the rest of the batter. Adjust the heat as needed so the bottom part of the pancake doesn't burn.
  10. Let the pancakes cool and keep them covered under a kitchen towel to keep them from drying.


Rose Scented Sugar Syrup :

Ingredients:
  • 1 cup white granulated sugar
  • 1/2 cup water
  • 1 teaspoon rose water

Instructions:


  1. In a medium saucepan, combine together the sugar, water, and a teaspoon of rose water. Set on the stovetop over high heat. Try to avoid stirring it as it heats to prevent crystallization from happening, but if the sugar is not dissolving, then help it out with a few stirs. Once it comes to a boil, STOP stirring.
  2. Bring to a rolling boil, then immediately reduce the heat to medium-low and let it simmer for 10 minutes. Set a timer! The syrup will thicken slightly and have a consistency similar to pancake syrup. If it simmers for longer it could thicken too much and become candy-like.
  3. Remove off the heat and transfer to a large bowl and allow to cool to room temperature before pouring over the Qatayef.

Ashta (Cream Filling):

Ingredients:
  • 1.5 Tablespoon cornstarch.
  • 1 cup milk.
  • a dash of rose water.
  • 3-4 Tablespoon unsalted cream cheese.
  • 1 tablespoon condensed milk or icing sugar

Instructions: 

  1. In a small saucepan, off the heat, whisk together the milk, sugar, and cornstarch until well combined and the cornstarch has dissolved completely without any visible lumps.
  2. Set the saucepan over medium-high heat and bring to a full boil, whisking constantly. Continue to boil for a few more seconds until the mixture thickens and large bubbles form around the surface.
  3. Remove the saucepan from the heat and whisk.
  4. Set the cream-filling aside to cool slightly and mix in the rose water and cream cheese.

Final Assembling:

  • Scoop about a teaspoon of the Ashta filling in the middle of the Qatayef.
  • Pinch the edges together sealing them two-thirds of the way. Dip the open side into ground pistachios.

  • Arrange nicely in a round assemble in a serving dish and cover until time to serve.
  • Drizzle the sugar syrup over the Qatayef right before serving. Enjoy them melt in your mouth!


Do try this recipe and don't forget to share your experience/feedback with me here in the comments or feel free to send me a mail. Also, do tag me at #taystedit if you try out my recipes on Facebook, Instagram etc so that I can see when you make it. ♡♡♡♡
Older Posts

Search This Blog

My name is Hasna Haneef, a mommy to a toddler, hailing from Thalassery, Kerala. Welcome to my humble abode on the Internet; wherein I share all my recipes and experiments. I am glad to have you on board!

TRENDING POSTS

  • Kerala Style Squid Roast
  • Chicken Steak with Creamy Mushroom Sauce
  • Emirati Chebab
  • Regag - Emirati Flat bread
  • Copy Cat Caesars Mini Pizza
  • Kerala Beef Fry/ Nadan beef dry fry

About Me

May peace be with you!

Welcome to my blog.

I am delighted to have you on board. My name is Hasna Haneef, a mommy to a toddler, hailing from Thalassery, Kerala. My homeplace being Dubai, as I am born and brought up here and I am very influenced by the lifestyle and the variety of authentic cuisines I get to try from here, which has made me try anything that comes across me
, click here →

Stay Connected!

Join Our Madness!

Join with Thousands Of Subscribers ! Get Our Latest Recipes Delivered to Your email Inbox!

Powered by follow.it
  • Home
  • About Me
  • Recipes

    • Main Course
    • Desserts
    • Snacks

    Uncategorized

    • Chicken
    • Meat
    • Vegetarian
    • Rice
    • Malabar Food
    • Baking
    • Breakfasts
    • Snacks
    • Drinks
    • Pasta
    • Fish
    • Soups
    • Desserts
  • Contact Me

Featured Post

Triple Chocolate Hazelnut Skillet Cookie

Blog Archive

  • ▼  2025 (4)
    • ▼  April (2)
      • 1 minute Chocolate Mug Cake
      • Grilled Cheese California Burrito
    • ►  March (1)
    • ►  February (1)
  • ►  2024 (36)
    • ►  October (4)
    • ►  September (5)
    • ►  July (1)
    • ►  June (2)
    • ►  May (4)
    • ►  April (3)
    • ►  March (10)
    • ►  January (7)
  • ►  2023 (47)
    • ►  December (3)
    • ►  September (2)
    • ►  August (6)
    • ►  July (6)
    • ►  June (9)
    • ►  May (4)
    • ►  April (5)
    • ►  March (6)
    • ►  February (3)
    • ►  January (3)
  • ►  2022 (69)
    • ►  November (4)
    • ►  October (6)
    • ►  September (7)
    • ►  August (9)
    • ►  July (12)
    • ►  June (5)
    • ►  May (5)
    • ►  April (12)
    • ►  March (4)
    • ►  February (2)
    • ►  January (3)
  • ►  2021 (24)
    • ►  November (1)
    • ►  October (2)
    • ►  July (1)
    • ►  June (4)
    • ►  May (6)
    • ►  April (4)
    • ►  February (4)
    • ►  January (2)
  • ►  2020 (82)
    • ►  December (5)
    • ►  November (6)
    • ►  October (4)
    • ►  September (2)
    • ►  August (5)
    • ►  July (10)
    • ►  June (10)
    • ►  May (13)
    • ►  April (12)
    • ►  March (8)
    • ►  February (4)
    • ►  January (3)
  • ►  2019 (22)
    • ►  December (1)
    • ►  November (2)
    • ►  October (6)
    • ►  September (1)
    • ►  August (1)
    • ►  February (3)
    • ►  January (8)
  • ►  2018 (15)
    • ►  December (4)
    • ►  November (6)
    • ►  October (3)
    • ►  September (2)

Subscribe Us

Labels

Bake Biscuits Breakfast Brown rice Burger Cheese Chocolate Dal Egg Emirati Fish Iftar Indonesian Japanese Jeerakashala rice Kerala Keto Kuwait food Lunch Milk Mutton Thai food UAE food afghan cuisine arabic beef biryani bread burnt cheesecake cake chicken cream dessert dinner greek healthy indo chinese lamb malabar prawns pudding puffs quick dinner ideas recipe refreshing drink rice salad sandwich stir fry vegetables vegetarian veggies yemeni

Contact Form


POPULAR POSTS AND PAGES

Kerala Style Squid Roast

Kerala Style Squid Roast

June 18, 2020
Chicken Steak with Creamy Mushroom Sauce

Chicken Steak with Creamy Mushroom Sauce

November 05, 2018
Emirati Chebab

Emirati Chebab

June 01, 2023
Regag - Emirati Flat bread

Regag - Emirati Flat bread

December 02, 2020
Copy Cat Caesars Mini Pizza

Copy Cat Caesars Mini Pizza

March 12, 2024

Pages

  • Home
  • About Me
  • Privacy Policy
  • Contact Me

Copywrite © 2023 TermsFeed®. All rights reserved.

Created By Sora Templates | Distributed By Gooyaabi Templates

Back to top