Search This Blog

Taystit by Hasna

Food, Recipes, and Beyond

  • Home
  • About Me
  • Recipes
    • Main Course
    • Snacks
    • Desserts
  • Uncategorized
    • Chicken
    • Meat
    • Vegetarian
    • Rice
    • Malabar Food
    • Baking
    • Breakfasts
    • Snacks
    • Fish
    • Pasta
    • Drinks
    • Soups
    • Desserts
  • Contact Me

Korean Air Fried Chicken 
Bao Buns 


This Ramadan I am trying to go oil free and that doesn’t mean I will be harsh on myself, when situation persists, like being invited for iftar parties #iykyk😅

Bao buns or also known as “wrapped” buns are the easiest to prepare, the softest and fluffiest. There are many versions of this easy Chinese bun, where you shallow fry after steaming and variation in shapes. The most traditional shape being a spherical shape with tiny pleats on top. Also you can stuff it your choice of fillings, I like the classic Korean fried chicken, as I am going oil free this Ramadan tried air frying the chicken and it turned out good, you may also oil fry the chicken for better texture of course! 😀


Along with the Korean Fried Chicken I also added julienned veggies like cucumber, and purple cabbage, you may add julienned carrots too. 

Ingredients:

Bao bun:

  • 2 1/2 cups All purpose flour 
  • 3/4 cup Milk
  • 1 tbsp Yeast
  • 1 tbsp Sugar
  • 1 tbsp Butter / 2 tbsp Vegetable oil
  • 1 tsp Baking powder
  • Salt 

Korean Fried Chicken 

  • 200 gms Bonless Chicken
  • Salt
  • 1/2 tsp Pepper powder
  • 3/4 cup all purpose Flour
  • 2 tbsp Gochujang Korean Chilli paste *
  • 1 tsp honey
  • 1/2 tsp soy sauce
  • 1 tsp Vinegar
  • 2-3 Garlic cloves, finely chopped
  • 1 tsp Ketchup
  • Cucumber and Purple Cabbage Julienned 
  • Sesame seeds

Instructions:

  1. In a beaker, combine slightly warm milk add sugar and yeast, to which add the butter and give it a mix and set aside. 
  2. Next, in another bowl all the dry ingredients like the flour, baking powder and salt. Now pour the wet mix to the dry ingredients and combine well to form a smooth dough. Cover and set aside to rest the dough for 60-90 minutes or until doubled in size. 

  3. Scrape the dough onto your clean work surface and knead well. Make equal sized balls and flatten them into a 4 inch oval shape. Alternatively, you may flatten the whole dough and cut into equal shapes bun using a cookie cutter.
  4. Slightly brush half of the inside of the bun and fold into half. (Brushing with oil help to open the bun easily once steamed)
  5. Transfer the bun onto a square piece of baking paper and to make sure you have a smooth surface on your bun, slightly roll over the bun using a roller. And place them onto a tray and do the rest of it similarly.

  6. Place the Bao buns into your steamer and allow to steam for 12 minutes and after the 12 minutes switch off the flame and allow the bun to stay in the steamer for 5 minutes before you open the lid.

  7. Cut your boneless chicken into tiny cubes and and marinate them in salt and pepper.
  8. Next coat them in flour and then dip in cold water and again dip in flour and then place them onto your air fryer and spray oil all over. Allow to air fry at 200 for 20 minutes (flipping or shaking your airfryer in between).
  9. In a small saucepan combine the gochujang, soy sayce, honey, vinegar, garlic, and ketchup and a dash of water and bring it to an oil and set aside. 
  10. Combine the sauce with the crispy air fried chicken. 
  11. Once your Bao buns have cooled slightly, open the bun gently and spread the sauce inside the bun and place your veggies and the Korean fried chicken. 

  12. Sprinkle sesame seeds and enjoy warm! 

Notes:
* You may alternately you my homemade Szechuan sauce, but since it’s Korean fried chicken, I suggest to get gochujang itself.


Do try this recipe and don't forget to share your experience/feedback with me here in the comments or feel free to send me a mail. Also, do tag me at #taystedit if you try out my recipes on Facebook, Instagram etc so that I can see when you make it. ♡♡♡♡

Healthy Energy Bars


Lately I have been trying to eat clean, early and on time. Alhamdulilah, so far so good! I have cut sugar from my diet, and I cover it up with little bites of fruits, but suddenly out of no where, I have been craving chocolate dream cake and I just cake take my head off it! And that’s when I came up with these healthy energy bars..mind you, eating more than one bar a day May result in weight gain! So have it sparingly if you want to lose weight but craving for chocolate. Once in a while, giving up with a little keeps you sane, keep in mind not be harsh on yourself. 

These can be called Energy bars/ protein bars, instead of adding protein powder, I have replaced it with powdered flax and chia seeds. And make sure the texture is a bit more jammy than mine by adding a little bit more dates, though I have used dark chocolate and a bit of semi sweet chocolate chips, you may completely avoid it (I ran out dark chocolate) 

I have also added a tsp of coconut oil when melting the chocolate making it even more delicious, glossy and helps to harden the chocolate. Sooo Yumm!! I have been guilty of giving my little girl with grocery bought snacks in her tiffin, finally I have prepped a batch and it’s ready for the week, Alhamdulilah! (Hope it lasts that long lol) 😄

Ingredients:


  • 1 1/2 Cups Rolled Oats
  • 1 cup Dates (pitted) preferably the wet types like khalas, sukkari etc
  • 3 + 3 tbsp Chia seeds and Flax seeds (powdered)
  • 1/3 cups Almond 
  • 1/3 cups Cashew 
  • 1/3 cups Pumpkin seeds
  • 2 tbsp Peanut Butter
  • 1 tbsp Honey, optional
  • 1/2 tsp Vanilla extract
  • A pinch of salt
  • 50 gms Dark Chocolate 
  • 50 gms Semi sweet Chocolate Chips, optional 
  • 1 tsp Coconut Oil 
  • Freeze dried Strawberries, for garnish (optional)

Instructions:


  1. In a pan, slightly roast rolled oats, almond, cashew, pumpkin seeds.
  2. Next in a food processor, add your pitted dates the roasted oats and nuts, and the rest of the ingredients and pulse well until desired consistency.

  3. Next, in a tray, line it with a parchment paper and add in the oats mix and flatten using a spatula and allow to freeze for half an hour. 

  4. Whilst at that, prepare the chocolate ganache, by mixing the chocolates and coconut oil by double boiling and pour over the mix and add in the freeze dried strawberries (optional) and place in the freezer for about 5-10 minutes.


  5. Enjoy once the chocolate ganache harden and slice them into bars and wrap them up separately using the butter papers and store in the freezer for months! The energy bars stays fresh in room temperature upto 3-4 days. Enjoy! 


Do try this recipe and don't forget to share your experience/feedback with me here in the comments or feel free to send me a mail. Also, do tag me at #taystedit if you try out my recipes on Facebook, Instagram etc so that I can see when you make it. ♡♡♡♡

Healthy Oats Khichdi


My go to recipe when I want to cook up something quick and dump in all the veggies in my fridge! And this one tastes so comforting that you won’t even feel you are eating healthy, but if course be easy on the portion you take too. 

Usually Khichdi is made with veggies or is more of a vegetarian dish (that’s what I know) but since my family loves chicken and instead of using store bought chicken cubes, adding the boneless chicken not only oomphs up the flavor but also gives you extra protein.

Add in whatever veggies you have in your fridge, potatoes, peas, bell peppers, etc cauliflower is also a great add on! I love cauliflower in Khichdi. This is such an amazing way to get your kids veggies..I tell you..they will ask for more!! 😁

Ingredients:


  • 1 1/2 cup Whole Oats
  • 1/2 cup Moong dal
  • 1-2 tbsp Ghee
  • Hing/ Asafoetida, a pinch
  • 1 tbsp Olive oil or any neutral oil
  • 1 Onion, chopped finely 
  • 1 tbsp ginger garlic paste
  • 1 cup Button Mushrooms, sliced
  • 1 Carrot, small, chopped
  • 1 cup Broccoli, chopped roughly 
  • 1/4 cup Frozen Corn
  • 150 gms Boneless Chicken, sliced into small thin strips
  • 1 tsp Jeera/ Cumin
  • 1 Sprig Curry leaves
  • 4-5 cups Water
  • Salt, as required 
  • 1 tsp White pepper
  • 1/4 tsp Turmeric powder
  • 1/2 tsp Red Chilli powder
  • 1-2 Green Chillies, optional 
  • Coriander leaves, finely chopped for garnish 
  • Lemon slice, for garnish

Instructions:

  1. In a pressure cooker wash the moong dal and add it into the pressure cooker and add in the oats and add salt as required. Pour in around 3 cups of water and allow to cook on medium high for 2 whistles. 

  2. In a large heavy bottom pan, pour the ghee and splutter the cumin, and a pinch of hing and add in the curry leaves. 
  3. Next add in the ginger garlic paste and add in the chopped onion and sauté well. 
  4. Next add in the chicken slices and add salt and pepper as required and cook well for around 4-5 minutes.
  5. Next, pour a little olive oil and add in the veggies and cook well and finally add in your spices and the cooked mushy oats and moong dal. 


  6. Add in some more water for the desired consistency and salt as required, pepper and finally add in a squeeze of lemon and ghee (if required).


Do try this recipe and don't forget to share your experience/feedback with me here in the comments or feel free to send me a mail. Also, do tag me at #taystedit if you try out my recipes on Facebook, Instagram etc so that I can see when you make it. ♡♡♡♡

Healthy Hazelnut Chocolate Spread/

 Homemade Nutella


It’s back to school and chocolate spread is inevitable in school lunch boxes. But we all know there is no goodness in the store bought Nutella that we spread on the bread and give to our kids on a daily basis. Instead try this homemade hazelnut chocolate spread! Also since Nutella is on the boycott list, don’t fret, just make this Easy and healthy spread! 

I have used 70% dark chocolate, but if you prefer the real deal the 90% dark chocolate, you may do so! Using milk chocolate, semi sweet etc can make it even more delicious, just that there is a lot of add on Sugar! So what I did is, add brown sugar to my choice. Not too much, just a couple of tablespoons (so we know we are in control of what we have!) 

Ever since I made this easy homemade Nutella, my girl always asks for more and I give it to her guilt free (along with other recommended food groups of course!) Flax seeds are loaded with nutrients and omega -3 fatty acids which are vital for the body. 

You just add all the ingredients to a mixer grinder and grind it to a smooth paste. 

Ingredients:

  • 200 gms Hazelnut (dry roast in oven at 160 deg C for 8-10 minutes or in pan on low flame for 10-15 minutes or until fragrant) *
  • 1 tbsp Flax seeds 
  • 150 gms Chocolate of your choice (preferably dark chocolate)
  • 2-3 tbsp Brown Sugar (optional)
  • 2-3 tbsp Extra Virgin Olive Oil
  • 1 tsp Vanilla Extract 


Instructions: 

  1. Roast the hazelnuts and grind all the ingredients in a mixer grinder.
  2. Store in refrigerator and enjoy upto a month! (That is if it lasts that long 😆)

Notes: 

If you are using hazelnuts with skin on, post dry roasting, you may transfer the hazelnuts to a dry and cleans kitchen towel and grab the towel and rub off the skin. 

Stays fresh on the counter top in cold climate for 2-3 days, but best to store in the refrigerator and stays fresh upto 1 month ( good luck for it to last that long) 😆

I used the chocolate as it is, you may melt and add it to the grinder too.

Ps: You may add cocoa powder if you like, and also use dates instead of brown sugar 


Do try this recipe and don't forget to share your experience/feedback with me here in the comments or feel free to send me a mail. Also, do tag me at #taystedit if you try out my recipes on Facebook, Instagram etc so that I can see when you make it. ♡♡♡♡


Eggplant Fatteh - Fattet Batenjan


There is something about Middle Eastern food, and I just love how easy yet delicious the food tastes! Looks so appealing, healthy and tastes fantastic with a lot of textures and super easy to assemble the dish. 

The Fatteh has many variations, this one being a veg but the meaty umami flavor from the air fried eggplants will not cease you from eating this delicious dish. The toasted pita, the garlicky yogurt sauce, the air fried eggplant, and chickpeas for added protein, with a tomato sauce to add to the tanginess (which is optional) and finally garnished with pomegranate seeds and fried nuts

Usually, for fatteh, the eggplants and khubs/ pita bread are deep fried, but this one is a healthier version. Since it’s Dhul- Hijjah and the first 9 days are recommended to fast. This dish can be prepared for Iftar easily and is very light on the tummy yet at the same time, very filling and delicious too! Do try and let me know, in sha Allah. And do include me and my family in your duaa. 

Ingredients: 

  • 1 Large Eggplant, cubed 
  • 2-3 Pita Bread, cut into small squares 
  • Olive oil
  • Salt 

Yogurt Sauce: 

  • 1 cup Low fat Yogurt* 
  • 1 tbsp Tahini
  • 1 small clove of Garlic, minced 
  • Salt 

Tomato Sauce: (Optional)

  • 1 tbsp Butter 
  • 1/2 Onion, chopped 
  • 1 small Clove of Garlic, minced 
  • Salt 
  • Tamarind , Half a lemon sized (soaked in  1/2 cup hot water) 
  • 1 tbsp Tomato Paste 
  • 1/4 tsp Cayenne pepper or Paprika 
  • 1 tsp Honey 

Garnish: 

  • 1/2 cup Cooked Chickpeas 
  • 2-3 tbsp Pine nuts/ Almonds**
  • Parsley, chopped 

Instructions: 


  1. Cut the pita into squares and toss it in some olive oil and salt and toast/ bake the Pita Bread in the oven for 10-15 minutes until crisp and brown in a preheated oven at 190 deg C. 


  2. Next, toss the cubes eggplants in some salt and olive oil and bake/ air fry for 25-30 minutes until golden and crisp with the insides tender. 


  3. Make the sauce by mixing the ingredients under yogurt sauce and set aside. 
  4. Next, take a small sauce pan and melt the butter and fry the nuts in the butter and set aside, now to the same butter add in your chopped onion, salt as required and sauté well.
  5. Add in the minced garlic, soaked tamrind water/ pulp, mix well and once started to boil, low the flame and add cayenne pepper/ paprika and a dash one honey to balance the acidity. Switch off the flame when you scrape the saucepan with a spatula, the sauce stays seperated.
  6. Finally, to assemble, take a large serving plate and first add in a layer of the toasted pita, then the air fried eggplants, top it with the tomato gravy (add once cooled), next pour in the yogurt sauce, cooked chickpeas, more toasted pita (for added crunchiness), pomegranate seeds, fried nuts and finally garnish with finely chopped parsley.


  7. Enjoy immediately!


*You can use full fat yogurt too
** I did not have pine nuts on me, so I soaked the almonds in warm water, removed its skin and sliced and fried them in butter 

Do try this recipe and don't forget to share your experience/feedback with me here in the comments or feel free to send me a mail. Also, do tag me at #taystedit if you try out my recipes on Facebook, Instagram etc so that I can see when you make it. ♡♡♡♡


Healthy Chocolate Chips Oatmeal Bars


When you want to have chocolate but you don’t want to just because it doesn’t have much nutrient benefits, then comes this sugar free, egg free, oil/ butter free, gluten free healthy chocolate chip oatmeal bars! 

These are so easy to make and very versatile, you may add in seeds like chia seeds, sunflower seeds etc, for that added nutrient benefit. 

Though chocolate in itself has sugar, we don’t add any additional sugar, the sweetness from the banana adds to it. These are small portions that can be enjoyed by 3-4 people. So easy to prepare, just mix everything in a bowl, dump into a baking paper lined baking tray and bake and enjoy! 

Ingredients:

  • 3 tbsp almond butter
  • 1 tbsp Flax seeds
  • ½ cup mashed ripe banana, 1 large banana
  • 1 teaspoon vanilla extract
  • 1 cup cups old fashioned rolled oats
  • ½ teaspoon baking powder
  • a pinch of salt
  • ½ cup chocolate chips, and for topping 

Instructions:

  1. Preheat your oven to 180°C. 
  2. Line an 8x8 inch baking pan with baking paper or spray with cooking spray and set aside.
  3. Add nut butter, mashed banana, flaxseed and vanilla extract to a large mixing bowl and combine.
  4. Add rolled oats, baking powder and salt to the bowl with the wet ingredients and stir to combine.
  5. Fold in the chocolate chips.
  6. Transfer to prepared baking pan and smooth out the top with a spatula. Sprinkle chocolate chips on top.
  7. Bake for 20-25 minutes or until golden brown on top and toothpick inserted comes out clean.
  8. Allow the bars to cool completely in the pan before cutting into squares and serving.


Do try this recipe and don't forget to share your experience/feedback with me here in the comments or feel free to send me a mail. Also, do tag me at #taystedit if you try out my recipes on Facebook, Instagram etc so that I can see when you make it. ♡♡♡♡

 
 Healthy Chocolate Mousse

You don't need to do too much to eat healthy! If you look carefully around your kitchen, there are loads of ingredients that can be eaten raw and not necessarily that comes in a package. It's almost impossible to live without packaged food these days, but one can strive to eat healthy food, not necessarily out of a box/ package.

This chocolate mousse is the perfect dessert/snack, that you can make almost immediately if you have Greek yogurt in your refrigerator then things are done easy here! Just a few ingredients like Avocado, peanut butter (unprocessed and unsweetened), funnily enough, you won't even know that the chocolate mousse was made with avocado.          

Not only is this dessert healthy , it is packed with flavors and nutrients! I would any day have these for dessert rather than feeling sulky for having had consumed loads of unhealthy fats etc.

Just add all the ingredients in, blend it away, cool or enjoy immediately, as easy as that! Love it!

Ingredients : (makes 3 small servings/ 1 large serving)

  • 1 1/2 ripe Avocado
  • 2-3 tbsp Peanut Butter (unsweetened)
  • 2 tbsp Hung Curd
  • 3-4 tbsp Honey
  • 1/2 Vanilla Essence / Extract
  • 3 tbsp Cocoa powder (unsweetened), levelled
  • 75 gms Dark Chocolate (unsweetened )
  • Berries 

Instructions :

  1. Just blend all the ingredients in a food processor and Serve cold or as it is.
  2. Pipe the mousse into ramekins or a large desert jar topped with strawberries, blueberries or any of your favorite berries and enjoy!


Do try this recipe and don't forget to share your experience/feedback with me here in the comments or feel free to send me a mail. Also, do tag me at #taystedit if you try out my recipes on Facebook, Instagram etc so that I can see when you make it. ♡♡♡♡


Chicken Lettuce Wraps 


Ramadan is all about fried food, said no one. We can try and include veggies and proteins into our diet without using too much oil. Iftar is the time when you need to have wholesome snacks. I know it isn’t easy to control the temptations for fried food, so let’s try to keep it moderate, where you have fried food every other day and then increase the days apart to having fried food in two days gap. :)

This lettuce wraps are not only delicious but low carb too. I love how versatile this idea is! You may include any of your favorite protein or veggies. You need not follow my recipe to the T. Have fun and add your favorite ingredients. I have added cashews for that added crunch, you may add your choice of nuts or no nuts at all. 

Let me tell you, this is the easiest snack you can put through for Iftar! So so delicious! Make sure to use fresh Iceberg lettuce for that crispy leaves. 

Before we wrap up.. Let’s make the wraps :P


Ingredients:


  • Iceberg Lettuce
  • 250 gms Boneless Chicken, minced
  • 3 Garlic cloves, finely chopped finely
  • 1 small piece Ginger, chopped finely 
  • 1 medium Onion, chopped finely 
  • 1/2 Red Capsicum, thinly sliced
  • 4-5 Mushrooms, chopped
  • Vegetable oil/ Olive oil
  • 8-10 Cashews, chopped
  • Spring Onions, to garnish 

Sauce Mix:

  • 2 tbsp Soy Sauce
  • 1 tsp White Vinegar
  • 1 tsp Honey
  • 1 tsp Hot Sauce
  • 1 tsp Red Chilli Flakes 
  • 1 tsp Red Chilli paste, optional (for extra spicy)

Instructions:


  1. In a small bowl, mix the sauces under the Sauce mix and set aside.
  2. In a pan, sauté chopped onion in some vegetable oil or olive oil. Once translucent, add finely chopped ginger and garlic. 
  3. Add chopped mushrooms and sauté on high.
  4. Make a well in the middle of the pan and add the minced meat and mix the chicken vigorously so that the chicken doesn’t cook as a clump.
  5. Half way cooked, add the sauce mix and mix well and cook on high flame. 
  6. Next garnish with spring onion, red capsicum and chopped cashews.

  7. Place each washed and dried lettuce leaf on the plate and top each lettuce with the prepared chicken filling and serve.
  8. Wrap it anyhow you like and pop it into your mouth, the crisp of the lettuce and the flavors will burst in your mouth.  

Ps: Be careful when you add salt, as the sauce have salt content more in them.

Do try this recipe and don't forget to share your experience/feedback with me here in the comments or feel free to send me a mail. Also, do tag me at #taystedit if you try out my recipes on Facebook, Instagram etc so that I can see when you make it. ♡♡♡♡

Healthy Oats Pancake 
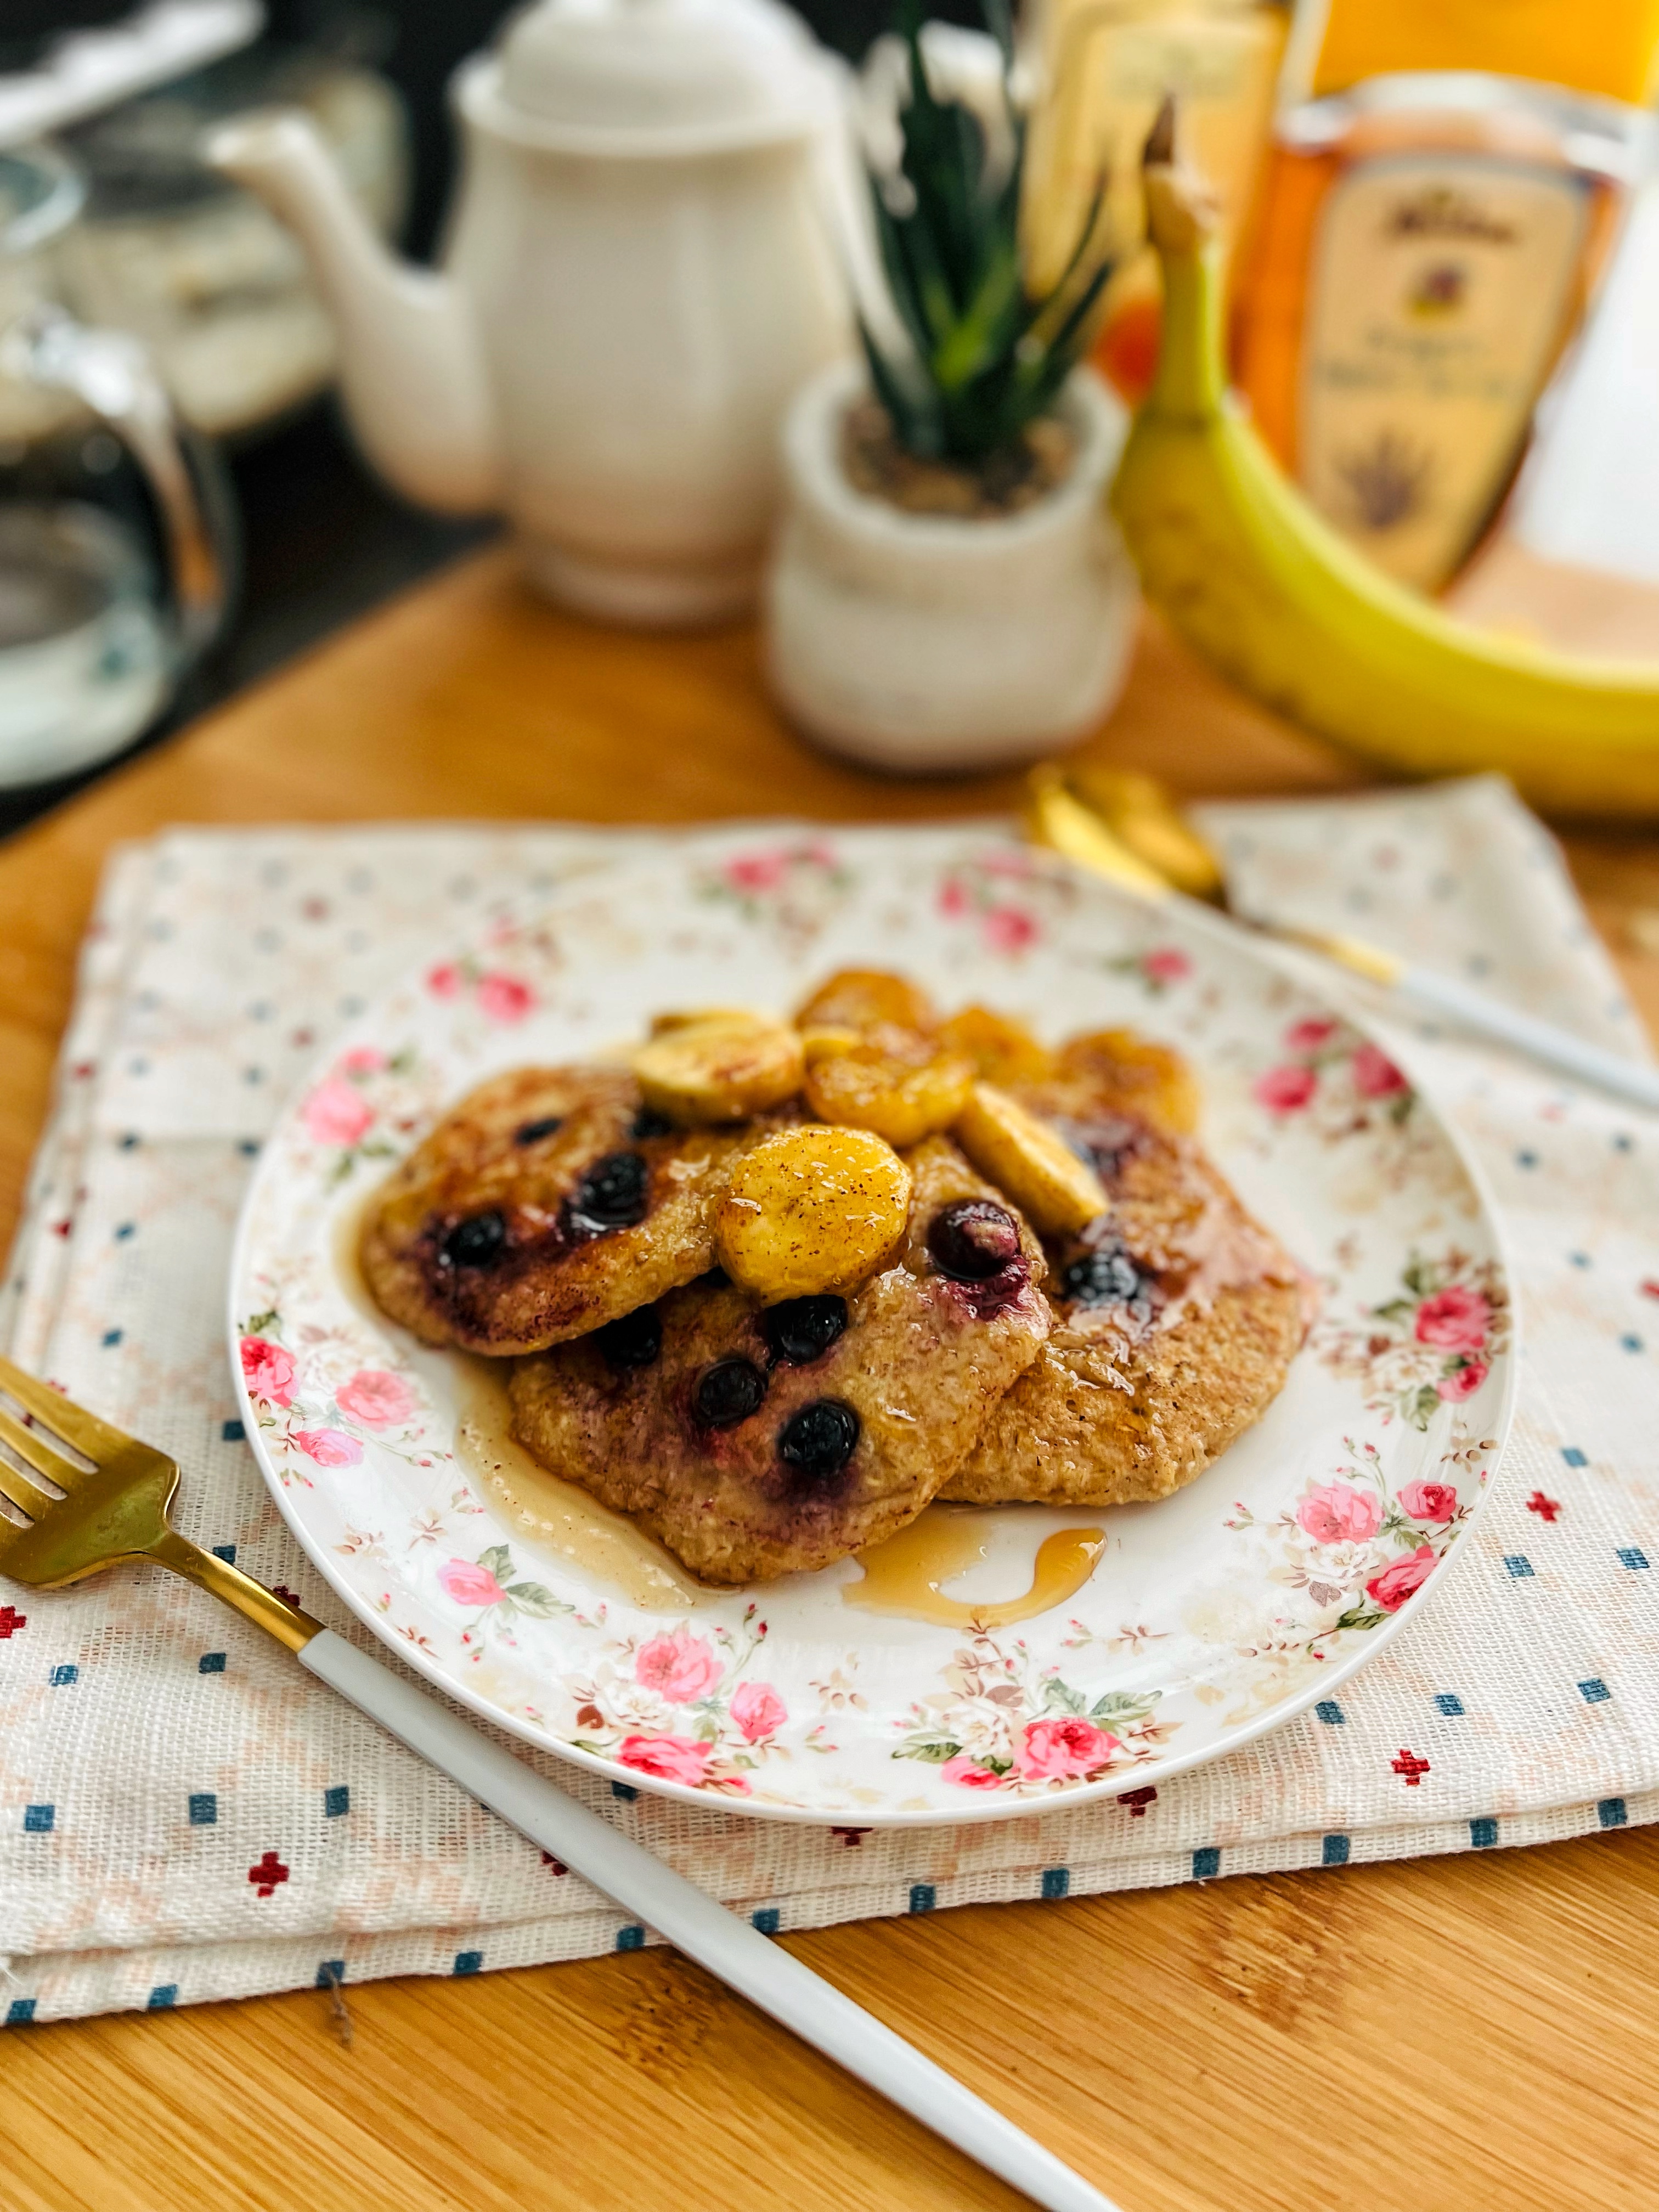
with Caramelized Cinnamon flavored Banana Slices


Anything healthy and delicious is game for me. I love how easy and versatile this Oats Pancake recipe is. With a handful of basic ingredients found at home, you can easily make these pancakes at home. My favorite add ons are fresh fruits, especially blueberries, strawberries, kiwi and honey while for my girl it's always her favorite chocolate chips with chocolate sauce.

Like I said that these Pancakes are versatile, I added my own touch by caramelizing just ripen robust bananas in a caramel sauce, ohh boyy they are sooo good!! This was completely spontaneous, I usually don't do these extra sauces, unless it's for some special occasion. But this one is such a keeper! I know the pictures don't look that tempting, but the truth is they dont do justice to how yum the sauce is that goes so well with theseoat pancakes.

These pancakes make a great lunchbox idea for kids, they are yummy and healthy too. I was first treated to these yummy goodies when  my friend cum relative invited me to her home for breakfast and I was wowed by how easy yet yummy they were and I couldn't clearly make out that it was prepared using something like oats that is fibrous yet very difficult to convince the kids to eat. Such a great idea! Thanks Buraida for introducing Oats Pancakes to me. <3

If you are in a hurry these pancakes are the best as they can be completely made directly in a blender or made using a hand held blender like I did. So much less dishes to wash and directly pour the batter to the butter greased pan and voila! So easy peesy! Let's see how it's made...


Ingredients :

  • 1 medium ripe or over ripe Robust Banana
  • 1 Egg
  • 1/4 cup Water/ Milk (adjust if more required)
  • 1 tsp Vanilla Essence 
  • 1 1/2 cups Old Fashioned Oats
  • 1/4 tsp Baking powder
  • 1/4 tsp Baking Soda
  • 1 Tbsp Yogurt
  • Salt, a pinch
  • 2 tbsp Unsalted Butter
  • Blueberries, to top
 

For Caramelized Banana Slices

  • 1/2 just ripened Banana slices
  • 2-3 tbsp Honey
  • Cinnamon powder, a pinch
  • Agave Syrup/ Honey

Instructions:

  1. In a bowl add all your Pancake ingredients except for bluberries and blend well using a hand blender or a machine blender.
  2. In a butter greased pan, pour 1/4 cup full of the batter to the pan, making 2-3 pancakes at a time (depending on the size of your pan). Drop a few Blueberries over the pancake and flip. Allow to cook well on both sides.
  3. Place the pamcake on a serving plate.
  4. To the same pan, add butter and drop in your sliced bananas, honey, Cinnamon powder and toss for a few seconds.
  5. Now slide the Caramelized bananas directly over the cooked pancakes and enjoy warm with a glass of fresh juice for a refreshing and delightful day ahead!
 

Do try this recipe and don't forget to share your experience/feedback with me here in the comments or feel free to send me a mail. Also, do tag me at #taystedit if you try out my recipes on Facebook, Instagram etc so that I can see when you make it. ♡♡♡♡

Tofu and Bok Choy Stir Fry - Healthy recipe


Howdy folks?! This healthy version of Tofu and Bok Choy stir fry is simply easy to prepare yet very nutritious. It makes a great breakfast or a quick meal. 

You may use add ons like oyster sauce or soy sauce, but to keep it on the healthier side, I did not add any. Yes, the sauces does make it even delicious, but this recipe is for those who want to eat clean and fresh. 

Tofu - aka Bean curd is a natural source of protein, in addition to other nutrients. The tofu usually comes packaged in some water. Rinse it off and dab off the excess water using a kitchen towel and cut them into cubes and fry them in olive oil. For adding flavor to the dish I used mushrooms too, which by default brings in an umami flavor.

I have added red kidney beans and bok choy are good sources of iron, potassium and Vitamin C respectively. Since this recipe is almost raw, without any additives, you will feel really good once you have it. 

Let’s see how to prepare the stir fry!

Ingredients:

  • 3-4 tbsp Extra Virgin Olive Oil
  • 250 gms Tofu, small cubes
  • 2 small Garlic, cloves
  • A handful of Bok Choy, washed and chopped 
  • 100 gms Mushroom, sliced
  • Salt, as required 
  • 1/4 tsp black pepper, crushed
  • 1 tsp White Vinegar
  • 1/4 cup Red Kidney Beans, boiled

Instructions:

  1. In a hot pan, pour olive oil and add minced garlic, almost immediately add in the tofu cubes. Season with salt.
  2. Once all sides are cooked and has a crust like feel, transfer to a plate and set aside.
  3. Now in the same pan, pour olive oil and add in minced garlic and add in the sliced mushroom, salt and black pepper.
  4. When the mushroom almost looks cooked, make a well in the middle, pour olive oil and add in the chopped bok choy, season with salt.
  5. Deglaze the pan with a couple of tbsp of water so that it helps to cook the bok choy easily.
  6. Add a dash of white vinegar to balance the flavor and add the cooked red kidney beans. Sauté and to cook for a couple of minutes.
  7. Finally add in your fried tofu and serve immediately and enjoy the stir fry hot! 


Notes:

To cook the red kidney beans, in a cooker add washed beans, to that, add an inch more of water and pressure cook for 1 whistle. Allow the pressure to cook the beans for around 5 minutes, after which, place the cooker under cool running water and slowly pull up the whistle (this will help release the pressure).
Drain over a colander. Once drained, transfer to an air tight container and add in a dash of olive oil place lid and shake to cover the beans with the oil, and store the cooked red kidney beans for up to 5 days in the refrigerator and use as and when required.


Do try this recipe and don't forget to share your experience/feedback with me here in the comments or feel free to send me a mail. Also, do tag me at #taystedit if you try out my recipes on Facebook, Instagram etc so that I can see when you make it. ♡♡♡♡
Older Posts

Search This Blog

My name is Hasna Haneef, a mommy to a toddler, hailing from Thalassery, Kerala. Welcome to my humble abode on the Internet; wherein I share all my recipes and experiments. I am glad to have you on board!

TRENDING POSTS

  • Emirati Chebab
  • Kerala Style Squid Roast
  • Thalassery Style Kozhi kaal/ Koyikaal
  • Kethel's Chicken
  • Copy Cat Caesars Mini Pizza
  • Chicken Steak with Creamy Mushroom Sauce

About Me

May peace be with you!

Welcome to my blog.

I am delighted to have you on board. My name is Hasna Haneef, a mommy to a toddler, hailing from Thalassery, Kerala. My homeplace being Dubai, as I am born and brought up here and I am very influenced by the lifestyle and the variety of authentic cuisines I get to try from here, which has made me try anything that comes across me
, click here →

Stay Connected!

Join Our Madness!

Join with Thousands Of Subscribers ! Get Our Latest Recipes Delivered to Your email Inbox!

Powered by follow.it
  • Home
  • About Me
  • Recipes

    • Main Course
    • Desserts
    • Snacks

    Uncategorized

    • Chicken
    • Meat
    • Vegetarian
    • Rice
    • Malabar Food
    • Baking
    • Breakfasts
    • Snacks
    • Drinks
    • Pasta
    • Fish
    • Soups
    • Desserts
  • Contact Me

Featured Post

Triple Chocolate Hazelnut Skillet Cookie

Blog Archive

  • ▼  2026 (3)
    • ▼  September (1)
      • Homemade Cerelac for Babies
    • ►  May (1)
    • ►  April (1)
  • ►  2025 (4)
    • ►  April (2)
    • ►  March (1)
    • ►  February (1)
  • ►  2024 (36)
    • ►  October (4)
    • ►  September (5)
    • ►  July (1)
    • ►  June (2)
    • ►  May (4)
    • ►  April (3)
    • ►  March (10)
    • ►  January (7)
  • ►  2023 (47)
    • ►  December (3)
    • ►  September (2)
    • ►  August (6)
    • ►  July (6)
    • ►  June (9)
    • ►  May (4)
    • ►  April (5)
    • ►  March (6)
    • ►  February (3)
    • ►  January (3)
  • ►  2022 (69)
    • ►  November (4)
    • ►  October (6)
    • ►  September (7)
    • ►  August (9)
    • ►  July (12)
    • ►  June (5)
    • ►  May (5)
    • ►  April (12)
    • ►  March (4)
    • ►  February (2)
    • ►  January (3)
  • ►  2021 (24)
    • ►  November (1)
    • ►  October (2)
    • ►  July (1)
    • ►  June (4)
    • ►  May (6)
    • ►  April (4)
    • ►  February (4)
    • ►  January (2)
  • ►  2020 (82)
    • ►  December (5)
    • ►  November (6)
    • ►  October (4)
    • ►  September (2)
    • ►  August (5)
    • ►  July (10)
    • ►  June (10)
    • ►  May (13)
    • ►  April (12)
    • ►  March (8)
    • ►  February (4)
    • ►  January (3)
  • ►  2019 (22)
    • ►  December (1)
    • ►  November (2)
    • ►  October (6)
    • ►  September (1)
    • ►  August (1)
    • ►  February (3)
    • ►  January (8)
  • ►  2018 (15)
    • ►  December (4)
    • ►  November (6)
    • ►  October (3)
    • ►  September (2)

Subscribe Us

Labels

Bake Biscuits Breakfast Brown rice Burger Cheese Chocolate Dal Egg Emirati Fish Iftar Indonesian Japanese Jeerakashala rice Kerala Keto Kuwait food Lunch Milk Mutton Thai food UAE food afghan cuisine arabic beef biryani bread burnt cheesecake cake chicken cream dessert dinner greek healthy indo chinese lamb malabar prawns pudding puffs quick dinner ideas recipe refreshing drink rice salad sandwich stir fry vegetables vegetarian veggies yemeni

Contact Form


POPULAR POSTS AND PAGES

Thalassery Style Kozhi kaal/ Koyikaal

Thalassery Style Kozhi kaal/ Koyikaal

June 08, 2020
Emirati Chebab

Emirati Chebab

June 01, 2023
Kerala Style Squid Roast

Kerala Style Squid Roast

June 18, 2020
Kethel's Chicken

Kethel's Chicken

August 25, 2022
Yemeni Mutton Haneeth

Yemeni Mutton Haneeth

October 20, 2022

Pages

  • Home
  • About Me
  • Privacy Policy
  • Contact Me

Copywrite © 2023 TermsFeed®. All rights reserved.

Created By Sora Templates | Distributed By Gooyaabi Templates

Back to top