Search This Blog

Taystit by Hasna

Food, Recipes, and Beyond

  • Home
  • About Me
  • Recipes
    • Main Course
    • Snacks
    • Desserts
  • Uncategorized
    • Chicken
    • Meat
    • Vegetarian
    • Rice
    • Malabar Food
    • Baking
    • Breakfasts
    • Snacks
    • Fish
    • Pasta
    • Drinks
    • Soups
    • Desserts
  • Contact Me


 Deconstructed Mango Falooda with Semiya Payasam


It's the mango season and Eid Al Adha is right around the corner, what better way to celebrate it with this innovative falooda. This deconstructed mango falooda is my mastermind, as I love falooda, but mixing everything always makes a mess, that's how this deconstructed falooda was born. I was craving for semiya payasam, so thought why not have two desserts in one and oh boy! The chilled payasam and falooda was exactly what I wanted to beat the heat.

Deconstructed Mango Falooda with Semiya Payasam is a must try!! Make this, flip it and let the action unfold, your family will love this!


Ingredients: (one serving)

  • 1 tbsp Sabja seeds
  • 3 tbsp Water 
  • 2 tbsp Ghee
  • 2 tbsp Cashews 
  • 1/4 cup Pakistani Vermicelli 
  • 3/4 cup Milk
  • 1/4 Condensed Milk
  • A pinch of Cardamom powder
  • A pinch of Salt
  • Pulp of 1 Mango 
  • Condensed Milk (if required, for added sweetness) 
  • Pomegranate seeds, for garnish 
  • Ice Cream as topping


Instructions: 

  1. Soak the Sabja seeds in water and set aside. 
  2. Roast the cashews in ghee and transfer to a bowl to cool and roughly chop the roasted cashews and set aside.
  3. In the same pan with ghee, break the Pakistani vermicelli and roast them in the ghee for a minute and pour the milk and cook the vermicelli in milk. Add more milk if required. 
  4. Finish off with the condensed milk, cardamom powder and a pinch of salt. 
  5. In a glass, layer the falooda by adding the Semiya Payasam as the first layer, next add the soaked sabja seeds, mango chunks, mango pulp, and repeat the layers until the glass is full, allow the falooda to chill. 
  6. Just before serving, for ease to release the falooda, simply dip the glass in warm water.
  7. Now take a pasta bowl, invert the bowl of the glass and flip, now slowly release the glasss upward and you now have deconstructed mango falooda. 
  8. Place a scoop of ice cream on top and garnish with mango chunks, pomegranate seeds, chopped ghee roasted cashews and mint leaves (optional). 
  9. Enjoy!! 


Do try this recipe and don't forget to share your experience/feedback with me here in the comments or feel free to send me a mail. Also, do tag me at #taystedit if you try out my recipes on Facebook, Instagram etc so that I can see when you make it. ♡♡♡♡

Dried Fig Pudding adorned with Baklawa and Pistachios


Many years back, my dad's cousin had bought a dried Fig pudding for a thakkaram/ salkaram (party given to the groom and his family), and it tasted soo good! I vividly remember asking her for the recipe, but I can't recall the recipe now. So I thought to recreate it this Eid! 

While I tried experimenting with the recipe, I learnt that boiling milk with fig could couagulate the milk, causing it to curdle. So I added the fig paste at the end of the process, yielding the exact result I was looking for, Alhamdulilah ! So make sure not boil milk and fig paste together.

Having at least one dessert on the Eid table is mandatory and everyone waits for that bit. This melt in the mouth dessert is one of a kind! The dessert is made using China grass/ agar-agar. And is very calming on the tummy. The Baklawa sheets that is Smashed and added as a topping gives the dessert an added texture, with the white chocolate and pistachio, everything combined, marries well with each other.


Make this delicious dessert for your family and surprise them!

Ingredients :

  • 200 gms Dried Figs
  • 1/2 cup hot water
  • 10 gms China grass/ agar agar soaked in 4 tbsp water 
  • 1 liter Milk
  • 1/4 cup Sugar
  • 1/2 cup Condensed Milk
  • 2 tbsp Cream (optional)
  • Phyllo sheets
  • Ghee/ Butter
  • Pistachios, ground 
  • White chocolate, melted 

Instructions :

  1. In a deep bowl, add in your dried figs and pour in the hot water and cover and allow to soak at least for half an hour.

  2. At the same time, soak the China grass in water and set aside.
  3. Now grind the figs with little bit water used for soaking. 
  4. In a deep saucepan, pour the milk and allow to bring to a boil. 
  5. Now at the same time, melt the China grass that has been soaking. 
  6. Remove milk from stove. Now, to the boiled milk, add sugar, condensed milk, melted China grass, and beaten cream (optional).
  7. Finally add in the fig paste and combine well using a whisk.

  8. Now pour into individual moulds or a dessert tray. 
  9. Allow to set in the refrigerator (3-4 hours or overnight).
  10. For assembling, brush ghee or butter onto phyllo sheets and bake them for 2-3 minutes at 180 deg C, this step is optional, adds an extra crunchy texture.

  11. Now smash and crumble the baked phyllo sheets and sprinkle as required over the pudding and decorate with melted white chocolate and ground pistachios. 
  12. Serve immediately! 


Do try this recipe and don't forget to share your experience/feedback with me here in the comments or feel free to send me a mail. Also, do tag me at #taystedit if you try out my recipes on Facebook, Instagram etc so that I can see when you make it. ♡♡♡♡

Rose Baklava with Rabri 


Few months back I had gone for a food hunt with my friends and that’s where I had this amazing combination of Jelebi and rabri. Never did I imagine it taste soo good, as both are sweets, I wondered what would be so great about it?! 

When I tried the combination from a restaurant called Chatori Gali in Dubai, I have been craving them ever since! Couple of nights back, I was trying to get some sleep when, the thought of a fusion of the Arabic dessert baklava and the Indian dessert Rabri striked my mind. I immediately jotted my idea (coz I know once I wake up, I won’t remember a thing! Haha, yeah I am crazy like that!) and had to give it a try next morning itself! I was so happy with the outcome! 

This dessert is not only easy to prepare, and requires less time and minimal ingredients. Anything with that combo, I am in! 😍 To be honest, the flavors are like umm ali..but with the rose twist ! 😅 If you were to serve this for a party, I am sure everyone will love it! Just make sure you don’t pour the rabri on the baklava and keep on the serving table, pour in the rabri when serving only. 


Ingredients:

  • Phyllo sheets/ Baklava sheets 
  • 4-5 tbsp melted Butter

Sugar Syrup: (for 6-8 roses)

  • 1/2 cup Sugar 
  • A little more than 1/2 cup water
  • 1 tbsp Lemon juice 

Rabri:

  • 500 ml Full fat Milk
  • 100 gm Paneer, preferably Malai Paneer
  • 2-3 tbsp Almonds, Cashew and Pistachio Nuts crushed coarsely 
  • 1/4 tsp Cardamom 
  • 1 tbsp Rose Water 
  • 3 tbsp Sugar

Instructions:

  1. Cut the baklava sheet into half, smear the melted butter on one side, and crinkle the dough to form a thin crinkled sheet, now starting with the edge, begin rolling onwards till it forms the shape of a flower. Now place the baklava roses into the melted butter greased cupcake tin, smear the roses with melted butter using a pastry brush.

2. Preheat oven to 180 deg C, bake for 10 minutes on lower rack and another 10-15 mins on the second rack or until golden.

3. Make the Sugar Syrup by adding sugar, water and lemon juice to a sauce pan, bring it to a boil and simmer it for 7 minutes.
4. Switch the flame off and allow to cool.
5. Once the baklava are done, pour in the sugar syrup to hear a slight sizzle.

6. Then, prepare the instant rabri by taking a heavy bottom shallow pan, rinse the pan with water and without wiping the bottom, pour in the milk and bring to a boil and simmer for 15 minutes and stir in intervals, so nothing gets stuck to the bottom of the pan. 
7. Scoop the milk fat to the sides of the pan, finally scrape off the milk fat to the reduced milk which is now 1/3rd of the 500 ml milk.
8. Grate the paneer using a grater and add it to the reduced milk, the ground nuts, the cardamom powder, and rose water and Sugar. Cook the rabri for around 5 more minutes, while stirring often. **


Notes:

**If you want, you may add extra sugar, but once the milk is reduced, and sits, it thickens, so adding more sugar might make the rabri super sweet and heavy! 
Also note, not to be tempted to cook the rabri till very thick, even if it’s watery consistency, it will thicken when it sits. 
If possible, chill the rabri before serving. 


Do try this recipe and don't forget to share your experience/feedback with me here in the comments or feel free to send me a mail. Also, do tag me at #taystedit if you try out my recipes on Facebook, Instagram etc so that I can see when you make it. ♡♡♡♡

Pastel de nata
(pastéis de nata)


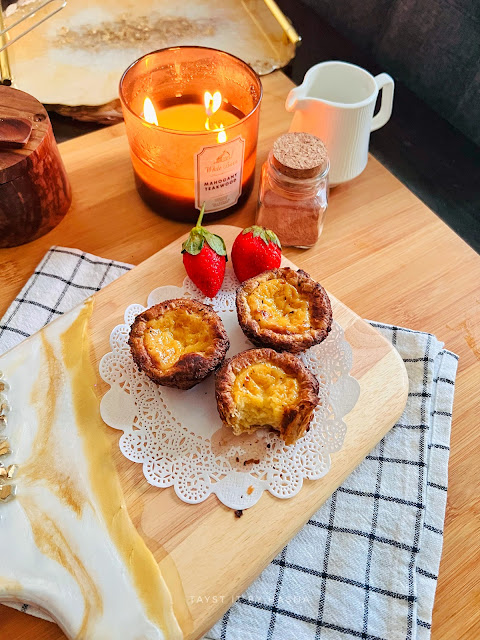
My first post for the new year, let’s start the year with this famous portugal dessert called pastel de nata. It’s crunchy, goey, yet not very sweet but satisfies your sweet tooth. The crunchiness from the puff pastry and the cooked milk custard is the main highlight of this dish where two different textures marry each other! 

Pastel de nata is popular all around the world. I tried it couple of years back and immediately knew it was easy to make at home. The caramelized custard and the flaky puff pastry is a match made made in heaven. 

You will have to bake these custard tarts at the highest temperature setting on your oven. I used store-bought whole wheat puff pastry, you may use the normal puff pastry sheets (or if you have the time and willing to take that extra effort, can make the puff pastry sheets at home) why take the hassle when you get ready made puff pastry sheets?! 😉

These cute little caramelized custard tart babies will make a beautiful addition to your dessert table too, don’t forget to impress your guests with these delicious pastel de nata !😍


Ingredients:

  • 20 gms All purpose Flour
  • 3 Eggs (separate the yolks from the whites)
  • 25 ml Whole Milk 
  • 1 tsp Vanilla Extract 
  • 1/4 tsp Cinnamon powder 
  • Salt, a pinch
  • 125 ml whole Milk
  • Puff pastry Sheets

Sugar syrup:

  • 85 ml Water
  • 120 gm Sugar

Instructions:

  1. Measure the flour and set aside. 
  2. Depart the egg yolks from the whites and set aside. 
  3. In a saucepan, pour in the 125 ml milk and add in the vanilla extract and allow to heat, until almost boiling.
  4. In a bowl, add in the measured flour, cinnamon powder, and salt, mix using a whisk. Now gradually add in the 25 ml milk and combine without any lumps. 
  5. Next add in the egg yolks and mix well.
  6. In another saucepan, add the sugar and water and allow to come to a boil or until the sugar melts into the water and forms sugar syrup.
  7. To the flour and milk slurry, add in the warm milk, whilst rigorously whisking (or else the eggs will get get lumpy and cooked).
  8. Similarly add in the sugar syrup and whisk continuously while pouring the hot syrup. 
  9. Preheat oven at 290 deg C or the highest temperature setting on your oven.
  10. In a muffin pan, press the puff pastry sheets into the cavities without tearing them. Cut off the excess dough using an offset spatula.


  11. Dip your fingers in cold water and press the inner sides of the tarts to keep the tarts cool when pouring the custard.
  12. Fill the tart cups halfway through and bake them for around 10-12 minutes or until the top of the tarts get caramelized.

  13. Enjoy warm with a cup of coffee! ☕️ 


(recipe adapted from @bakingnicky)

Ps: *Try not make ahead, it’s best enjoyed right out of the oven or the same day itself.
*Pastel de nata can be frozen, make them and place the muffin pan in Tupperware containers or ziplock bags and freeze. Thaw and use them as and when required. (But know that they won’t taste the same and freshly made)
*It is best to bake them in a convection oven (if you have then please use the convection oven)
*I used whole wheat puff pastry sheets, you may use the regular (but good quality) ones too.
* I enjoyed having them slightly warm!


Do try this recipe and don't forget to share your experience/feedback with me here in the comments or feel free to send me a mail. Also, do tag me at #taystedit if you try out my recipes on Facebook, Instagram etc so that I can see when you make it. ♡♡♡♡

Crema Catalana


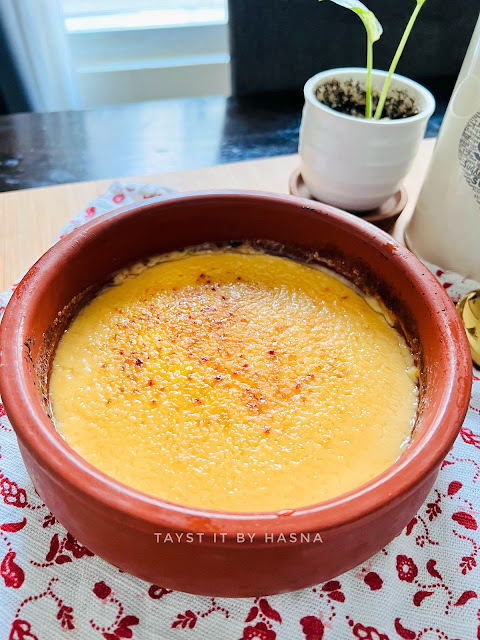
A Spanish dessert that is similar to Crème Brûlée, though they look a lot alike, Crema Catalana is made with milk and the latter is made with cream. 

Crema Catalana’s recipe way more easier. Requires very few ingredients and the method is much more easier. Crema Catalana is basically a custard prepared using egg yolks, milk, cornflour, lemon peels, cinnamon and vanilla. Similar to Creme Brûlée, Crema Catalana also has a crust made from sugar using blow torch. Since I do not own one, I tried replicating the same using the grilled in the oven, though the results were not what I wanted, works just fine. If you have a blow torch, this is one recipe that you can use it for other than Creme Brûlée 😄

Ingredients: (recipe adapted from Spain on a fork)

  • 2 cups Full fat Milk 
  • Few Lemon peels
  • 1 Cinnamon Stick
  • 1 tsp Vanilla Essence/ Extract (ideally 1 vanilla pod)
  • 2 tbsp White Sugar
  • 4 egg yolks
  • 2 tbsp White Sugar
  • 1/2 cup Cold Milk
  • 1 tbsp Corn Starch

Instructions:

  1. In a saucepan add in the milk, add in the lemon peels (without the white part), cinnamon stick, vanilla and Sugar. Allow to heat on medium and mix.
  2. Once it comes to a light boil, switch off flame and allow the lemon, cinnamon and vanilla flavors to infuse in the milk.
  3. In a bowl add in the egg yolks and sugar, mix well.
  4. In another bowl, pour the half cup cold milk and add in the corn flour and mix well.
  5. Add the cornflour milk to the egg yolks and mix well until well combined.
  6. Next, pour the infused milk that has been sitting on the stove and pour the milk using a strainer to the egg yolk mix. Combine well using a whisk.
  7. Pour this mix back to the saucepan and stir continuously for 9-10 minutes, or else the eggs will cook to form lumps.
  8. To know if the Crema Catalana is done, use the back of a wooden spoon and dip it in the custard and run your finger through it, if the custard stays separated it means the Crema Catalana is ready to be poured to serving bowls or a large bowl.


  9. Cover with a cling wrap and allow to set for 4 hours or overnight.
  10. Sprinkle a tablespoon of sugar on the top and using a blow torch, burn the sugar to create a crust.
  11. Enjoy immediately! 


Ps: 
If you store back in the fridge, the crust will soften.
You can use up the egg whites to make meringues, macarons or whip up a yummy omelette. 😍

Do try this recipe and don't forget to share your experience/feedback with me here in the comments or feel free to send me a mail. Also, do tag me at #taystedit if you try out my recipes on Facebook, Instagram etc so that I can see when you make it. ♡♡♡♡

Brownie in a Mug


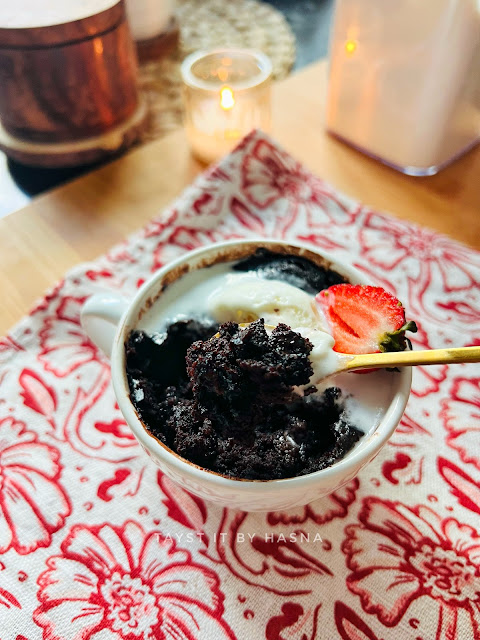
It’s the weekend and you definitely deserve a treat! And this has been my constant guilty pleasure lately. You have had it all mug cake, cookie dough mug cake and what not in a mug?! Well, give this one a try and I bet you won’t regret. 

This moist and dense brownie in a mug doesn’t use egg and that’s the biggest highlight for me. Nor does it use any other raising agents! 😍

I added chocolate chips for that extra richness, since we don’t add any eggs. But I tried it even without the chocolate and it was good either way. The outcome is dangerously delicious! Be ready to get addicted to this one. Happy weekend!


Ingredients:

  • 3 tbsp All purpose Flour
  • 3 tbsp Cocoa powder
  • 3 tbsp Sugar
  • Salt, a generous pinch
  • 4 tbsp Milk 
  • 1/4 tsp Coffee (mix it with the milk)
  • 2 tbsp Vegetable oil
  • 1/4 tsp Vanilla Essence/ extract
  • 2 tsp Nutella (optional)
  • 1-2 tbsp Chocolate Chips/ chunks (optional)

Instructions:

  1. In a mug, combine the dry ingredients with a small whisk/ spoon. 

  2. Pour in the wet ingredients and the chocolate chips/chunks. Mix well without any lumps. 

  3. Microwave for a minute or 10 seconds extra, on high. (Timing can vary depending upon your oven, I had to do a minute and 10 seconds)
  4. Allow the brownie to cook slightly and enjoy with a dollop of ice cream and berries of your choice!


Do try this recipe and don't forget to share your experience/feedback with me here in the comments or feel free to send me a mail. Also, do tag me at #taystedit if you try out my recipes on Facebook, Instagram etc so that I can see when you make it. ♡♡♡♡

Milky Cheese Cake


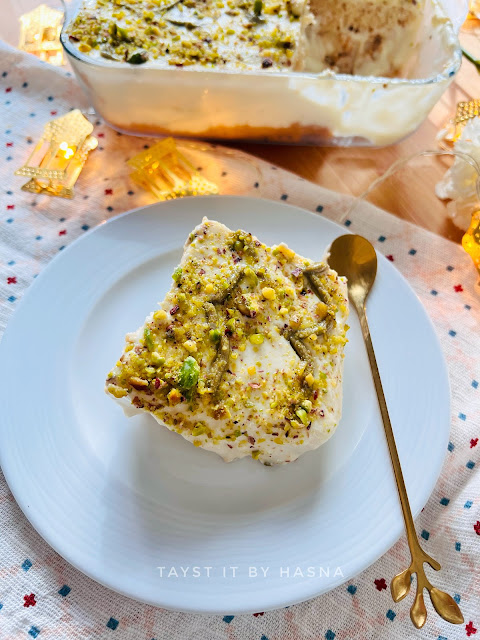
Eid Al Adha is in very few days and I came up with this milk cake and cheese cake two in one dessert! If you don’t want to make the cake from scratch you may use store bought vanilla sponge cake. If I have the time I like to make my cake from scratch or else if I am short on time, I resort to store-bought cakes for my desserts.

You may play around with the flavors! This is a basic milk cake flavor but definitely a delicious one! 

I finally garnished it with pistachios and pistachio cream. This is one very easy dessert to try. Hope you guys give this the set a drive.

Ingredients:

  • 4 eggs
  • 1 cup sugar
  • 1/2 cup water
  • 1/2 cup vegetable oil
  • 1 tsp Vanilla Essence 
  • 1 tsp baking powder 
  • 2 cups flour
  • Pistachios, for garnishing

Soaking milk:

  • 300 ml full fat milk
  • 200 ml Evaporated milk

Cheesecake layer:

  • 200 gms Cream Cheese
  • 500 ml Milk
  • 1 can condensed milk
  • 3 tbsp Corn Flour
  • 1 pack Cream

Instructions:

 
  1. To prepare the cake base:
  2. In a bowl, cracked eggs and add in sugar and beat well. Next add in the liquid ingredients like water, vegetable oil, and Vanilla essence.
  3. In another bowl, add the flour and baking powder and mix well with the help of a whisk.
  4. Now slowly little by little, add the flour to the whisked eggs, keep in mind to add flour, makes little at a time and combine the flour mix without any lumps.
  5. Preheat the oven to 180°C into a baking tray, line it with a parchment paper or a baking paper, pour the cake mix over the baking paper.
  6. Allow to bake for around 35 minute until skewer inserted in the middle comes out clean. 

  7. Allow the cake to cool on a cooling rack.
  8. Once the cake has cooled down, remove the parchment paper, and cut the cake into two layers.
  9. Into a saucepan add milk, cornflour and please on the gas stove and keep whisking and combine well without any lumps.

  10. Once the mixture starts thickening, remove the saucepan from the flame and set aside to cool.
  11. In a bowl, add cream cheese, cream and condensed milk. To this add the earlier prepared milk mixture.
  12. Please one layer of the cake slice on the pudding tray and drench the cake slice with evaporated milk or milk.
  13. Now pour the milk and cream cheese custard mix over the cake layer and sprinkle pistachios.

  14. Repeat the same for the other layer of cake and cream cheese too.
  15. Allowed to sit in the refrigerator for 3 to 4 hours.


Do try this recipe and don't forget to share your experience/feedback with me here in the comments or feel free to send me a mail. Also, do tag me at #taystedit if you try out my recipes on Facebook, Instagram etc so that I can see when you make it. ♡♡♡♡

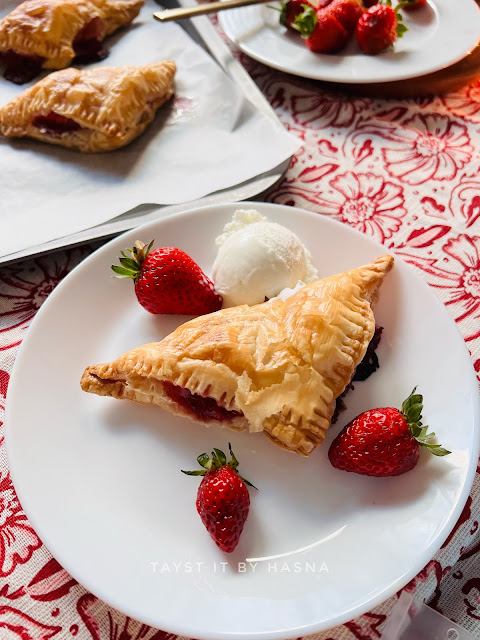
Strawberry Turnovers 


As much as I love strawberries, I hate the super sour ones (obvious when strawberries are not in season anymore). My girl loves strawberries but since these were too sour for both of us, I was thinking of ways to use up the strawberries.

These turnovers have been a ‘thing’ of the past, as we have so many innovative recipes around, that we forget to cherish the golden ones. These turnovers are so easy to make and so scrumptious too! I gave it my touch by adding in pieces of Kinder Chocolate in a couple of them and some had Cream cheese. I loveeed the chocolate ones. My hubsy loved both, though my girl complained that I could have added a couple more pieces in each turnover. 😄 

Let’s make these easy yet delicious treats right away! 


Ingredients:


  • 1 cup Fresh Strawberries, chopped
  • 1 1/2 tsp Corn Flour
  • 2-3 tbsp Granulated Sugar
  • 1/2 tsp Vanilla Essence 
  • 1/2 tsp Lemon Juice
  • Lemon Zest (optional)
  • Salt, a pinch
  • 7-8 Frozen Puff pastry sheets
  • Kinder Chocolate Bars (optional)
  • Cream cheese spread/ Kiri Cheese (optional)
  • 1 egg, for egg wash/ mayonnaise *
  • Vanilla Ice cream to serve

Instructions:

  1. In a sauce pan, add in your chopped strawberries, sugar, corn flour, and lemon juice. 
  2. Cook on low for 2-3 minutes.
  3. Add in lemon zest, vanilla Essence and a pinch of salt.
  4. Spread the strawberry compote on each puff pastry square and add in kinder chocolate/ cream cheese cubes and overlap to shape into a triangle and seal the ends using the help of a fork and make a small slit on the top of the puff so that air doesn’t get trapped and in turn the filling oozes out from the sides ( I forgot to do that).**

  5. Finally, give it an egg wash/ apply Mayo and bake in a preheated oven at 200 deg C for 25-30 minutes or until golden and puffed.


  6. Enjoy warm with a dollop of ice cream and fresh strawberries.


*Mayonnaise is a great alternative for egg wash, that has minimal egg smell. 
** I forgot to give a slit on the top, so that the filling doesn’t ooze out from the sides when baking.

Do try this recipe and don't forget to share your experience/feedback with me here in the comments or feel free to send me a mail. Also, do tag me at #taystedit if you try out my recipes on Facebook, Instagram etc so that I can see when you make it. ♡♡♡♡
Older Posts

Search This Blog

My name is Hasna Haneef, a mommy to a toddler, hailing from Thalassery, Kerala. Welcome to my humble abode on the Internet; wherein I share all my recipes and experiments. I am glad to have you on board!

TRENDING POSTS

  • Kerala Style Squid Roast
  • Chicken Steak with Creamy Mushroom Sauce
  • Emirati Chebab
  • Regag - Emirati Flat bread
  • Copy Cat Caesars Mini Pizza
  • Kerala Beef Fry/ Nadan beef dry fry

About Me

May peace be with you!

Welcome to my blog.

I am delighted to have you on board. My name is Hasna Haneef, a mommy to a toddler, hailing from Thalassery, Kerala. My homeplace being Dubai, as I am born and brought up here and I am very influenced by the lifestyle and the variety of authentic cuisines I get to try from here, which has made me try anything that comes across me
, click here →

Stay Connected!

Join Our Madness!

Join with Thousands Of Subscribers ! Get Our Latest Recipes Delivered to Your email Inbox!

Powered by follow.it
  • Home
  • About Me
  • Recipes

    • Main Course
    • Desserts
    • Snacks

    Uncategorized

    • Chicken
    • Meat
    • Vegetarian
    • Rice
    • Malabar Food
    • Baking
    • Breakfasts
    • Snacks
    • Drinks
    • Pasta
    • Fish
    • Soups
    • Desserts
  • Contact Me

Featured Post

Triple Chocolate Hazelnut Skillet Cookie

Blog Archive

  • ▼  2025 (4)
    • ▼  April (2)
      • 1 minute Chocolate Mug Cake
      • Grilled Cheese California Burrito
    • ►  March (1)
    • ►  February (1)
  • ►  2024 (36)
    • ►  October (4)
    • ►  September (5)
    • ►  July (1)
    • ►  June (2)
    • ►  May (4)
    • ►  April (3)
    • ►  March (10)
    • ►  January (7)
  • ►  2023 (47)
    • ►  December (3)
    • ►  September (2)
    • ►  August (6)
    • ►  July (6)
    • ►  June (9)
    • ►  May (4)
    • ►  April (5)
    • ►  March (6)
    • ►  February (3)
    • ►  January (3)
  • ►  2022 (69)
    • ►  November (4)
    • ►  October (6)
    • ►  September (7)
    • ►  August (9)
    • ►  July (12)
    • ►  June (5)
    • ►  May (5)
    • ►  April (12)
    • ►  March (4)
    • ►  February (2)
    • ►  January (3)
  • ►  2021 (24)
    • ►  November (1)
    • ►  October (2)
    • ►  July (1)
    • ►  June (4)
    • ►  May (6)
    • ►  April (4)
    • ►  February (4)
    • ►  January (2)
  • ►  2020 (82)
    • ►  December (5)
    • ►  November (6)
    • ►  October (4)
    • ►  September (2)
    • ►  August (5)
    • ►  July (10)
    • ►  June (10)
    • ►  May (13)
    • ►  April (12)
    • ►  March (8)
    • ►  February (4)
    • ►  January (3)
  • ►  2019 (22)
    • ►  December (1)
    • ►  November (2)
    • ►  October (6)
    • ►  September (1)
    • ►  August (1)
    • ►  February (3)
    • ►  January (8)
  • ►  2018 (15)
    • ►  December (4)
    • ►  November (6)
    • ►  October (3)
    • ►  September (2)

Subscribe Us

Labels

Bake Biscuits Breakfast Brown rice Burger Cheese Chocolate Dal Egg Emirati Fish Iftar Indonesian Japanese Jeerakashala rice Kerala Keto Kuwait food Lunch Milk Mutton Thai food UAE food afghan cuisine arabic beef biryani bread burnt cheesecake cake chicken cream dessert dinner greek healthy indo chinese lamb malabar prawns pudding puffs quick dinner ideas recipe refreshing drink rice salad sandwich stir fry vegetables vegetarian veggies yemeni

Contact Form


POPULAR POSTS AND PAGES

Kerala Style Squid Roast

Kerala Style Squid Roast

June 18, 2020
Chicken Steak with Creamy Mushroom Sauce

Chicken Steak with Creamy Mushroom Sauce

November 05, 2018
Emirati Chebab

Emirati Chebab

June 01, 2023
Regag - Emirati Flat bread

Regag - Emirati Flat bread

December 02, 2020
Copy Cat Caesars Mini Pizza

Copy Cat Caesars Mini Pizza

March 12, 2024

Pages

  • Home
  • About Me
  • Privacy Policy
  • Contact Me

Copywrite © 2023 TermsFeed®. All rights reserved.

Created By Sora Templates | Distributed By Gooyaabi Templates

Back to top