If you have mincemeat and some rigatoni pasta then this is your quick fix meal done in less than 45 minutes. For those of you who may be wondering what Rigatoni is, these are pasta shaped into long cylindrical tubes. Basically, if you want to try this recipe you don't really require rigatoni pasta, Macaroni or any other kind of pasta would work but rigatoni would be the first preference.
Pasta is something that is easily prepared which is why it has become an inevitable item in our pantries. But when you are tired with the same old white sauce and red sauce, bolognese comes to the rescue. Bolognese is a meat-based sauce that is used to assemble lasagna ala bolognese and used in other versions of pasta.Here I will be demonstrating my super easy - quick fix lunch /dinner recipe. I bet your family will love it! 😋
This basically took only 45 minutes from start to finish. My little one kept saying it was so yummy and oh boy was I so happy to see her wipe finish the plate clean. Such a tasty dish prepared in a few minutes, and is super delicious, what else do we want for busy weekdays.
I have used only onion, carrot and sweet corn kernels for veggies, you may add in baby corn, beans, mushrooms, broccoli or any vegetable of your choice.
Now for the secret to the perfect bolognese sauce. Milk! Milk makes the meat sauce richer, tastier and thicker. One might not think of milk to go into bolognese as tomato is acidic in nature. But it comes along great!
My love for Italian food is just unexplainable as I love how easy Italian food is prepared with such delicacy and perfection. The sautéing of minced garlic in olive oil brings out this baffling aroma which makes anyone hungry. This pasta recipe is perfect for those who don't like white/pink sauce. I personally know many people who dislike white/pink sauce. So let's gather the ingredients and get started!
Ingredients
- 2 cups Rigatoni pasta
- 2 tbsp unsalted butter
- 1 medium onion (chopped finely)
- 1 small Carrot (chopped)
- 1/4 cup sweet corn kernels
- 1/2 kg ground/minced beef
- 2 tbsp tomato paste
- 3 cloves of garlic (minced)
- 1/4 tsp oregano
- 1/4 tsp Cajun spice /allspice
- 1/2 cup Milk
- 1 tbsp olive oil
- Salt as required
- 1/4 tsp Black pepper
- Basil/dill leaves as required
- 2 tbsp grated parmesan cheese
Instructions
- In a large pot of boiling salted water add in the pasta and cook until al dente`. *check notes
- Meanwhile in a large skillet melt the butter along with olive oil, sautee the onions until translucent and add the minced garlic. Once the garlic gives out a fragrant aroma add the chopped carrots and sautee until cooked. Add salt as required. Also, add the sweet corn kernels.
- Next, add in the minced beef and break down the meat with the help of a wooden spoon and add salt and pepper, oregano and Cajun spice. Keeping breaking the meat until the meat is no longer pink, takes about 5-6 minutes on medium-high.
- Dunk in the tomato paste and stir gently until combined.
- Now for the secret ingredient, pour in the milk and let it simmer for 5 minutes.
- Finally add the rigatoni, season with salt and pepper and add some chicken broth if required to thin the sauce. Garnish with grated parmesan cheese and herbs. Serve hot and enjoy the deliciousness!

Note: *Al dente: Pasta/ rice that is cooked to be firm to the bite. Cook the pasta until almost about done, the cooking of the pasta has to be stopped at this stage so that the rest is done in the final cooking process. Please note the pasta has to be al dente so that the end-product does not feel soggy.
Do try this recipe and don't forget to share your experience/feedback with me here in the comments or feel free to send me a mail. Also, do tag me at #taystedit if you try out my recipes on Facebook, Instagram etc so that I can see when you make it. ♡♡♡♡
Payyoli Chicken Fry (Calicut Paragon inspired)
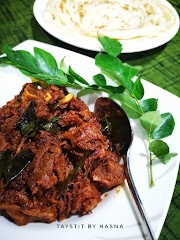
Haven't you tried the combination of Chicken with grated coconut yet? Sounds strange? Whether your answer is a yes or a no, this is one insane combination that defines Kerala cuisine. Payyoli Chicken is very commonly known among the mallu hommies as it is a popular dish of the well-known restaurant Calicut Paragon. It simply is scrumptious. Though the recipe is super simple, the touch of spicy fried coconut takes the chicken fry to a next level.
This is the perfect recipe if you are on the lookout to try some mallu style chicken fry. It was indeed a triumph when I made this for the first time and from then on has been a family favorite. Whenever I have guests over for dinner or lunch I make this chicken fry as it is super easy and delicious 😋.
Payyoli chicken can be served with any Kerala style curry, and chappati or simply as a starter. The chicken is preferably marinated twice for the marination to get absorbed well, where the rice powder is skipped and added right before you fry the chicken so that the chicken remains crispy from the outside and juicy from the inside. The chicken is first marinated in spicy marination and fried, which is then topped up with grated spicy coconut that is roasted in an iron Kadai (wok) which gives immense flavor dimension to the chicken fry.
You have to be very careful when roasting the coconut, watch over very closely, the coconut may look like it's still not done, but all of a sudden it may change color and burn. The whole point is that the shredded coconut has to be crispy, fiery and not burnt with a beautiful dark reddish color.
We begin the recipe by soaking the dried red chilies in hot water for 15 minutes, preferably Kashmir dried red whole chilies. Since I did not have the Kashmiri variety I used the normal dried red chillies. Also if you do not have any type of dried chilies at home you may use chili powder but the zing comes from the ground dried red chilies paste. Let's fry the chicken and top it with the crunchy roasted coconut. Let's get started!
Ingredients :
For the chicken marinade:
- 700 gms bone-in chicken (small cut pieces)
- 8 dried red chillies soaked in hot water for 15 minutes and made into paste
- 2 tsp gg paste
- 1 tsp meat masala/chicken Masala powder
- 1/4 tsp Turmeric powder
- 1 tsp Kashmiri Red chilli powder
- 1 tbsp lemon juice
- 1/2 tsp red chilli flakes (optional)
- 2 tbsp cornflour
- 1 tbsp maida/ all-purpose flour
- Salt as required
- 3/4 tbsp rice flour
For roasting coconut:
- Coconut oil
- Salt as required
- 4-5 tbsp grated coconut
- 3-4 green chillies (slit)
- Curry leaves
- 1-2 tsp of red chilli paste prepared earlier
Instructions :
- Grind the soaked red chilies to a paste.
- Marinate the cleaned, bone-in chicken pieces with the items under 'for the chicken marinade' title for at least half an hour to 2 hours.
- Reserve a couple of teaspoons of the chili paste for the coconut roast. The rest of the paste may be added to the chicken marinade.
- Right before you fry the chicken, mix in the rice flour and fry or med-high heat.
- Fry for 4 minutes each side for a total of 15-18 minutes or until well done and slightly crispy on the outside.
Drain the chicken on a tissue paper.
-
- Grind the coconut with the reserved chilli paste and salt and set aside.
- Set aside some of the fried oil and fry the green chillies, and curry leaves in the same Kadai or pan.
- Next, fry the coconut chilli paste until crispy roasted. Be careful not to burn it.
- Scoop the fried coconut from the oil and transfer it onto a tissue paper.
- Serve your spicy chicken topped with your crispy roasted coconut, green chillies and curry leaves.
Notes:
- Keep a close watch when roasting the coconut, thus one step goes wrong and the whole dish isn't worth it.
- Use coconut oil for frying the chicken for bringing out its 'naadan' flavors.
- Always remember while frying chicken do not overcrowd the Kadai or pan, it makes the chicken soggy and the chicken might not get done from the inside.
- Another tip for the coating to stay in place is to let the chicken cook at least for 3-4 minutes and flip so that the coating cooks and does not stick to the Kadai or pan.
Do try this recipe and don't forget to share your experience/feedback with me here in the comments or feel free to send me a mail. Also, do tag me at #taystedit if you try out my recipes on Facebook, Instagram etc so that I can see when you make it. ♡♡♡♡