Search This Blog

Taystit by Hasna

Food, Recipes, and Beyond

  • Home
  • About Me
  • Recipes
    • Main Course
    • Snacks
    • Desserts
  • Uncategorized
    • Chicken
    • Meat
    • Vegetarian
    • Rice
    • Malabar Food
    • Baking
    • Breakfasts
    • Snacks
    • Fish
    • Pasta
    • Drinks
    • Soups
    • Desserts
  • Contact Me

Savory Breakfast Muffins


Have you ever wished if you could whip up a filling breakfast that is healthy at the same time delicious? I know we all have! Just imagine baking some easy breakfast muffins that are so simple that if you cut and prep the veggies the night before I am sure it won't take no more than half an hour from prepping to baking these cute little muffins, or more like mini frittatas (if you fancy a fancy name! *wink*) But if you want the perfect frittata recipe do check here.

These are so delicious and easy to prepare that I am sure once you make these you are going to bake these at least once a week! Who doesn't like recipes that are quick and done in a jiffy?! Also, this is a great idea for a potluck breakfast. Done so easy and yet so yummy. As these are tiny and bite-sized, kids will love to have them for sure. Well, my daughter did! This is a mini package full of nutrients - proteins, carbs, dairy, veggies, and everything you want for a meal. 


As parents, don't we always get clueless on a hustle bustle mornin, where you have so much to do yet little time to manage for a healthy yet nutricious meals for yourself and your little ones? Well, this is your answer to all your dilemma. The perfect lunch box solution! Recently I have been binge watcing this series on NETFLIX, where Nadiya, the famous chef-baker that hosts the show says that oven is your best friend when it comes to cooking food that are delicious, yet you have no time to toil in front of the stove. How true is that?! You just prep the dish, place it in the oven, do your chores and bam! You have your meal ready! Like Nadiya says,  The sooner you realise the oven is your best friend in your kitchen, the easier your life is going to be and I second that! That is my mantra to easy cooking too. 
Every time I open the oven to bring out the baked goodies it amazes me how easy and stress-free that was and how easily did I prepare my meal.


Now coming back to the recipe, the main ingredients in these muffins are broccoli, mushrooms, and cream cheese, you may add or omit any veggies or spices according to your choice. I have used Kiri cream cheese, you may use any cheese according to your preference like feta, etc. But if you are using feta cheese be careful when you add salt. Also, you may add soy sauce while sauteeing your veggies for a change, but here I am trying to keep it healthy. I have poured the egg mixture directly to the generously greased muffin pan. I'd suggest using muffin liners, if so add about 2 tbsp olive oil to the egg mixture.


As the saying goes, eat your breakfast like a king! This is a perfect breakfast as it has everything that needs to make you energetic all day round. Without further a-do, lets bake these and have breakfast like a king!

Ingredients:


  • 3 large Omega Eggs
  • 2-3 White button mushrooms, finely chopped
  • 4 tbsp Broccoli, finely chopped
  • 1 small garlic clove, minced
  • 2 tbsp tomato, finely chopped
  • 1/4th Maggi chicken cube (optional)
  • 2 Kiri Cheese cubes, cut into small squared
  • 3 tbsp cooking cream or fresh cream
  • 1 tsp cajun spice or oregano
  • 2 tbsp olive oil
  • Salt, as required

Instructions:

  1. Preheat your oven to 180 deg C.
  2. In a frying pan, pour in some olive oil and sautee mushrooms along with minced garlic clove and broccoli and add your chicken cube.
  3. In a hand whisk jar, crack in 3 large eggs.
  4. Add in your Cajun spice/Oregano, salt, as required, and cooking cream and whisk well.
  5. Into the whisked eggs, add your cooked veggies, finely chopped tomatoes, and Kiri cheese cubes (cut into small cubes).
  6. Gently mix and pour in generously greased cupcake pans or muffin liners (if using muffin liners add 2 tbsp olive oil in the egg mixture).
  7. Bake for 25 minutes or until the muffins are golden and come off the sides of the pan.
  8. Once slightly cooled, enjoy with your morning cuppa coffee or tea.

Note : I got 12 Muffins from this quantity. 


Do try this recipe and don't forget to share your experience/feedback with me here in the comments or feel free to send me a mail. Also, do tag me at #taystedit if you try out my recipes on Facebook, Instagram etc so that I can see when you make it. ♡♡♡♡

 Breakfast Cheddar Biscuits


Since it's the vacation season, kids are always at home, and this makes a great garb and go breakfast idea when you have made plans with your family. These biscuits when paired with some veggies and fresh juice, makes a great breakfast meal. These buscuits comes together very easily, no effort at all, I guarantee. 

The aroma that sits in the house is just, aaaah, sooo good. Well, of course, you have butter as the star ingredient. You can make them ahead and store it in the frezeer, so that you have something ready for your kids snack time. These are much similar to buttermilk biscuits that are my favorite, Popeyes biscuits. The crisp from the scallions are just so good. If you can get hold of some shredded cheddar cheese, do try this recipe. If you have made ahead, and frozen them, thaw the biscuits in the refrigerator overnight and bake them for 15 minutes and have it warm, and enjoy. 😋

Ingredients:

  • 1 1/2 cup All purpose flour
  • 1 tsp baking powder 
  • 1/2 tsp baking soda
  • Black pepper, crushed
  • Salt, as required 
  • 1/2 cup cold butter, cubed
  • 1 tbsp butter, melted
  • 1/4 cup Scallions, chopped
  • 1/2 cup shredded cheddar cheese
  • 3/4 cup buttermilk

Instructions:

In a large bowl add flour, baking powder, baking soda, black pepper and salt.
Work the cold butter into the flour, using fork/finger until crumbly in texture.
Add in the chopped scallions and cheddar cheese, mix well.
Now pour the buttermilk, little at a time and bring to a dough until not too sticky or too crumbly.

Transfer the dough to a lightly floured counter top and kneed well, just until the dough comes together.
Flatten into a rectangle shape and fold the short sides overlapping each other and press down and flatten and repeat the process again.

Now flatten a little and using a dough scrapper/knife , cut the dough into 6 equal squares.

On a baking paper lined sheet, place a little cheddar cheese just before placing each biscuit. The cheese comes underneath each biscuit.
Brush the biscuits with melted butter and bake the biscuits in a preheated oven at 210 deg C for 15 minutes until golden brown.
Enjoy with semi boiled eggs and fresh fruits and juice for breakfast! 😋😍


Do try this recipe and don't forget to share your experience/feedback with me here in the comments or feel free to send me a mail. Also, do tag me at #taystedit if you try out my recipes on Facebook, Instagram etc so that I can see when you make it. ♡♡♡♡

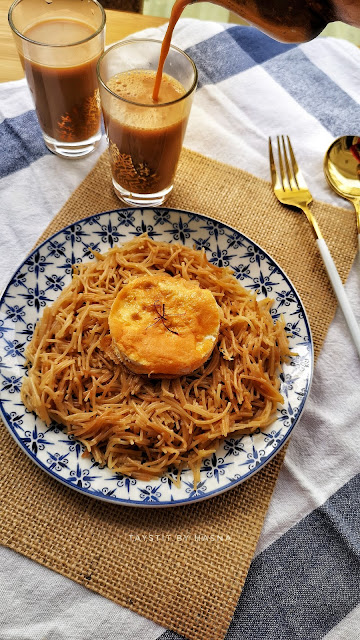
Balaleet


Balaleet is one the most popular breakfasts of Emiratis. Bring born and bought up in the United Arab Emirates I have always had such so much love for the food and culture of this beautiful country.

This traditional dish is usually served with boiled garbanzo beans and served with other sides like Hummus, cheese and bread.
Balaleet has contrasting flavors. The noodle pasta/vermicelli is sweet and the eggs are savory.

The bedouins have always prepared eggs with sweet but the noodle pasta/vermicelli came into existence from the traders who introduced pasta to the middle east. This with some boiled beans and a cup of Karak is only you need for breakfast. I could not get hold of the garbanzo beans today. But I definitely recommend it for a complete meal.


Balaleet is a combination of cardamom and saffron flavored sweet vermicelli tht is served with savory eggs. It is also served for iftar during Ramadan. The first time I had it was from Arabian Tea House, a prominent restaurant in Dubai. I wanted to create it at home right away! The ingredients seemed accessible. But the first time I made, it was a big flop coz I made around 400 gms of vermicelli for 6 of us. While preparing balaleet, remember less is more. 😅 Also if you love sweet and savory in one dish, you will certainly love balaleet for breakfast. I feel the dish has an acquired taste, the situation at home was mixed reviews. So I think it is definitely an acquired taste. I loved it though! 😍 

I have been delaying to post the recipe of balaleet as I wanted to post for UAE National Day. But I wasn't able to do so. So I thought let me share it anyways 😄, it's never too late for anything.. It's the mind's game that keeps us from doing things sometimes. Anywhoo let's go check out how to prepare this easy Emirati  breakfast! 😍

Ingredients -

  • 200 gms vermicelli
  • 2 1/2 cups water or as required 
  • 1/2 cup sugar
  • 3 tbsp ghee
  • Saffron, a pinch
  • Powdered Cardamom, a pinch
  • 2 eggs
  • Salt, a pinch
  • Vegetable oil

Instructions :

  1. Roast the vermicelli in a pan until they turn golden brown, by stirring constantly so that the vermicelli does not burn.
  2. Next pour your water and bring to a boil and allow to cook for around 5 minutes. Drain water if necessary. 
  3. Now soak saffron in a tbsp of water. 

  4. Next in a large pan, add in your cooked vermicelli and ghee, mix well. 
  5. Next add in your sugar, soaked saffron and a pinch of cardamom powder, mix well and your sweet side of the dish is done. 
  6. Next prepare your eggs by pouring your beaten eggs with a pinch of salt and flip the Omlette once the underside is done and  the upside is dry. Once the eggs are cooked for around 2 minutes on medium low heat, set the omlette aside. 
  7. Now for the plating, place the omelet over the bed of cooked sweet vermicelli and your Emirati breakfast is ready to relish preferably with a glass of Karak chai! 😍 


Do try this recipe and don't forget to share your experience/feedback with me here in the comments or feel free to send me a mail. Also, do tag me at #taystedit if you try out my recipes on Facebook, Instagram etc so that I can see when you make it. ♡♡♡♡
Overnight Chia Oats with Blueberries and Kiwi


Mirror Mirror on the wall, which is the easiest and healthiest breakfast of them all?
It is definitely these Oats Chia Pudding!

It is not only a piece of cake to make this nutrient-boost/on the go breakfast with has full of life. Who wouldn't love to have a dessert/pudding right in the morning? This is not only going to give you your full potential to your day but will keep you full for a long time. Now ain't we looking for something like that, huh? We all might have had those days where we wanted to eat healthily but don't know how to start healthy. Well, this is absolutely dedicated to you guys. Well, I do not have a step by step image of this one, but hey, even a 5-year-old can make this! It's that simple. 

Ps: I wasn't actually planning to post this on the blog, this explains why there isn't a step by step recipe. *Posting because of popular demand!😊

Let me be frank here, I am not a big fan of oats that is made into porridge. I actually feel empty within an hour or so when I have oats in the morning. So I pretty much don't like it, it is like the last resort I think of when it comes to breakfast ( like when there is only milk and oats to hog in the morning😬)

However, this cold oats pretty much changed my perspective on cold food; when you are up from the bed. You are going to love your mornings when you make such delights. These creamy, rich and nutritious, slightly sweet course is undoubtedly going to make it to your favorite breakfast menu. Your fam is going to love you even more. 


All I do is grab my jar of Oats that has been sitting in the fridge since last night or 2 and grab a few berries and fruits or if I am much more in a hurry just put in a dash of dry fruits and voila! Delicious and filling breakfast ready! Hassle-free mornings are the best. Aren't they? So what are you waiting for? Grab your mason jars and get ready to indulge! 


You will need: 

  • A Mason Jar or any type of Glass Jar that has a covering
  • 1/2 Cup Oats 
  • 2 Tablespoon Chia Seeds (or more)
  • 1 Cup Unsweetened Almond milk/ Cow's milk
  • A pinch of Salt
  • A pinch of Cinnamon Powder
  • 2-3  Tablespoon Maple Syrup or Honey (I added both)
  • Cereals (Optional)
  • Walnuts/Almonds (Any dry fruit - Optional)
  • Fruits/ Berries (I used Kiwi and Blueberries)


Instructions:


  1. Combine Chia seeds, Oats, Almond milk, Salt, Cinnamon Powder, Maple Syrup and Honey in a mason jar or a glass container. Give it a good shake or mix.
  2. Place it in the refrigerator overnight.
  3. Give the mixture a good stir to make sure the chia seeds have soaked up all the goodness.
  4. You may add in berry puree or fruit smoothie for some extra craziness, but I prefer bite-size fruits in my jar.
  5. Top up with some cereals for crunch, any dry fruits (I used walnuts), fruits and berries. (all these are optional)
  6. Voila! Your Oats is ready to be relished.


Feel free to comment below all your thoughts and questions. If you try out this recipe, please do tag me at #taystedit, so that I can find all your lovely creations. Lots more great recipes coming up. Stay tuned! 

Cilbir - Turkish Poached eggs in Greek Yogurt


I have always been a dinner person. For me breakfast cooking is a nightmare, something that I rarely look upon. But recently I have had this liking to cook more breakfast recipes. And what better than an easy 10 minute breakfast. Turkish poached eggs also called Cilbir is something that I have been making since quite a few years now. Cilbir are poached eggs placed on a bed of Greek yogurt with a hint of garlic and finally finished off with a chilli butter sauce topping. 

I haven't been to Turkey, but it is definitely one in my bucket list. Turkish food is always full of flavors, mostly done with very less ingredients unlike Indian cuisine. I loveeee Turkish food. This was basically my first attempt to Turkish cuisine. There was a time during high school I used to be crazy enough to sit wide awake at 3 am in the morning to catch up on cookery shows. The food food channel, Nigella Lawson's show that aired on TLC network to name a few. One fine night, I happened to watch her make these delicious Turkish eggs. I just love her style of cooking, without placing almost all ingredients in front of you, I mean I like to cook like that, just adding what comes my way lol, and that I might have emulated from her elegant cooking style. I can watch her cook all day! 😍

For us Indians, eggs are either cooked with full of masalas or they are sweet, eggs in yogurt is something that was new to me.

I somehow could not try and make that day, so a couple of days later, my sister made it and she kept raving about how good it was. So I decided that I definitely had to give it a go. And oh boy was I amazed by the flavors. 

Basically, cilbir are poached eggs that are placed on a bed of garlic- Greek yogurt/thick yogurt and topped off with a chilli butter sauce, if you don't burn it, the flavors are intense. So good that you will be addicted I bet! 😍

This has been my go to breakfast or brunch idea, I love how easy it is to make this, within no time, you have your delicious cilbir ready to devour. And for me it's always been about easy breakfasts. I just condemn the fact of working in the kitchen right in the morning.


Who would have thought eggs and yogurt would go well? Well, if you haven't given this a try yet, you definitely gotto try, don't miss out! Without further a do, let's get started!

Ingredients : (for 2 people) 

  • 1 cup stirred Balade Greek yogurt
  • 1 small garlic clove, minced
  • 2-4 eggs (for poaching)
  • Water and 1 tbsp vinegar for poaching
  • 2 tbsp butter / 1 tbsp butter and 1 tbsp olive oil 
  • 1 tsp paprika 
  • 1/2 tsp Red Chilli Flakes 
  • Fresh Dill, to garnish

Instructions :


  1. Add 1 cup of Balade stirred Greek yogurt to a bowl, Mince in 1 small garlic clove and ass salt as required. 
  2. To poach your eggs, in a deep small pan, bring water to a boil, simmer, add in 1 tbsp white vinegar. 
  3. Prepare your serving plate with a bed of the prepared Balade Greek yogurt. 
  4. Next, crack in an egg into a small bowl and drop into the hot water, as closely and slowly as possible. 
  5. Allow to cook for 2-3 minutes for a runny yolk, use a slotted spoon to lift the egg from the water and using a kitchen towel drain the excess water by placing the kitchen towel under the slotted soon and rubbing it. 
  6. Whilst you poach your eggs, let's quickly make the chilli butter sauce. 
  7. In a small pan, add in 1 tbsp butter and 1 tbsp olive oil, next add in red chilli flakes and paprika and cook them for about a minute without burning. 
  8. Pour the sauce over the poached eggs. 
  9. Finally garnish with dill leaves and enjoy with a crusty bread or a salad! 😍 


Do try this recipe and don't forget to share your experience/feedback with me here in the comments or feel free to send me a mail. Also, do tag me at #taystedit if you try out my recipes on Facebook, Instagram etc so that I can see when you make it. ♡♡♡♡

Dynamite Tortilla Wraps


Good evening folks!

When breakfast can be made scrumptious in a jiffy, why skip breakfasts. A wholesome breakfast is what is required to boost your energy levels to be productive the entire day.

Just in time, few days back, a brand named 'Kawan' approached me. They sent me their sample products which included just heat chappathis, Paratha, protein Paratha, tortillas, Puff pastry etc. Their Tortillas fascinated me, coz I haven't seen frozen tortillas before.

The idea of having Tortilla wraps for breakfast is my favorite, as they are simple to prepare right in the morning, when you have less time but you need to eat like a king. These tortilla wraps are super easy to make. The fillings can be customized, but here I demonstrate using Mexican flavors. And being a lover of any food spicy, I added. A packet of crushed Oman chips which added to the flavor and texture. You may play around with the fillings as you like. You may also use leftover chicken.

The sauce that is used in this recipe plays a major role in bringing out the flavors of this wrap. I use Mayo, tomato ketchup, tobasco, Sriracha and smoked paprika and a squeeze of lemon juice. Basically a DYNAMITE Tortilla wrap. My initial thoughts were to experiment something with authentic Mexican flavors. So here I combined it with everyone's favorite Dynamite sauce.

It is so filling and the flavors are just next level. 🔥 The Crunch from the Oman chips is the Icing on the cake. This is completely an experimental Tortilla wrap that turned out super yum! Not to forget to mention the Kawan Tortilla wraps were super soft, even after toasting on the pan, which gave a Crispy texture outside though super soft inside. This cheesy Tortilla wraps with a fiery sauce is just too good. Do try and let me know your feedback..

Ingredients :
  • Frozen Kawan Tortilla Wraps
  • 2 Omega eggs
  • 1 tbsp finely chopped onion
  • 1 tbsp finely chopped capsicum
  • 1 tsp smoked paprika powder
  • Salt as required
  • 1 tbsp olive oil
  • 2 tbsp Corn niblets
  • 1 tbsp Sliced Black Olives 
  • 1 tsp Chopped Jalapeños 
  • Handful of Shredded Mozzarella Cheese
  • 1 packet Oman Chips
  • Chopped Coriander leaves. 

Dynamite sauce:
  • 2 - 3 tbsp Mayonaise
  • 2 tsp Tomato Ketchup
  • 2 tsp Sriracha sauce/ hot sauce
  • 1 tsp Tobasco sauce
  • A squeeze of lemon juice
  • 1/2 tsp Black Pepper Powder
  • 1 tsp Smoked Paprika


Instructions :
  1. In a bowl, prepare the sauce by mixing the ingredients mentioned below Dynamite sauce and set aside. 
  2. Make an Omlette using chopped onions, capsicum, smoked paprika powder, and salt as required.
  3. Place 1 Kawan Tortilla wrap right away and allow the Omlette to cook for around 2 minutes.
  4. Now flip, and add in your defrosted corn niblets, sliced black olives, chopped jalapeños, shredded Mozzarella cheese, slightly crushed Oman chips and drizzle in your prepared sauce and finally garnish with chopped Coriander leaves.
  5. Now carefully, roll the Tortilla wrap from one side to the other and press down so that the melted cheese allows the wrap to bind together.
  6. Trasfer to a serving plate.
  7. Cut into half and serve hot alongside your favorite sauce or the Dynamite sauce.


Notes:
You may use leftover shredded chicken


Do try this recipe and don't forget to share your experience/feedback with me here in the comments or feel free to send me a mail. Also, do tag me at #taystedit if you try out my recipes on Facebook, Instagram etc so that I can see when you make it. ♡♡♡♡


Breakfast Waffles 


Some days I wake up craving for spicy food for breakfast whilst on other days it can get a bit dramatic, instead of going to a cafe, I might as well whip up some waffles at home itself. Especially if you have berries sitting in the fridge, it’s the best way to put it to use. 😋 
The tartness from the berries adds the perfect flavor to the light, crispy and slightly sweet waffles.. Love it with a cup of coffee!  Postpartum cravings have been everywhere..will be posting more recipes soon..Stay tuned! 

Ingredients:

  • 1 cup all-purpose flour
  • 1/2 cup cornstarch
  • ½ teaspoon baking powder
  • ¼ teaspoon baking soda
  • ½ teaspoon table salt
  • 1 cup buttermilk
  • 1/4 cup vegetable oil
  • 1 egg
  • 1½ teaspoons sugar
  • ¾ teaspoon vanilla
  • Butter
  • Berries
  • Maple syrup/ agave syrup/ honey/ chocolate sauce (as per liking)

Instructions:

1. Whisk all the dry ingredients in a bowl and set aside.
In another bowl, mix all the wet ingredients. 
2. Add in the dry ingredients gradually and mix well using a whisk until no lumps can be seen. Do not worry about over mixing. 

3. Next, grease your waffle plate with butter, scoop and pour a ladleful of batter and allow to cook for 7-8 minutes depending on the temperature of the waffle maker. 

Drizzle maple syrup and top up with berries and enjoy!

Ps: Pro tip: If you want your waffles to be crispy and warm, keep the cooked waffles in a slightly warm oven with the broiler function on.

You can always double or triple the recipe and make extra batches. Store them in a ziplock bag in your freezer, thaw and microwave and use as required.

Makes a great school tiffin box meal too.

Can add chocolate for kids after pouring batter to the waffle plate 


Do try this recipe and don't forget to share your experience/feedback with me here in the comments or feel free to send me a mail. Also, do tag me at #taystedit if you try out my recipes on Facebook, Instagram etc so that I can see when you make it. ♡♡♡♡

 Skillet Granola


I love days when my day starts with a bowl of Granola, it is light on the tummy, super Nutritious and delicous. Granola once prepared, can be stored in an air tight container and can be used upto a couple of months. The case here is that, Granola always vanishes to thin air, and mostly I will have to hid the jar, or else the next morning the jar gets empty. I love how the sweet crunchy oats marries well with the beaten yogurt and fresh fruits and berries.

Such an underrated breakfast I must say. I feel so pumped up in the morning whenever I eat granola. The perfect breakfast when you have little to no time to prepare food for yourself. The skillet granola is such a good hack, when you want to make granola and you don't have access to oven. While making on a skillet, make sure you keep stirring the granola, so that the rolled oats does not get burnt, especially once you add honey, the chances of burning are high. But making granola on a skillet is much easier, as you can make sure, nothing gets burnt and the granola gets crispy pretty quickly. Do try this super easy breakfast and I am sure you will love it!


Ingredients :

  • 1 1/2 - 2 cups whole Rolled Oats
  • 1/4 cup Coconut oil
  • 5-6 tbsp Honey/ maple syrup
  • 1 tsp Vanilla Essence 
  • Salt, a pinch
  • 1/4 cup Healthy Nut Mix
  • 1/2 cup Yogurt
  • 1/4 cup berries
  • Fresh fruits of your choice
  • 1 tsp Chia seeds

Instructions:

  1. In a pan, pour coconut oil and add in your rolled oats, keep tossing until crisp.
  2. Once you feel the oats are crisp, add in your sweetener, honey. Combine well.
  3. Next add Vanilla Essence, salt, and health nuts mix and toss again.

  4. Whilst hot, transfer the granola to a baking paper and allow to cool.

  5. You may tap and shape into a rectangle, either way, allow to cool and crisp. Once cooled, break the granola pieces between your fingers/ palms so that the granola is not joined into a bar.
  6. In a bowl, whisk yogurt well, and add the crisp granola as topping along with fresh fruits and berrie and a teaspoon of chia seeds. 

Do try this recipe and don't forget to share your experience/feedback with me here in the comments or feel free to send me a mail. Also, do tag me at #taystedit if you try out my recipes on Facebook, Instagram etc so that I can see when you make it. ♡♡♡♡


Luscious Lotus Waffles


Sometimes indulging right in the morning is the right way to start a day. You can always have a cheat day and today was my cheat day for indulging, this yummy waffles that are crispy outside and soft inside with a dollop of vanilla ice cream takes it to a whole new level. What else are weekend breakfasts for?

I have been daydreaming of this combination, for a few days now. Finally had this, it was sooo delicious and the combination of hot waffles with the cold ice cream is deadly.

This is my go-to waffle recipe that has always given me the best results. Never turns out soggy. I completely detest soggy waffles. I like them crispy and warm. And if you have been following me on Instagram or any social media platform, you might already know my love for lotus spread and their biscuits. I just love it! And I mostly have my waffles with maple syrup, chocolate sauces, fresh cream and fruits. But ever since this idea hit me, I never got a chance to try this. It was oh soooo good! If you are a health freak don't even think of trying this hahaha. Just joking. I mean, this is a super indulgent breakfast waffle. So if you love sweet mornings when your sweet cravings hit real hard, no better way to start your day.

Even though slightly guilty, I was super happy, and to balance the calories I consoled myself with a glass of orange juice. Lol. But let me tell you, this is the best waffle combo, out-of-the-world good!

Why eat out to munch on these yummies, when you can make this at home if you have a waffle maker? Also if you don't have a waffle maker use grill pans or even make pan cakes out of it! 😍 The perfect summer breakfast I must say. A few ingredients and 15-20 minutes of your time and ta daaaa.
Now, do you want to know the secret to my Crispy waffles? Well, the rule of thumb to make the perfect waffles is to allow them to cook no more than 5-8 minutes, they tend to dry out too much, which takes away its actual texture. Now another tip is to keep your waffles, once cooked, in a preheated oven for a couple of minutes on the wire rack directly to crispen up, a tip my fellow foodie friends suggested. Well, my recipe doesn't need that extra step, for that all you have to do is add a little cornflour and voila! You have the perfect waffles of all time👌😍 and for that perfect soft insides whip up your egg whites to stiff peaks and fold them in your waffle mixture. Always comes out perfect 👌 😋 

These warm waffles are topped with a scoop of vanilla ice cream, which is drizzled with some lotus spread sauce. Drooling already? Well, let's not waste any time and make some right away!


Ingredients : (makes for 2-3 people) 

  • 1 egg, yolk and white separated
  • 1 cup buttermilk
  • 1/4 cup vegetable oil
  • 2 tbsp butter
  • 1 tsp Vanilla Essence
  • 3/4cup All purpose flour
  • 1/4 cup Wheat flour*
  • 1/4 cup Corn flour
  • 4 slightly crumbled Lotus Biscoff Biscuits 
  • 1 tsp baking powder
  • A pinch of salt
  • 2 tbsp sugar
  • 2 tbsp Lotus biscoff spread ( microwave 30 seconds) 
  • Vanilla Ice cream as required

Instructions:

  1. Separate the egg yolk and white. Whisk the egg yolk, buttermilk, oil and vanilla essence.
  2. In a separate bowl, whisk together the dry ingredients (flour, baking powder, cornstarch, crumbled lotus biscoff biscuits and salt) and set aside.
  3. Whisk the egg whites with sugar well using an electric mixer until stiff peaks are formed. (if you invert your bowl, the whites shouldn't fall off)
  4. Gradually and slowly add the wet ingredients mixture to the dry ingredients and slowly mix.
  5. Next, gently fold in the whipped egg whites into the mixture, be careful not to deflate the whipped egg white, lumps are totally fine. 
  6. In a preheated waffle maker, pour the batter and cook for 5-8 minutes, no more. 
  7. Finally, serve it with a dollop of vanilla ice cream and drizzle some of your lotus sauce. Enjoy! 


Notes :
  • You may use 1 cup All purpose flour.
  • If your waffles doesn't crispen, a tip is to keep your waffles, once cooked, in a preheated oven for a couple of minutes on the wire rack directly to crispen up. 
  • Double the recipe if you are making it for more people, considering only 1 tbsp extra sugar.

Do try this recipe and don't forget to share your experience/feedback with me here in the comments or feel free to send me a mail. Also, do tag me at #taystedit if you try out my recipes on Facebook, Instagram etc so that I can see when you make it. ♡♡♡♡

Cinnabon inspired Cinnamon pancakes with Cream Cheese Icing


Good evening ya'll!

I can't wait for the winter vacation. Like literally! This e-learning experience is the worst. Sometimes gets on my nerves, especially if you have a child doing their kindergarten. So exhausting! And every day in the morning I just sit so blank as I have no time to prepare anything fancy. The breakfast or lunch here since distance learning started has been so boring which otherwise never happens here.


I kept scrolling my phone whilst I got some time to chill once my LO's break time happened, just looking for inspiration 😉
But my my even 5 minutes in break time is precious. But I was wanting to cook something exciting. And not the every day stuff. So all that came to my mind was pancakes! And I was sick of all the basic combinations like maple syrup, honey, Lotus biscoff, bananas, blueberries and other berries etc. Suddenly I had this craving for Cinnabon rolls. So I asked the Mister if he was okay with cinnamon flavor for pancakes. He nodded and then and there I knew I had to do this! 😍 And the Cinnabon inspired cinnamon pancakes with cream cheese frosting was born. 😋😋

Even though the flavors were the same, the textures made a slight difference and I loved it! The pancakes and the frosting was ready in less than half an hour and the perfect solution on a weekday breakfast for busy momma's like me. This was an instant idea and added in ingredients as though a recipe book was open in front of me. But honestly, it was indeed the best pancake flavor 🤤🤤

Though the pictures did not turn out like that I had in my mind as the Mister was in such a hurry, I urge you must try! Super easy and delicious, kids are going to love this😋👌 Well, my LO approved! 😁😍

*LO - Little one🤭


For pancakes:

  • 1 and 1/2 cup All purpose flour
  • 1 egg preferably omega
  • 3/4 tsp baking powder
  • 1/2 tsp baking soda
  • 1 cup milk
  • 1/4 cup melted butter
  • 1 1/2 tsp cinnamon powder
  • 3 tbsp honey
  • Salt, a pinch


For icing:

  • 100 gms cream cheese, softened
  • 1 tsp Vanilla Essence
  • 1/4 cup butter, softened
  • 4 tbsp heaped sugar
  • 2 tsps and more of milk/cream /Whipping cream.
  • A pinch of salt

Instructions :

  1. In a large bowl add in your your dry ingredients and give a mix using a whisk.
  2. Next make a well in the middle and add in your wet ingredients one by one and combine well using a whisk.
  3. Cook the pancakes on a heavy cast iron pan or a pancake pan.
  4. Place a small piece of butter and smear the pan.
  5. Next pour in 2-3 ladlefuls of pancake batter in equal proportions and flip when you notice bubbles forming on the top.
  6. Cook for 2-3 minutes and transfer to a small plate and stack them up until you finish the process.
  7. The cream cheese Icing is prepared by combing all the ingredients mentioned under the ingredients of Icing. If at all yih come across lumps, use a electric whisk and combine well.
  8. Finally pour this luscious and delicious cream cheese frosting over the pancakes and enjoy! 😍


Notes :
Try to use unsalted cream cheese. If not possible, use a brand that has less salt content. You don't want your Icing to be too salty. 


Do try this recipe and don't forget to share your experience/feedback with me here in the comments or feel free to send me a mail. Also, do tag me at #taystedit if you try out my recipes on Facebook, Instagram etc so that I can see when you make it. ♡♡♡♡

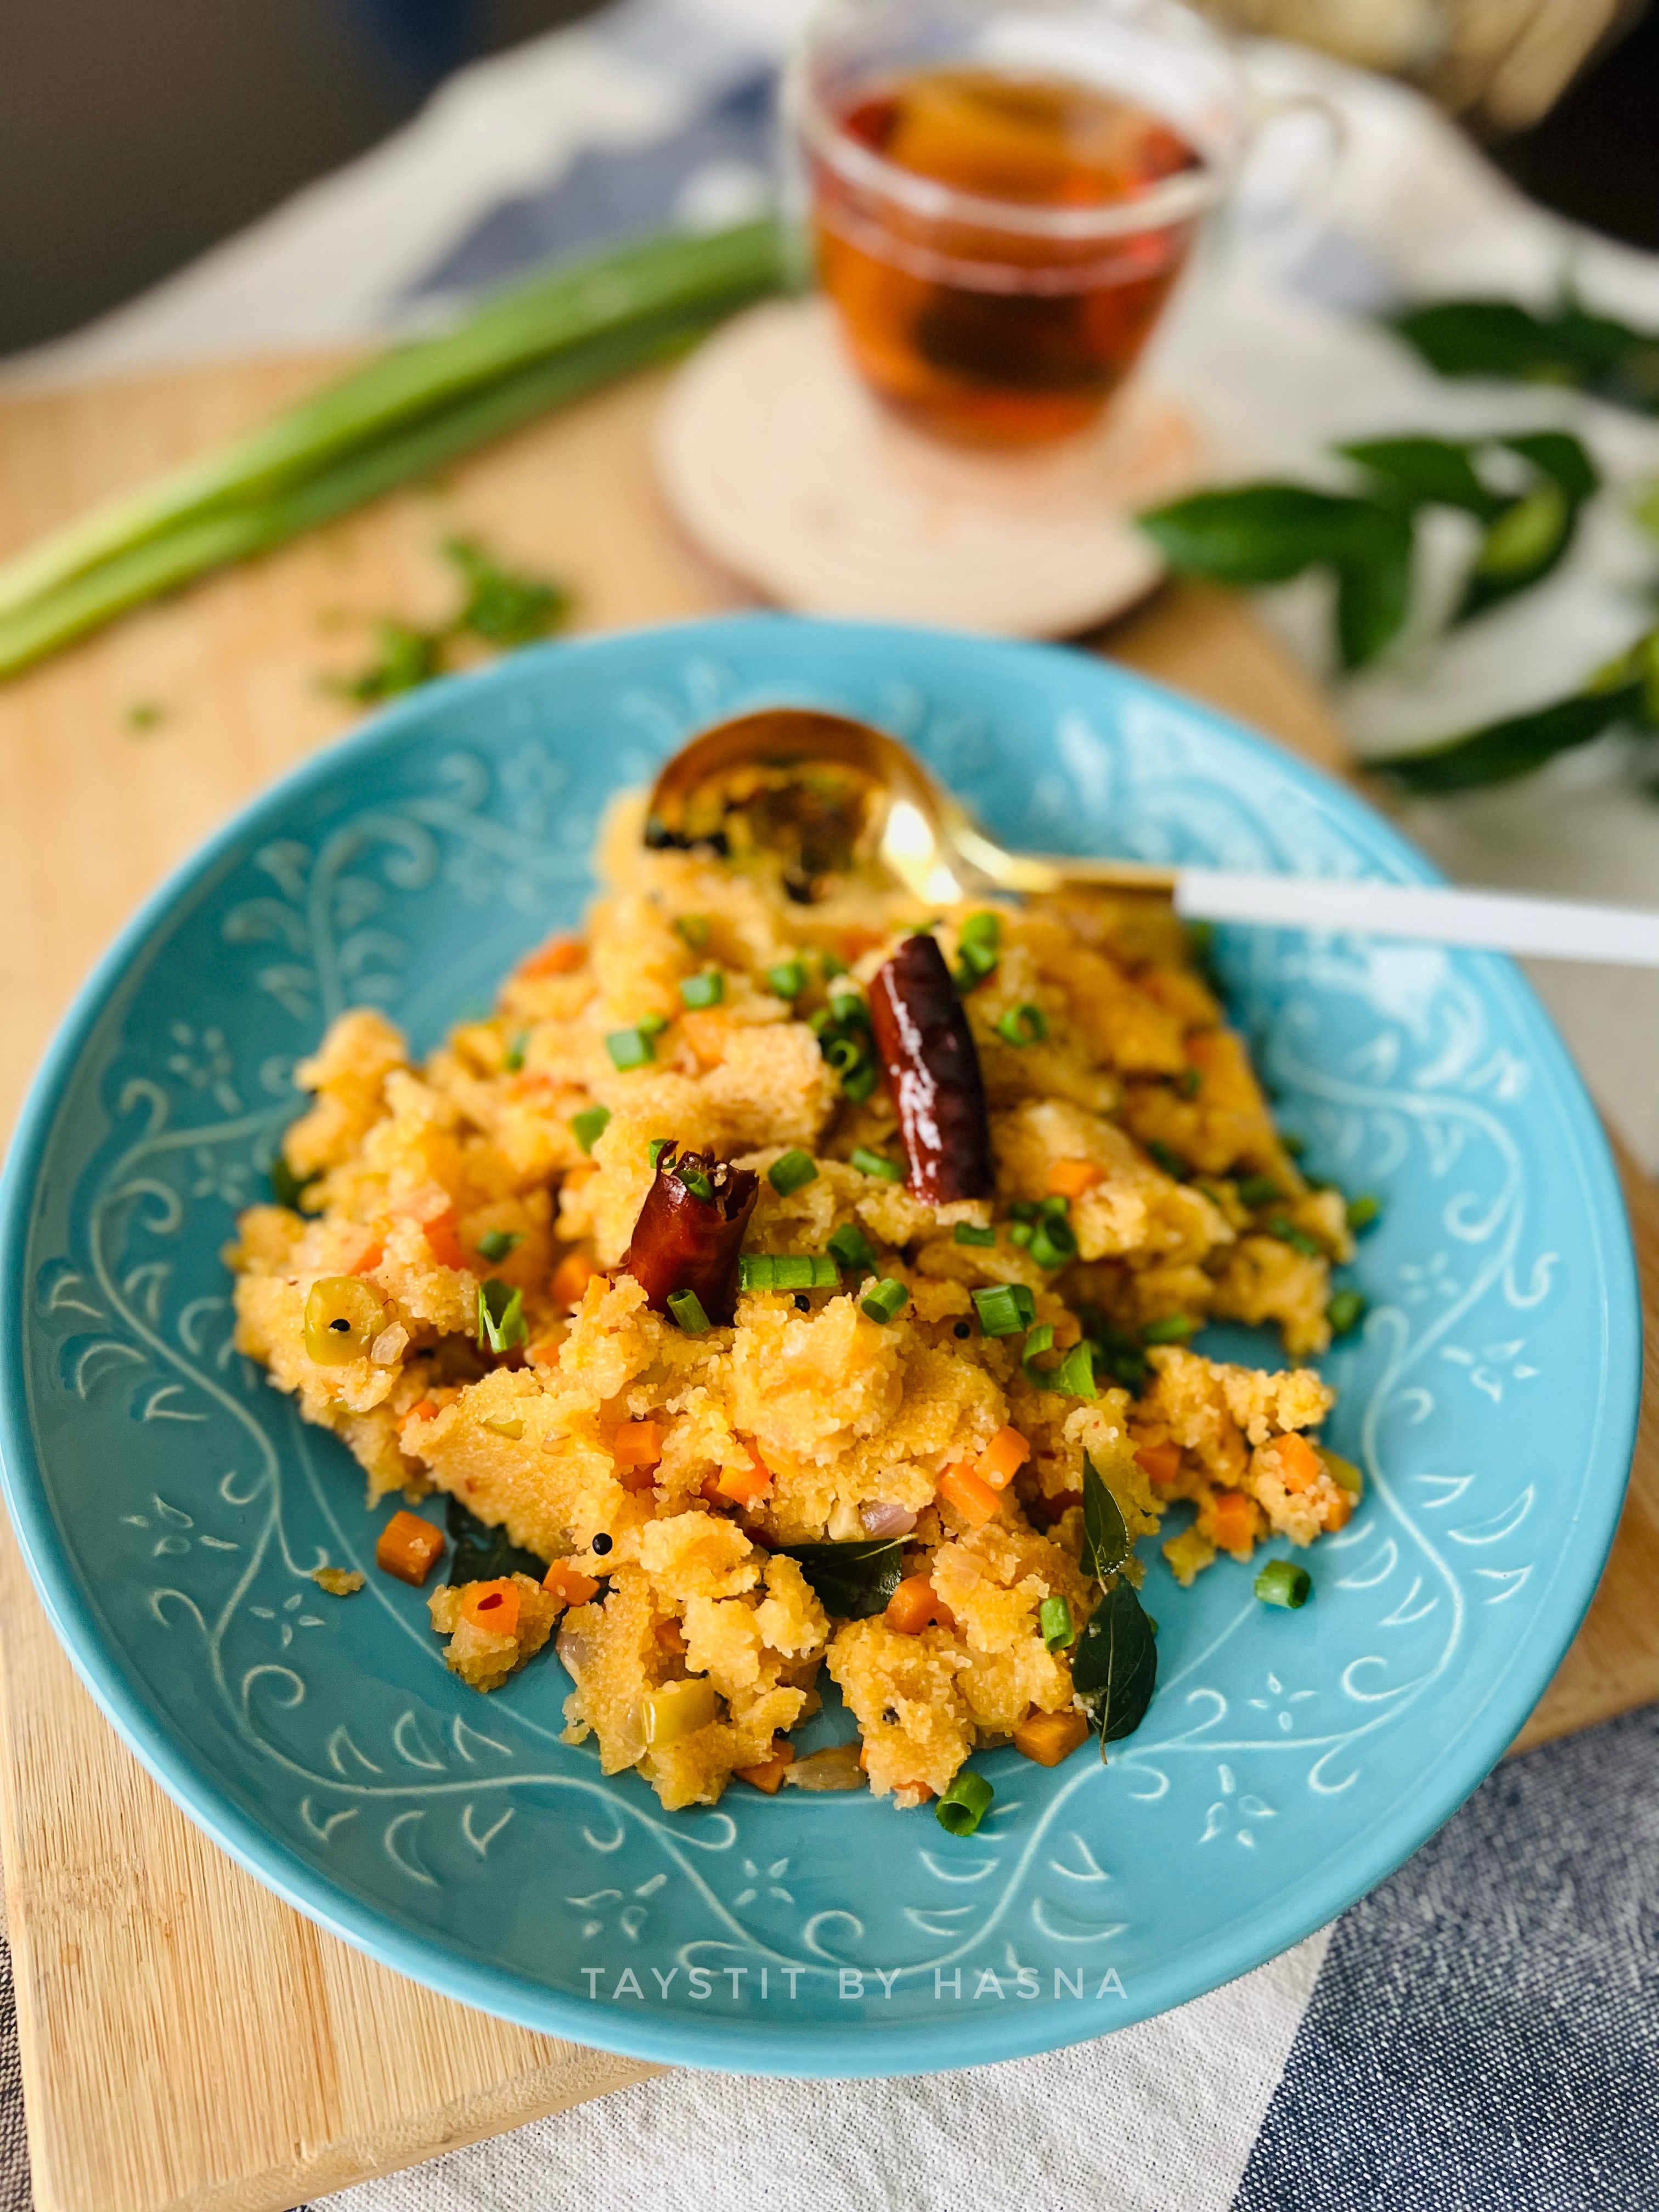
Szechuan Upma


Once you try this fusion version of upma, you will bid farewell to the ol' upma. One morning I was craving for indo chinese, thats how I developed this recipe. On my counter top, there was this small bottle of homemade Szechuan sauce I prepared for a ramen noodle RECIPE. Here, I have used Chings Szechuan Sauce. I hate the chopping part, right in the morning, but let me promise you, it's worth it! Also you may add your choice of veggies.

Upma/ Uppumavu is a semolina based thick porridge usually had for breakfast of Indian origin. Literally Upma/ uppumavu is translated to Salt-Mango tree. The basic flavor comes from ginger, where mustard seeds, dry red chillies and curry leaves are spluttered, to which hot water is poured and roasted semolina is gradually and slowly added to the hot salted water, mixing simultaneously.

Upma is a simple yet easy and filling breakfast. Szechuan Upma is no less easier. So let's make this easy indo - Chinese version of the same.
 

Ingredients : (makes for 2)

  • Roasted Semolina, as required
  • 2 cups Hot water
  • 1/2 cup carrot, chopped
  • 1/2 cup French beans. Chopped 
  • 1 tsp ginger garlic paste
  • 1 tsp mustard seeds
  • 1/2 tsp split urad dal 
  • 2 dried red chillies
  • 1 sprig curry leaves 
  • 2 tbsp coconut oil
  • 2 tbsp Ghee
  • 1/4 cup Onion, chopped
  • 1- 2 tbsp Szechuan chutney (based on spice level)
  • Salt, as required

Instructions:

  1. In a non stick saucepan, heat coconut oil and ghee. Once the oil is hot add your mustard seeds, allow to splutter. 
  2. Next add your urad dal, dried red chillies, and curry leaves and ginger garlic paste.
  3. Add your chopped onions, add salt, Sautee well.
  4. Next add in your chopped veggies and mix well, allow to cook.
  5. Add in your szechuan chutney and saute. Now add water and salt as required.
  6. Slowly add in your roasted semolina little by little in a slow motion to the salted water and keep mixing simultaneously using the othe hand, making sure not to make lumps.
  7. Once the upma reaches a consistency not too soft or not too thick, stop adding the semolina/ rava. Mix well, and place lid and keep it on the lowest flame and allow to simmer for around 5 minutes.
  8. And voila! Your Szechuan Upma is ready!! 


Notes:

  • I have not mentioned the quantity for rava as some people like it thick, some like it more poriddgy.. 
  • Technically, 3 cups water is required for 1 cup rava
  • But for 2 people that quantity will be too much.
  • Around 3/4 of a glass of water is perfect portion size for 1 person.
  • I’d suggest to keep slowly adding the rava/ semolina and mixing vigorously until desired consistency is achieved. (Stop adding right before you think that the consistency is correct, as the rava thickens when it comes in contact with hot water)
  • I also suggest to only use roasted rava/semolina for better results.

Do try this recipe and don't forget to share your experience/feedback with me here in the comments or feel free to send me a mail. Also, do tag me at #taystedit if you try out my recipes on Facebook, Instagram etc so that I can see when you make it. ♡♡♡♡


Mocha Swirls


What about a 2 in 1; breakfast and dessert in one go?! Wouldn't that be magical 😍

I have been binge watching nadiya hussein's shows lately and couldn't stop myself from baking one of her recipes. And what is best than enjoying mocha swirls/rolls right in the morning! The filling consists of butter, espresso powder, cocoa powder, brown sugar and semi sweet chocolate chips.. What is a better combination, now you tell me?

Aah, in around 75 minutes, these amazing swirls were ready to devour, so simple yet realistically good. I must say, the smell from the oven when these little buns were baking was just divine. My house smelled like one the best bakeries in town and I was awestruck!

The recipe uses self raising flour, which is great when you want to bake instantly and it gives great results always. Unlike cinnamon rolls you do not need to proof them beauties before baking. Just roll them, cut them, smash them, and off they go to bake in the oven.

Without making you drool furthermore, let's get started!

Ingredients:

For the filling:

  • 2 tbsp Unsalted butter, melted
  • 2 tsp espresso/coffee granules
  • 2 tsp cocoa powder
  • 1/4 cup light brown sugar
  • 100 gms semi sweet chocolate chips

For the dough:

  • 2 1/2 cups self raising flour
  • 2 tbsp sugar
  • 1/4 tsp salt
  • 100 gms butter, melted 
  • 1 tsp vanilla bean paste/vanilla essence
  • 2 egg yolks
  • 200 ml milk

For the icing

  • 2 tbsp warm water
  • 1 tsp coffee /espresso powder
  • 2 Kiri cream cheese cubes, at room temperature 
  • 2-3 tbsp Icing sugar
  • 1 tbsp room temperature butter

Instructions:


  1. In a bowl, combine your filling by mixing melted butter, coffee granules, cocoa powder, brown sugar and chocolate. Set aside. 
  2. Prepare your dough by mixing your dry ingredients first - self raising flour, salt, sugar. 
  3. In a saupan, melt your butter and allow to cool slightly, now add in your milk and the egg yolk sand vanilla bean paste, whisk until combined. 
  4. Make a well in the dry ingredients and pour in your wet ingredients and knead everything together to form a smooth dough. I'd suggest to set the dough aside for 5 minutes for better elasticity of dough. 
  5. Sprinkle flour over your work surface and place your dough on it. Roll your dough to a rectangle. 
  6. Spread the filling, make sure it reaches every nook and corner and roll tightly starting from the long edge of the rectangle. 

  7. Preheat your oven to 180 deg C and prepare your pan by greasing it with butter. 
  8. Cut the prepared log into 9 equal pieces and smash with your inner palm and place the rolls in your pan starting from the inside and fill it up. 

  9. Brush the rolls with milk and bake for around 30- 35 minutes, once the rolls turn golden. 

  10. Allow the rolls to cool in the pan itself, by placing your hot pan on a cooling rack. 

  11. To prepare the Icing add all your ingredients under Icing in a blender and blend well. This will will give you a semi liquid Icing without any lumps. 
  12. Drizzle the Icing all over the cooled swirls. 

  13. And they are ready! 


Like Nadiya Hussain says, your breakfast and coffee in one go is ready to serve! 😍 


Do try this recipe and don't forget to share your experience/feedback with me here in the comments or feel free to send me a mail. Also, do tag me at #taystedit if you try out my recipes on Facebook, Instagram etc so that I can see when you make it. ♡♡♡♡
Older Posts

Search This Blog

My name is Hasna Haneef, a mommy to a toddler, hailing from Thalassery, Kerala. Welcome to my humble abode on the Internet; wherein I share all my recipes and experiments. I am glad to have you on board!

TRENDING POSTS

  • Emirati Chebab
  • Kerala Style Squid Roast
  • Kethel's Chicken
  • Thalassery Style Kozhi kaal/ Koyikaal
  • Copy Cat Caesars Mini Pizza
  • Chicken Steak with Creamy Mushroom Sauce

About Me

May peace be with you!

Welcome to my blog.

I am delighted to have you on board. My name is Hasna Haneef, a mommy to a toddler, hailing from Thalassery, Kerala. My homeplace being Dubai, as I am born and brought up here and I am very influenced by the lifestyle and the variety of authentic cuisines I get to try from here, which has made me try anything that comes across me
, click here →

Stay Connected!

Join Our Madness!

Join with Thousands Of Subscribers ! Get Our Latest Recipes Delivered to Your email Inbox!

Powered by follow.it
  • Home
  • About Me
  • Recipes

    • Main Course
    • Desserts
    • Snacks

    Uncategorized

    • Chicken
    • Meat
    • Vegetarian
    • Rice
    • Malabar Food
    • Baking
    • Breakfasts
    • Snacks
    • Drinks
    • Pasta
    • Fish
    • Soups
    • Desserts
  • Contact Me

Featured Post

Triple Chocolate Hazelnut Skillet Cookie

Blog Archive

  • ▼  2026 (3)
    • ▼  September (1)
      • Homemade Cerelac for Babies
    • ►  May (1)
    • ►  April (1)
  • ►  2025 (4)
    • ►  April (2)
    • ►  March (1)
    • ►  February (1)
  • ►  2024 (36)
    • ►  October (4)
    • ►  September (5)
    • ►  July (1)
    • ►  June (2)
    • ►  May (4)
    • ►  April (3)
    • ►  March (10)
    • ►  January (7)
  • ►  2023 (47)
    • ►  December (3)
    • ►  September (2)
    • ►  August (6)
    • ►  July (6)
    • ►  June (9)
    • ►  May (4)
    • ►  April (5)
    • ►  March (6)
    • ►  February (3)
    • ►  January (3)
  • ►  2022 (69)
    • ►  November (4)
    • ►  October (6)
    • ►  September (7)
    • ►  August (9)
    • ►  July (12)
    • ►  June (5)
    • ►  May (5)
    • ►  April (12)
    • ►  March (4)
    • ►  February (2)
    • ►  January (3)
  • ►  2021 (24)
    • ►  November (1)
    • ►  October (2)
    • ►  July (1)
    • ►  June (4)
    • ►  May (6)
    • ►  April (4)
    • ►  February (4)
    • ►  January (2)
  • ►  2020 (82)
    • ►  December (5)
    • ►  November (6)
    • ►  October (4)
    • ►  September (2)
    • ►  August (5)
    • ►  July (10)
    • ►  June (10)
    • ►  May (13)
    • ►  April (12)
    • ►  March (8)
    • ►  February (4)
    • ►  January (3)
  • ►  2019 (22)
    • ►  December (1)
    • ►  November (2)
    • ►  October (6)
    • ►  September (1)
    • ►  August (1)
    • ►  February (3)
    • ►  January (8)
  • ►  2018 (15)
    • ►  December (4)
    • ►  November (6)
    • ►  October (3)
    • ►  September (2)

Subscribe Us

Labels

Bake Biscuits Breakfast Brown rice Burger Cheese Chocolate Dal Egg Emirati Fish Iftar Indonesian Japanese Jeerakashala rice Kerala Keto Kuwait food Lunch Milk Mutton Thai food UAE food afghan cuisine arabic beef biryani bread burnt cheesecake cake chicken cream dessert dinner greek healthy indo chinese lamb malabar prawns pudding puffs quick dinner ideas recipe refreshing drink rice salad sandwich stir fry vegetables vegetarian veggies yemeni

Contact Form


POPULAR POSTS AND PAGES

Thalassery Style Kozhi kaal/ Koyikaal

Thalassery Style Kozhi kaal/ Koyikaal

June 08, 2020
Emirati Chebab

Emirati Chebab

June 01, 2023
Kerala Style Squid Roast

Kerala Style Squid Roast

June 18, 2020
Kethel's Chicken

Kethel's Chicken

August 25, 2022
Yemeni Mutton Haneeth

Yemeni Mutton Haneeth

October 20, 2022

Pages

  • Home
  • About Me
  • Privacy Policy
  • Contact Me

Copywrite © 2023 TermsFeed®. All rights reserved.

Created By Sora Templates | Distributed By Gooyaabi Templates

Back to top