Search This Blog

Taystit by Hasna

Food, Recipes, and Beyond

  • Home
  • About Me
  • Recipes
    • Main Course
    • Snacks
    • Desserts
  • Uncategorized
    • Chicken
    • Meat
    • Vegetarian
    • Rice
    • Malabar Food
    • Baking
    • Breakfasts
    • Snacks
    • Fish
    • Pasta
    • Drinks
    • Soups
    • Desserts
  • Contact Me

Butter Egg Masala 


Out of ideas for breakfast/ dinner?! Try this luscious and delicious butter egg masala and Thank me later! It’s so easy to prepare, it’s like my go to curry when I am out of ideas and other ingredients 😁 

The steps are pretty much like a rich and India’s own Butter Chicken Masala (psst, my butter chicken parcels are always a hit! Try it out, and let me know how it goes!)

What I like about this recipe is that all those veggies are just roughly chopped, as they are anyways going to be made into a paste, so not precision chopping required. It’s all so quick and easy! Once the gravy is done, and in the your cream and crack in your eggs ( or add in your hard boiled eggs, that are slightly slit on the sides and fried in some turmeric, chilli powder and salt, if that’s how you like it, I like mine just cracked into the butter masala) and voila! Your Butter Egg Masala is ready! It’s that easy! 😍😋

Pair it hot with some chappati so, poori, bhatura etc and enjoy!!

Ingredients: (makes for two)

  • 1 medium Onion, roughly chopped
  • 1 medium tomato, roughly chopped
  • 1 garlic clove
  • 1 really tiny piece of ginger (you don’t want it to overpower)
  • 1 + 1 tbsp Butter 
  • 1 green Chilli
  • 8-10 Cashews
  • 8-10 Raisins
  • Ketchup (optional, as required)
  • 1 tsp Kashmiri Chilli powder
  • Dried Fenugreek leaves, a pinch 
  • A drizzle of fresh cream (any sugarless cream will do)
  • 2-3 Eggs
  • Coriander leaves, for garnish 

Instructions: 

  1. In a pan, add in your blob of butter and sauté your chopped onions and once translucent add in your chopped tomatoes, ginger garlic, green chilli, cashews and raisins and close the lid. 
  2. Add in a tbsp of water and allow them to get mushy on low flame. 
  3. Once mushy, allow to cool a bit, once touchable, add the sautéed veggies to a blender and blend to a smooth fine paste. 
  4. Next in the same pan, add in a blob of butter and add in a teaspoon of Kashmiri chilli powder for that extra color and mix well. 
  5. Next, add in the paste to the pan and pour some water or milk to adjust the consistency and add salt and ketchup as required.
  6. And add in a pinch of dried fenugreek leaves and allow to come to a slight boil.
  7. Finally pour in the cream and crack in the eggs and cook covered until desired consistency of egg and garnish with chopped coriander leaves. 
  8. Enjoy hot with chappati, poori, bhatura etc!


Do try this recipe and don't forget to share your experience/feedback with me here in the comments or feel free to send me a mail. Also, do tag me at #taystedit if you try out my recipes on Facebook, Instagram etc so that I can see when you make it. ♡♡♡♡

Malabar Moodi Pathal/ Pathiri
(Rice pancakes)


These soft, pan-poured rice pancakes is one of the most staple breakfast and dinner rice pancakes in Thalassery, and other parts of northern Kerala. Can also call it a distant cousin of dosa 😅 w/o the fermentation.

Moodi pathal, unlike the commonly known pathiri which is a flatbread made of rice flour is rice soaked for half an hour and ground into a paste along with shredded coconut and cooked rice, made into a thin batter and a ladleful of the batter is pour into a pan and swirled to get a round pancake which is immediately covered with a lid, allowing the pancake to cook from both sides simultaneously. Hence the name Moodi Pathal,  “Moodi” means covered/ lid and pathal means pancake/ flatbread. 

The addition of shredded coconut, though not necessary, but adds in a lot of flavor profile to the rice flatbread. Usually enjoyed with coconut milk and sugar, spicy malabar fish curry aka mulagittadh/Fish Varattiyadh (you can find the recipe by tapping the link), or any curry of your choice. 

Ingredients: (Makes for 2)

  • 1 cup White rice (Basmati and the likes of it also can be used)
  • 2 tbsp leftover cooked rice (ponni, kuruva, matta rices) 
  • 1/4 cup Shredded Coconut 
  • Salt 
  • 1 and 1/2 cups approx Water (can be a little less or more)
  • 1 tbsp Coconut oil
  • Ghee for smearing on the pathal

Instructions: 

  1. Rinse and soak the rice for half an hour at least or upto 2 hours and in a mixer grinder, add in the soaked rice, leftover cooked rice, shredded coconut, salt and half cup water.
  2. Transfer the batter to a bowl and add water to the required consistency (quite loose but not too watery either)

  3. Heat a well seasoned cast iron pan on high, and smear with coconut oil, once water sprinkled jumps, you may pour in a deep ladle full of batter into the pan and swirl it to get a nice round rice pancake. Cover it immediately and allow to cook on medium heat for around 2 minutes and transfer the pathal into hotpot or plate, smear ghee and cover it with a lid. 
  4. Enjoy with coconut milk and sugar or with spicy malabar fish curry (mulagittadh) or your choice of curry.

Tips: 

  1. Make sure you do not add too much of cooked rice, which can turn out to be a messy situation.
  2. Make sure the pan is on medium high flame, preferably a well seasoned cast iron pan, may feel like a crispy dosa, but once smeared with ghee and covered in and kept for couple of minutes in a hotpot or a plate, you will see how nice and soft it becomes. 
  3. Make sure the batter is quite loose, not very watery either. 
  4. The first couple of them might turn out with cracks, if the pan isn’t well heated and at the right temperature and make sure you cover the pathal immediately after pouring and swirling.
  5. Make sure to grind the rice with very little water, or else you will end up with a batter than isn’t ground properly. 

Do try this recipe and don't forget to share your experience/feedback with me here in the comments or feel free to send me a mail. Also, do tag me at #taystedit if you try out my recipes on Facebook, Instagram etc so that I can see when you make it. ♡♡♡♡

Healthy Oats Khichdi


My go to recipe when I want to cook up something quick and dump in all the veggies in my fridge! And this one tastes so comforting that you won’t even feel you are eating healthy, but if course be easy on the portion you take too. 

Usually Khichdi is made with veggies or is more of a vegetarian dish (that’s what I know) but since my family loves chicken and instead of using store bought chicken cubes, adding the boneless chicken not only oomphs up the flavor but also gives you extra protein.

Add in whatever veggies you have in your fridge, potatoes, peas, bell peppers, etc cauliflower is also a great add on! I love cauliflower in Khichdi. This is such an amazing way to get your kids veggies..I tell you..they will ask for more!! 😁

Ingredients:


  • 1 1/2 cup Whole Oats
  • 1/2 cup Moong dal
  • 1-2 tbsp Ghee
  • Hing/ Asafoetida, a pinch
  • 1 tbsp Olive oil or any neutral oil
  • 1 Onion, chopped finely 
  • 1 tbsp ginger garlic paste
  • 1 cup Button Mushrooms, sliced
  • 1 Carrot, small, chopped
  • 1 cup Broccoli, chopped roughly 
  • 1/4 cup Frozen Corn
  • 150 gms Boneless Chicken, sliced into small thin strips
  • 1 tsp Jeera/ Cumin
  • 1 Sprig Curry leaves
  • 4-5 cups Water
  • Salt, as required 
  • 1 tsp White pepper
  • 1/4 tsp Turmeric powder
  • 1/2 tsp Red Chilli powder
  • 1-2 Green Chillies, optional 
  • Coriander leaves, finely chopped for garnish 
  • Lemon slice, for garnish

Instructions:

  1. In a pressure cooker wash the moong dal and add it into the pressure cooker and add in the oats and add salt as required. Pour in around 3 cups of water and allow to cook on medium high for 2 whistles. 

  2. In a large heavy bottom pan, pour the ghee and splutter the cumin, and a pinch of hing and add in the curry leaves. 
  3. Next add in the ginger garlic paste and add in the chopped onion and sauté well. 
  4. Next add in the chicken slices and add salt and pepper as required and cook well for around 4-5 minutes.
  5. Next, pour a little olive oil and add in the veggies and cook well and finally add in your spices and the cooked mushy oats and moong dal. 


  6. Add in some more water for the desired consistency and salt as required, pepper and finally add in a squeeze of lemon and ghee (if required).


Do try this recipe and don't forget to share your experience/feedback with me here in the comments or feel free to send me a mail. Also, do tag me at #taystedit if you try out my recipes on Facebook, Instagram etc so that I can see when you make it. ♡♡♡♡

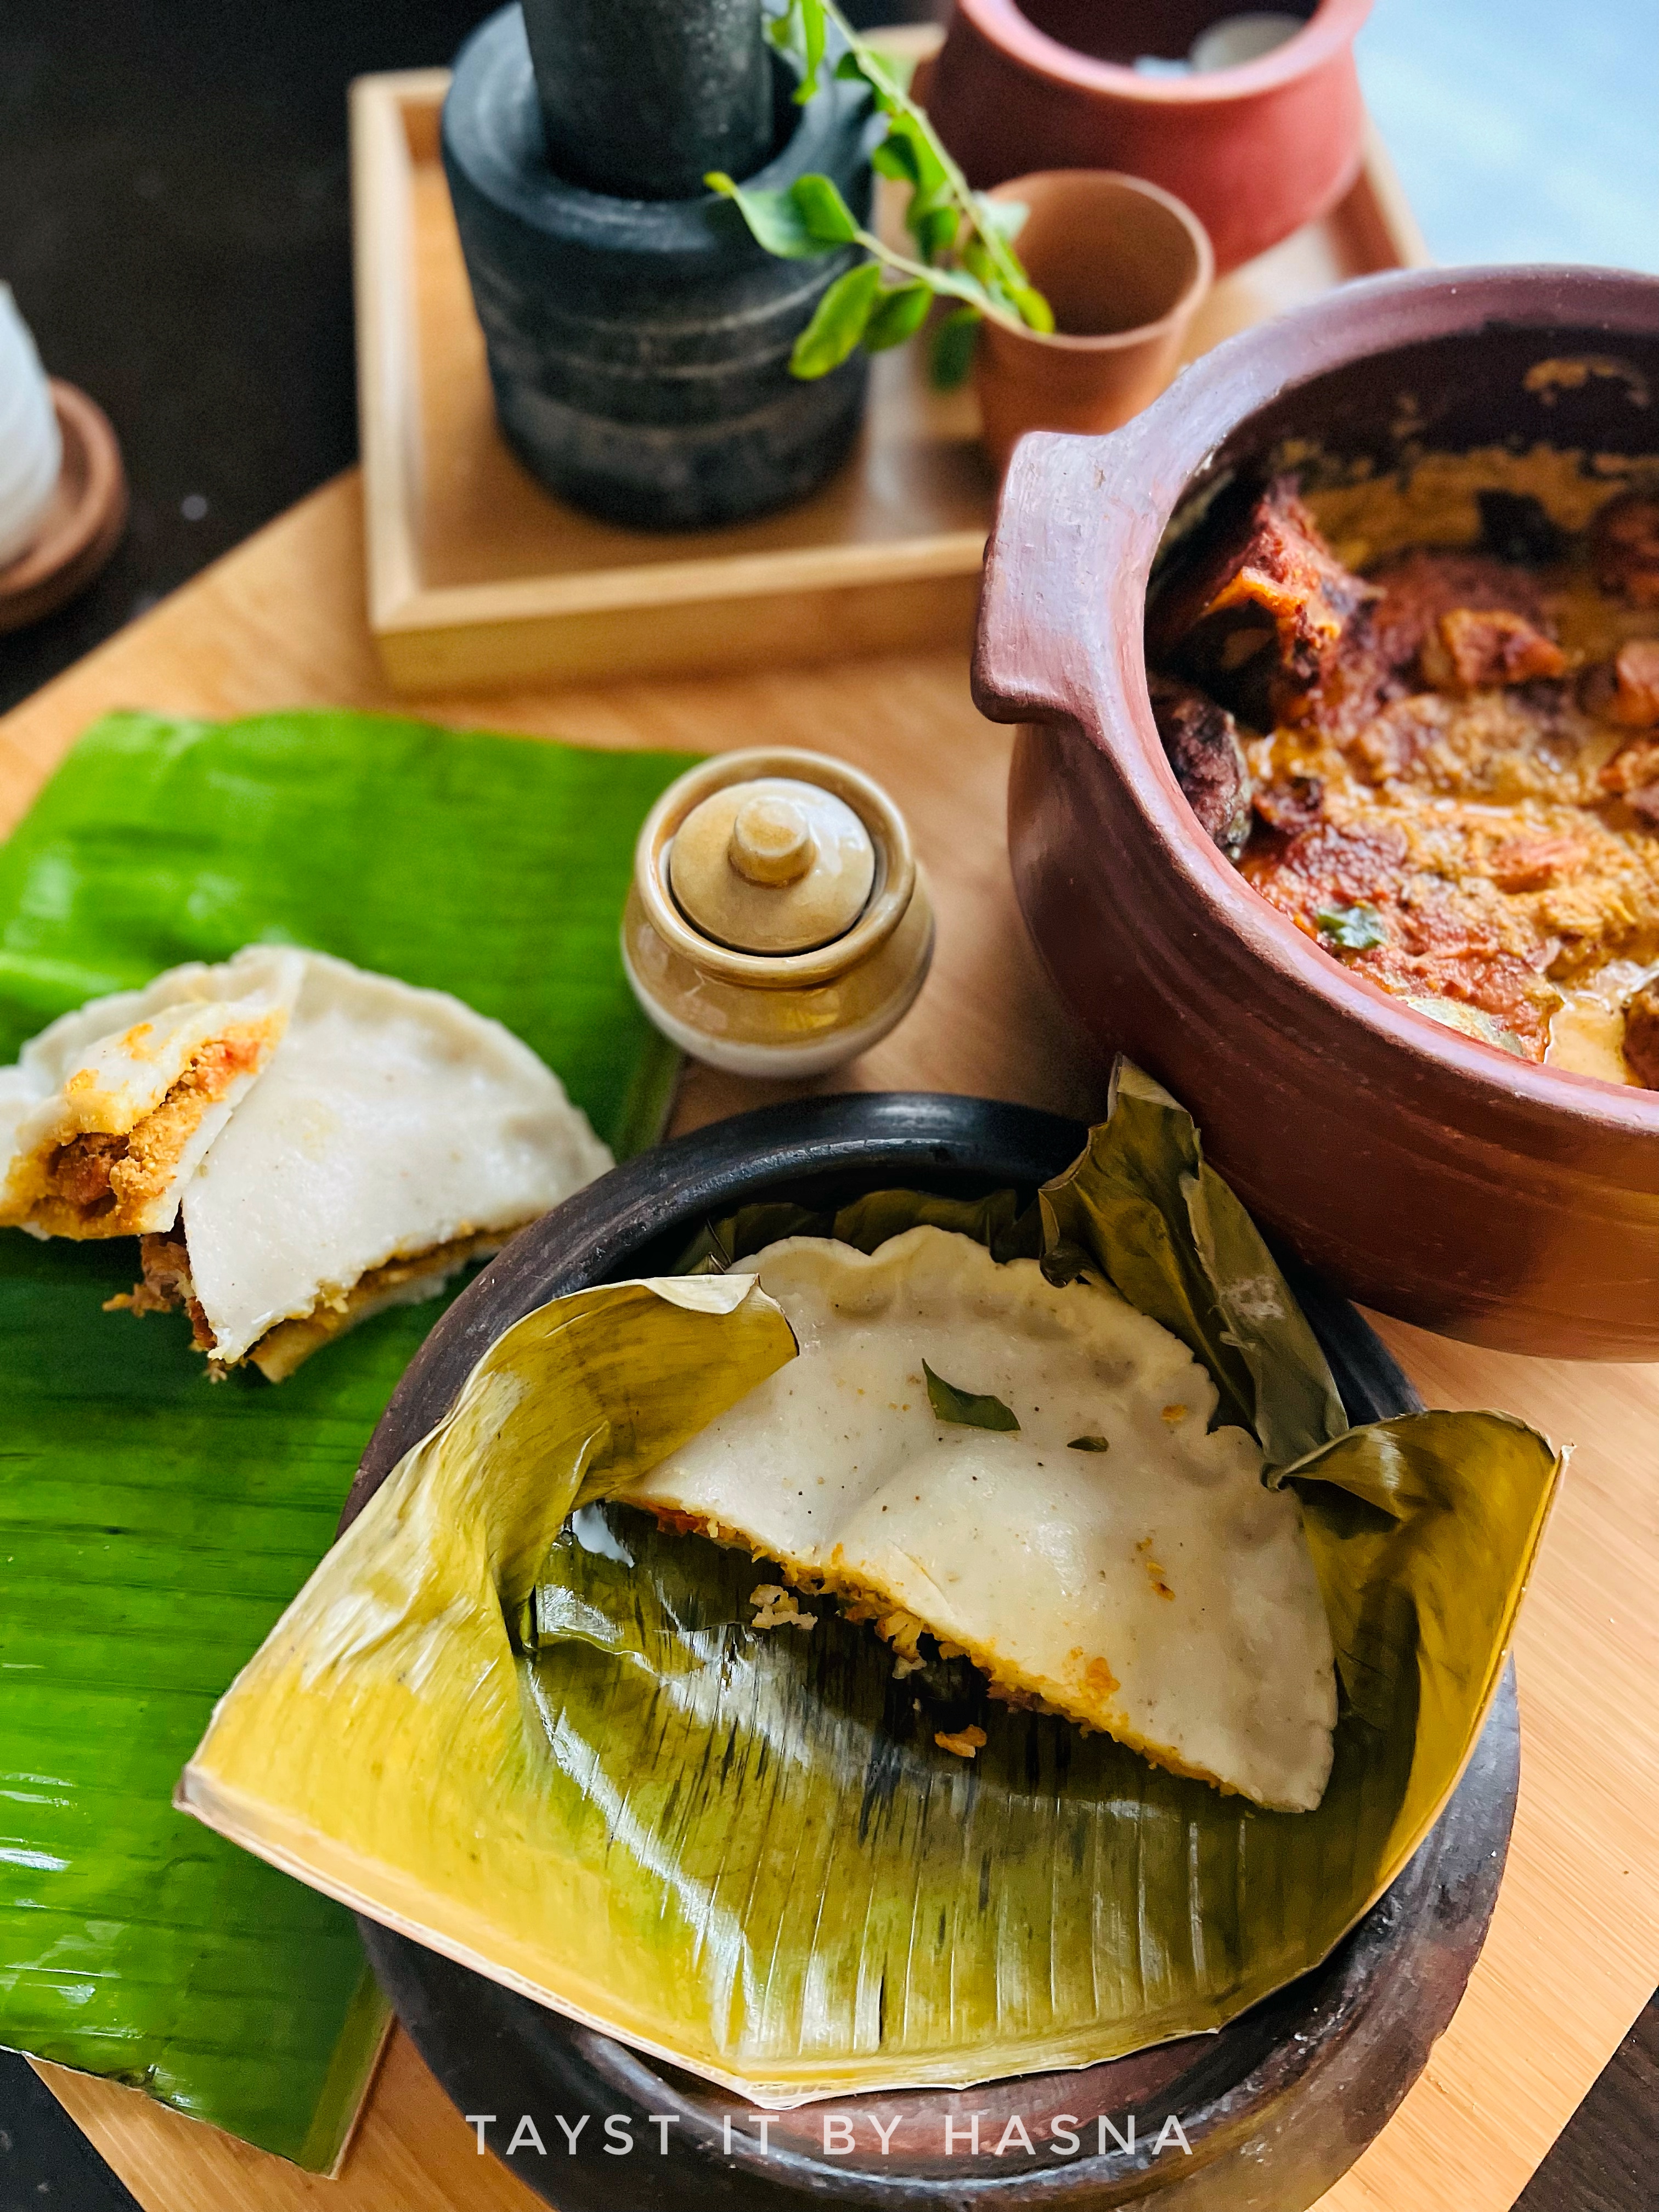
 Puzhungapathil/ Meen vecha pathil (Steamed Rice Pancakes stuffed with Fish Masala)


Here I am sharing the recipe of puzhungapathil, something I despised until few years ago. Never did I imagine Iwould actually be posting the recipe of puzhungapathil, or aka meen vecha pathil, it's more like a Kerala version of stuffed pizza, at least that's how it is popularly known among kids. :D

This pathil is one of the most popular dinner dishes originating from Thalassery, where a dough is made of rice flour and spread with a layer of fish masala made using ground coconut, over which fried fish is placed and finally a similar layer of rice flour dough is smeared with the fish masala and placed over the fried fish layer, the masala smeared side facing downwards. The sides of the pathil are pressed slightly to close the edges which might leave finger impression son the edges.

The process might seem tedious and may look like huge task, but when the work is divided, and done in advance, it's easier to assemble and prepare the final product. The rice need to be soaked and ground and made into a dough adding roce flour and set aside. Prepare the fish masala and fish fry and set aside and assemble them and steam them, when required for around 20 minutes each. The name puzhungapathil comes as the pathil (roti) is made using the steaming method (puzhungal) so we call it puzhungapathil, puzhungalarotti, meen vecha pathil, etc. The same pathil is made into a crescent shape and stuffed with the masala and fried fish and is called Meen ada. Some people like to make the masala like dry fry, I prefer the more moist version, and also in some versions, the fried fish is pulled apart and the flesh is added to the masala. No matter what fish you choose for the masala, adding prawns always takes the flavor of the masala to a next level. Puzhungapathil with a glass of Sulaimani (black tea) is a must. It always tastes the best the next morning..mmmm.. Yummmm!!

Here I have used kingfish and prawns. I am sure you will love this TRADITIONAL Malabar dinner! Without further a do, let's see how it's done!


Ingredients : (makes around 7-8 medium pathils)

For Pathil:

  • 3 cups ready made rice powder/ 2 cups Puzhungalari (par boiled rice) soaked in medium hot water for 4-5 hours
  • 1/2 box Shredded Coconut
  • 1 tsp Fennel seeds
  • 1/2 tsp Garam masala powder
  • 1/2 Onion, roughly chopped
  • Salt, as required

For Frying fish:

  • 100 gms Prawns, cleaned and deviened (marinated in turmeric, chilli powder and salt)
  • 250 gms King Fish slices (marinated in turmeric, chilli powder and salt)
  • Coconut oil, for frying
  • 2 sprigs curry leaves

For the masala/ filling:

  • 1/2 + 3 tbsp box Shredded coconut
  • 1 tsp Fennel seeds
  • 1/2 cup warm water
  • 1 1/2 Onions, sliced
  • 1 tbsp ginger garlic, freshly pound 
  • 2 sprigs Curry leaves
  • 1 Tomato, chopped 
  • 1/4 tsp Turmeric powder
  • 2 tsp Kashmir red chilli powder
  • 1 tsp Coriander powder
  • 3 Green chillies, slit
  • Salt, as required

Instructions :

  1. You may prepare the pathil using two method - either by soaking the Puzhungalari in warm water for 4-5 hours and tightening the dough using rice powder or only using rice powder and adding water according to package and adding a mixture of ground paste that consists of coconut, fennel seeds, garam masala powder and onion and preparing a rice dough. Cover the bowl and set aside.
  2. To prepare the filling, first fry the king fish and prawns in coconut oil with curry leaves (3-4 minutes) and set aside.
  3. In an earthern pot or any pot of your choice, pour the residual coconut oil that was used for frying the fish.
  4. Add the sliced onion, curry leaves and add salt and saute until translucent .
  5. Next add in the pound ginger garlic paste, saute until raw smell disappears.
  6. Add in the chopped tomatoes, mix and place lid and allow to cook for 1-2 mins, until mushy.
  7. Next, add in the spices like turmeric powder, red chilli powder, and coriander powder, sauté well.
  8. Add salt, if required and allow the ingredients to combine, you can know this when the oil starts separating from the masala.
  9. Now, add in the slit green chillies and mix.
  10. In a mixer grinder, add in the coconut and fennel seeds and grind to a coarse paste.
  11. Add water and salt as required, allow to come to a boil.
  12. Now add the fried fishes and allow to simmer on low for 2-3 minutes. Allow the masala to cool before filling the pathil.

  13. The dough that has been resting has to be made into balls of same quantity.
  14. On a banana leaf/ Aluminum foil sheet, rub a good amount of coconut oil and place a ball and spread the rice dough ball using your fingers or using the back of a flat lid. (oiled) and flatten well, not as thin thin as a roti 

  15. Onto the flattened rice dough, spread the masala and place the fried fish (kigh fish and 3-4 prawns) and similarly repeat the process for another piece of dough ball, but this time only spread the filling and don't place the fried fish.

  16. Now flip the flattened pathil with only the masala filling and slowly hovering it above the pathil with fried fish with the masala side facing down, slowly place one end of the pathil one the oathil with the fish and slowly slide the banana leaf off, and seal the edges using your finger impressions .

  17. Now to a pre boiling steamer, place the prepared pathil and allow to steam for 20- 25 minutes depending upon the size of the pathil.

  18. Once taken out, allow to cool, slice to desired sizes, and enjoy with a hot cup of sulamani (black tea).


Notes:

Make sure the filling isn't too dry or too watery.
The rice dough should be too hard, if it's hard, the dough will have cracks and if the dough is too loose, it will not hold its shape.
Prepare the filling in advance, so that the preparation becomes easier.


Do try this recipe and don't forget to share your experience/feedback with me here in the comments or feel free to send me a mail. Also, do tag me at #taystedit if you try out my recipes on Facebook, Instagram etc so that I can see when you make it. ♡♡♡♡

 Soy Chunk Balls in Marinara Sauce


Don't you love food that tastes delicious, yet helps you in eating clean?! Well, this recipe I developed with the thought of weight reduction (not for me xD), by including ample amount of nutrients in the diet. Recently, many have been messaging me to share recipes that help in weight reduction. You need not only have salads, you can always include ingredients you love into your meals, by ingredients , I meant the healthy ones; for example, if you dislike Broccoli you may add in spinach etc.
 
I love Marinara sauce, it has tomatoes as a main ingredient which has an umami flavor with asslight tanginess, with the addition of honey/ sugar with a dash of black pepper, the sauce comes to a beautiful balance of flavors (also make sure you add the right amount of salt to the sauce, as once, in one of my attempts, I forgot to add enough salt and it did not taste very good). Also to keep the nutrients intact, I have used fresh tomatoes to prepare the Marinara sauce, you may use canned tomatoes too.

To make the soy Chunk balls, you may use your favorite veggies (play around with the veggies you like). Store the extra balls in the freezer and transfer them to a zip lock bag, just shallow fry them when required and add them to Marinara Sauce or any of your favorite sauce and voila! Your healthy meal is ready!!

Whenever I make this dish here, everyone fights to have it, as it tastes so much like meatballs and smells amazing! They are also called VEGAN MEATBALLS! 
Hack: You may make some extras, so that you can give your kids Soy chunks balls in their lunch boxes too.
 

Ingredients : (3 people)

  • 1 1/2 cups Soya Chunks (soaked in water for around 20 minutes)
  • 1/2 Onions, roughly chopped
  • 2 Garlic cloves
  • 1/2 cup Broccoli 
  • 1/2 cup Carrot, chopped roughly 
  • Salt, as required 
  • 1 tsp Black Pepper, crushed
  • 3-4 tbsp Jowar Flour preferably/ Rice flour
  • 4-5  tbsp Olive oil

Marinara Sauce:

  • 2 large Tomatoes
  • 2 Garlic cloves
  • 1 tsp Paprika powder/ red chilli powder
  • Oregano, a pinch
  • 1 tsp Honey
  • 1 tsp Black Pepper, crushed
  • Salt, as required
  • 1 tsp Arrowroot powder/ Corn Flour
  • Basil Leaves, for garnish

Instructions:

  1. Soak the Soya beans for around 20 minutes, squeeze the swollen soya chunks and remove excess liquid, and chop the soya chunks using a food processor and set aside.
  2. In the same food processor, add in the onion, garlic cloves, Broccoli and carrot, blitz and add to the finely chopped soya chunks.
  3. Next add Jowar flour/ rice flour as a binding agent, salt and pepper. Mix ans knead well.
  4. Squeeze a small ball size inside your hand palm to see if the ball holds the shape, if not add more jowar flour.
  5. Make small balls of same size, and freeze the balls for around 15-20 minutes .

  6. To make the Marinara sauce, in a blender, add in your tomatoes, garlic cloves and blend to a smooth paste and set aside.
  7. In a pan, pour some olive oil and shallow fry the slightly frozen soya chunk balls. Shaking the pan from time to time, so that all sides cook and brown equally. 

  8. Transfer the bowls to a deep dish.
  9. In the same pan, pour some olive oil and pour in the tomato paste, and add seasonings like paprika powder, oregano, honey, crushed black pepper and salt as required, and allow the sauce to cook well.
  10. Make an arrowroot slurry and add to the sauce, mixing vigorously using a ladle/ spatula so that the sauce thickens (not too thick nor watery). Check for seasoning .
  11. Add the sauce to the meatballs and garnish with basil leaves, serve hot. Buon Appétito !


Notes:
To make it even more healthier, you may air fry the soya chunk balls at 180 for 10-12 mins with a spritz of oil 

Do try this recipe and don't forget to share your experience/feedback with me here in the comments or feel free to send me a mail. Also, do tag me at #taystedit if you try out my recipes on Facebook, Instagram etc so that I can see when you make it. ♡♡♡♡

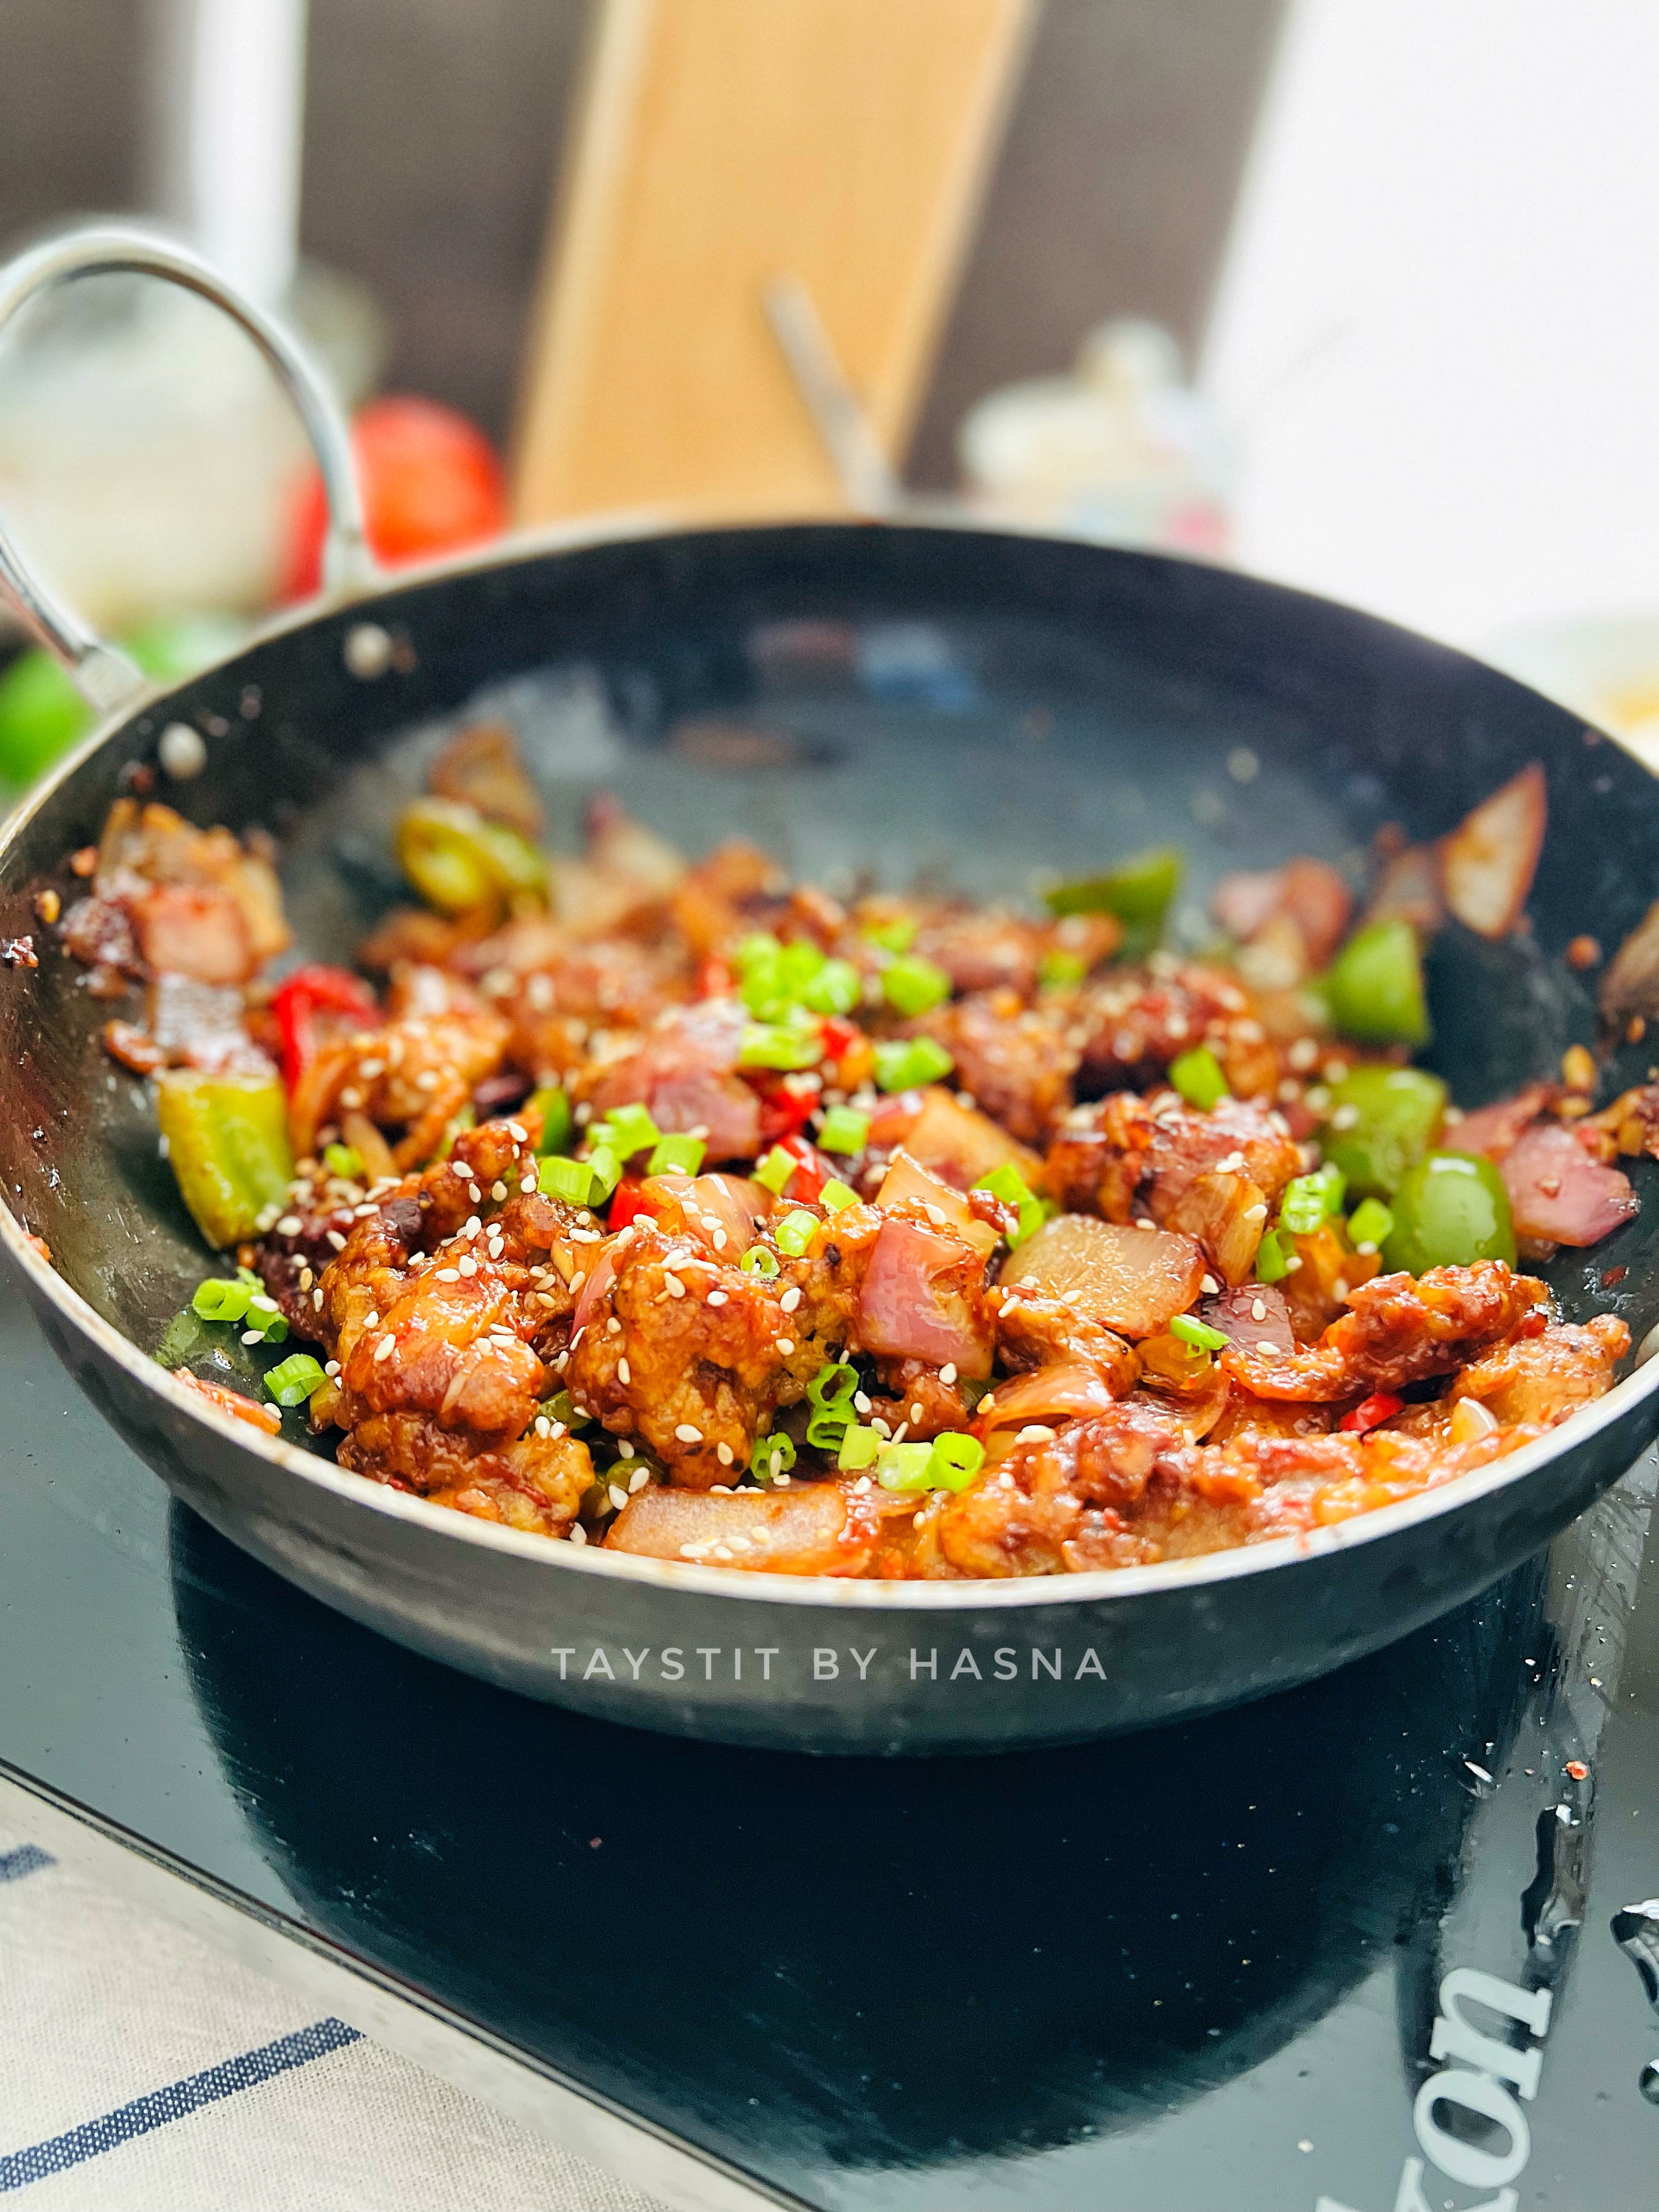
 Crispy Beef Chilly


Indo Chinese is one of my favorite cuisines. This Crispy Beef chilly is everything.. Goes well with Noodles, fried rice etc. On lazy days I even have it with Khubz (Arabic pita bread). Unlike the South Indian version of beef chilly, the beef is not pressure cooked rather made into very thin long strips and fried raw with corn flour, all purpose flour, salt pepper and egg to help coat the beef strips well.

I have always been asked why I fry the beef without cooking it first , this method ensures all the juices from the beef are stored well within, and the flavors from the beef does not dim away. Think of it as a steak, similarly, the beef strips are fried raw (preferably deep fried) but I do not like to waste oil that has the residue of the flours in it, so I shallow fry the battered beef strips. Do not cook the beef strips more than 5-6 minutes as the beef would turn chewy.

The condiments, other than the condiments that I mentioned here, sometimes I like to add green Chilli sauce too and maybe a dash of white pepper powder. As soy sauce is concentrated with salt, be careful not to add too much of salt, either in the batter or in the final stage. Once the dish is done, serve immediately as the coating of the beef absorbs the moisture from the sauce, and makes the beef not so crispy. If you want to serve the dish at a later time, prepare the sauce and the beef and set aside, and combine only at the time of serving.

Crispy Beef Chilli is one of husband's favorites. Now that everyone has their sacrificial meat from Eid AL Adha, do give this recipe a try. You can never go wrong with this dish, it's super delicious 😋

Ingredients : (Makes for 3- 4 people)


  • 350 gms Boneless Beef, sliced to thin strips
  • 6-7 Garlic cloves, finely minced
  • 1 inch Ginger, finely minced
  • 1 large Onion, cubed
  • 1/2 of a large Capsicum, cubed
  • 1 Red Chili Pepper, sliced
  • 2 tbsp All Purpose Flour
  • 3 tbsp Corn Flour + 1 tsp Corn flour for slurry
  • 1 Egg, large
  • Salt, as required
  • 1 tsp Black Pepper, crused
  • 1/2 tsp Red Chilli Flakes
  • Vegetable oil
  • 3 tbsp Soy Sauce
  • 2 tsp Red Chilli paste/ any red Chilli sauce
  • 1/2 tsp Black Pepper, crushed
  • 1 tbsp White Vinegar
  • 1/2 tsp Sugar
  • Salt, if required
  • 3 tbsp water, for slurry 
  • Spring onions , chopped, for garnishing 
  • Sesame seeds, for garnishing 

Instructions:

  1. In a large bowl, add in your beef strips, all purpose flour, corn flour, egg, crushed black pepper and salt. Combine well, to coat the beef strips.  


  2. In an Iron Kadai/ wok, pour the vegetable oil to shallow fry the beef, for no more than 5-6 minutes.
  3. Strain the crispy beef strips from oil and keep aside, let's prepare the sauce.
  4. For the sauce, in the same wok, add more oil if required, add in the minced garlic and ginger. Saute on medium high for 10 seconds and immediately add the cubed onion, and saute well for 2-3 minutes on high flame.

  5. Now add the cubed Capsicum and mix well for 1 minute.
  6. Add the soy sauce and red Chilli paste, mix well.
  7. Keep the wok on high flame add in your beef strips and stir well.

  8. Now make a corn flour slurry and pour and immediately mix well.
  9. Finally add white vinegar, salt and pepper, as required.
  10. Garnish with chopped spring onions and sesame seeds and serve immediately with fried rice, noodles, etc.


Do try this recipe and don't forget to share your experience/feedback with me here in the comments or feel free to send me a mail. Also, do tag me at #taystedit if you try out my recipes on Facebook, Instagram etc so that I can see when you make it. ♡♡♡♡

Tamale Pie


As weird as Tamale may sound, I weirdly loved the name given to this dish. Tamale Pie is a comfort food that originates from US in the early 1900. Though it has its origin from US, the flavors are totally Mexican inspired. 

It is said that the original recipe of Tamale takes hours of labor and due to the time consuming process, the authentic recipe isn't followed as much. After hours of researching I understood that Tamale isn't actually a pie, it is more like a casserole; never mind the name. This corn bread casserole is super easy to prepare, more like a shepherd's pie, corn version.

Interesting yea?!

Well, I wasn't quite aware of this dish, until lately when I happened to read about Tamale Pie… I wanted to try it right away! Usually, the dish is prepared using any red meat or minced chicken, or  can be done using only veggies. This dish makes a great veg/keto dish too if made slight variations in the ingredients.

Generally, the pie has its corn crust as the top layer, but I wanted to try it with a twist and made the corn layer as the base. Even though I love Mexican flavors, I don't usually stock up on Mexican ingredients so for the base, I used Masa Harina/cornmeal crust; flour made using dried corn kernels, and I had some cauliflower in the fridge waiting to be used. So I immediately blitzed the cauliflower and used it along with the base. Though I was quite unsure if the base would become soggy, I took the wrong road without the seatbelt. And oh boy was it a success! Alhamdulilah!

Also I made my own red enchilada sauce too from scratch! I am so happy that this dish turned out exactly like the comfort food I had in mind. I had to share the recipe today itself, before I forget how I prepared it!

The best part is that, if you prepare this dish, you will always have an additional casserole to save, which calls for a meal that is ready to it! For the cheesy layer I only used mozzarella cheese. You may use a combination of Monterey jack. cheddar cheese, mozzarella etc.

This recipe is definitely a keeper! Without further a-do lets gets started!

Ingredients:


Corn Base:

  • 1 cup Cornmeal/ Masa Harina
  • 1/2 cup Blitzed Cauliflower (optional)
  • 1/4 cup All Purpose Flour
  • A pinch of sugar
  • 1/2 cup canned creamed corn or corn niblets
  • 1 tbsp butter, room temperature
  • 1/4 cup heavy cream
  • 1 large egg
  • Salt as required.

Red Enchilada Sauce:

  • 3 tbsp vegetable oil 
  • 2 tbsp all purpose flour
  • 3 tbsp red chilly powder
  • 1 tsp cumin powder
  • 1/4 tsp dried oregano
  • 1 cup low-sodium beef broth
  • 1 Large Tomato, blended**/ 1 store bought canned tomato sauce
  • 1 clove garlic, minced/ 1 tsp garlic powder
  • Salt, as required

Meat Filling:

  • 250 gms ground beef
  • 1 Onion, chopped
  • 2 Garlic Cloves, minced
  • 2 tsp Red Chilli Powder
  • 1 tsp Cumin Powder
  • Freshly Ground Pepper
  • Salt, as required
  • 1 cup Mozarella*
  • Sliced Pickled Jalapenos, for garnish
  • Finely chopped Tomatoes, for garnish (without the inner core)

Instructions:

  1. Prepare your enchilada sauce, by stiring your oil, flour, chilli powder, cumin powder and oregano in a sauce pan on sim and allow to bubble.


  2. Add in your beef broth, tomato sauce, garlic and salt as required.
  3. Allow to simmer for 5-10 minutes, stir occasionally. Set aside, allow to cool.
  4. Preheat oven to 210 deg C. Grease a large casserole dish with butter or cooking spray.
  5. In a large bowl, mix all the ingredients under corn base. Now, into the prepared casserole dish, transfer the corn base and bake for around 15-20 minutes, or until golden. Allow to cool.

  6. In a skillet, over pour olive oil and sauté your chopped onions and minced garlic , once fragrant add in your seasonings like chilly powder, cumin powder, salt and pepper. Now add in your ground beef, break the meat using your wooden spoon, for around 6-7 minutes, until no pink color in visible. Drain the residual fat, that oozes out.


  7. Once your corn base has cooled, poke in using a fork and pour in your prepared enchilada sauce.


  8. Add your prepared beef and top with cheese.

  9. Cover with foil and bake for around 15-20 minutes. Allow to broil after removing the foil, so that cheese turns golden, for around 5 minutes.
  10. Your delicious Tamale Pie is ready to serve. Garnish with chopped tomatoes and sliced pickled jalapenos and a dollop of sour cream if you have or a sprinkle of chopped parsley will do. 


Note:

Other recipes calls for baking powder, I did not use here.
*You may use a combination of Monterey jack. cheddar cheese, mozzarella etc.
**If using fresh tomatoes, use a dash of Tomato ketchup to balance the tanginess.
The above recipe I divided into two medium casserole dishes so that I could use the other one later.


Do try this recipe and don't forget to share your experience/feedback with me here in the comments or feel free to send me a mail. Also, do tag me at #taystedit if you try out my recipes on Facebook, Instagram etc so that I can see when you make it. ♡♡♡♡
Older Posts

Search This Blog

My name is Hasna Haneef, a mommy to a toddler, hailing from Thalassery, Kerala. Welcome to my humble abode on the Internet; wherein I share all my recipes and experiments. I am glad to have you on board!

TRENDING POSTS

  • Emirati Chebab
  • Kerala Style Squid Roast
  • Chicken Steak with Creamy Mushroom Sauce
  • Kethel's Chicken
  • Kerala Beef Fry/ Nadan beef dry fry
  • Yemeni Mutton Haneeth

About Me

May peace be with you!

Welcome to my blog.

I am delighted to have you on board. My name is Hasna Haneef, a mommy to a toddler, hailing from Thalassery, Kerala. My homeplace being Dubai, as I am born and brought up here and I am very influenced by the lifestyle and the variety of authentic cuisines I get to try from here, which has made me try anything that comes across me
, click here →

Stay Connected!

Join Our Madness!

Join with Thousands Of Subscribers ! Get Our Latest Recipes Delivered to Your email Inbox!

Powered by follow.it
  • Home
  • About Me
  • Recipes

    • Main Course
    • Desserts
    • Snacks

    Uncategorized

    • Chicken
    • Meat
    • Vegetarian
    • Rice
    • Malabar Food
    • Baking
    • Breakfasts
    • Snacks
    • Drinks
    • Pasta
    • Fish
    • Soups
    • Desserts
  • Contact Me

Featured Post

Triple Chocolate Hazelnut Skillet Cookie

Blog Archive

  • ▼  2026 (2)
    • ▼  May (1)
      • Breakfast Waffles
    • ►  April (1)
  • ►  2025 (4)
    • ►  April (2)
    • ►  March (1)
    • ►  February (1)
  • ►  2024 (36)
    • ►  October (4)
    • ►  September (5)
    • ►  July (1)
    • ►  June (2)
    • ►  May (4)
    • ►  April (3)
    • ►  March (10)
    • ►  January (7)
  • ►  2023 (47)
    • ►  December (3)
    • ►  September (2)
    • ►  August (6)
    • ►  July (6)
    • ►  June (9)
    • ►  May (4)
    • ►  April (5)
    • ►  March (6)
    • ►  February (3)
    • ►  January (3)
  • ►  2022 (69)
    • ►  November (4)
    • ►  October (6)
    • ►  September (7)
    • ►  August (9)
    • ►  July (12)
    • ►  June (5)
    • ►  May (5)
    • ►  April (12)
    • ►  March (4)
    • ►  February (2)
    • ►  January (3)
  • ►  2021 (24)
    • ►  November (1)
    • ►  October (2)
    • ►  July (1)
    • ►  June (4)
    • ►  May (6)
    • ►  April (4)
    • ►  February (4)
    • ►  January (2)
  • ►  2020 (82)
    • ►  December (5)
    • ►  November (6)
    • ►  October (4)
    • ►  September (2)
    • ►  August (5)
    • ►  July (10)
    • ►  June (10)
    • ►  May (13)
    • ►  April (12)
    • ►  March (8)
    • ►  February (4)
    • ►  January (3)
  • ►  2019 (22)
    • ►  December (1)
    • ►  November (2)
    • ►  October (6)
    • ►  September (1)
    • ►  August (1)
    • ►  February (3)
    • ►  January (8)
  • ►  2018 (15)
    • ►  December (4)
    • ►  November (6)
    • ►  October (3)
    • ►  September (2)

Subscribe Us

Labels

Bake Biscuits Breakfast Brown rice Burger Cheese Chocolate Dal Egg Emirati Fish Iftar Indonesian Japanese Jeerakashala rice Kerala Keto Kuwait food Lunch Milk Mutton Thai food UAE food afghan cuisine arabic beef biryani bread burnt cheesecake cake chicken cream dessert dinner greek healthy indo chinese lamb malabar prawns pudding puffs quick dinner ideas recipe refreshing drink rice salad sandwich stir fry vegetables vegetarian veggies yemeni

Contact Form


POPULAR POSTS AND PAGES

Emirati Chebab

Emirati Chebab

June 01, 2023
Chicken Steak with Creamy Mushroom Sauce

Chicken Steak with Creamy Mushroom Sauce

November 05, 2018
Kerala Style Squid Roast

Kerala Style Squid Roast

June 18, 2020
Kethel's Chicken

Kethel's Chicken

August 25, 2022
Thalassery Style Kozhi kaal/ Koyikaal

Thalassery Style Kozhi kaal/ Koyikaal

June 08, 2020

Pages

  • Home
  • About Me
  • Privacy Policy
  • Contact Me

Copywrite © 2023 TermsFeed®. All rights reserved.

Created By Sora Templates | Distributed By Gooyaabi Templates

Back to top