Search This Blog

Taystit by Hasna

Food, Recipes, and Beyond

  • Home
  • About Me
  • Recipes
    • Main Course
    • Snacks
    • Desserts
  • Uncategorized
    • Chicken
    • Meat
    • Vegetarian
    • Rice
    • Malabar Food
    • Baking
    • Breakfasts
    • Snacks
    • Fish
    • Pasta
    • Drinks
    • Soups
    • Desserts
  • Contact Me


 Hariyali Chicken Biryani


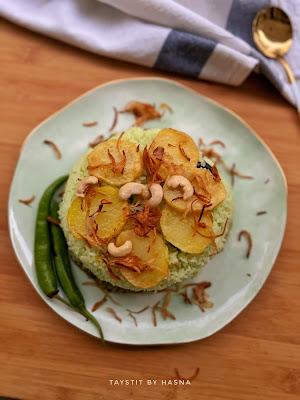
Hariyali Chicken Biryani/ Green Chicken Biryani is a recipe that I grasped/ learned from my in laws, basically my aunt-in-law, called Shabna. This is a special biryani that they make especially only during special celebrations like birthdays and anniversaries. So the last time I went to India my MIL and SIL was all praises about a special biryani that my aunt in law makes during such occasions. They said, the house smells amazing when she makes that biryani, and that unlike usual biryani, this had everything green in it and fried potatoes that made it extra special. I sooo wanted to try it. And finally I got a chance to taste it when it was their daughter's birthday and to my surprise I loved how flavorful the biryani was and of course it looked all green. Even the chicken, I was sure it was food color, and yes it was! That is why the biryani is only prepared during special occasions. So I wondered once in a while a little color won't hurt, but if preparing this biryani once every week, I'd suggest not to use the color.

Well, coming back to the flavors, one big mouthful and I could identify all the flavors, unlike in my recipe she had added capsicum pieces too. I didn't have capsicum/ bell pepper. Instead I added Spinach leaves (palak), this is totally optional, if you do not like the flavor of palak you can completely avoid it and still tastes sooo good*. Ever since I was back in Dubai, I wanted to replicate it, she was someone who found it difficult to explain the recipe like me. For me, I add spices and seasonings each time according to the flavor of the dish, so it will vary. So I almost made out the recipe in my head, noted down what I thought it would be like and it was a success. Just make sure you allow the green chicken masala and rice to stay in dum for some time .


Also, in the video I haven't allowed the onions to be translucent as to my liking, (as sun was setting and I wanted to finish filming in day light), so I pressure cooked the just the onion masala for 1 whistle, because we here like our biryani masala quite mushy, if you like the onions to stay without being smashy, just avoid this step. And that's it! Let's make this delicious Hariyali Chicken Biryani or as the kids call it, HULK Biryani! 😂

Ingredients : (makes for 3 people)

2 Large potatoes, sliced 

For the Masala:

  • 2 tsp Ghee/ Clarified Butter
  • 3 onions, sliced finely
  • 1 tbsp Garlic, crushed
  • 1 tsp Ginger, crushed
  • 2 medium Tomatoes, chopped
  • 1/2 bunch Spinach/ palak, blanched in salted hot water, cooled in ice water and pureed
  • Mint and Coriander leaves, as required, pureed
  • Salt, as required
  • 1 tsp Garam Masala 

Chicken Marination:

  • 1/2 cup oil for frying
  • 1/2 kg chicken  
  • 1 tsp ginger garlic paste
  • 1 tsp Lemon Juice 
  • Salt, as required
  • Green Food Coloring (optional)

For the Rice:

  • 3 tsp Ghee
  • 3 tbsp Vegetable Oil
  • 1 Onion, finely sliced
  • 8-10 Cashews
  • 3 Cloves
  • 1 inch piece Cinnamon Stick
  • 2 Cardamoms
  • 2 sprigs Curry leaves
  • 3 cups Jeerakashala Rice, washed and drained
  • 4 1/2 cups water
  • 2 Maggi Chicken Cube
  • 1 tsp Green Food Coloring (optional)
  • Salt, as required
  • Lemon juice, as required
 

Instructions:

  1. Marinate chicken as per the ingredients mentioned below chicken marination and set aside.
  2. Slice Potatoes, sprinkle salt and fry them in oil, set aside.
  3. Fry the chicken pieces for around 15- 20 minutes , drain and set aside.
  4. Now to make the masala, blanch the spinach and cool with ice water, puree along with coriander and mint leaves.
  5. In a large pot, pour the oil that was used to fry chicken and ghee.
  6. Next, saute the sliced onions with some salt until translucent.
  7. Next add the crushed ginger garlic and saute until raw aroma disappears.
  8. Now add your chopped tomatoes, allow to cook well.
  9. Next add in the pureed leaves and herbs, saute with salt and garam masala. Pressure cook the masala for 1 whistle if not mushy enough.
  10. In a large non stick rice pot, fry the onion until golden brown and crispy for the rice in ghee and vegetable oil and set aside.
  11. Now add in the whole spices like cloves, cinnamon stick and cardamom, add in your washed and drained rice and Sautee for a couple of minutes, to that add in the curry leaves, Maggi chicken cube, green food color ( if required) and salt, as required .
  12. Pour water and allow to cook for 15 minutes and gently turn the rice over to check if cooked.
  13. To the cooked masala, add in your fried chicken pieces and allow to boil on simmer for 5 minutes.
  14. Squeeze lemon juice as required, check for seasonings, put on dum by putting the rice as a layer over the masal over which some fried onion and cashews are sprinkled.
  15. Place the fried potatoes.
  16. Cover the pot with aluminum foil, place lid and allow to be on dum for 1/2 hour at least.
  17. Mix everything together. Serve hot and enjoy!


Notes:

  • If using palak make sure to add a lot of lemon juice to balance out the bitter flavor of palak.
  • You will only require half a bunch of palak.  
  • The video shows recipe made for 6 people.

Do try this recipe and don't forget to share your experience/feedback with me here in the comments or feel free to send me a mail. Also, do tag me at #taystedit if you try out my recipes on Facebook, Instagram etc so that I can see when you make it. ♡♡♡♡

Tamil Nadu/ Madras Chicken Dum Biryani


Nothing screams the weekend like biryani, and Tamil Nadu biryani is one of the best biryani that you could have! It is so light on your tummy, yet so flavorful and easy to prepare. My advice would be to prepare the biryani as early as possible and allow the biryani to develop better flavors by staying in dum. 


Now coming back to our recipe of the day Tamil nadu/Madras Style Chicken Dum Biryani. I have had this special fondness to try out this yummy biryani which has its ingredients very similar to our very own Thalassery Biryani. Although there is an addition of yogurt and the rice used here is Basmati rice. And the process varies slightly from Thalassery Biryani, of course! You definitely need some time to keep the rice and Masala in dum.

The first time I tried attempting this biryani, I did not quite like it. Though the next day when the flavors from the chicken Masala actually mingled with the rice, it tasted super delicious. I was all so curious to try out Madras Biryani as I have always heard Tamil stars, celebrities and anyone from Tamil nadu rave about Madras biryani. If you ask them their favorite food it's always biryani. Though I haven't tried the real Madras biryani, I wanted to replicate and ask the people in my house i.e, my bhabhi who has been bought up in Madras and my Hubby who has done his college in Coimbatore and wanted them to check if it resembles. And to my surprise, bhabhi said it's exactly the same way they prepare, just that it's red in color and my hubster told me that it felt like he back in his college days and was similar to what he used to have from coimbatore.

OK. So now, I myself was super happy. But I would definitely prefer Thalassery Biryani to this. But who doesn't like a change and it definitely tastes soo good the next day. Especially along with the raita. As this biryani is quite dry compared to what we usually prepare, raita definitely helps bring out its flavor dimensions. This is when little Huda helped me prepare this biryani. She loves to be with me in my kitchen. So yeah, basically this biryani credit goes to my 3 year old daughter who became a 4 year old last week. (like literally where is the time flying?😭) 


Yallah! Let's make this yum biryani and enjoy the moment.😋

Ingredients :


Rice:

  • 3 cups Basmati rice
  • 4 and 1/2 cups normal water
  • 3 tbsp ghee

Masala:

  • 1 kg fresh chicken
  • 1 tbsp ghee
  • 3 tbsp vegetable oil 
  • 2 cloves
  • 3 cardamom pods
  • 2 2" cinnamon stick 
  • 3 medium onions, sliced finely
  • 5-6 garlic cloves, chopped coarsley
  • 1" ginger, chopped coarsely 
  • 3-4 green chillies 
  • 1 medium tomato, chopped 
  • 1 tbsp kashmiri chilli powder 
  • 2 tbsp Coriander powder
  • 1/4 cup yogurt 
  • Salt, as required 
  • Couple of tbsp of lemon juice
  • 15 leaves of mint leaves approx, chopped
  • 5-6 sprigs of Coriander leaves, chopped
  • Red/orange food color (optional) 

Raita:

  • 1 cup yogurt 
  • 1/4 of an onion, finely chopped 
  • 2 small green chillies, slit

Instructions :

  1. Soak your Basmati rice for around 15-20 minutes and cook the Basmati rice by turning the flame to the lowest setting when you see fumes forming on top of the boiling water and close the lid and cook untouched for 20-25 minutes (until 80% cooked) and open the lid, pour in your ghee and fluff your rice using a fork gently and allow to cool completely, so that the rice attains better texture. (Cooling in a platter is a good idea) 
  2. In a pressure cooker,  pour in your ghee and vegetable oil (flavorless) and add in your whole spices (cloves, cardamom, and cinnamon) and Sautee. 
  3. Next add in your sinely sliced onions and add some some salt, Sautee until translucent. 

  4. Chop your garlic, ginger and green chillies using a hand held chopper or grinder. 
  5. Add the ground ingredients to the onions and sauté for a couple of minutes until the raw aroma dissappears. 


  6. Next add in your chopped tomatoes and cook until tomatoes turn mushy. 
  7. Now add in your Coriander powder and Chilli powder and sauté well. 
  8. Add in your yogurt and mix gently. 

  9. Finally add in your chicken, salt and chopped herbs. 

  10. Close and cook for 2 whistles. Once the pressure is down, open the cooker and allow the gravy to thicken by keeping the masala under low flame. Once done, finally squeeze in your lemon.

  11. Into a larger vessel start layering the masala and the rice, begining with the masala layer, then a rice layer and a sprinkle of chopped herbs. 
  12. Continue the process until done and add in your color (if you are adding). I prefer my biryani without color. 
  13. Using a foil paper or Maida dough close the lid and seal in the aroma. 
  14. In a preheated oven, 200° C, place your vessel and allow to stay in dum for around 20-30 minutes. 
  15. Serve hot with raita. 

Notes:

  • Refer to my Bukhari rice recipe for tips to cook Basmati rice perfectly to the T. 
  • You may add in red color, which is the authentic style. I haven't used any color here. 
  • You may do the dum process on the stove top if you do not have an oven by placing a flat tawa on flame and put the flame to simmer and place your vessel with your biryani while using a foil to cover your vessel and finally closing with a lid and allow to dum for around 15-20 minutes. 


Do try this recipe and don't forget to share your experience/feedback with me here in the comments or feel free to send me a mail. Also, do tag me at #taystedit if you try out my recipes on Facebook, Instagram etc so that I can see when you make it. ♡♡♡♡
Older Posts

Search This Blog

My name is Hasna Haneef, a mommy to a toddler, hailing from Thalassery, Kerala. Welcome to my humble abode on the Internet; wherein I share all my recipes and experiments. I am glad to have you on board!

TRENDING POSTS

  • Kerala Style Squid Roast
  • Chicken Steak with Creamy Mushroom Sauce
  • Emirati Chebab
  • Regag - Emirati Flat bread
  • Kerala Beef Fry/ Nadan beef dry fry
  • Copy Cat Caesars Mini Pizza

About Me

May peace be with you!

Welcome to my blog.

I am delighted to have you on board. My name is Hasna Haneef, a mommy to a toddler, hailing from Thalassery, Kerala. My homeplace being Dubai, as I am born and brought up here and I am very influenced by the lifestyle and the variety of authentic cuisines I get to try from here, which has made me try anything that comes across me
, click here →

Stay Connected!

Join Our Madness!

Join with Thousands Of Subscribers ! Get Our Latest Recipes Delivered to Your email Inbox!

Powered by follow.it
  • Home
  • About Me
  • Recipes

    • Main Course
    • Desserts
    • Snacks

    Uncategorized

    • Chicken
    • Meat
    • Vegetarian
    • Rice
    • Malabar Food
    • Baking
    • Breakfasts
    • Snacks
    • Drinks
    • Pasta
    • Fish
    • Soups
    • Desserts
  • Contact Me

Featured Post

Triple Chocolate Hazelnut Skillet Cookie

Blog Archive

  • ▼  2025 (4)
    • ▼  April (2)
      • 1 minute Chocolate Mug Cake
      • Grilled Cheese California Burrito
    • ►  March (1)
    • ►  February (1)
  • ►  2024 (36)
    • ►  October (4)
    • ►  September (5)
    • ►  July (1)
    • ►  June (2)
    • ►  May (4)
    • ►  April (3)
    • ►  March (10)
    • ►  January (7)
  • ►  2023 (47)
    • ►  December (3)
    • ►  September (2)
    • ►  August (6)
    • ►  July (6)
    • ►  June (9)
    • ►  May (4)
    • ►  April (5)
    • ►  March (6)
    • ►  February (3)
    • ►  January (3)
  • ►  2022 (69)
    • ►  November (4)
    • ►  October (6)
    • ►  September (7)
    • ►  August (9)
    • ►  July (12)
    • ►  June (5)
    • ►  May (5)
    • ►  April (12)
    • ►  March (4)
    • ►  February (2)
    • ►  January (3)
  • ►  2021 (24)
    • ►  November (1)
    • ►  October (2)
    • ►  July (1)
    • ►  June (4)
    • ►  May (6)
    • ►  April (4)
    • ►  February (4)
    • ►  January (2)
  • ►  2020 (82)
    • ►  December (5)
    • ►  November (6)
    • ►  October (4)
    • ►  September (2)
    • ►  August (5)
    • ►  July (10)
    • ►  June (10)
    • ►  May (13)
    • ►  April (12)
    • ►  March (8)
    • ►  February (4)
    • ►  January (3)
  • ►  2019 (22)
    • ►  December (1)
    • ►  November (2)
    • ►  October (6)
    • ►  September (1)
    • ►  August (1)
    • ►  February (3)
    • ►  January (8)
  • ►  2018 (15)
    • ►  December (4)
    • ►  November (6)
    • ►  October (3)
    • ►  September (2)

Subscribe Us

Labels

Bake Biscuits Breakfast Brown rice Burger Cheese Chocolate Dal Egg Emirati Fish Iftar Indonesian Japanese Jeerakashala rice Kerala Keto Kuwait food Lunch Milk Mutton Thai food UAE food afghan cuisine arabic beef biryani bread burnt cheesecake cake chicken cream dessert dinner greek healthy indo chinese lamb malabar prawns pudding puffs quick dinner ideas recipe refreshing drink rice salad sandwich stir fry vegetables vegetarian veggies yemeni

Contact Form


POPULAR POSTS AND PAGES

Kerala Style Squid Roast

Kerala Style Squid Roast

June 18, 2020
Chicken Steak with Creamy Mushroom Sauce

Chicken Steak with Creamy Mushroom Sauce

November 05, 2018
Emirati Chebab

Emirati Chebab

June 01, 2023
Regag - Emirati Flat bread

Regag - Emirati Flat bread

December 02, 2020
Kerala Beef Fry/ Nadan beef dry fry

Kerala Beef Fry/ Nadan beef dry fry

October 08, 2019

Pages

  • Home
  • About Me
  • Privacy Policy
  • Contact Me

Copywrite © 2023 TermsFeed®. All rights reserved.

Created By Sora Templates | Distributed By Gooyaabi Templates

Back to top