Search This Blog

Taystit by Hasna

Food, Recipes, and Beyond

  • Home
  • About Me
  • Recipes
    • Main Course
    • Snacks
    • Desserts
  • Uncategorized
    • Chicken
    • Meat
    • Vegetarian
    • Rice
    • Malabar Food
    • Baking
    • Breakfasts
    • Snacks
    • Fish
    • Pasta
    • Drinks
    • Soups
    • Desserts
  • Contact Me

Creamy Chicken Casserole

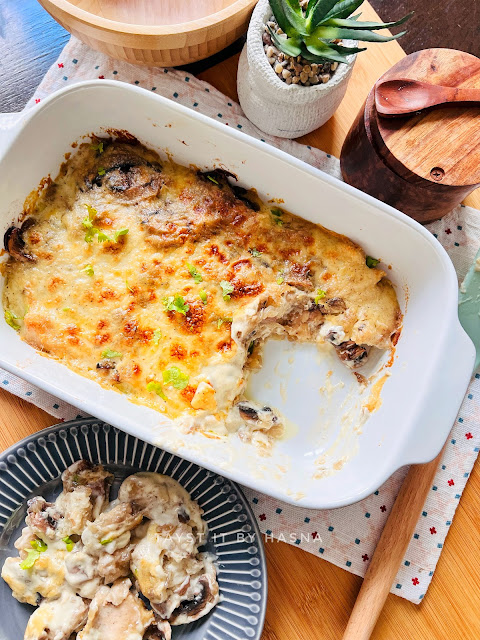
Updated Picture of Casserole Chicken 


The name might sound cheesy, but trust me, this is one among the most requested recipes of all. For me, comfort food is all about my chicken casserole. Not boasting here, but this flavor-packed casserole is just insane. The main 3 stages of cooking for this casserole are a chicken layer, an onion-mushroom layer, and a creamy sauce layer. If you don't like mushrooms you are gonna love it after you make this. This is one dish that is a family favorite now. They keep asking for more. It is mouthwatering - finger lickin good.

The first layer of chicken is a base with strips of chicken floured and cooked in some olive oil. The next layer is what makes the dish so flavorful, the onion-mushroom layer. Then a sauce similar to the white sauce is made and heavy cream or any thick cream is added to the sauce and poured over the chicken and mushroom. The sauce helps combine all the flavors when kept in the oven. Since casserole is a deep dish used for baking in the oven and serving the dish on its own, the dish is called a casserole.

Updated picture of Casserole Chicken 


Don't have an oven? Don't fret. Just make the same in a deep non-stick dish instead of a casserole and keep a fry pan beneath the non-stick casserole-pan and cover the pan using a foil and place the lid on. When it gets done, the sauce mimics a cheese layer. So you don't have to add any extra cheese.

Have this hot with some pasta, rice or potatoes (in any form). I prefer warm mashed potatoes to go with the sauce. I will post the recipe of my mashed potatoes soon. It is utterly butterly delicious. I am already drooling while typing this. Try this and I am sure this will turn out to be your family favorite too. Believe me, IT IS THAT GOOD. *smack*


Ingredients: Recipe adapted from Natasha’s Kitchen 

  • 500 gm boneless chicken breasts, cut into 1 -inch thick strips
  • Salt to taste
  • 1/4 tsp black pepper plus more to taste
  • ½ tsp Garlic Powder
  • 1 cup all-purpose flour to coat the chicken
  • 6 Tbsp olive oil divided
  • 1 box about 12 - 15 white mushrooms thickly sliced
  • 1 tsp soy sauce
  • 1 medium onion finely diced
  • 3 garlic cloves minced

Ingredients for White Sauce

  • 2 Tbsp unsalted butter
  • 1 Tbsp Olive Oil
  • 3 Tbsp all-purpose flour for the sauce
  • 1 1/2 cups chicken broth
  • 1 cup milk + 1/2 cup heavy cream/ thick cream 

Instructions:


  1. Season chicken with salt and pepper and dip both sides in flour. Heat 3 Tbsp oil in a large skillet over medium/high heat. Once oil is hot, add chicken and saute until golden. Work in batches if needed so you don't crowd your pan. Don't worry about cooking the chicken through; it still needs to go in the oven. Transfer chicken to a 13x9 casserole baking dish/ a deep non stick pan. 

  2. Scrape off any debris from the skillet. Add 3 Tbsp oil along with sliced mushrooms and diced onions and saute until soft and golden. Add garlic and saute another 1-2 min. Add in the soy sauce. Sautee till the mushrooms get done. Spread mixture over the chicken.
  3. In the same pan you've been using, melt 3 Tbsp butter. Whisk in 3 Tbsp flour for a few seconds till the flour is cooked slightly. 
  4. Add 1 1/2 cups chicken broth, 1/4 tsp pepper, and whisk until smooth. Add 1 cup heavy cream/ molk and bring to a simmer. Season with salt and pepper to taste. 
  5. Pour sauce over the chicken and mushrooms. Cover with foil and bake at 350˚F for 45 minutes. If doing the same in a deep non stick pan, cover the pan with foil and place the deep pan on a fry pan and let it cook on simmer for 20-25 minutes. Serve warm or hot over mashed potatoes, pasta or rice.


Do try this recipe and don't forget to share your experience/feedback with me here in the comments or feel free to send me a mail. Also, do tag me at #taystedit if you try out my recipes on Facebook, Instagram etc so that I can see when you make it. ♡♡♡♡

Crunchy Chilli Baby Corn Skewers


Do you love baby corns? I lurve the corn family in any form, be it corn on the cob, frozen corn, baby corn, popcorn, cornflakes yata yata.. I was not sure what to make of these baby corns when I bought them. I use them in salads mostly, but I was craving for Indo-Chinese the other day, so I thought to myself why not try a version of chili chicken using baby corn. And this appetizer happened! I coupled it with Chinese Hakka Noodles as the main course. It is a very interesting concept for the baby corn, you gotta have it hot if you gotta know what I am saying.


The crispiness is achieved by double frying the baby corns and you can obtain the crunchy munchiness. It is super delish yet very simple too.  Fit for veg or non-veg people, this appetizer is sure to tingle your taste buds with excitement. Do try the recipe, and comment below, I would love to hear from you.

INGREDIENTS

  • 1 pack Baby Corn
  • 2 tbsp All-Purpose Flour
  • 1½ teaspoon Corn Flour
  • Salt
  • Water
  • 1 tbsp Sesame Seeds (roasted)
  • 1 tbsp Vegetable Oil
  • 1 tsp Garlic (chopped)
  • 2 Green Chilis 
  • 1 tsp Spring Onion
  • 2 tbsp Ketchup
  • 2 tsp Soy Sauce
  • 1/2 tsp green chilli paste 

INSTRUCTIONS

  1. Boil or steam the baby corn for 2 minutes.
  2. Mix All-Purpose Flour, Corn Flour, Salt, and Water and make a loose batter.
  3. Heat oil in a small deep pan and deep fry the baby corn by dipping in the batter. After 5 minutes, double fry the baby corn if you want it crispier. 
  4. In a separate pan, pour in the oil and add in the garlic and green chillis and saute till the raw smell disappears.
  5. Mix in the sauces and sautee for a minute. Add the fried baby corn to the pan and sautee till the sauces get covered in the sauce and immediately transfer to a serving dish.
  6. Push in Skewers onto the baby corn lengthwise. Garnish with spring onions and sesame seeds.
Do try this recipe and don't forget to share your experience/feedback with me here in the comments or feel free to send me a mail. Also, do tag me at #taystedit if you try out my recipes on Facebook, Instagram etc so that I can see when you make it. ♡♡♡♡

Creamy Fish Molly/ Moilee/ Molee


Have you ever had fish molly? A traditional Kerala dish. It is a fish stew, mildly spiced, originated in Kerala with a Portuguese impact. It is prepared in a coconut milk base which gives its mildness. This curry is simply delicious, loved by the little ones too as it isn't very spicy. There is a story behind the name and invention to this curry. Centuries ago when the Portuguese invaded India, the local people of Kerala used to prepare food very spicy, which the Portuguese weren't fond of. Kerala was a place abundant in spices, coconut, and seafood. So to suit their taste buds, the curry was prepared with coconut milk to make it mild. This the Portuguese loved and named the curry after the lady;Molly, who made it. That is how Fish Molly/ Moilee happened.

I have my own touch to this recipe I have added cashew nut paste for a more creamier touch. And I used Coconut milk powder for ease of cooking. You may use fresh coconut milk for a more tastier experience. This isn't exactly the authentic recipe. But I like it this way. I haven't added the tomatoes in the last stage unlike the authentic recipe, the fact being, no one likes to have raw tomatoes in the curry here!😄

The aroma when you make this dish is simply amazing. The curry leaves when sauteed in ghee takes you to a whole new experience taste and smell wise. The spiciness comes from the green chilli and black pepper yet they are made subtle using coconut milk. The fish is lightly marinated in salt, pepper and turmeric powder and fried for a couple of minutes, just until the fish is slightly done. The fish gets done in the curry base. It goes best with Appa, Idiyappam, and Chapathi/ Roti. Let's get cooking!


INGREDIENTS

For the marinade
  • ½ kg fish (see notes, I have used King Fish)
  • 1 tbsp lemon juice
  • 1 tsp turmeric powder
  • 1 tsp pepper powder
  • Salt (as required)
For the fish molee
  • ½ inch sized ginger piece (finely minced)
  • 2 garlic cloves (finely chopped)
  • 1 medium sized onion, 4-5 shallots(sliced), shallots are better
  • 3-4 green chilies (slit)
  • ¼ tsp turmeric powder
  • 1 tsp pepper
  • 1 cup thin coconut milk
  • 1 cup thick coconut milk
  • 2 sprigs of curry leaves
  • 1 tbsp lemon juice
  • 1 tomato (chopped or sliced)
  • ½ tsp red chilli flakes
  • ½ tsp garam masala
  • 8 Cashew Nuts (made into a paste by boiling or soaking in hot water)
  • Salt (as required)
  • 1 tsp ghee
  • Coconut oil (as required)

INSTRUCTIONS


  1. Clean and cut fish into pieces. Marinate with lemon juice, pepper, salt and turmeric powder for 15-20 minutes.
  2. In a kadai/pan, add little coconut oil and shallow fry fish on both sides. Keep it aside.
  3. In a separate pan, add oil and ghee and heat on a medium flame. Add the sliced onions and sauté until translucent, add the curry leaves, minced ginger, garlic, and green chilies, sauté for a minute until its raw smell subsides.
  4. Add tomatoes and let it cook for a couple of minutes.
  5. Next add the turmeric powder, pepper powder, and thin coconut milk. Close the lid and allow the curry to boil for 3 minutes on a medium flame. When the oil starts separating, reduce the flame to a low and mix well.
  6. Now add the fried fish, cover it with the gravy, and allow the curry to blend well with the fish, bring to a boil. Add the Cashew cream. Do not stir once the fish is added, instead rotate the pan to mix the gravy.
  7. Add the thick coconut milk and cook on a low flame for another 2 minutes, make sure not to allow the dish to boil beyond this stage. Check for the seasoning.
  8. Add sliced round tomatoes and more curry leaves and chilli flake, close the lid and switch off the flame. Let the tomato cook in the remaining steam.
Serve with Appam, Idiyappam, and Chapati/Roti. Enjoy!


 Notes:
  • Fishes like salmon, king fish, Pomfret etc can be used. 
  • Adjust the spiciness of the curry according to your taste by reducing green chilies.
  • Coconut oil is the ideal oil for all authentic Kerala recipes


Do try this recipe and don't forget to share your experience/feedback with me here in the comments or feel free to send me a mail. Also, do tag me at #taystedit if you try out my recipes on Facebook, Instagram etc so that I can see when you make it. ♡♡♡♡

Arabian Delight - Shakshuka/ Shakshouka


Poached eggs in a spicy tomato gravy to fulfill your palate, that is SHAKSHUKA, a one-skillet dish
of eggs poached in a smoky, spicy, tomato sauce. It is simply fun to say it. TRY IT! 😃 Everyone looks at me so weird when I say the name of the dish, as though I invented the name. 😎 Poor me, lol.😅 Here I am showing you a step by step of pictures that I recently made. Shakshuka is a Middle Eastern/ Mediterranean dish which is healthy at the same time easy to cook. I would say it is the best dish a beginner could cook, it is that simple yet delicious. Shakshuka is traditionally made in a cast iron pan (though any stainless steel or nonstick pan will work) and served straight from the pan at the table so everyone can dig in and help themselves. A loaf of good bread or pita bread is a must to mop up the sauce. A crusty bread I would say. Definitely a hearty meal!


The meaning of the word Shakshuka simply means 'mixture', a mixture of all the fine ingredients to sum up to a great dish. When I first heard of the name I anticipated it would be something I got to try for sure!  I wasn't disappointed. This can be made for breakfast, dinner or any time of the day. My Mr loves this dish, Alhamdulillah, so I make it quite often and keep playing with flavors. This is a very versatile dish, play with the flavors that suit your taste buds and I'm sure you won't regret it! I also add schezwan sauce at times for a change. You can totally avoid the chicken cube, if you are thinking healthy. And I like to serve it with a nice dollop of sour cream to tally the tanginess. Don't want to make you salivate more, let's move on to the ingredients and get started! 😊

INGREDIENTS


  • 1 tbsp olive oil
  • 1/2 onion, peeled and diced
  • 1 clove garlic, minced
  • 1 bell pepper, seeded and chopped
  • 1 Maggi Chicken cube
  • 2 cups ripe diced tomatoes (semi-blended)
  • 1 tbsp tomato paste
  • 1 tsp chili powder
  • 1 tsp cumin
  • 1 tsp paprika
  • Pinch of sugar (optional, to taste)
  • Salt and pepper, to taste
  • ½ tsp red chili flakes
  • 4 eggs (as per your requirements)
  • 1/2 tbsp fresh chopped fresh dill leaves(optional, for garnish)
  • A dollop of Sour Cream

  • INSTRUCTIONS

    1. Heat 3 tbsp olive oil in a large cast iron skillet. Add the onions, bell pepper, garlic and once the raw smell disappears add the spices, pinch salt and pepper. Cook, stirring frequently until the vegetables have softened, about 5-10 minutes.


    2. Add the semi-blended tomatoes, tomato sauce, and sugar. Simmer until the tomato mixture begins to reduce, about 10-12 minutes. Taste and adjust the seasoning to your liking.
    3. Using a wooden spoon, make 4 indentations, or “wells,” in the tomato mixture (make sure the indentations are spaced out). Gently crack an egg into each indention.


    4. Reduce the heat, cover the skillet, and cook on low until the egg whites are set about 7-10 minutes, depending on how runny or hard you want the yolk.
    5. Uncover and add the fresh dill leaves. You can add more black pepper or crushed red chili flakes if you like. Serve with a dollop of sour cream and warm pita, bread, or your choice of crusty bread. Enjoy!

    Let me know in the comments below if you want the recipe for my pita bread. Would love to hear from you! Bon appetit!😋


    Do try this recipe and don't forget to share your experience/feedback with me here in the comments or feel free to send me a mail. Also, do tag me at #taystedit if you try out my recipes on Facebook, Instagram etc so that I can see when you make it. ♡♡♡♡

    Mini Falafel Bites with Tahini Dip


    Falafel? What is that?... a few of you might wonder. Falafels are balls made of soaked, ground and seasoned chickpeas, fried to perfection. Any kid bought up in a middle eastern country cannot deny the fact that they do not know what a falafel is. It is the cheapest yet tastiest snack one can find in the streets of a middle eastern country. People have now innovated falafels into sandwiches, shawarmas etc. There are many variations of the same falafel with slight differences in the ingredients. Let me tell you I have come across only a few good cafeterias or restaurants that serve the best falafels, its either their falafels I like or their tahini dip. Never the both. Let me know in the comments below if you know one such place that serves the best falafels and dips in town.

    And like I said Al Mallah, famous for their falafels, I love them, but not their dip, boooo! And I used to love one in Meena Bazar, Bur Dubai that cafe is no more, cannot recall the name of the cafe but they used to serve piping hot crispy falafels, I used to love it, now the building itself is demolished. Then there is this childhood favorite, again in Meena Bazar, The Persian Cafeteria/ Farisian Cafeteria, a very famous, small cafeteria, an old man, who I believe is the owner of the shop has been serving beautiful lip-smacking, tasty and cheap snacks including falafels and samosas. But I guess old age has struck him and the place is no more good. The cleanliness, the taste, everything is gone, it's sad. It was one of my favorite childhood hog spots. So since then, I have wanted to develop my own recipe for falafel. Be it Ramadan or any month, falafels are so flavorful yet an amazing snack you cannot get enough of. I always like small snacks, these are pop in your mouth sized hence the name mini falafel bites!

    Let me not drag too much and let's dive into this crispy flavorsome snack!

    INGREDIENTS

    Falafel

    • 1 Cup Chick Peas (soaked overnight)
    • 1 small Red Onion, roughly chopped
    • 2 small Garlic cloves, minced
    • A handful of Coriander Leaves 
    • A few Mint leaves
    • 1 tsp Cumin seeds
    • 1 tsp Coriander seed
    • ½ tsp Paprika powder
    • 1 tsp Lemon Juice
    • 2 tbsp All-Purpose Flour
    • Salt, to taste
    • Vegetable Oil

    Tahini Sauce

    • ¼ Cup Tahini
    • 1 tsp Lemon Juice
    • Pinch of salt
    • 2 tbsp Yogurt
    • Water, if required

    INSTRUCTIONS

    1) Drain the soaked chickpeas and rinse them, you should have about 3 cups now.

    2) Working in two batches, add half of the chickpeas, coriander leaves, mint leaves, garlic, onion and to a food processor and blitz until you are left with a coarse paste that’s not completely smooth but has a granular texture. Be careful not to over blitz. Place the mixture in a bowl and repeat the process with the other half of the ingredients.

    3) In a small dry skillet, add the cumin seeds and coriander seeds and toast until fragrant, then place them in a mortar and pestle and grind them until almost smooth, place in the bowl with the ground chickpea mixture along with the lemon juice, flour, and salt, mix until well combined.

    4) Fill a deep bottomed pot with some vegetable oil and let the oil become hot enough.

    5) Grab a bit of mixture and make bite size falafel balls, fry them in medium-high flame for 2-3 min each side until deeply golden brown and crispy, do not turn the balls immediately after you put the falafel balls in the oil.

    6) Drain on a paper towel lined plate and continue with the rest.


    For the sauce:

    7) In a bowl, whisk together the tahini, lemon juice, yogurt, and salt. The tahini will start to seize and get thick and dry, this is normal so start adding the water a little at a time if required, only if the consistency is too thick.


    Serving Suggestion: Serve with a hot cup of Sulaimani/ Black tea.


    Notes:

    • Do not over blitz the chickpea mixture, the big granule chunks make the falafel crispy.
    • Let them cook in the oil properly on medium flame, as the insides have to get done evenly.
    • Use the stem part of coriander leaves in this recipe, no one will ever make out if they are leaves or stems. (Leaves can be used in various other dishes, no need to waste them as they get ground)
    • Be careful not to over toast the seeds.

    Do try this recipe and don't forget to share your experience/feedback with me here in the comments or feel free to send me a mail. Also, do tag me at #taystedit if you try out my recipes on Facebook, Instagram etc so that I can see when you make it. ♡♡♡♡
    Newer Posts
    Older Posts

    Search This Blog

    My name is Hasna Haneef, a mommy to a toddler, hailing from Thalassery, Kerala. Welcome to my humble abode on the Internet; wherein I share all my recipes and experiments. I am glad to have you on board!

    TRENDING POSTS

    • Emirati Chebab
    • Chicken Steak with Creamy Mushroom Sauce
    • Kerala Style Squid Roast
    • Regag - Emirati Flat bread
    • Kerala Beef Fry/ Nadan beef dry fry
    • Junglee Chicken Sandwich

    About Me

    May peace be with you!

    Welcome to my blog.

    I am delighted to have you on board. My name is Hasna Haneef, a mommy to a toddler, hailing from Thalassery, Kerala. My homeplace being Dubai, as I am born and brought up here and I am very influenced by the lifestyle and the variety of authentic cuisines I get to try from here, which has made me try anything that comes across me
    , click here →

    Stay Connected!

    Join Our Madness!

    Join with Thousands Of Subscribers ! Get Our Latest Recipes Delivered to Your email Inbox!

    Powered by follow.it
    • Home
    • About Me
    • Recipes

      • Main Course
      • Desserts
      • Snacks

      Uncategorized

      • Chicken
      • Meat
      • Vegetarian
      • Rice
      • Malabar Food
      • Baking
      • Breakfasts
      • Snacks
      • Drinks
      • Pasta
      • Fish
      • Soups
      • Desserts
    • Contact Me

    Featured Post

    Triple Chocolate Hazelnut Skillet Cookie

    Blog Archive

    • ►  2025 (4)
      • ►  April (2)
      • ►  March (1)
      • ►  February (1)
    • ►  2024 (36)
      • ►  October (4)
      • ►  September (5)
      • ►  July (1)
      • ►  June (2)
      • ►  May (4)
      • ►  April (3)
      • ►  March (10)
      • ►  January (7)
    • ►  2023 (47)
      • ►  December (3)
      • ►  September (2)
      • ►  August (6)
      • ►  July (6)
      • ►  June (9)
      • ►  May (4)
      • ►  April (5)
      • ►  March (6)
      • ►  February (3)
      • ►  January (3)
    • ►  2022 (69)
      • ►  November (4)
      • ►  October (6)
      • ►  September (7)
      • ►  August (9)
      • ►  July (12)
      • ►  June (5)
      • ►  May (5)
      • ►  April (12)
      • ►  March (4)
      • ►  February (2)
      • ►  January (3)
    • ►  2021 (24)
      • ►  November (1)
      • ►  October (2)
      • ►  July (1)
      • ►  June (4)
      • ►  May (6)
      • ►  April (4)
      • ►  February (4)
      • ►  January (2)
    • ►  2020 (82)
      • ►  December (5)
      • ►  November (6)
      • ►  October (4)
      • ►  September (2)
      • ►  August (5)
      • ►  July (10)
      • ►  June (10)
      • ►  May (13)
      • ►  April (12)
      • ►  March (8)
      • ►  February (4)
      • ►  January (3)
    • ▼  2019 (22)
      • ►  December (1)
      • ►  November (2)
      • ►  October (6)
      • ►  September (1)
      • ►  August (1)
      • ►  February (3)
      • ▼  January (8)
        • Creamy Chicken Casserole
        • Crunchy Chilli Baby Corn Skewers
        • Creamy Fish Molly/ Moilee/ Molee
        • Arabian Delight - Shakshuka/ Shakshouka
        • Mini Falafel Bites with Tahini Dip
        • The Ultimate Healthy Chicken Brown Fried Rice
        • Roasted Rosemary Potatoes and Cauliflower
        • Tiramisu Brownie Ice Cream Sandwich Bars
    • ►  2018 (15)
      • ►  December (4)
      • ►  November (6)
      • ►  October (3)
      • ►  September (2)

    Subscribe Us

    Labels

    Bake Biscuits Breakfast Brown rice Burger Cheese Chocolate Dal Egg Emirati Fish Iftar Indonesian Japanese Jeerakashala rice Kerala Keto Kuwait food Lunch Milk Mutton Thai food UAE food afghan cuisine arabic beef biryani bread burnt cheesecake cake chicken cream dessert dinner greek healthy indo chinese lamb malabar prawns pudding puffs quick dinner ideas recipe refreshing drink rice salad sandwich stir fry vegetables vegetarian veggies yemeni

    Contact Form


    POPULAR POSTS AND PAGES

    Emirati Chebab

    Emirati Chebab

    June 01, 2023
    Chicken Steak with Creamy Mushroom Sauce

    Chicken Steak with Creamy Mushroom Sauce

    November 05, 2018
    Kerala Style Squid Roast

    Kerala Style Squid Roast

    June 18, 2020
    Regag - Emirati Flat bread

    Regag - Emirati Flat bread

    December 02, 2020
    Kerala Beef Fry/ Nadan beef dry fry

    Kerala Beef Fry/ Nadan beef dry fry

    October 08, 2019

    Pages

    • Home
    • About Me
    • Privacy Policy
    • Contact Me

    Copywrite © 2023 TermsFeed®. All rights reserved.

    Created By Sora Templates | Distributed By Gooyaabi Templates

    Back to top