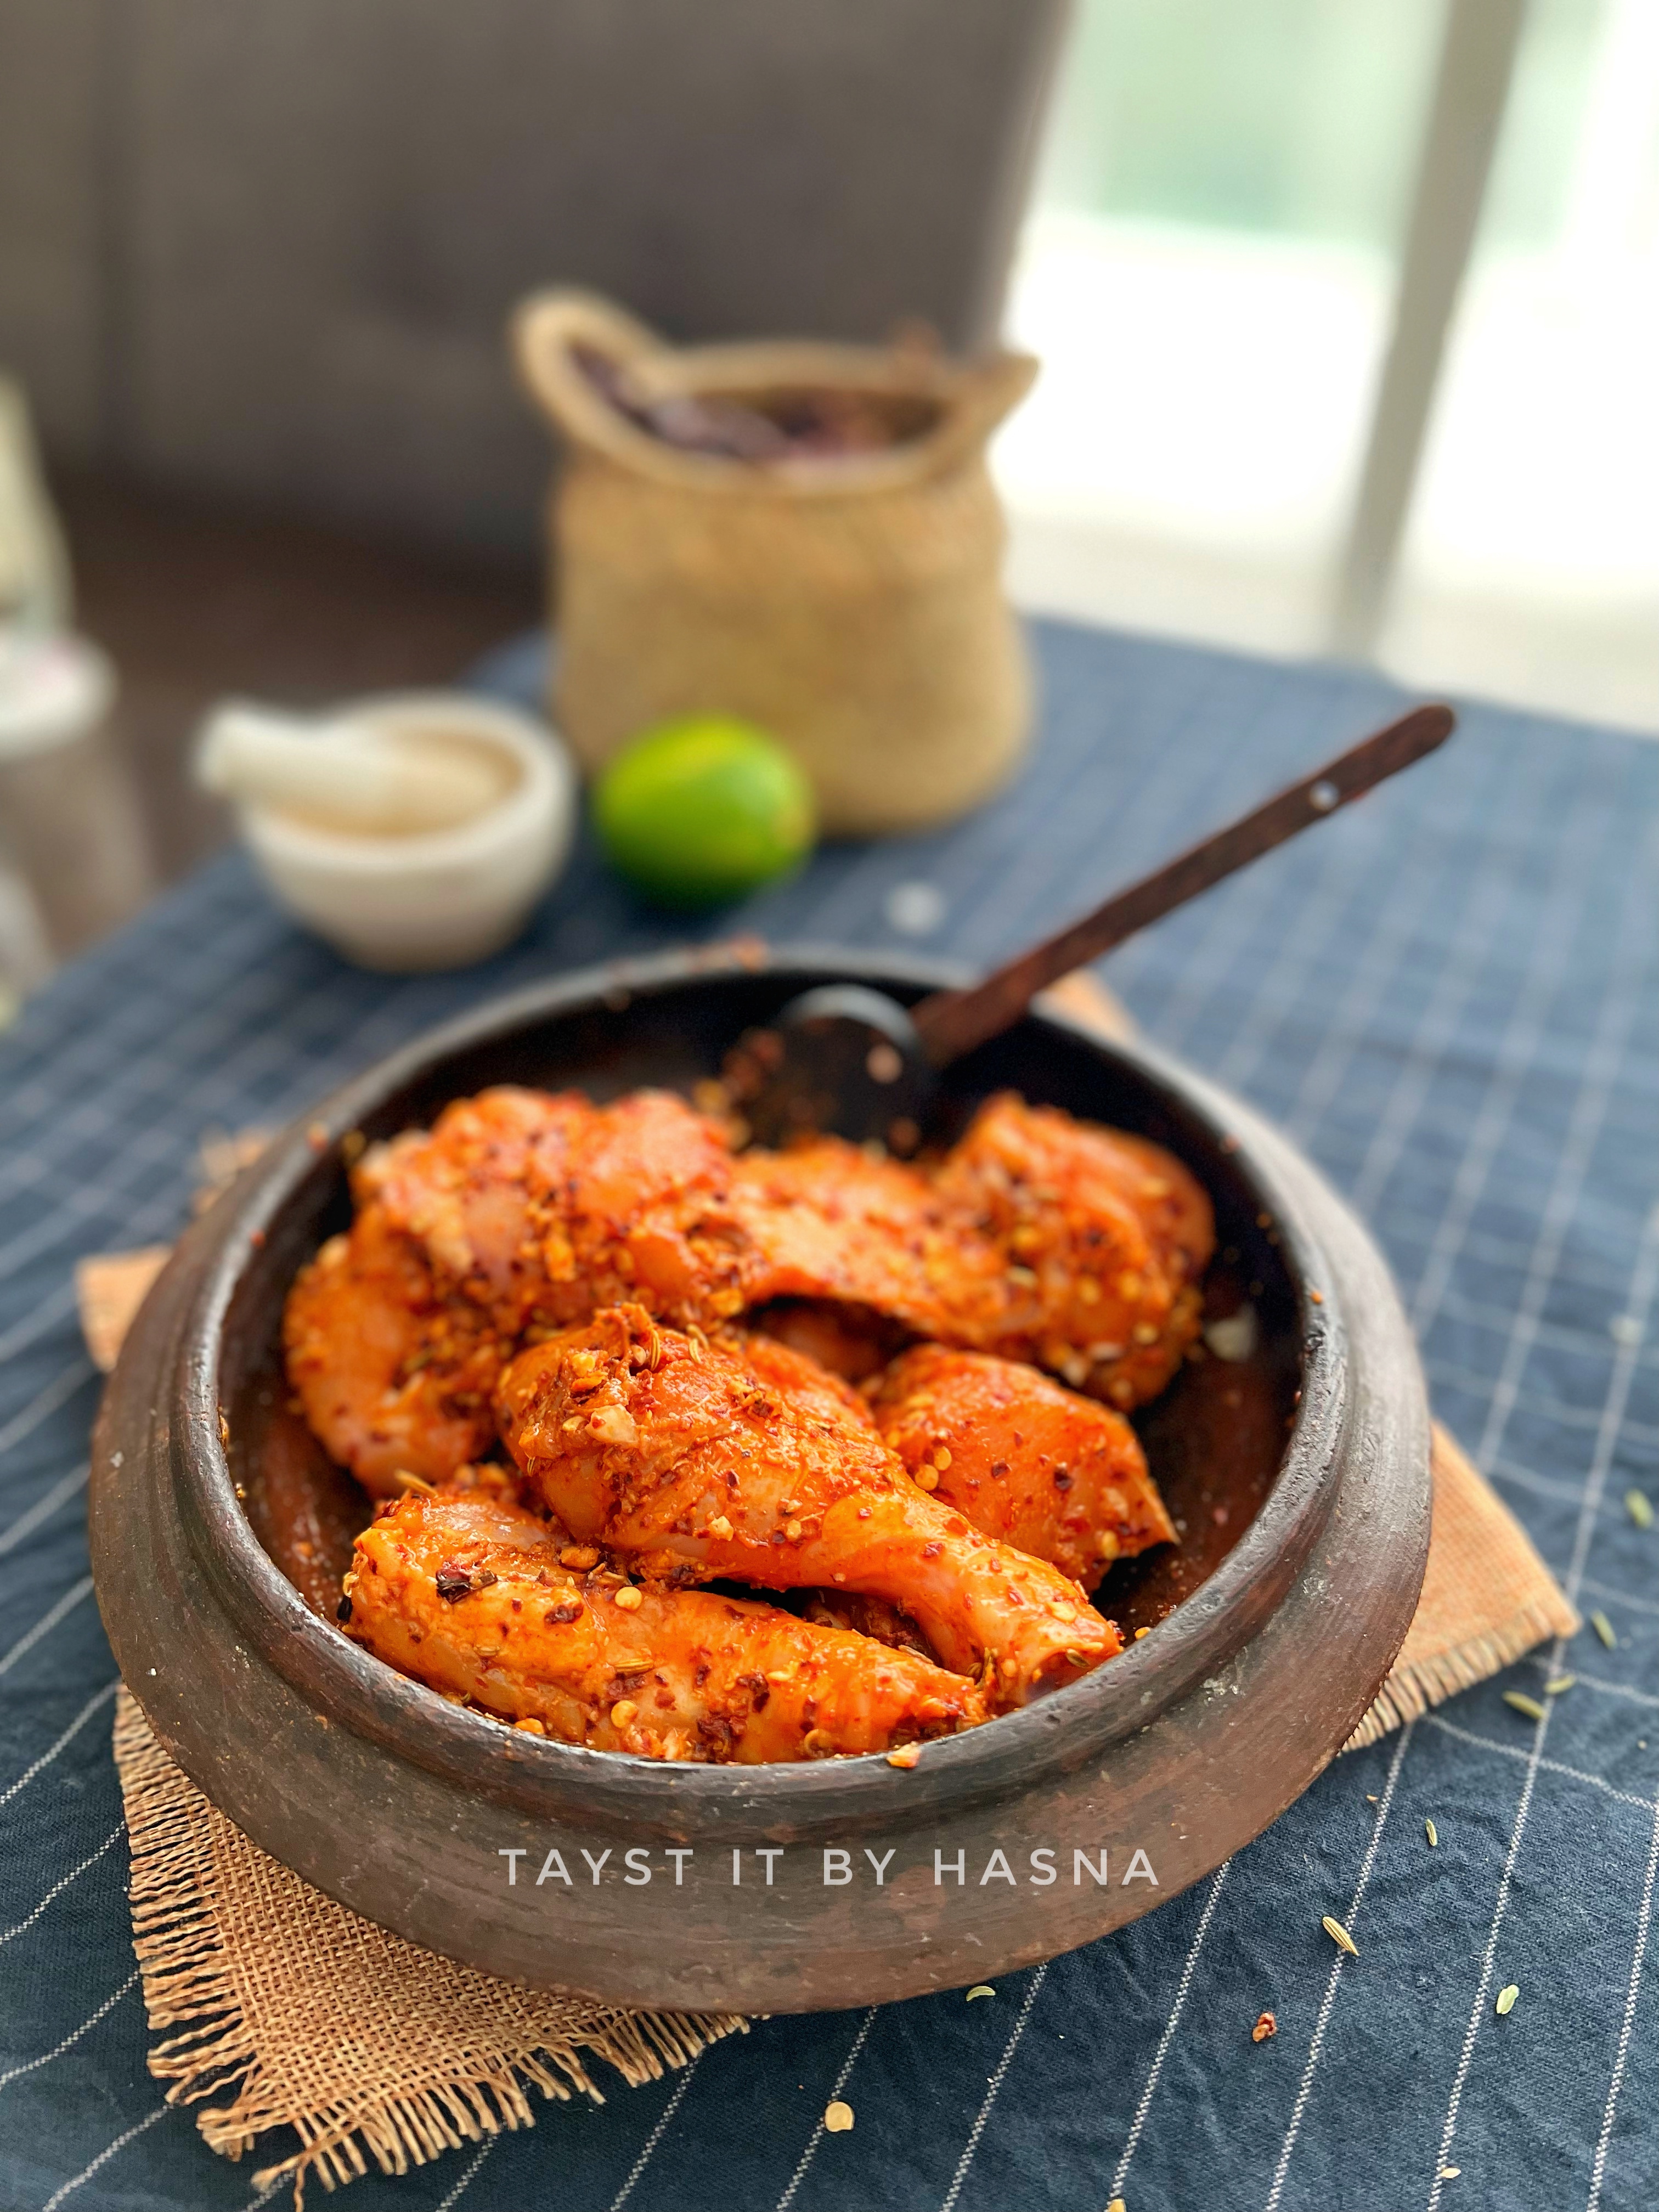
Search This Blog

Taystit by Hasna

Food, Recipes, and Beyond

  • Home
  • About Me
  • Recipes
    • Main Course
    • Snacks
    • Desserts
  • Uncategorized
    • Chicken
    • Meat
    • Vegetarian
    • Rice
    • Malabar Food
    • Baking
    • Breakfasts
    • Snacks
    • Fish
    • Pasta
    • Drinks
    • Soups
    • Desserts
  • Contact Me

 Kethel's Chicken


Who doesn't love a good fried chicken? Well, this one is an invention that can be exclusively found in Hotel Rahmaniya, Kerala. They have many branches in Kerala, and I have been to the Cochin outlet and we love it! It’s super fiery, so make sure you ask for the lemonade that they serve that makes the combo extra special 🔥 Kethel's chicken is usually prepared with spring chicken (the young bird), this makes it more delicious and succulent, giving it the best flavor. Here, I have used normal chicken pieces, you may use spring chicken pieces preferably.

The chicken pieces are marinated in a special spice blend using ingredients like dried Kashmir Chilies (these chillies are not spicy), rock salt, etc. A part of the spice blend is reserved to fry at the end of the frying process. The chicken is then kept for marination half an hour or overnight. Of course, this is just my version of Kethel's chicken :D

But I promise you, it tastes soo good, and do not forget to use coconut oil for frying. The chicken is usually deep fried, but I used a cast iron kadai, sent to me by @earthandethics, thanks to Faiza, may Allah bless her business abundantly, made the frying process so convenient with very less oil. I do not like using a lot of oil, especially coconut oil, as all the extra oil would go to waste. And I hate wasting anything. 

Also a tad bit of rice flour is added right before frying, this helps the coating on the chicken stay intact. Do try the recipe and let me know how you liked it! It's lip smacking good! 

Ingredients :

  • 400 gms Chicken pieces, preferably spring chicken
  • 10-12 Whole Dried Kashmir Chillies
  • 1 tsp Rock Salt 
  • 1 tsp Fennel seeds
  • 2-3 Garlic cloves
  • 1/4 inch Ginger
  • 1 tsp Rice Flour
  • 1 tbsp Lemon Juice
  • 1 tsp Red Chilli flakes (optional)
  • 1+1/2 tsp Kashmiri Red Chilli Powder
  • 1/4 tsp Turmeric powder
  • 2 sprigs Curry leaves
  • Coconut Oil, for frying
 

Instructions:

  1. Using a small mixer grinder/ a mortar and pestle, grind the whole Kashmiri Chillies with garlic, ginger, rock salt, fennel seeds, lemon juice and ground or pulse coarsly. To this mix, add the red chilli flakes. Reserve a tablespoon of the mix.


  2. Now to the cleaned chicken pieces, add turmeric powder, Kashmiri Chilli powder, Crushed chilli mix, and salt as required. Mix well, and rub the marinade all over the chicken and set aside for half hour or overnight.


  3. Add curry leaves and rice powder to the marinated chicken.

  4. In a deep kadai, pour coconut oil and fry for 8-10 minutes, both sides.

  5. Finally, when the last batch of the chicken is frying, in the last few minutes, add the reserved chilli mix and fry and fish out the chilli mix and add over the fried chicken pieces.

  6. Enjoy hot with ghee rice, roti, dal fry etc.

Do try this recipe and don't forget to share your experience/feedback with me here in the comments or feel free to send me a mail. Also, do tag me at #taystedit if you try out my recipes on Facebook, Instagram etc so that I can see when you make it. ♡♡♡♡


 Healthy Whole Grain Bread 


When I came across the benefits of this Navara ari, being a super food, I had to try ways to include it in our diet in a fun and delicious way, and I experimented this bread and oh boy! Did it turn out delicious? I was spell bound, I was expecting an utter flop. Ever since I posted a snippet of the bread on my stories, I always get recipe requests of the same, so I decided to share the recipe ASAP so that I could benefit others. 

This healthy bread is such a wonderful breakfast idea, especially for new moms, and working moms, who have little to no time to spend in the kitchen, right in the morning. Around 3 slices of the bread with banana slices and/ natural peanut butter with a drizzle of honey will keep you full and energetic for a long time. This bread is so delicious and regularly consuming whole grains can reduce, your risk of heart disease, type 2 diabetes and obesity.

The only main task is to wash, dry, grind and sieve the grains and rice. This bread does not require proofing/rising. When the baking soda reacts with vinegar, it helps to keep the bread soft (Please note: The bread is made of rice, so do not expect it to be soft and fluffly). Well, since the bread contains barley, it can't be called be called gluten free either. The bread contains Navara Ari (red rice), barley, popcorn kernels, flax seeds, and chia seeds, super nutritional bread, I must say! I always feel so good after I eat these bread slices. Make sure to pour honey generously. And the bread stays fresh in air tight container/ plastic bag for 2 days, after which refrigerate and reheat the slices when required. The best part is that my girl loves this bread too. One happy momma here! Alhamdulilah.

Ingredients :

  • 1 cup Barley (washed, dried, ground and sifted)
  • 1/2 cup Navara Ari (washed, dried, ground and sifted) 
  • 1/2 cup Popcorn Kernels (ground and sifted)
  • 2 tbsp Chia Seeds
  • 1/4 Cup Flax seeds 
  • Salt, a pinch
  • 2-3 tbsp Honey, Organic 
  • 2 Large Eggs/ 3 Medium Eggs
  • 1/4 tsp Baking Soda 
  • 1 tbsp Vinegar 
  • 2 tbsp Extra Virgin Olive Oil

Instructions :

  1. Wash Navara Ari and Barley and dry in direct sunlight.
  2. Ground and Sieve Barley, Navara Ari, and Popcorn Kernels.

  3. In a large bowl, add the ground and sift whole grains, to which add in Chia seeds and Flax seeds, salt, baking soda and mix well with a whisk.

  4. In a separate bowl, crack in 2-3 eggs, Honey, Olive Oil and Vinegar and mix well using a fork.
  5. Add the egg mixture to the whole grains, mix well using a spatula.
  6. A soft dough is formed. Pre heat the oven to 180 deg C.

  7. In a loaf pan lined with baking sheet, transfer the dough and level the dough usimg a spatula and bake the bread for 25-30 minutes, or until tooth pick inserted comes out clean.
  8. Allow the bread to cool on a cooling rack.
  9. Cut into slices and enjoy with sliced bananas and/ peanut butter drizzled with a generous amount of honey.


Note: 

Flax seeds are not whole grains, you may skip them if required.

Do try this recipe and don't forget to share your experience/feedback with me here in the comments or feel free to send me a mail. Also, do tag me at #taystedit if you try out my recipes on Facebook, Instagram etc so that I can see when you make it. ♡♡♡♡

 Chemmeen Kappa Puzhuk/ Mashed Tapioca with Prawns


Been long since I shared a savory Naadan (traditional) recipe here. So here you go.. Presenting to you, one of my favorite side dishes for rice, this Puzhuk and rice is enough for me for a scrumptious meal (and yeah, if there is mollotta (spicy red fish curry) it's even better). I am not a big fan of the usual traditional rice and curries, but of course, if it contains such side items, I would love it any day!
 
I love Tapioca in any form, if you would like to see other Tapioca recipes, check out this*. The Tapioca is cooked for a whistle in the pressure cooker, whose pressure is naturally released. To which, the fried prawns and coconut paste is added and finally tempered with curry leaves, dry red chilli, and garlic paste in ghee.

This side dish is so flavorsome, that you can even have this on its own. Super delicious I must say! I also did not add green chillies, as my girl does not like her food spicy. I omitted the green chillies, please feel free to spicen up according to you liking. Also, if you feel the Puzhuk looks too yellow, you may add a tad bit of chilli powder before the final simmer or can be done while tempering. My favorite part is to eat the Tapioca that gets stuck in the bottom of the pot while cooking. :D

Let me know which is your favorite traditional/ naadan dishes!
 
Withou further a do, let's get started!
 

Ingredients:

  • 400 gms Tapioca, peeled and chopped
  • 150 gms Prawns, cleaned and deviened 
  • 1/4 tsp Turmeric Powder
  • Salt, as required
  • Water, as required 
 

For marinating the prawns:


  • 1/4 tsp Turmeric powder
  • 1/2 tsp Kashmiri Red Chilli powder
  • 1/2 tsp Garlic paste
  • 1 tbsp Coconut oil
  • Salt, as required
  • Curry leaves
 

For Coconut paste:

  • 4-5 Shallots
  • 1/2 cup Shredded Coconut 
  • 1 tsp Fennel seeds
  • 1/4 tsp Turmeric powder
  • 1/4 tsp Kashmiri Red Chilli powder
  • Water, as required
 

For tempering:

  • 1 tbsp Ghee/ Clarified butter 
  • 4-5 Shallots
  • 2-3 Dry Red Chillies
  • 2 sprigs, Curry leaves
  • 1 tsp Garlic paste
 

Instructions :

  1. In a pressure cooker, cook the Tapioca with turmeric powder and salt with water, as required for one whistle and allow the pressure to release naturally.

  2. Marinate prawns with ingredients mentioned above, fry in coconut oil for 3-4 minutes in high flame and set aside.

  3. In a mixer grinder, add the ingredients mentioned above to make a coconut paste and blend to smooth paste with very little water.
  4. Open the pressure cooker, and mash the Tapioca well using a masher, or a strong wooden ladle.
  5. Pour the ground coconut paste and the fried prawns to the Tapioca and allow to come to a boil.
  6. Finally temper the ingredients mentioned above in ghee and add to the Mashed tapioca. Allow everything to simmer well for a couple of minutes and you are ready to enjoy with boiled ponni/ Matta rice or any rice of your choice, or even just like that! 


Notes:

I did not add green chillies as my daughter does not prefer spicy food, if you like your food spicy and hot, add slit green chillies when pressure cooking the tapioca.


Do try this recipe and don't forget to share your experience/feedback with me here in the comments or feel free to send me a mail. Also, do tag me at #taystedit if you try out my recipes on Facebook, Instagram etc so that I can see when you make it. ♡♡♡♡

 Air Fried Chicken BBQ wings & Potato Wedges


I so love my food crispy and hot, and imagine to achieve the results with little to no oil, well, this chicken BBQ wings was air fried and so  are the potato wedges, so crispy.. Love love love the results! Few days back, the brand NinjaKitchen had send me their airfryer and oh boy am I amazed by the results?!

I used a tad bit of baking powder to keep the wings extra crisp. Some tips to keep in mind when you air fry:

Dab the chicken wings dry using a kitchen towel, this helps to crispen the wimgs better

Make sure you pre heat your air fryer before placing the wings.

Do not over crowd your air fryer pan, this way all the wings get cooked evenly.

You can use a parchment paper for easy cleanup, but the undersides might get soggy as the parchment paper does not allow drainage of fat/oil etc.

Make sure not to place your parchment paper while preheating your air fryer.

I used home made BBQ sauce, you may use store bought BBQ sauce or any of your favorite sauce to coat the air fried chicken wings. I will briefly put down the recipe of the BBQ sauce in this post.

I  couldn't stop munching on the Potato Wedges and the best part? Made the whole batch with just a tbsp of olive oil. I couldn't believe my eyes or my tongue :P So crisp and delicious! This is the perfect game night snack. Without further a do, let's get started!


Ingredients :

For the Chicken Wings:

  • 500 gms Chicken Wings
  • 1 tbsp Extra Virgin Olive oil
  • 1 tsp Garlic powder
  • 1/4 tsp Baking Powder 
  • Salt, as required

For Potato Wedges:

  • 2 Potatoes, cut to wedges
  • 1 tbsp Extra Virgin Olive Oil
  • 1 tsp Smoked Paprika 
  • 1/2 tsp Garlic Powder
  • Dried Parsley, a sprinkle


For home made BBQ sauce:

  • 1 cup tomato Ketchup
  • 1/4 Cup apple cider vinegar
  • 1 tbsp Honey
  • 1/4 Cup brown sugar
  • 1 tbsp Worcestershire Sauce
  • 1/4 Hot Sauce, optional
  • 1/2 tsp Smoked Paprika 
  • 1/2 tsp Garlic powder
  • 1/2 tsp Onion powder
  • 1/4 tsp Black Pepper Powder 
  • Salt, a pinch
 

Instructions:

To make the Home made BBQ Sauce:

  1. Mix all the sauces in a saucepan and bring to boil.
  2. Allow to simmer for 10-15 minutes uncovered or until desired consistency is achieved.
  3. Use the BBQ sauce immediately or upto 1 week stored in a clean air tight container in a refrigerator.
 

To make the BBQ Chicken Wings:

  1. Wash and cut the wings into drumettes and wingettes. (Discard the tips of the wings)
  2. Preheat your air fryer at 200 deg C.
  3. Dab the chicken wings with a kitchen towel. Add the ingredients under the chicken wings and mix well and toss well.

  4. Air fry the marinated chicken wings for 15- 20 minutes and shake the pan or flip using thongs, halfway through  the cooking process.
  5. Transfer the cooked wimgs to a bowl, add the BBQ sauce , toss and Enjoy immediately!


To make the Potato Wedges:

  1. Wash the potatoes well, make sure its cleaned well, as the potatoes are cut into wedges with skin on.
  2. Preheat your air fryer, at 200 deg C. Transfer the potato wedges to a bowl, add in your spices and toss the wedges well in the bowl.
  3. Place the wedges in the airfryer without over crowding, and air fry for 10-12 minutes, flipping or tossing the airfryer pan half way through. Serve with your favorite soft drinks and enjoy your game night!


Do try this recipe and don't forget to share your experience/feedback with me here in the comments or feel free to send me a mail. Also, do tag me at #taystedit if you try out my recipes on Facebook, Instagram etc so that I can see when you make it. ♡♡♡♡

Instant Saffron and Pistachio Milk Peda


Happy Independence Day! I love loveee Milk Peda, what better day to make these Tri Color Peda on India's Independence Day?! These sweets are the easiest to make, and is simply the best. Milk Peda are sweets or more like a milk fudge that is traditionally made using Khoya. 

The mixture of milk, ghee and milk powder is allow to boil and reduce to a thick consistency. To the almost cooled Peda dough, powdered sugar and flavorants like cardamom, saffron etc are added for added flavor. These Pedas stay fresh for a day on room temperature, and for a week in the refrigerator. 

There are some points to keep in mind, while making pedas. The Peda mixture must never be over cooked as this will results in chewy pedas, while undercooking will result in sticky dough and will be difficult to shape them. Make sure to remove from the pan, as soon as the mixture feels non sticky to the fingers touch. (be careful while you do so)

As it's INDEPENDENCE DAY, I gave the peda, agreen hue with Pistachio paste and orange hue with saffron soaked milk.

Let's make these delicious treats!

Ingredients :

  • 1 tbsp Ghee/ Clarified butter
  • 1 cup Milk Powder
  • 1/2 cup Fresh Milk
  • 4-5 tbsp Powdered Sugar  
  • Saffron , a pinch
  • 2 tbsp pistachios (made to a paste with 1 tbsp hot water)

Instructions :

  1. In a pan, add 1/2 tbsp ghee and 1/2 cup milk, when the milk turns warm, remove the pan from flame, and add the milk powder and mix well.
  2. Once the milk powder and milk combines well, place on medium heat and continously mix well.
  3. Allow to thicken a little, add the 1/2 tbsp of ghee and continue mixing till the mixture starts to thicken and starts coming off the sides of the pan, continue mixing till the mixture forms a firm dough, not too loose, nor too dried up.
  4. Transfer the milk dough to a clean bowl and allow to cool.
  5. When almost cooled, grease your palms and add 3-4 tbsp powdered sugar and do a taste st and check if more is required.

  6. To the milk dough mixture, separate to 3 balls and add the Pistachio paste to the middle of a ball and knead well to spread the Pistachio green evenly, similarly do the same with another ball with saffron strands and milk.
  7. Make tiny balls and make pedas out of it. (By rolling and flattening lightly)


Notes:

  • Do not over cook or undercook the milk mixture.
  • Do not add the powdered sugar, if the milk mixture is still warm.
  • Try to use heavy botton pan, as the milk would cook up way too much.

Do try this recipe and don't forget to share your experience/feedback with me here in the comments or feel free to send me a mail. Also, do tag me at #taystedit if you try out my recipes on Facebook, Instagram etc so that I can see when you make it. ♡♡♡♡

Crispy Rose Jalebi


Jalebi is a sweet that is popular all around India. I love Jalebi when they are warm, crunchy and juicy. A batter made of all purpose flour, corn flour, curd and in this case, rose syrup. The fried little chakras or Jalebis are soaked into warm sugar syrup, which soaks up the sugar syrup leaving the Jalebis crispy on the outside and juicy inside.

A squeeze of lemon juice is added to the sugar syrup, so that the sugar syrup does not crystalize. And this keeps the Jalebis juicy. In my hometown, it is one the most popular dessert that is served at weddings. Me being someone who likes being innovative, made the Jalebi a little out of the box. The actual Jalebi are orange in colour, with a cardamom flavor to it, this recipe has a rose flavor and tint of rose color to the Jalebi.
 
The Pistachio that is used to garnish the Jalebi is what pops the flavor of the ROSE JALEBI with an extra crunch and adds to the flavor of the rose. I used Rose syrup in the recipe, you may use rose water with a few drops of red food coloring. Next time you have guests over, try making this Jalebi for dessert or as sweet and they are going to be super impressed! Don't forget to mention where you found the recipe.  ;)


Ingredients: (makes around 25 jelebis)

For Jalebi:

  • 1 cup All Purpose Flour
  • 4 tbsp Corn Flour
  • 4 tbsp Yogurt
  • 2 tbsp Rose Syrup / Rose water
  • 2 drops of red food coloring
  • 1/4 Baking Soda
  • Salt, a pinch
  • 1 cup/ 200 ml water
  •  Vegetable Oil
  • Pistachios, to garnish

 For Sugar Syrup:

  • 2 cups Sugar
  • 1 cup Water
  • 4-5 whole Cardamom 
  • 2 tsp Lemon Juice
  • 3-4 tbsp Rose Syrup 
  • 2-3 drop red food coloring 

Instructions :

  1. To make the Jalebi batter, in a bowl, add your all purpose flour, corn flour, baking soda, and salt and give a stir using a whisk.
  2. Next add yogurt/curd, rose syrup, red food coloring and add water little at a time and mix well, and make a batter without lumps. (The batter should not be too thin, or too thick).

  3. Cover with a lid, and set aside until we prepare the sugar syrup. 
  4. To make the sugar syrup, In a deep pot, melt sugar with water, cardamom and lemon juice.
  5. Allow to come to a boil, in around 5 minutes, when the sugar syrup achieves one string consistency, immediately remove from flame.
  6. Add rose syrup and red food coloring and mix well and set aside on a cooling rack.
  7. Transfer the batter to a squeeze bottle using a funnel, or you may use a piping bag too.  
  8. In a wide and large frying pan, pour the vegetable oil and allow the oil to come to high temperature, now on medium high flame, squeeze the batter into spiral shapes and bring the end of the spiral to the middle while releasing pressure on the squeeze bottle, this way, the layers of spiral stay attached while frying.
  9. Fry until the sides start to brown a little, immediately drain and drop the Jalebi to the warm sugar syrup. Allow the Jalebi to soak the sugar syrup, and let it stay in the sugar syrup until you make the next batch of jalebis.
  10. Using thongs, remove the Jalebi from sugar syrup and serve. Garnish with crushed pistachios.
  11. Serve as it is (warm/ cold, preferably warm) or enjoy with rabri or any milk dessert of your choice. 

Note:

  • The Jalebi might turn a little on a browner shade while frying, it is quite natural, and a fully rose color when fried is not possible to achieve.
  • The sugar syrup has to be warm, not too hot or too cold, as hot syrup will make the Jalebi soft and cold syrup will not allow the jalebi to soak up the sugar syrup.
  • The process might look a bit tedoius, but it is very therapeutic if you follow the instructions.

Do try this recipe and don't forget to share your experience/feedback with me here in the comments or feel free to send me a mail. Also, do tag me at #taystedit if you try out my recipes on Facebook, Instagram etc so that I can see when you make it. ♡♡♡♡


Punjabi Rajma Masala


Rajma masala is most commonly known as a comfort food. The flavors are subtle yet very fulfilling. Usually paired with boiled rice, also known as Rajma Chawal is quite popular throughout India. Rajma/ red kidney beans are known to have been brought to India from Mexico. This North Indian dish is a staple on weekends, weddings etc.

The recipe doesn't involve many ingredients, mostly basic ingredients that are available in every Indian kitchen. If you reduce the amount of ghee used, it becomes a healthy dish too. This is such an energy packed dish. Red kidney beans are an excellent source of protein. Soaking the kidney beans, helps the beans to cook faster and helps our body to absorb the minerals more easily.

I like my gravy in a fine paste form, but here I demonstrate the onions being chopped, if you like Rajma masala with a fine texture, you may blend the onions too. I have paired the Rajma masala with Jeera rice, you may enjoy with boiled rice, roti etc.


Ingredients : (2 people)

  • 1/2 cup Rajma/ red kidney beans, soaked for 6-8 hours or overnight (Reserve stock water)
  • 1 tbsp Ghee/ clarified butter
  • 1 tsp Ginger garlic, crushed using mortar and pestle
  • 1 medium Onion, chopped finely or pureed 
  • 1 1/2 Tomatoes, pureed
  • 1 tsp Kashmiri Chilli Powder
  • 1/4 tsp Cumin powder
  • 1/4 tsp Turmeric powder
  • 1 tsp Coriander powder
  • 3/4 tsp Garam masala powder
  • Salt, as required
  • 1/2 tsp Dried Fenugreek leaves
  • Coriander leaves, chopped
  • 1/2 tsp Sugar/ honey
  • Lemon wedges, garnish

Instructions:

  1. Wash and soak the rajma/ red kidney beans for 6-8 hours or overnight.Pressure cook for 1 whistle, let the pressure stay for 5 minutes and place the cooker under running water and slowly remove whistle and lid.

  2. In a kadai, add in your ghee and crushed ginger garlic, Sautee until raw aroma disappears.
  3. Add cumin powder and sauté for 30 seconds. Add your finely chopped onions/ pureed onion and add salt, helps the onion to become translucent quickly.
  4. Add spices like turmeric powder, Kashmiri red chilli powder, coriander powder and garam masala powder, Sautee for few seconds.
  5. Next, add in the tomato puree and cook well, until water evaporates.

  6. Next add in the cooked kidney beans, add rajma stock water, salt, dried Fenugreek leaves, and chopped coriander leaves.
  7. Cover with lid and cook for 5-10 minutes on low flame, until all masala gets married with the Rajma well.
  8. Check if gravy requires more stock water or salt and add as required.
  9. Finaly serve the Rajma masala in a bowl, and garnish with chopped coriander leaves and lemon wedges.

Do try this recipe and don't forget to share your experience/feedback with me here in the comments or feel free to send me a mail. Also, do tag me at #taystedit if you try out my recipes on Facebook, Instagram etc so that I can see when you make it. ♡♡♡♡


4 Ingredient Chocolate Coconut Macaroons


Looking for a snack idea to make with your kids?! Well, this is one super easy recipe that kids will not only love to make it, but enjoy eating them too. The process is not only easy, it doesn't take much time too. It's a great party snack too, kids will love it! 

Whenever I take these chocolate Coconut macaroons to parties, everyone wants the recipe. I have got comments that they taste similar to the coconut biscuits we get from bakeries. Egg whites are beaten to soft peaks and set aside. In a bowl, the dessicated coconut, sweetened condensed milk, vanilla essence, and a pinch of salt, mix this well, to this fold in the egg whites and make a form of dough (add more dessicated coconut if required). Using a tablespoon as a scoop, tightly pack the dough amd using the help of a teaspoon place the macaroons on a baking tray lined with baking sheet and bake until golden. The insides are chewy and the outside is crunchy, and the melted chocolate takes it to a whole new level. Be sure not to use dark chocolate, only if you like the bitterness. You may use milk chocolate or semi sweet chocolate.

This is the perfect baking project you can do with your kids during this summer vacation. Do try and let me know how you liked these delicious coconut macaroons.


 Ingredients : (makes 28)

  • 11/2 cup Dessicated Coconut
  • 3/4 cup Sweetened Condensed Milk
  • 2 egg whites (60 grams)
  • 1/2 cup Semi sweet Choco chips
  • 1 tsp Vanilla Essence
  • Salt, a pinch

Instructions:

  1. In a bowl, whip the egg whites to soft peaks using a hand blender and set aside.
  2. In another bowl, add in the Dessicated coconut, sweetened condensed milk, vanilla essence and salt. Mix well using a spatula.
  3. Preheat oven at 170 Deg C. 
  4. Now fold the whipped egg whites to the coconut mixture and using a round tablespoon measuring spoon, pack and scoop the mixture and with the help of a teaspoon drop the macaroons on a baking tray lined with baking paper.

  5. Bake for 20-25 minutes until golden.
  6. Allow to cool on a cooling rack.

  7. Melt the semi sweet chocolate chips over a double boiler and drizzle ove rthe macaroons, allow to set and enjoy!


Do try this recipe and don't forget to share your experience/feedback with me here in the comments or feel free to send me a mail. Also, do tag me at #taystedit if you try out my recipes on Facebook, Instagram etc so that I can see when you make it. ♡♡♡♡


 Elaneer Avil Milk / Tender Coconut Avil Milk


Avil milk is something that has been a part of every Malayalee's life, that can be found in the streets of Malabar region. The actual Avil milk consists of aval (beaten rice flakes), with mashed ripe banana, milk and nuts (peanuts are more prominently used).

There are many variations to this now, which includes the addition of boost. For me, anything and everything with elaneer/ Tender Coconut is just out-of-the-world good. I wanted to keep the authenticity of Avil milk, so I kept the mashed bananas, which is the signature flavor. Now, if you want the Elaneer flavor to stand out, add Tender coconut chunks instead of the bananas, for a full on tender coconut experience! 

What I truly love about this refreshing and filling drink is that, it can be prepared as a meal in itself, imagine a dessert for breakfast.. Aaah it's the best! I am not a big fan of the usual Avil milk, especially because of the addition of peanuts. Hence, I use other nuts like cashews, almonds and pistachios. 

The first layer is the mashed banana, then the aval (beaten rice) is added, to which chopped nuts are added, next added the tender coconut pulp, finally pour milk and top with ice cream and garnish with caramelized coconut and nuts.

Lets make this delicious, refreshing and filling Avil milk and enjoy during the peak summer days!


Ingredients:

  • 3 mysore banana (mashed with a tsp of sugar)/ Tender Coconut chunks
  • 1/4 cup Aval (beaten rice)
  • 1/2 cup Tender Coconut Pulp (store bought)
  • 1/4 cup Almonds and Cashews, chopped
  • Cardamom, a pinch
  • 1/2 cup Milk
  • 2 scoops Vanilla Ice cream
  • Caramelized Coconut 
  • Pistachios, slivered

Instructions :

  1. Mash the bananas with a tsp of sugar, set aside.
  2. In a bowl, add the tender coconut pulp and add a pinch of Cardamom and mix.

  3. Next, into a tall glass, add the mashed banana as the first layer.
  4. Next, add the aval/ beaten rice and add the chopped nuts.
  5. Next, add the Cardamom flavored tender coconut pulp.
  6. Pour the milk, add the ice cream scoops and garnish with caramelized coconut and silvered pistachio.
  7. Mix everything well with a long spoon, and enjoy immediately with a crunch in every bite. Sooo good!


Do try this recipe and don't forget to share your experience/feedback with me here in the comments or feel free to send me a mail. Also, do tag me at #taystedit if you try out my recipes on Facebook, Instagram etc so that I can see when you make it. ♡♡♡♡


Newer Posts
Older Posts

Search This Blog

My name is Hasna Haneef, a mommy to a toddler, hailing from Thalassery, Kerala. Welcome to my humble abode on the Internet; wherein I share all my recipes and experiments. I am glad to have you on board!

TRENDING POSTS

  • Emirati Chebab
  • Chicken Steak with Creamy Mushroom Sauce
  • Kerala Style Squid Roast
  • Regag - Emirati Flat bread
  • Kerala Beef Fry/ Nadan beef dry fry
  • Junglee Chicken Sandwich

About Me

May peace be with you!

Welcome to my blog.

I am delighted to have you on board. My name is Hasna Haneef, a mommy to a toddler, hailing from Thalassery, Kerala. My homeplace being Dubai, as I am born and brought up here and I am very influenced by the lifestyle and the variety of authentic cuisines I get to try from here, which has made me try anything that comes across me
, click here →

Stay Connected!

Join Our Madness!

Join with Thousands Of Subscribers ! Get Our Latest Recipes Delivered to Your email Inbox!

Powered by follow.it
  • Home
  • About Me
  • Recipes

    • Main Course
    • Desserts
    • Snacks

    Uncategorized

    • Chicken
    • Meat
    • Vegetarian
    • Rice
    • Malabar Food
    • Baking
    • Breakfasts
    • Snacks
    • Drinks
    • Pasta
    • Fish
    • Soups
    • Desserts
  • Contact Me

Featured Post

Triple Chocolate Hazelnut Skillet Cookie

Blog Archive

  • ►  2025 (4)
    • ►  April (2)
    • ►  March (1)
    • ►  February (1)
  • ►  2024 (36)
    • ►  October (4)
    • ►  September (5)
    • ►  July (1)
    • ►  June (2)
    • ►  May (4)
    • ►  April (3)
    • ►  March (10)
    • ►  January (7)
  • ►  2023 (47)
    • ►  December (3)
    • ►  September (2)
    • ►  August (6)
    • ►  July (6)
    • ►  June (9)
    • ►  May (4)
    • ►  April (5)
    • ►  March (6)
    • ►  February (3)
    • ►  January (3)
  • ▼  2022 (69)
    • ►  November (4)
    • ►  October (6)
    • ►  September (7)
    • ▼  August (9)
      • Kethel's Chicken
      • Healthy and Nutritious Whole Grain Bread
      • Chemmeen Kappa Puzhuk/ Mashed Tapioca with Prawns
      • Air Fried Chicken BBQ wings & Potato Wedges
      • Instant Saffron and Pistachio Milk Peda
      • Crispy Rose Jalebi
      • Punjabi Rajma Masala
      • 4 Ingredient Chocolate Coconut Macaroons
      • Elaneer Avil Milk/ Tender Coconut Avil Milk
    • ►  July (12)
    • ►  June (5)
    • ►  May (5)
    • ►  April (12)
    • ►  March (4)
    • ►  February (2)
    • ►  January (3)
  • ►  2021 (24)
    • ►  November (1)
    • ►  October (2)
    • ►  July (1)
    • ►  June (4)
    • ►  May (6)
    • ►  April (4)
    • ►  February (4)
    • ►  January (2)
  • ►  2020 (82)
    • ►  December (5)
    • ►  November (6)
    • ►  October (4)
    • ►  September (2)
    • ►  August (5)
    • ►  July (10)
    • ►  June (10)
    • ►  May (13)
    • ►  April (12)
    • ►  March (8)
    • ►  February (4)
    • ►  January (3)
  • ►  2019 (22)
    • ►  December (1)
    • ►  November (2)
    • ►  October (6)
    • ►  September (1)
    • ►  August (1)
    • ►  February (3)
    • ►  January (8)
  • ►  2018 (15)
    • ►  December (4)
    • ►  November (6)
    • ►  October (3)
    • ►  September (2)

Subscribe Us

Labels

Bake Biscuits Breakfast Brown rice Burger Cheese Chocolate Dal Egg Emirati Fish Iftar Indonesian Japanese Jeerakashala rice Kerala Keto Kuwait food Lunch Milk Mutton Thai food UAE food afghan cuisine arabic beef biryani bread burnt cheesecake cake chicken cream dessert dinner greek healthy indo chinese lamb malabar prawns pudding puffs quick dinner ideas recipe refreshing drink rice salad sandwich stir fry vegetables vegetarian veggies yemeni

Contact Form


POPULAR POSTS AND PAGES

Emirati Chebab

Emirati Chebab

June 01, 2023
Chicken Steak with Creamy Mushroom Sauce

Chicken Steak with Creamy Mushroom Sauce

November 05, 2018
Kerala Style Squid Roast

Kerala Style Squid Roast

June 18, 2020
Regag - Emirati Flat bread

Regag - Emirati Flat bread

December 02, 2020
Kerala Beef Fry/ Nadan beef dry fry

Kerala Beef Fry/ Nadan beef dry fry

October 08, 2019

Pages

  • Home
  • About Me
  • Privacy Policy
  • Contact Me

Copywrite © 2023 TermsFeed®. All rights reserved.

Created By Sora Templates | Distributed By Gooyaabi Templates

Back to top