Search This Blog

Taystit by Hasna

Food, Recipes, and Beyond

  • Home
  • About Me
  • Recipes
    • Main Course
    • Snacks
    • Desserts
  • Uncategorized
    • Chicken
    • Meat
    • Vegetarian
    • Rice
    • Malabar Food
    • Baking
    • Breakfasts
    • Snacks
    • Fish
    • Pasta
    • Drinks
    • Soups
    • Desserts
  • Contact Me

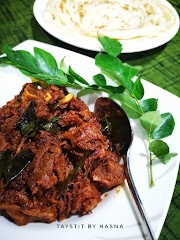
Kappa Vevichathu


One of my most favorite evening snack during winters is the kappa vevichathu. The memory of my mama giving me a bowl of piping hot kappa with some amazingly brewed chukku kaapi ( dry ginger coffee) is super nostalgic. It’s super easy to make and very light on the stomach. When paired with chukku kaapi (fry ginger coffee) is the best feeling especially if you are down with the flu or cold. 

Kappa is Tapioca in Malayalam, a very versatile vegetable that can be made into various delicious dishes. Tapioca was also called poor man’s food as it is a great substitute for those who cannot afford rice. Kappa has been very popular these days especially when it comes to kappa Biryani, THALASSERY KOYIKAAL, kappa puzhukk etc

Usually Kappa Vevichathu is had with a spicy fish curry, but I like to have it on its own for a snack. Of course, lesser the work, better it is ! ;) 

This recipe only requires very minimal ingredients tapioca, turmeric powder, shredded coconut, green Chillies and for tadka (tempering) mustard seeds, minced garlic, dry red Chillies, and curry leaves and coconut oil. As simple as that! 

I am sure once you try this combination of spicy tapioca with chukku kaapi it’s going to be your go-to snack during winters too! Hehe 


Ingredients:

  • 1 pack frozen Tapioca, medium cubes(700 gms) / 1 large Fresh Tapioca*
  • 1/4 tsp Turmeric powder
  • Salt, as required 
  • 2-3 green Chillies, slit
  • 1/2 cup Water 
  • 1/4 cup Shredded Coconut 
  • 3 tbsp Coconut oil
  • 1 tsp Mustard seeds
  • 1 small Garlic, minced 
  • 2-3 Dry Red Chillies
  • 2 sprigs Curry leaves 

Instructions:

  1. In a pot, add in the tapioca cubes with the turmeric powder, salt, green Chillies and Water. Combine everything.
  2. Close the lid and allow to come to a boil, boil for around 7-8 minutes, if knife inserted, glides in easily, you may switch off the flame. **
  3. In a tempering pan, pour coconut oil, once the oil is hot, add the mustard seeds.
  4. Once the mustard seeds have spluttered, add in the minced garlic and mix immediately (make sure the flame is low) for 5-10 seconds, next tear the dry red Chillies, and card in the curry leaves Rand aloo to splutter. 
  5. Add the tadka, to the boiled tapioca, combine well and enjoy with some spicy fish curry or a glass of chukku kaapi (dry ginger coffee) like I do!


Note: 

*Boiling time for fresh tapioca can exceed than frozen tapioca
** The starch content in tapiocas can vary, depending on this, you may have to open the lid and allow the tapioca to cook until almost dry. 


Do try this recipe and don't forget to share your experience/feedback with me here in the comments or feel free to send me a mail. Also, do tag me at #taystedit if you try out my recipes on Facebook, Instagram etc so that I can see when you make it. ♡♡♡♡

Easy Chocolate Traybake Cake


Its winter vacation and kids tend to ask for treats every now and then. And who doesn't fancy a chocolate cake?! I thought of baking a cake that doesn't involve too much of hardwork or precision. This one is super easy, just make the cake cake mix dump onto tray and bake it. Enjoy it with chocolate frosting or spread any chocolate spread and khalas, enjoy! 

Well, I took the extra step of making the chocolate frosting. The cake is soft, spongey and delicious, but tastes better with frosting. I baked it in a 9x13 inches baking tray, and there will be a lot of cake. This is the perfect cake that you can make in a jiffy and your kids can share with their friends too. 

The cake stays good to eat for 3 days, but I would suggest to enjoy it the same day. Tastes best when its fresh and just baked. You may top it with strawberries (since strawberries is in the season now), chocolate sprinkles etc. 

The recipe is adapted from www.supergoldenbakes.com


Ingredients:

  • 2 1/2 cups All purpose Flour
  • 1/2 cup unsweetened Cocoa powder
  • 1 1/4 cup Sugar (you may use half brown sugar and half white sugar)
  • 1/2 tsp Instant Coffee powder (optional)
  • 1 tsp Vanilla Essence
  • 1 tbsp Baking powder
  • 1/2 tbsp Baking soda
  • 100 gms Unsalted Butter, softened
  • 1/4 Vegetable Oil
  • 3 medium Eggs
  • 3/4 cup Milk
  • 2 tbsp white Vinegar

Chocolate Frosting:

  • 1 cup Icing Sugar
  • 3 tbsp Cocoa powder
  • 70 gms Unsalted Butter, softened
  • 60 ml warm Milk
  • 100 gms Dark Chocolate, melted 

Instructions:

  1. Preheat the oven at 170 deg C and line a 9x13 inches tray with baking paper.
  2. Combine the milk and white vinegar in a jar, mix and set aside for 5 minutes.
  3. In a large mixing bowl, combine the dry ingredients like flour, cocoa powder, sugar, baking powder, baking soda and a pinch of salt and mix with a balloon whisk.

  4. Add in the butter, eggs, and butter milk.


  5. Beat on the lowest setting until the ingredients come together.
  6. Scrape the bowl and increase the speed gradually until everything is incorporated well.
  7. Transfer the batter into the prepared tray and level out.

  8. Bake for 35-40 minutes or until the skewer comes out clean. 


Chocolate Frosting:

  1. Melt the dark cholate in a microwave for 30 second bursts or until melted. Or you may double boil the chocolate over a saucepan with boiling water and melt the chocolate. Set aside to cool.
  2. In a bowl combine icing sugar (sifted), Cocoa powder (sifted), add in the softened butter and mix well.

  3. Gradually add milk little by little, as required.
  4. Finally add in the melted and cooled chocolate and beat well until the frosting holds stiff peaks. (I like mine as ganache, so I did not do this step)

  5. Finally, once the cake has cooled on a cooling rack, spread the frosting/ ganache and add your desired toppings like strawberries (if eating immediately), chocolate sprinkles etc.


Make sure to make a batch when you have many people/ kids over, they will love it!


Do try this recipe and don't forget to share your experience/feedback with me here in the comments or feel free to send me a mail. Also, do tag me at #taystedit if you try out my recipes on Facebook, Instagram etc so that I can see when you make it. ♡♡♡♡


Shimla Mirch Chicken Biryani


I happened to have a few capsicum/ Green Bell Pepper aka Shimla Mirch (in India) that needed to be used up, as I was foraging through the fridge to make something for lunch. The recipe is an inspiration of the flavor from Najaf Style Chicken 65 where the curry leaves and chillies are sauteed in Ghee. 

The aromatic spices that are added to the chicken marinade, which is then fried, in the same pot that the rice will be cooked. Its a win-win, almost no dishes to wash as its a one-pot Biryani! I was skeptical when I served The Husband this new invention of mine, as I have spoiled him and he easily finds faults or gives constructive criticism spontaneously. But at least I now have an in-house food taster who gives the right verdict.. hahah!

In short, its an easy lunch idea which tastes delicious without much effort..with a side of salsa Salad and enjoy! Without further ado, lets get started!


Ingredients:

For The Marinade : 

  • 2 tsp Kashmiri Chili Powder
  • 1/4 tsp Turmeric Powder
  • 1/4 tsp Fennel Seeds
  • 1/4 tsp Freshly Crushed Black Pepper
  • 1/4 tsp Garam Masala Powder
  • Salt, as required
  • 1 tsp Ginger Garlic, paste
  • 1/2 tsp Lemon juice
  • 1 tbsp Olive oil

Other ingredients:

  • 500 gms Chicken pieces
  • 3 tbsp Vegetable oil
  • Curry Leaves
  • 2 dried Bay Leaves
  • 1 Cinnamon Stick
  • 2-3 Cardamom Pods
  • 2-3 Cloves
  • 1 Large Onion, finely chopped
  • 2 tsp Ghee
  • 2-3 Green chillies (slant cut)
  • 1 Capsicum/ Green Bell Pepper, chopped
  • 1 tsp Ginger Garlic, minced
  • 1 Tomato, finely chopped
  • 3 cups Basmati Rice (washed and soaked for 1/2 an hour)
  • 4 1/2 cups Water
  • 1 tbsp Lemon juice
  • Salt, as required

Instructions:

  1. In a bowl, add all the spices, under marinade and coat the chicken well in the marination, allow to marinate at least for half an hour.
  2. In a large biryani pot (preferably non stick), pour in the vegetable oil and fry the chicken pieces well, for around 8 minutes on one side and around 10 minutes on medium flame the other side. Add in a few curry leaves too.

  3. After frying the chicken pieces, add in your whole spices like bay leaf, cinnamon stick, cardamom pods and cloves.
  4. Give it a saute, and add in the chopped onion, and salt as required.
  5. In the same pot, bring aside the onion and whole spices to a side and add in the ghee and splutter the curry leaves along with the green chillies.
  6. Next add in the hero ingredient, Shimla Mirch (capsicum). 
  7. Add salt, as required and add the minced ginger garlic and sauté well. Finally add in the finely chopped tomato and cover with the lid. 
  8. Once everything comes out mushy, add in your leftover marinade mix well and add in your soaked and drained rice, give it a toss to absorb all the masalas and then pour in the water and add salt and lemon juice.
  9. Once the water comes to a rolling boil, close the lid and cook for around 25 minutes on low flame and do not open the lid.


  10. Once the rice is nice and fluffy at around 20 minutes, open the lid and add in the fried chicken pieces and close the lid and allow the flavors to marry. 
  11. Finally serve hot with your favorite chutney or salsa.


Do try this recipe and don't forget to share your experience/feedback with me here in the comments or feel free to send me a mail. Also, do tag me at #taystedit if you try out my recipes on Facebook, Instagram etc so that I can see when you make it. ♡♡♡♡

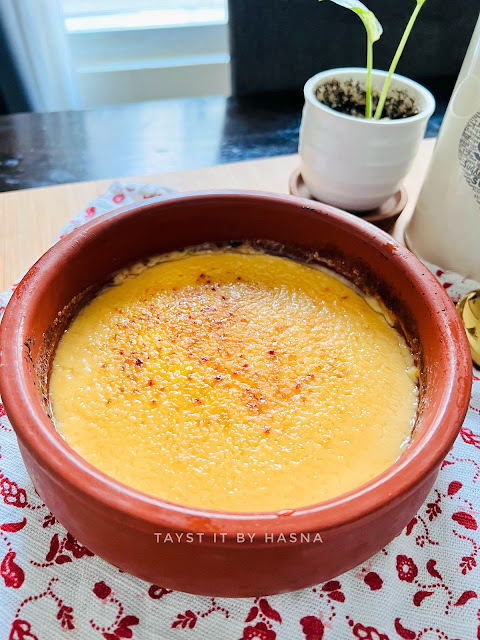
Crema Catalana


A Spanish dessert that is similar to Crème Brûlée, though they look a lot alike, Crema Catalana is made with milk and the latter is made with cream. 

Crema Catalana’s recipe way more easier. Requires very few ingredients and the method is much more easier. Crema Catalana is basically a custard prepared using egg yolks, milk, cornflour, lemon peels, cinnamon and vanilla. Similar to Creme Brûlée, Crema Catalana also has a crust made from sugar using blow torch. Since I do not own one, I tried replicating the same using the grilled in the oven, though the results were not what I wanted, works just fine. If you have a blow torch, this is one recipe that you can use it for other than Creme Brûlée 😄

Ingredients: (recipe adapted from Spain on a fork)

  • 2 cups Full fat Milk 
  • Few Lemon peels
  • 1 Cinnamon Stick
  • 1 tsp Vanilla Essence/ Extract (ideally 1 vanilla pod)
  • 2 tbsp White Sugar
  • 4 egg yolks
  • 2 tbsp White Sugar
  • 1/2 cup Cold Milk
  • 1 tbsp Corn Starch

Instructions:

  1. In a saucepan add in the milk, add in the lemon peels (without the white part), cinnamon stick, vanilla and Sugar. Allow to heat on medium and mix.
  2. Once it comes to a light boil, switch off flame and allow the lemon, cinnamon and vanilla flavors to infuse in the milk.
  3. In a bowl add in the egg yolks and sugar, mix well.
  4. In another bowl, pour the half cup cold milk and add in the corn flour and mix well.
  5. Add the cornflour milk to the egg yolks and mix well until well combined.
  6. Next, pour the infused milk that has been sitting on the stove and pour the milk using a strainer to the egg yolk mix. Combine well using a whisk.
  7. Pour this mix back to the saucepan and stir continuously for 9-10 minutes, or else the eggs will cook to form lumps.
  8. To know if the Crema Catalana is done, use the back of a wooden spoon and dip it in the custard and run your finger through it, if the custard stays separated it means the Crema Catalana is ready to be poured to serving bowls or a large bowl.


  9. Cover with a cling wrap and allow to set for 4 hours or overnight.
  10. Sprinkle a tablespoon of sugar on the top and using a blow torch, burn the sugar to create a crust.
  11. Enjoy immediately! 


Ps: 
If you store back in the fridge, the crust will soften.
You can use up the egg whites to make meringues, macarons or whip up a yummy omelette. 😍

Do try this recipe and don't forget to share your experience/feedback with me here in the comments or feel free to send me a mail. Also, do tag me at #taystedit if you try out my recipes on Facebook, Instagram etc so that I can see when you make it. ♡♡♡♡

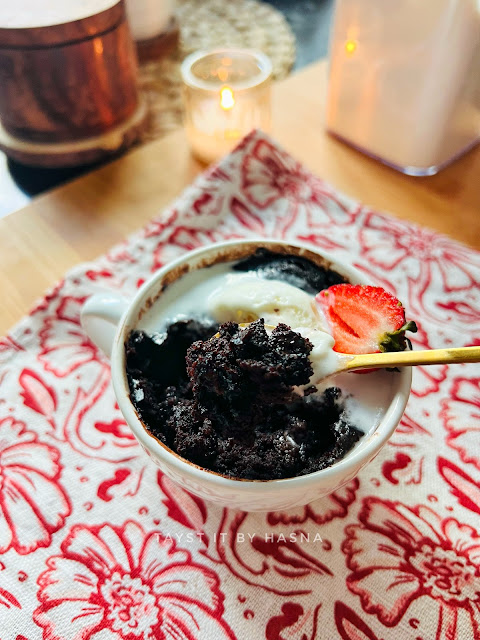
Brownie in a Mug


It’s the weekend and you definitely deserve a treat! And this has been my constant guilty pleasure lately. You have had it all mug cake, cookie dough mug cake and what not in a mug?! Well, give this one a try and I bet you won’t regret. 

This moist and dense brownie in a mug doesn’t use egg and that’s the biggest highlight for me. Nor does it use any other raising agents! 😍

I added chocolate chips for that extra richness, since we don’t add any eggs. But I tried it even without the chocolate and it was good either way. The outcome is dangerously delicious! Be ready to get addicted to this one. Happy weekend!


Ingredients:

  • 3 tbsp All purpose Flour
  • 3 tbsp Cocoa powder
  • 3 tbsp Sugar
  • Salt, a generous pinch
  • 4 tbsp Milk 
  • 1/4 tsp Coffee (mix it with the milk)
  • 2 tbsp Vegetable oil
  • 1/4 tsp Vanilla Essence/ extract
  • 2 tsp Nutella (optional)
  • 1-2 tbsp Chocolate Chips/ chunks (optional)

Instructions:

  1. In a mug, combine the dry ingredients with a small whisk/ spoon. 

  2. Pour in the wet ingredients and the chocolate chips/chunks. Mix well without any lumps. 

  3. Microwave for a minute or 10 seconds extra, on high. (Timing can vary depending upon your oven, I had to do a minute and 10 seconds)
  4. Allow the brownie to cook slightly and enjoy with a dollop of ice cream and berries of your choice!


Do try this recipe and don't forget to share your experience/feedback with me here in the comments or feel free to send me a mail. Also, do tag me at #taystedit if you try out my recipes on Facebook, Instagram etc so that I can see when you make it. ♡♡♡♡

Mushroom & Avocado stuffed Omelette 


I happened to develop this nutritious omelette few days back, and it has been on loop here. Undoubtedly a favorite! So I thought it’s high time I shared this recipe on my blog. The omelette consists of a layer of sautéed mushrooms, over which sliced avocados are placed.

I just love how easy the omelette is, and the avocado just doesn’t give out its bitterness which is covered up by the flavor from the sautéed mushrooms. I just looooove sautéed mushrooms and this omelette just is the right and nutrient packed breakfast you should definitely give a try! 😃

Ingredients: recipe for 1

  • 2 eggs 
  • 1 Scallion, chopped
  • 1/4 Capsicum, chopped
  • 1 small Onion, finely chopped
  • 6-7 White Mushrooms, sliced
  • 1 small Garlic clove, minced 
  • Salt, as required 
  • 1/4 tsp Oregano 
  • 1/2 ripe Avocado, sliced thinly 
  • Olive oil
  • Crushed Chilli flakes


Instructions:

  1. In a pan, pour olive oil and add the chopped onion, minced garlic, and sauté until raw smell disappears and add in the sliced mushrooms.
  2. Add salt as required and a splash of water.
  3. Next add in the chopped capsicum and sauté and finally add in oregano. And transfer the mushroom mix to a bowl.
  4. In another bowl, crack in 2 eggs and add in the chopped scallions and salt as required and mix well using a fork.
  5. In the same pan used earlier, pour some olive oil and pour the egg mix to the hot pan and swirl areas with excess eggs using a silicone or wooden spoon and allow to cook on low heat.
  6. Spread the mushroom mix prepared earlier on half of the omelette and place the uniformly sliced avocado over the bed of mushrooms and sprinkle the crushed chili flake’s and flip over the other side of the omelette and transfer to a plate and serve with fresh cherry tomatoes.


Do try this recipe and don't forget to share your experience/feedback with me here in the comments or feel free to send me a mail. Also, do tag me at #taystedit if you try out my recipes on Facebook, Instagram etc so that I can see when you make it. ♡♡♡♡

 White Bread


Years ago, I always thought baking bread was such a difficult task. To my surprise, not only is it easy to prepare homemade bread, it is very rewarding and not to mention the aroma that the baked bread gives is just exceptionally good. I just love the aroma of baked bread!

This recipe is so easy and can be made with basic ingredients that almost every kitchen has, this white bread does not use butter nor eggs. Brioche bread uses butter and eggs, and they are a rich variant of breads. I will definitely share my brioche recipe soon!


The bread is prepared by just combining flour, yeast, sugar, salt, oil and water, as simple as that! Knead well for around 5-10 minutes, or until the dough have developed gluten and the dough is elastic. You can do this test by pulling a portion of the bread dough and checking if the dough stretches well without tearing off, and has a nice elasticity to it, making the dough see through, or also called the window pane test. If you have a stand mixer, the easier it gets! Once the dough is allowed to rise for an hour or until double in size, you must break the air bubbles using your fist, and flatten to a rectangle shape (using your finger tips), to the size of your loaf pan, and roll it to form a log. 

In a well greased loaf pan, (do not forget to oil the lid of the loaf pan too), drop in the dough log and close with lid and allow to proof. Make sure the temperature of your oven is no more than 180 deg C, as having too much heat can make the outer sides of the bread hard.


Adapted from: YouTube Channel - Yeast Mode

Ingredients :

  • 1 cup lukewarm water/milk
  • 3+1/4 Cup All Purpose flour/ Bread Flour
  • 1/4 Sugar
  • 1 1/4 tsp Instant yeast (6 gms)
  • 1/4 Cup Vegetable Oil
  • 1/2 tsp Salt
Loaf pan used 8 x 4 x 4 inches

Instructions :

  1. In a bowl combine sugar, water and the yeast using a whisk .
  2. Next add in the vegetable oil and add in your Flour and mis well using a wooden spatula and once almost combined, lightly flour your countertop and flip the dough ball onto the counter top.
  3. Knead the dough for a good 5-10 minutes until the gluten develops and check if the dough is ready by doing the window pan test, (simply stretch a portion of the dough and the dough shouldn't tear apart and light should pass through the stretched dough).

  4. Grease the bowl well and drop the dough, cover using a cling film. Allow to proof/ rest for an hour or until the dough rises double in size. 


  5. Using your fist, punch the dough to release any air bubbles.
  6. Now transfer the dough to the clean counter top and flatten the dough into a rectangle shape with the help of your finger tips. Keep in mind, that the width should be the size of the loaf pan.
  7. Once the dough has been flattened, roll the dough into a log and place the dough log in a well greased loaf pan.


  8. Cover the loaf pan and allow to rise in a warm and dark place for 30 minutes, during this time, pre heat your oven at 180 deg C.

  9. Now bake the bread for 25-30 minutes, depending on your oven temperature. *
  10. Remove the lid of the loaf pan and turn the loaf pan, to release the bread from the loaf pan.

  11. Cover the bread using a kitchen towel and allow the bread to cool down completely.
  12. Now, using a serrated knife, cut the bread into slices and store in a zip lock bag, or a bread basket covered in kitchen towel until further use.

  13. Enjoy your freshly baked home made bread! 


Notes:

*To check if the bread is done, simply tap the loaf pan, and if you hear a hollow sound, the bread should be ready! Or if you have have a kitchen thermometer check the temperature of the inside of the bread.
* Do not be tempted to add too much flour if the dough doesn’t come together, if you add too much flour, the bread can tend to get hard. Remember that the more moist the dough is, the more steam while baking, making the bread softer.
More tips have been mentioned above.
*I have used All purpose Flour (as Bread flour isn’t widely available to everyone) and Water in this recipe instead of milk, you may use bread flour if you have, it yields better texture. 
As for milk, if you use milk instead of water, the crust of the bread tends to be super soft. Use them according to your preference of bread.
 

Do try this recipe and don't forget to share your experience/feedback with me here in the comments or feel free to send me a mail. Also, do tag me at #taystedit if you try out my recipes on Facebook, Instagram etc so that I can see when you make it. ♡♡♡♡

 Mango Swiss roll


One of my favorites and successful bakes in the recent times! I must say this one was "next level", like the husband exclaimed. While editing the video/reel of the recipe, my little one comes to me saying, my tummy says that it wants the cake you made yesterday again! You know what such compliments mean, It was craaazy good! Mango Swiss roll right out of a cafe/ bakers shop! I mean it!

This mango Swiss roll shouts summer like no OTHER! I mean, I wanted to play around with flavors, but this one was as good as it was being plain in itself. I would try to add tropical favors like coconut the nect time, for added texture, but otherwise, we loved the Swiss roll with a generous spread of Mango coulis, and chantilly cream (comprises of whipped cream, vanilla and icing sugar).


I happened to buy this R2e2 Mango from Carrefour, it's a huge sized variety of mango family. I had so many ideas to try using this mango, finally I settled for this swissroll that I have been procrastinating since a long time now. Next time I make this Mango Swiss roll, I would probably use a smaller mago for the decoration, as the weight of the Mango slices weighs down the Swiss roll, this R2e2 Mango of Australian origin was delicious otherwise! The best part is that, since the cake is made completely using vegetable oil, the cake stays soft and moist even when taken right out of the refrigerator, and also most ingredients are easily available at home. I am definitely making this for the next party at home, I mean it is such a show stopper that just melts in the mouth. If you haven't tried making Swiss rolls yet, give this Mango Swiss roll a try, everyone is going to be all praises. You can thank me later! <3


Recipe adapted from Mattadlard

Ingredients:

For the Sponge :

4 Large Eggs (yolks and whites separated)
  • 1/4 Cup Sugar, for the yolk
  • 1/4 Cup Sugar, for the white
  • 1/4+1 tsp Cup Plain Flour
  • 1/4 Cup Corn Flour
  • 1/4 tsp Baking powder 
  • 1/4 Cup +1 tsp Whole milk
  • 1/4 Cup Vegetable Oil
  • 1 tsp Vanilla
  • 1/4 tsp Lemon Zest
 

Chantilly Cream:

  • 1 Cup Whipping Cream
  • 2 tbsp Sugar
  • 1/2 tsp Vanilla 
  • 1/2 cup Mascarpone (optional)

Mango Coulis:

  • 1 Mango, peeled abd chopped 
  • 3 tsp Sugar
  • 2 tsp Lemon juice

Mango slices and Strawberries for topping

Instructions:

  1. Separate the Egg yolks from the egg whites, and whip the egg yolks, lemon zest with sugar and in another bowl, whip the egg whites and sugar until stiff peaks, now fold the egg whites into the egg yolks.
  2. Using a strainer, sift the plain flour, corn flour and baking powder and very gently fold the dry ingredients.
  3. Now add in the milk and vegetable oil, and make sure you go well under there and scoop and fold the wet ingredients wellaas they tend to stay at the bottom.        
  4. Preheat the oevn at 170 deg C, line a 33*33 cm baking tray with baking paper and pour the cake batter and evel using a off set spatula.
  5. Bake for 25 minutes and broil for the last 5 minutes for that perfect baked tops.

  6. Prepare the coulis by cooking Mango pieces with sugar and lemon juice on simmer for around 10 minutes and once cooled make a paste using an emulsion blender.
  7. Next prepare the Chantilly cream, whip the cream with sugar and vanilla and fold in the beaten Mascarpone if you have it! Whip everything well till you have medium peaks.
  8. Once the sponge cake has baked, drop the baked top facing on a new baking paper and remove the baking paper used for baking, trim off the edges using a knife and smear the cake generously with the Mango coulis, this is where the flavor comes from!

  9. Spread the chantilly cream, be careful not to over do it, as it will be difficult to roll otherwise!
  10. Roll it up real tight, as shown in the video on my Instagram reel, and allow to chill for 30 minutes, covered.

  11. Spread the remaining chantilly over the Swiss roll and decorate as per your liking. 


  12. Enjoy chilled!
Newer Posts
Older Posts

Search This Blog

My name is Hasna Haneef, a mommy to a toddler, hailing from Thalassery, Kerala. Welcome to my humble abode on the Internet; wherein I share all my recipes and experiments. I am glad to have you on board!

TRENDING POSTS

  • Emirati Chebab
  • Chicken Steak with Creamy Mushroom Sauce
  • Kerala Style Squid Roast
  • Regag - Emirati Flat bread
  • Kerala Beef Fry/ Nadan beef dry fry
  • Junglee Chicken Sandwich

About Me

May peace be with you!

Welcome to my blog.

I am delighted to have you on board. My name is Hasna Haneef, a mommy to a toddler, hailing from Thalassery, Kerala. My homeplace being Dubai, as I am born and brought up here and I am very influenced by the lifestyle and the variety of authentic cuisines I get to try from here, which has made me try anything that comes across me
, click here →

Stay Connected!

Join Our Madness!

Join with Thousands Of Subscribers ! Get Our Latest Recipes Delivered to Your email Inbox!

Powered by follow.it
  • Home
  • About Me
  • Recipes

    • Main Course
    • Desserts
    • Snacks

    Uncategorized

    • Chicken
    • Meat
    • Vegetarian
    • Rice
    • Malabar Food
    • Baking
    • Breakfasts
    • Snacks
    • Drinks
    • Pasta
    • Fish
    • Soups
    • Desserts
  • Contact Me

Featured Post

Triple Chocolate Hazelnut Skillet Cookie

Blog Archive

  • ►  2025 (4)
    • ►  April (2)
    • ►  March (1)
    • ►  February (1)
  • ►  2024 (36)
    • ►  October (4)
    • ►  September (5)
    • ►  July (1)
    • ►  June (2)
    • ►  May (4)
    • ►  April (3)
    • ►  March (10)
    • ►  January (7)
  • ▼  2023 (47)
    • ▼  December (3)
      • Kappa Vevichathu (Boiled Tapioca)
      • Easy Chocolate Traybake Cake
      • Shimla Mirch Chicken Biryani
    • ►  September (2)
      • Crema Catalana
      • Brownie in a Mug
    • ►  August (6)
      • Mushroom & Avocado stuffed Omelette
      • White Bread Loaf
      • Mango Swiss roll
    • ►  July (6)
    • ►  June (9)
    • ►  May (4)
    • ►  April (5)
    • ►  March (6)
    • ►  February (3)
    • ►  January (3)
  • ►  2022 (69)
    • ►  November (4)
    • ►  October (6)
    • ►  September (7)
    • ►  August (9)
    • ►  July (12)
    • ►  June (5)
    • ►  May (5)
    • ►  April (12)
    • ►  March (4)
    • ►  February (2)
    • ►  January (3)
  • ►  2021 (24)
    • ►  November (1)
    • ►  October (2)
    • ►  July (1)
    • ►  June (4)
    • ►  May (6)
    • ►  April (4)
    • ►  February (4)
    • ►  January (2)
  • ►  2020 (82)
    • ►  December (5)
    • ►  November (6)
    • ►  October (4)
    • ►  September (2)
    • ►  August (5)
    • ►  July (10)
    • ►  June (10)
    • ►  May (13)
    • ►  April (12)
    • ►  March (8)
    • ►  February (4)
    • ►  January (3)
  • ►  2019 (22)
    • ►  December (1)
    • ►  November (2)
    • ►  October (6)
    • ►  September (1)
    • ►  August (1)
    • ►  February (3)
    • ►  January (8)
  • ►  2018 (15)
    • ►  December (4)
    • ►  November (6)
    • ►  October (3)
    • ►  September (2)

Subscribe Us

Labels

Bake Biscuits Breakfast Brown rice Burger Cheese Chocolate Dal Egg Emirati Fish Iftar Indonesian Japanese Jeerakashala rice Kerala Keto Kuwait food Lunch Milk Mutton Thai food UAE food afghan cuisine arabic beef biryani bread burnt cheesecake cake chicken cream dessert dinner greek healthy indo chinese lamb malabar prawns pudding puffs quick dinner ideas recipe refreshing drink rice salad sandwich stir fry vegetables vegetarian veggies yemeni

Contact Form


POPULAR POSTS AND PAGES

Emirati Chebab

Emirati Chebab

June 01, 2023
Chicken Steak with Creamy Mushroom Sauce

Chicken Steak with Creamy Mushroom Sauce

November 05, 2018
Kerala Style Squid Roast

Kerala Style Squid Roast

June 18, 2020
Regag - Emirati Flat bread

Regag - Emirati Flat bread

December 02, 2020
Kerala Beef Fry/ Nadan beef dry fry

Kerala Beef Fry/ Nadan beef dry fry

October 08, 2019

Pages

  • Home
  • About Me
  • Privacy Policy
  • Contact Me

Copywrite © 2023 TermsFeed®. All rights reserved.

Created By Sora Templates | Distributed By Gooyaabi Templates

Back to top