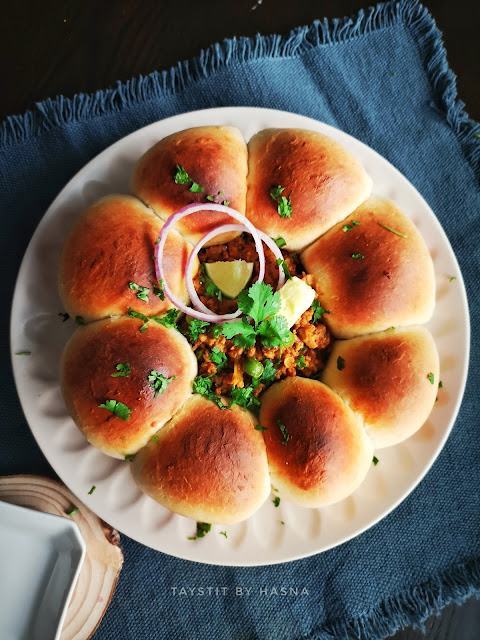
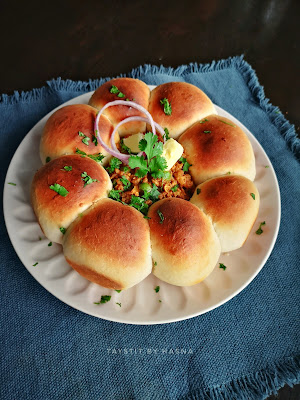
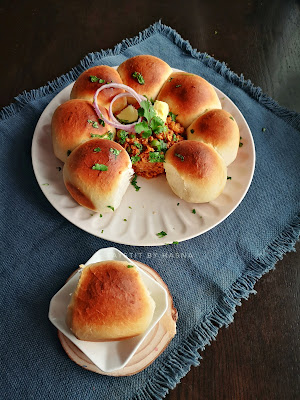
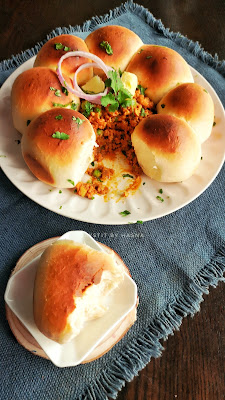
Search This Blog

Taystit by Hasna

Food, Recipes, and Beyond

  • Home
  • About Me
  • Recipes
    • Main Course
    • Snacks
    • Desserts
  • Uncategorized
    • Chicken
    • Meat
    • Vegetarian
    • Rice
    • Malabar Food
    • Baking
    • Breakfasts
    • Snacks
    • Fish
    • Pasta
    • Drinks
    • Soups
    • Desserts
  • Contact Me

Kheema Pav Wreath


Howdy folks?! Like promised I am going to try and share more innovative recipes to you guys.. And this is one among my innovations.. How pretty does this look for a ladies Night or a game night.. What say eh?

When the westerners does their pull apart bread with cheese, bolognese sauce etc, I thought why not Indian food? And Mutton Kheema masala is what popped right in my head.

When basic ingredients that can found home can make a difference, I thought to myself, why not be the difference. The Mutton mince /kheema is cooked for 15- 20 minutes in Indian spices and Masalas that gives in its beautiful aroma. 


I have noticed that what I hate in Kheema is that when it's dry and the mince doesn't feel succulent in the mouth. Ever since, I have been adding a dash of milk or cream to my kheema that not only makes my kheema masala succulent and Juicy, but also makes it fit for a king! Psst psst.. Let me tell you, not only was it delicious, it is also very filling. I usually don't like mattar/ green Peas in my kheema. But I like the vibrancy from the green color that it gives to the dish. 

My initial plan was to fill the kheema inside the Pav. But I wanted the kheema to get kore exposure, that's when the wreath idea came into existence. I am sure this will be a hit for a party table too! 

Soft, buttery and pillowy Pav buns is what the wreath is made of. The combination is so rewarding to the palate. I have always been fond of bread baking and let this be a beginning to it.


Ingredients :

  • 800 gms/ 3 1/2 cups of bread flour/ all purpose flour
  • 4 tbsp milk powder
  • 2 tsp instant yeast
  • 2 tsp sugar
  • 1 1/2 - 2 cups water **
  • Salt, as required 

Kheema Masala:

  • 500 gms minced Mutton 
  • 3 tbsp oil
  • 1 tsp Gheem clarified butter
  • 2 medium onions, chopped
  • 3 green chillies, chopped
  • Salt, as required 
  • 1 tbsp ginger garlic paste 
  • 1/4 tsp Turmeric powder 
  • 1 tsp Chilli powder
  • 1 tsp Coriander Powder 
  • 1 tsp Garam Masala
  • 1/2 tsp Cumin powder 
  • 2 tomato, ground to paste
  • 1/4 frozen green peas
  • 1/2 cup milk + 3 tbsp for brushing

Instructions:


  1. In a bowl or on a clean counter top, add your flour and other dry ingredients like yeast, milk powder, sugar and salt. 
  2. Mix the dry ingredients with hand gently, now slowly add in your water gradually. 
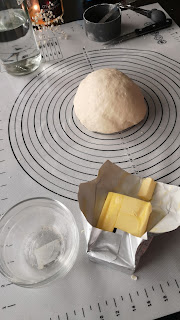
  3. Allow the gluten to work so that you get a stretchy dough. *
  4. Allow to rise in a dry and warm place with a kitchen towel over the dough for at least 1/2 and to 1 hour. 
  5. To prepare the kheema masala, take a pan and add oil and ghee/clarified butter. 
  6. Add in your chopped onions, green chillies and Sautee well. 
  7. Next add in your ginger garlic paste and saute until the raw smell disappears. 
  8. Next add in your masala powders and saute for around 30 seconds. 
  9. Next add in your freshly ground tomato paste and mix until combined and allow to cook well for 5 minutes. 
  10. Now add in your minced meat and season with salt and mix well using a spatula or a wooden spoon. 
  11. Add in your green peas in the last 5 minutes of cooking meat. 
  12. Cook the minced meat with masalas for around 20 minutes until cooked well. 
  13. Finally drop in a piece of butter and set aside. 
  14. Now the dough would have doubled the size, using a bench scrapper cut the dough into 8 equal parts and tuck them into a ball shape, roll well and place them in a springfoam pan, placing a dessert ring in the middle, place the shaped balls around the ring in the shape of a wreath with an inch gap in between for the Pav hub's to rise while baking. 

  15. Brush milk over the buns and allow to bake for 30-35 minutes in a preheated oven at 180 degrees C. 
  16. Remove from oven and immediately brush butter oven the hot baked bread 😍
  17. Allow to cool for 5 minutes and remove the ring and fill the ring with the prepared Kheema masala and garnish with onion rings, lemon wedges and chopped Coriander leaves. 


Notes :

** water quantity depends on how sticky or dry your dough is. You need a dough that is sticky, stretchy and that does does break when you pull or stretch. When you touch the dough with a dry finger, the dough shouldnt stick to your finger. If your water content is less, chances are your dough will break. 

*If you plan to keep your baked Pav buns out, transfer to plate/bowl and cover with kitchen towel trapping the warmth inside and hence will keep your Pav buns soft and warm


Do try this recipe and don't forget to share your experience/feedback with me here in the comments or feel free to send me a mail. Also, do tag me at #taystedit if you try out my recipes on Facebook, Instagram etc so that I can see when you make it. ♡♡♡♡

Balaleet


Balaleet is one the most popular breakfasts of Emiratis. Bring born and bought up in the United Arab Emirates I have always had such so much love for the food and culture of this beautiful country.

This traditional dish is usually served with boiled garbanzo beans and served with other sides like Hummus, cheese and bread.
Balaleet has contrasting flavors. The noodle pasta/vermicelli is sweet and the eggs are savory.

The bedouins have always prepared eggs with sweet but the noodle pasta/vermicelli came into existence from the traders who introduced pasta to the middle east. This with some boiled beans and a cup of Karak is only you need for breakfast. I could not get hold of the garbanzo beans today. But I definitely recommend it for a complete meal.


Balaleet is a combination of cardamom and saffron flavored sweet vermicelli tht is served with savory eggs. It is also served for iftar during Ramadan. The first time I had it was from Arabian Tea House, a prominent restaurant in Dubai. I wanted to create it at home right away! The ingredients seemed accessible. But the first time I made, it was a big flop coz I made around 400 gms of vermicelli for 6 of us. While preparing balaleet, remember less is more. 😅 Also if you love sweet and savory in one dish, you will certainly love balaleet for breakfast. I feel the dish has an acquired taste, the situation at home was mixed reviews. So I think it is definitely an acquired taste. I loved it though! 😍 

I have been delaying to post the recipe of balaleet as I wanted to post for UAE National Day. But I wasn't able to do so. So I thought let me share it anyways 😄, it's never too late for anything.. It's the mind's game that keeps us from doing things sometimes. Anywhoo let's go check out how to prepare this easy Emirati  breakfast! 😍

Ingredients -

  • 200 gms vermicelli
  • 2 1/2 cups water or as required 
  • 1/2 cup sugar
  • 3 tbsp ghee
  • Saffron, a pinch
  • Powdered Cardamom, a pinch
  • 2 eggs
  • Salt, a pinch
  • Vegetable oil

Instructions :

  1. Roast the vermicelli in a pan until they turn golden brown, by stirring constantly so that the vermicelli does not burn.
  2. Next pour your water and bring to a boil and allow to cook for around 5 minutes. Drain water if necessary. 
  3. Now soak saffron in a tbsp of water. 

  4. Next in a large pan, add in your cooked vermicelli and ghee, mix well. 
  5. Next add in your sugar, soaked saffron and a pinch of cardamom powder, mix well and your sweet side of the dish is done. 
  6. Next prepare your eggs by pouring your beaten eggs with a pinch of salt and flip the Omlette once the underside is done and  the upside is dry. Once the eggs are cooked for around 2 minutes on medium low heat, set the omlette aside. 
  7. Now for the plating, place the omelet over the bed of cooked sweet vermicelli and your Emirati breakfast is ready to relish preferably with a glass of Karak chai! 😍 


Do try this recipe and don't forget to share your experience/feedback with me here in the comments or feel free to send me a mail. Also, do tag me at #taystedit if you try out my recipes on Facebook, Instagram etc so that I can see when you make it. ♡♡♡♡


Fiery Buffalo wings


I always fancy anything glazed. And these fiery Buffalo wings explode in the mouth with tanginess and all things spice. 

Chicken wings for starters are always the best I.e perfectly fried  and coated in the amazing tangy buttery sauce is just aahhhmaaayyzing! 

Ever since I heard the name Buffalo wings, I was always perplexed to think how can one associate a chicken wing and Buffalo. Later to my surprise, when researched., though the name does bemuse and makes one think that Buffalo has something to do with "Buffalo Wings", it is completely unrelated to the name. It's origin is from a place called Buffalo in NY. It was invented when a mother, Co owner of a bar, made a late night snack of Buffalo wings for her son and friends by deep frying chicken wings and then coating them in a butter based cayenne pepper sauce. 


The first time I tried Buffalo wings, I didn't quite like them as it was not quite as I expected it to be, as it was inauthentic. But later on when I tried the real deal, my thoughts on Buffalo wings changed, ever since! I have always wanted to replicate them at home, with available resources at home. I have used Sriracha sauce to make the sauce for coating the deep fried chicken wings. 

So, here I am! Demonstrating Buffalo wings for you guys.. An amazing appetizer, that I am sure everyone is going to ask for a second helping! 

So without further a do, let's get started! 

Ingredients :

  • 500 gms Chicken wings
  • 1/2 tsp crushed black pepper 
  • Salt, as required 
  • 1 tsp Paprika powder 
  • 3/4 cup All Purpose Flour 
  • 1 tbsp Butter
  • 200 ml Sriracha Sauce/ any favorite spicy sauce
  • 1 tsp sugar
  • 1/2 tsp pepper powder
  • 1 tsp Paprika
  • 1 garlic clove/ 1/2 tsp Garlic Powder 
  • 1 tbsp corn flour 
  • Oil for deep frying 

Instructions :

  1. Marinate the chicken wings using salt, pepper and paprika powder.

  2. Next coat the chicken wings in all purpose flour and deep fry until golden and crisp for around 6 minutes. 
  3. Now, to prepare the sauce, in a saucepan, drop a tablespoon of butter and then pour in your Sriracha Sauce. 
  4. Next add in your seasonings, paprika, black pepper powder, salt and sugar for balancing. 
  5. Finally add in freshly minced garlic clove or garlic powder. 
  6. Next, before the sauce starts to boil, add in your corn flour as slurry as thickening agent. Combine well. 
  7. Allow to boil for a minute on medium low flame and your Buffalo sauce is ready! 

  8. Finally, coat the fried chicken wings in your buffallo sauce and enjoy hot! 😋


Do try this recipe and don't forget to share your experience/feedback with me here in the comments or feel free to send me a mail. Also, do tag me at #taystedit if you try out my recipes on Facebook, Instagram etc so that I can see when you make it. ♡♡♡♡
Newer Posts
Older Posts

Search This Blog

My name is Hasna Haneef, a mommy to a toddler, hailing from Thalassery, Kerala. Welcome to my humble abode on the Internet; wherein I share all my recipes and experiments. I am glad to have you on board!

TRENDING POSTS

  • Emirati Chebab
  • Chicken Steak with Creamy Mushroom Sauce
  • Kerala Style Squid Roast
  • Regag - Emirati Flat bread
  • Kerala Beef Fry/ Nadan beef dry fry
  • Junglee Chicken Sandwich

About Me

May peace be with you!

Welcome to my blog.

I am delighted to have you on board. My name is Hasna Haneef, a mommy to a toddler, hailing from Thalassery, Kerala. My homeplace being Dubai, as I am born and brought up here and I am very influenced by the lifestyle and the variety of authentic cuisines I get to try from here, which has made me try anything that comes across me
, click here →

Stay Connected!

Join Our Madness!

Join with Thousands Of Subscribers ! Get Our Latest Recipes Delivered to Your email Inbox!

Powered by follow.it
  • Home
  • About Me
  • Recipes

    • Main Course
    • Desserts
    • Snacks

    Uncategorized

    • Chicken
    • Meat
    • Vegetarian
    • Rice
    • Malabar Food
    • Baking
    • Breakfasts
    • Snacks
    • Drinks
    • Pasta
    • Fish
    • Soups
    • Desserts
  • Contact Me

Featured Post

Triple Chocolate Hazelnut Skillet Cookie

Blog Archive

  • ►  2025 (4)
    • ►  April (2)
    • ►  March (1)
    • ►  February (1)
  • ►  2024 (36)
    • ►  October (4)
    • ►  September (5)
    • ►  July (1)
    • ►  June (2)
    • ►  May (4)
    • ►  April (3)
    • ►  March (10)
    • ►  January (7)
  • ►  2023 (47)
    • ►  December (3)
    • ►  September (2)
    • ►  August (6)
    • ►  July (6)
    • ►  June (9)
    • ►  May (4)
    • ►  April (5)
    • ►  March (6)
    • ►  February (3)
    • ►  January (3)
  • ▼  2022 (69)
    • ►  November (4)
    • ►  October (6)
    • ►  September (7)
    • ►  August (9)
    • ►  July (12)
    • ►  June (5)
    • ►  May (5)
    • ►  April (12)
    • ►  March (4)
    • ►  February (2)
    • ▼  January (3)
      • Kheema Pav Wreath
      • Balaleet - A Traditional Emirati Breakfast
      • Fiery Buffalo Wings
  • ►  2021 (24)
    • ►  November (1)
    • ►  October (2)
    • ►  July (1)
    • ►  June (4)
    • ►  May (6)
    • ►  April (4)
    • ►  February (4)
    • ►  January (2)
  • ►  2020 (82)
    • ►  December (5)
    • ►  November (6)
    • ►  October (4)
    • ►  September (2)
    • ►  August (5)
    • ►  July (10)
    • ►  June (10)
    • ►  May (13)
    • ►  April (12)
    • ►  March (8)
    • ►  February (4)
    • ►  January (3)
  • ►  2019 (22)
    • ►  December (1)
    • ►  November (2)
    • ►  October (6)
    • ►  September (1)
    • ►  August (1)
    • ►  February (3)
    • ►  January (8)
  • ►  2018 (15)
    • ►  December (4)
    • ►  November (6)
    • ►  October (3)
    • ►  September (2)

Subscribe Us

Labels

Bake Biscuits Breakfast Brown rice Burger Cheese Chocolate Dal Egg Emirati Fish Iftar Indonesian Japanese Jeerakashala rice Kerala Keto Kuwait food Lunch Milk Mutton Thai food UAE food afghan cuisine arabic beef biryani bread burnt cheesecake cake chicken cream dessert dinner greek healthy indo chinese lamb malabar prawns pudding puffs quick dinner ideas recipe refreshing drink rice salad sandwich stir fry vegetables vegetarian veggies yemeni

Contact Form


POPULAR POSTS AND PAGES

Emirati Chebab

Emirati Chebab

June 01, 2023
Chicken Steak with Creamy Mushroom Sauce

Chicken Steak with Creamy Mushroom Sauce

November 05, 2018
Kerala Style Squid Roast

Kerala Style Squid Roast

June 18, 2020
Regag - Emirati Flat bread

Regag - Emirati Flat bread

December 02, 2020
Kerala Beef Fry/ Nadan beef dry fry

Kerala Beef Fry/ Nadan beef dry fry

October 08, 2019

Pages

  • Home
  • About Me
  • Privacy Policy
  • Contact Me

Copywrite © 2023 TermsFeed®. All rights reserved.

Created By Sora Templates | Distributed By Gooyaabi Templates

Back to top