Search This Blog

Taystit by Hasna

Food, Recipes, and Beyond

  • Home
  • About Me
  • Recipes
    • Main Course
    • Snacks
    • Desserts
  • Uncategorized
    • Chicken
    • Meat
    • Vegetarian
    • Rice
    • Malabar Food
    • Baking
    • Breakfasts
    • Snacks
    • Fish
    • Pasta
    • Drinks
    • Soups
    • Desserts
  • Contact Me

Galaktoboureko - Milk Custard Pie


Assalamualaikum wa rahmathullahi wa barakathuh

With less than 10 days left for Ramadan, the anticipation is getting real. Can't wait for the months blessings and happiness from Allah to be bestowed on us and may Allah accept all our Ibadah and duaa.

Let's come to the point now, the question; what's for iftar? This year I have decided not to over indulge in oily food, rather prepare 1 or 2 healthy dishes everyday. Also since I have been asked to share more healthy recipes for iftar, I have been doing a lot of experimenting lately, which is WHY I haven't been sharing many recipes recently.

That being said, I do not say that I will not be sharing yummy delicious snacks here. I have shared a few recipes already and I will be making a new selection in the menu bar for Ramadan recipe. This will help my dearest readers to have easy access to iftar/suhoor recipes like Butter Chicken Parcel and Malabar mini Vella pola.

Let's begin the Iftar recipe series with something sweet, as the elders say, it's always best to begin something with anything sweet. After much thought process, I came up with a delicious snack/dessert, to my surprise, a similar dish is already on the internet on the name Gulaktoboreko, which is a Greek dessert. So I kept the name the same 😁 Thanks to the Greek name, it came to my rescue to create a new name for the dish😝

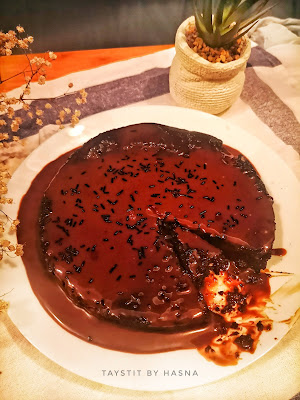
Galaktoboreko gala means milk in greek and boreko means pie. First you have to prepare the sugar syrup and then the custard filling is prepared. It is similar to baklava, the layers are made using Phyllo dough and ghee is drizzled over the layers, and a filling made from milk, Semolina, vanilla and lemon zest is made and covered using the overflowing extras of Phyllo sheets and tucked in, which is then scored using a knife, carefully without cutting all the way to the base. This helps the hot air to escape and keeps the Phyllo crisp. Once baked, pour in your Cinnamon sugar syrup* and enjoy! It is very difficult to convince my momma when it comes to sweet dishes, but one bite of this and her face made my day! ✨ This one is too good, I tell you! 🤤😍😍

Ingredients :

  • Phyllo dough sheets, thawed
  • 3 tbsp Unsalted Butter
  • 2 cups milk
  • Little more than 1/4 cup sugar 
  • 1/4 cup semolina/ rava
  • 1 whole egg 
  • 1 egg yolk
  • 1 tsp vanilla essence
  • Zest of lemon or orange
  • Salt, a pinch 

For Syrup:

  • 3/4 cup sugar
  • 1/4 cup honey 
  • 1/2 water
  • A Cinnamon stick
  • 2 tbsp lemon juice
  • 1 tsp vanilla essence

Instructions :

  1. In a sauce pan, combine sugar, water, lemon juice and Cinnamon stick. 
  2. Bring to a boil and allow to boil for around 30 seconds. 
  3. Remove from heat and pour your honey to the sugar syrup prepared and mix well and set aside to cool. 

To make the custard :

  1. Beat the egg, yolk, half the sugar, salt, Semolina and corn starch for around 3 minutes until thick and pale. 

  2. Next pour the milk in the saucepan and allow the milk to heat on low.
  3. Next add the egg mixture to the milk and slowly cook over low heat while stirring constantly until it thickens. 
  4. Remove from heat and add vanilla extract and lemon zest. Mix well and set aside. 
  5. Grease your 4" by 7" baking dish, with melted butter. 
  6. Preheat your oven to 180°C.
  7. Line the first layer of Phyllo sheet on your baking dish, keeping in mind to allow half the sheet to hang out of the baking dish and drizzle melted butter on each layer. 
  8. After your first set of about 4 layers are done, pour the custard layer in the middle and fold the Phyllo sheets hanging over the sides, while drizzling melted butter on each layer of Phyllo sheet as you go. **

  9.  Score the resultant pie into the desired number of squares, keeping in mind not to score too deep into the pie, all way to the bottom. 

  10. Use up all the remaining butter brushing the Phyllo on all sides.
  11. Bake for 40 minutes or more, depending on your oven until it turn deep golden in colour. 
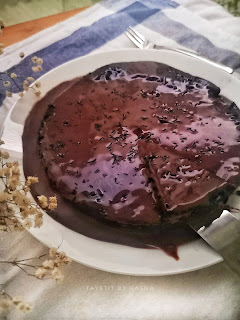
  12. As soon as the pie is done, cut deep through the scored areas to the bottom, so that it's easier to take portions as required. 
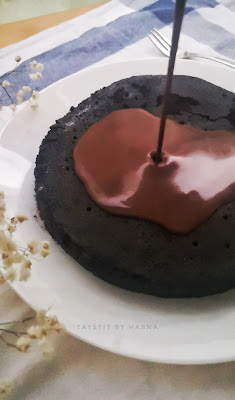
  13. Pour the prepared and cooled sugar syrup over the pie. 
  14. Sprinkle silvered pistachios or powdered Cinnamon, allow to set for 30 minutes or according to your liking you may have it warm and oozing, or if you like it set, have it after 30 minutes and enjoy! 


Notes:

  • Be careful to only pour sugar syrup that has been cooled and pour over the baked galaktoboureko allow to soak.. And enjoy!
  • **You may use extra sheets and tuck in if necessary, I forgot to allow to hang the sheets a bit over the dish, so I had to place extra sheets on top. 


Do try this recipe and don't forget to share your experience/feedback with me here in the comments or feel free to send me a mail. Also, do tag me at #taystedit if you try out my recipes on Facebook, Instagram etc so that I can see when you make it. ♡♡♡♡

Caramelized Onion Egg Roast


Onions are something that I hate to deal with. Always makes one cry! But caramelized onions are everything! Egg Roast this way  has been a game changer. Though the onions are not fried like that which is done for biryani, for the egg roast, the onions are sautéed in Coconut oil until the onions turns caramel brown in shade. The onions turn caramel when the water content  from the onions evaporate and you are left with a slightly sweet caramelized onion. 

I have always hated the Mutta (egg) roast that we get in hotels, as the onions are always almost uncooked with chunky pieces. Ever since, I have been preparing egg roast this way that requires a bit more time than usual egg roast and I must say, it is lip smacking good.


In this recipe, I make a version where I don't add water. But you may add water if you want more gravy like for chappathi etc.

The gravy base is quite simple and made with staple ingredients like ginger garlic paste, green chilli, tomato and spice powders in which your boiled eggs with 3 slits goes into the gravy and is allowed to smear in the gravy which gives the eggs a chance to penitrate in the gravy and gives the eggs a yellow tint. This delicious gravy can be enjoyed with any roti or puris. I like to pair mine with Vellappam (using fermented rice batter).

Ingredients :

  • 5 tbsp Coconut oil
  • 4 Onions, sliced thin
  • 2 sprig Curry leaves
  • 2 Green chillies, slit
  • 1 tbsp ginger garlic paste 
  • 1 small tomato, chopped
  • 1/4 tsp Turmeric powder 
  • 1 1/2 tsp Kashmiri Red chilli powder 
  • 1 tsp Coriander Powder 
  • 1/2 tsp Fennel seed Powder 
  • 1/4 tsp Garam Masala Powder 
  • 1/4 tsp Black Pepper Powder 
  • 1/2 tsp Sugar (Optional) 
  • 5 boiled eggs, slit
  • Salt, as required 

Instructions :

  1. In a clay pot, pour in coconut oil and sauté the thinly sliced onions with salt. 

  2. Add your curry leaves and sauté until the onions caramelize and not burn (mix well every minute) and keep the flame on medium low. 
  3. Next add in ginger garlic paste and green chillies. Sauté well. 
  4. Next add in your chopped tomatoes. Mix well and close lid. 
  5. Now add in your spices like Turmeric powder, chilli powder, Coriander powder, Fennel seed powder, Garam masala powder, and black pepper powder and saute well. Check for salt, if required. 

  6. If you think the gravy is too dry, add 1/4 cup of water and allow to cook for 2 minutes. 

  7. Finally add in your boiled eggs, mix and cover and cook well for 2-3 minutes until the egg coats well in the Masala. 
  8. Enjoy with puri, chappathi, appam etc! 😋😋


Do try this recipe and don't forget to share your experience/feedback with me here in the comments or feel free to send me a mail. Also, do tag me at #taystedit if you try out my recipes on Facebook, Instagram etc so that I can see when you make it. ♡♡♡♡


Rooh Afza Hot Chocolate


Happy Women's Day! Dedicating this white hot chocolate to all the women around the world and to all the men who have been a strong pillar to women in their lives. As Ramadan is approaching, Rooh Afza has to be around. Rooh Afza is a squash made from ingredients like rose, mint etc, said to have cooling properties. It's a staple in all homes during Ramadan. Bidding farewell to the most amazing winter season, I wanted to make some hot chocolate, but like always with a 'twist'.

It happens to be women's day , so I thought why not try some Rooh Afza Hot Chocolate. We all have tried Rooh afza in many chilled ways, but a warm drink? Well, this might be a first.. But oh boy! It was really good! 😋

A warm mug of pink hued hot white chocolate is all you need for your evening me time.. Like a warm hug in a mug. But I warn you it's not something that you can have on a  daily basis. It's perfect to satisfy sudden sweet cravings, as it's quite rich and decadent. It's super easy to make too. I would suggest to use good quality white chocolate. Using the normal white chocolate chips might not give the desired taste.

Please feel free to add your favorite toppings, I somehow thought that I had mini marshmallows in my pantry. Boohoo, it would have been an amazing add on! 
Nevertheless, let's see how to make this Easy Rooh Afza White Hot Chocolate.


Ingredients:

  • 2 Cups Whole Milk
  • 1/4 Cup Cream
  • 50 gms White Chocolate
  • 2 tbsp Rooh Afza
  • 1/4 Cup dairy whipped cream
  • Dash of Vanilla Essence
  • Sprinkles

Instructions :

  1. In a small sauce pan, pour in your milk and cream.
  2. Once it comes to a boil, drop in your chopped white chocolate, do not agitate for a minute.
  3. Using a whisk, gently mix until the white chocolate mixes with the milk.
  4. Next pour your Rooh Afza and mix.
  5. Finally pour it into your favorite mug. 
  6. Using a hand blender, whisk your whipping cream with a dash of vanilla essence and top it over the Rooh Afza Hot White chocolate.
  7. And add in your favorite hot chocolate toppings like marmallows, sprinkles etc.


Do try this recipe and don't forget to share your experience/feedback with me here in the comments or feel free to send me a mail. Also, do tag me at #taystedit if you try out my recipes on Facebook, Instagram etc so that I can see when you make it. ♡♡♡♡

15 minute Microwave Chocolate Ganache Cake


Have you ever had sudden cravings for chocolate cake? You have all the ingredients to make the perfect chocolate cake at home, but no patience? Well, this is me, I have to get cake when I think of it. But you know all the time it takes to bake a proper chocolate cake. I don't have that kind of patience for a simple chocolate cake.

That's how this super easy and delicious cake was invented. I have been doing recipe trials of this one lately and everyone has been asking for me. This cake is simple yet deliciously good, no one will ever make out it's a microwave cake until you tell them. It's that simple! And the best part is that unlike any other basic chocolate cakes, this one isn't heavy and you can't just stop at one spoonfull. You just want to keep diving in all that chocolatey goodness with the chocolate ganache. The perfect recipe to satisfy all your sudden chocolate cake cravings!


I have always been in this situation, where whenever I make a mug cake, I can never eat one mug cake peacefully. Either I will have to share or will have to make couple more for everyone. Boohoo. So this recipe solves all such problems. This one is especially dedicated to all my friends who are in hostel and have always asked me for recipes that can be done in microwave especially for immediate cravings. I am not joking when I saw it only takes 15 minutes from start to finish.

The chocolate ganache makes the cake even more indulgent! Though the chocolate ganache isn't necessary, but I wouldn't trade mine for one with the ganache, teehee. The only issue with this cake is that you won't be able save some, or take a picture of it, it will be long gone.. At least that's what happened with me everytime I wanted to take a good picture of the cake. 😅
Lets see how to make this super easy Chocolate Ganache Cake which is ridiculously indulgent!

Ingredients:

Dry Ingredients:

  • 3/4 Cup All Purpose Flour
  • 1/2 Cup Sugar
  • 1/4 Cup Good Quality Cocoa Powder
  • 1 tsp Baking Powder
  • Salt, a pinch

Wet Ingredients :

  • 1/2 cup Vegetable Oil
  • 1 Egg
  • 1/2 cup Full Fat Milk
  • 1 tsp Vanilla Essence
  • 1 Cup warm water

Chocolate Ganache:

  • 1/2 cup Dark/ Milk Chocolate
  • 1/2 cup Heavy/ Cooking Cream

Instructions:

  1. First prepare your ganache by pouring warm heavy cream into a bowl that contains your chocolate. Mix well using a whisk. Cover the bow with a lid and allow to cool and set in the freezer.
  2. In a large bowl add all the ingredients and mix well.
  3. In another bowl, mix together all your wet ingredients except for warm water.
  4. Pour in your wet mix to the bowl with your dry ingredients and mix until combined.
  5. Now pour in your warm water and mix well to get a little runny cake batter.
  6. In a 7" microwave proof dish/pan lined with baking/parchment paper, pour in your batter and microwave for 5 minutes, checking every 30 seconds after 3 minutes 30 seconds, until skewer inserted comes out clean.*
  7. Allow the cake to cool completely before removing from pan. Use a blunt knife to slide around the pan for easy removal of the cake, if required.
  8. Once your cake has been transfered to your serving plate, pour your chocolate ganache (that has been sitting in the freezer) over your 15 minute cake and enjoy! 😋🤤


Notes:
The middle portion may look a little undone, but the skewer inserted should come out clean.
You can spread melted Nutella or any of your favorite spreads instead of the chocolate ganache.


Do try this recipe and don't forget to share your experience/feedback with me here in the comments or feel free to send me a mail. Also, do tag me at #taystedit if you try out my recipes on Facebook, Instagram etc so that I can see when you make it. ♡♡♡♡
Newer Posts
Older Posts

Search This Blog

My name is Hasna Haneef, a mommy to a toddler, hailing from Thalassery, Kerala. Welcome to my humble abode on the Internet; wherein I share all my recipes and experiments. I am glad to have you on board!

TRENDING POSTS

  • Emirati Chebab
  • Chicken Steak with Creamy Mushroom Sauce
  • Kerala Style Squid Roast
  • Regag - Emirati Flat bread
  • Kerala Beef Fry/ Nadan beef dry fry
  • Junglee Chicken Sandwich

About Me

May peace be with you!

Welcome to my blog.

I am delighted to have you on board. My name is Hasna Haneef, a mommy to a toddler, hailing from Thalassery, Kerala. My homeplace being Dubai, as I am born and brought up here and I am very influenced by the lifestyle and the variety of authentic cuisines I get to try from here, which has made me try anything that comes across me
, click here →

Stay Connected!

Join Our Madness!

Join with Thousands Of Subscribers ! Get Our Latest Recipes Delivered to Your email Inbox!

Powered by follow.it
  • Home
  • About Me
  • Recipes

    • Main Course
    • Desserts
    • Snacks

    Uncategorized

    • Chicken
    • Meat
    • Vegetarian
    • Rice
    • Malabar Food
    • Baking
    • Breakfasts
    • Snacks
    • Drinks
    • Pasta
    • Fish
    • Soups
    • Desserts
  • Contact Me

Featured Post

Triple Chocolate Hazelnut Skillet Cookie

Blog Archive

  • ►  2025 (4)
    • ►  April (2)
    • ►  March (1)
    • ►  February (1)
  • ►  2024 (36)
    • ►  October (4)
    • ►  September (5)
    • ►  July (1)
    • ►  June (2)
    • ►  May (4)
    • ►  April (3)
    • ►  March (10)
    • ►  January (7)
  • ►  2023 (47)
    • ►  December (3)
    • ►  September (2)
    • ►  August (6)
    • ►  July (6)
    • ►  June (9)
    • ►  May (4)
    • ►  April (5)
    • ►  March (6)
    • ►  February (3)
    • ►  January (3)
  • ▼  2022 (69)
    • ►  November (4)
    • ►  October (6)
    • ►  September (7)
    • ►  August (9)
    • ►  July (12)
    • ►  June (5)
    • ►  May (5)
    • ►  April (12)
    • ▼  March (4)
      • Galaktoboureko - Milk Custard Pie
      • Caramelized Onion Egg Roast (Mutta Roast)
      • Rooh Afza Hot Chocolate
      • 15 minute Microwave Chocolate Ganache Cake
    • ►  February (2)
    • ►  January (3)
  • ►  2021 (24)
    • ►  November (1)
    • ►  October (2)
    • ►  July (1)
    • ►  June (4)
    • ►  May (6)
    • ►  April (4)
    • ►  February (4)
    • ►  January (2)
  • ►  2020 (82)
    • ►  December (5)
    • ►  November (6)
    • ►  October (4)
    • ►  September (2)
    • ►  August (5)
    • ►  July (10)
    • ►  June (10)
    • ►  May (13)
    • ►  April (12)
    • ►  March (8)
    • ►  February (4)
    • ►  January (3)
  • ►  2019 (22)
    • ►  December (1)
    • ►  November (2)
    • ►  October (6)
    • ►  September (1)
    • ►  August (1)
    • ►  February (3)
    • ►  January (8)
  • ►  2018 (15)
    • ►  December (4)
    • ►  November (6)
    • ►  October (3)
    • ►  September (2)

Subscribe Us

Labels

Bake Biscuits Breakfast Brown rice Burger Cheese Chocolate Dal Egg Emirati Fish Iftar Indonesian Japanese Jeerakashala rice Kerala Keto Kuwait food Lunch Milk Mutton Thai food UAE food afghan cuisine arabic beef biryani bread burnt cheesecake cake chicken cream dessert dinner greek healthy indo chinese lamb malabar prawns pudding puffs quick dinner ideas recipe refreshing drink rice salad sandwich stir fry vegetables vegetarian veggies yemeni

Contact Form


POPULAR POSTS AND PAGES

Emirati Chebab

Emirati Chebab

June 01, 2023
Chicken Steak with Creamy Mushroom Sauce

Chicken Steak with Creamy Mushroom Sauce

November 05, 2018
Kerala Style Squid Roast

Kerala Style Squid Roast

June 18, 2020
Regag - Emirati Flat bread

Regag - Emirati Flat bread

December 02, 2020
Thalassery Style Kozhi kaal/ Koyikaal

Thalassery Style Kozhi kaal/ Koyikaal

June 08, 2020

Pages

  • Home
  • About Me
  • Privacy Policy
  • Contact Me

Copywrite © 2023 TermsFeed®. All rights reserved.

Created By Sora Templates | Distributed By Gooyaabi Templates

Back to top