Search This Blog

Taystit by Hasna

Food, Recipes, and Beyond

  • Home
  • About Me
  • Recipes
    • Main Course
    • Snacks
    • Desserts
  • Uncategorized
    • Chicken
    • Meat
    • Vegetarian
    • Rice
    • Malabar Food
    • Baking
    • Breakfasts
    • Snacks
    • Fish
    • Pasta
    • Drinks
    • Soups
    • Desserts
  • Contact Me


 Mango Watermelon Mojito

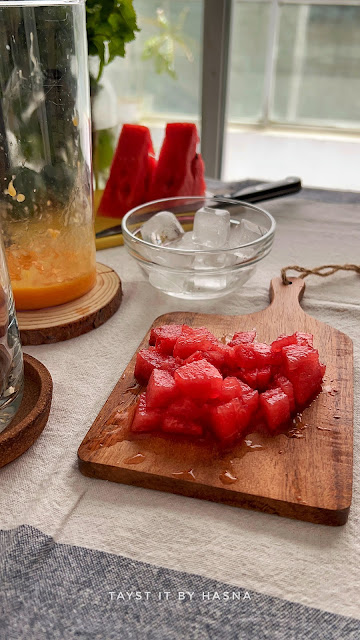
It's peak summer here in Dubai and anything refreshing really makes a difference. I love Mojito. Mint and lemon is my all time favorite mojito. The mango puree elevates the flavor and the watermelon cubes is what makes it even more refreshing and colorful.

You have to blend the Mango really well, and make a fine paste and make sure to use low fibrous mango. You may crush the water melon before adding the soda, but I like to have bite while drinking it, so I used a stirrer that is a straw as well as has a spoon at the end of it, so I can drink the mojito as well as scoop up some water melon cubes for that crunch.

Muh-hee-tow is how it's pronounced. So next time, make this mojito in the afternoon for yourself or your folks and feel the freshness! 


Ingredients: (makes for 2)

  • 1 cup Watermelon cubes
  • 1 low fibrous mango, pureed
  • 3 tsp Sugar
  • 1 Lemon, slices
  • Few Fresh Mint leaves
  • 1 Can Soda
  • Ice cubes
 

Instructions

  1. Chop the watermelon to cubes and set aside.
  2. Puree the Mango and pour it to a tall tumbler.
  3. Next add the watermelon cubes, the lemon slices, sugar, and tear the mint leaves and add to the tumbler.
  4. Add some ice cubes. 
  5. Pour the soda and enjoy! 
 

 Notes:

You may add lemon juice instead of lemon slices.


Do try this recipe and don't forget to share your experience/feedback with me here in the comments or feel free to send me a mail. Also, do tag me at #taystedit if you try out my recipes on Facebook, Instagram etc so that I can see when you make it. ♡♡♡♡

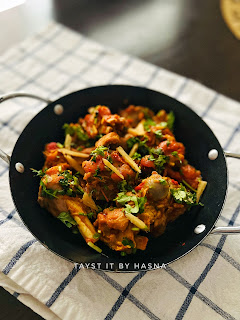
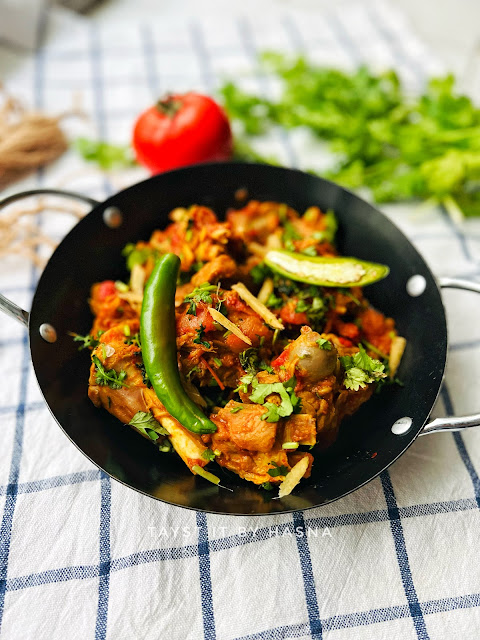
 Dhaba Style Mutton Karahi


When it comes to my favorite dish in Mutton, it is undoubtedly this delicious Dhaba Style Mutton Karahi. I just love how very few ingredients brings out the flavor of the mutton. In fact, less masalas, the better Karahi tastes. Karahi needs to be slow cooked, and that's what makes the gravy finger licking good. 

Some of my near and dear ones have tried this recipe from me and always been a hit for them too! Tomatoes being the star of the dish is what gives the Karahi an umami flavor. I love to make Karahi on days when I super busy with chores and errands to get done. The Karahi doesn't need much of your attention, just dump the mutton, tomatoes, ginger garlic and salt and allow it to do its magic. And a couple of masalas in the end and you are done.


My brother had tried Karahi from a restaurant and it tasted the best according to him, so he went on to ask the attender about the dish. He asked how did they make the Karahi with such distinct taste and deliciousness (as he couldn't make out what masalas were added, before you judge, yeah, we are a foodie fam here :D). So the guy got the chef and he said it's just tomatoes, mutton, salt and some ghee/ fat. He was surprised to know that they did not even add ginger and garlic, yet didn't have the meaty smell or taste, as it's cooked with fats and oil. Well, I am yet to try that version. But this one is very close to it as, I use very minimal ingredients too. The original recipe had many more ingredients, I adapted it to my taste.

Anyhow, let me tell you, be ready to be mind blown by how delicious this Karahi tastes, exactly like the ones you get in dhabas. 😋
 

Ingredients :

  • 1 kg Mutton
  • 4 large Tomatoes
  • 1 1/2 tbsp Ginger Garlic paste/ crushed
  • Salt, as required
  • 1 tsp Red Chilli powder 
  • 1/4 tsp Turmeric Powder
  • 1 tsp roasted and ground Coriander 
  • 1 tsp roasted and ground Cumin
  • 1 tsp Red Chili Flakes
  • 2 tbsp ghee
  • 1 tsp Lemon juice (optional)
  • Ginger, juliennned, for garnish
  • Chopped Coriander, for garnish

Instructions:

  1. In a large wok/ cheena chatti, add the mutton, chopped tomatoes, ginger garlic paste, and slat as required. Mix well and allow to come to a boil. Do not add water.
  2. Cover with lid and allow to cook for 20 minutes on medium heat and stir so that nothing gets burned on the bottom. Cover again and allow to slow cook for another 20-25 minutes until meat is tender. Open lid and cook uncovered for around 5 minutes until some of the liquid evaporates.

  3. Add spices like chili powder, turmeric powder, roasted and ground Coriander and cumin, and red chili flakes. Mix well and allow the spices to be aromatic.

  4. If you require more gravy add very little water.
  5. Finally finish off with some ghee/ clarified butter.
  6. Garnish with chopped Coriander and juliennned ginger. Enjoy hot with any roti.


Notes:

You may add green chillies according to your preference, my daughter doesn't like very spicy food, so you may add a couple of green chilies, slit.
The original Dhaba style has a lot of ghee in it, so add ghee according to your preference.


Do try this recipe and don't forget to share your experience/feedback with me here in the comments or feel free to send me a mail. Also, do tag me at #taystedit if you try out my recipes on Facebook, Instagram etc so that I can see when you make it. ♡♡♡♡

 Mutta Pettiyappam/ Chethappam


Mutta Pettiyappam is a delicious, low cost snack that can be prepared easily at home. It is a famous Thalassery snack that especially grandmothers and other loved ones prepare especially to send to gulf countries in the 90's. (at least that's how I remember it haha).This is one snack that gives me nostalgic memories. Since it's vacation time and we haven't gone home, I was kind of missing all these pampering of delicious home made snacks and food. With monsoon at India and the scorching heat here, we thankfully had a downpour, alhamdulilah. Felt so good as the heat here was unbearable. Immediately I had this craving for munching on some Mutta pettiyappam. These are made of basic ingredients like egg, powdered sugar, maida, cardamom powder, rava(optional), ghee and a pinch of salt. These are ingredients found in every home, and the process isn't very tiresome, except that it takes some time to fry. I would say to make the diamonds as small as possible, that makes it easier to fry and fun to munch on.


Mine happened to be bigger than I expected. I remember , as a child, I used to sit with one dabba of this and finish it in one go while watching tv. It's addictive and very crunchy. If you do not like it vey crunchy, you may avoid rava, I add rava as I like it super crunchy. There is this flavor at the back of your mouth that makes you want me. It is known by many names Kajoor appam, Mutta pettiyappam, chethappam, thari pettiyappam, pettiyappam etc


I am sharing the recipe of a small batch, as it's just us (me, hub and Huda here). You may double or triple the recipe to make a larger batch. There is no waiting time too. You just have to make sure that the oil is super hot, after which you have to decrease the flame to the lowest flame, as the insides would not cook properly. And fry on medium low until light brown. Do try this out for your kidd, they will love it!
 

Ingredients : (small batch)

  • 1 Egg
  • 1/2 Cup Powdered Sugar
  • 1 1/2 -3/4 or more Cup All Purpose flour/ Maida
  • 1 tbsp Rava/Semolina
  • 1/4 tsp Cardamom Powder
  • Salt, a pinch
  • 2 tsp Ghee/ clarified butter

Instructions :

  1. In a bowl crack an egg, beat well.
  2. Add in powdered sugar and mix well with a whisk.
  3. Next add in rava, cardamom powder, ghee and salt. Combine well with a whisk and using your clean hands add maida little by little and make a dough.
  4. Form a small cylinder and flatten using a roller with 1/4 inch thickness.
  5. Make diagonal cuts all over to form tiny diamond shapes.
  6. Heat oil well on high flame, now lower the heat and add the Chethappam one by one to the oil and fry until golden brown.

  7. Allow to cool.
  8. Once cooled, store in air tight containers. Enjoy!


Notes:
Do not add rava more, as rava makes it super crunchy and hard. So if you like it crunchy, the lesser, the better.

Do try this recipe and don't forget to share your experience/feedback with me here in the comments or feel free to send me a mail. Also, do tag me at #taystedit if you try out my recipes on Facebook, Instagram etc so that I can see when you make it. ♡♡♡♡

 Soya Chunks Burji


Eating healthy is not complex or challenging. It is our mindset that works against it. I do not say that we should be strict with healthy eating, we can always have cheat days/ meals by keeping it within the limits. I have been asked how to help with limiting or cautioning oneself; well, for me it has always been the mid night junk munching issue, for that I found that brushing my teeth as soon as I am done with dinner helped, you wouldn't want to eat junk after that. Just find a way about it, and you will get used to it.

Another way, is to always read the list of ingredients of the food consumed, so that it helps to avoid consumption of junk food. Try to avoid processed and packaged food as much as possible. The number of additives, preservatives etc, that goes into the packaging are INSANE! I am not a complete clean eater. Trying to take baby steps, one meal at a time.

Today I am sharing with you the recipe of Soya Chunks burji. One easy yet delicious recipe that you can have with whole meal bread, or as it is. The benefits of Soya Chunks are many , they are rich in protein, omega3 fatty acids, Fibre etc. It also helps lower bad cholesterol levels in the body. Soya Chunks act as a meat substitute, it is known as the meat in vegetarian. 😃 It is very simple to cook them too. The dry soya Chunks are soaked in water for 10- 15 minutes, which then doubles in size.

This recipe is very easy to prepare as these are ingredients that are easily available in every Indian home. My girl said that it smells like maggi when I make Soya chunk burji. Not going to lie, it does smell the same and tastes even better too! Let's get started!

Ingredients : (2 persons)

  • 1 cup Soya Chunks (soaked in water for 10-15 minutes)
  • 1 tbsp Extra Virgin Olive Oil
  • 1 small Garlic clove, minced
  • 1 medium Onion, chopped finely
  • 1 Green chilly, slit
  • 1 Tomato, chopped
  • 1/4 tsp Turmeric Powder
  • 1 tsp Red Chili Powder
  • 1/4 tsp Garam Masala Powder
  • 1/4 Cup Water
  • Salt, as required 
  • 1/4 cup Frozen Green Peas (Optional)
  • 1/4 cup Frozen Sweet Corn Kernels (Optional)
  • 1/4 tsp dried Fenugreek Leaves 
  • Squeeze of Lemon
  • Coriander leaves, chopped (to garnish)

Instructions :

  1. Soak the soya Chunks in water for 10-15 minutes. Squeeze out the excess water and chop using a food processor or chopper and set aside.
  2. In a cast iron pan/ wok, pour Extra Virgin Olive oil and saute your minced garlic, to that add in your chopped onions, salt and green chilli and sauté well.

  3. Next add the chopped tomatoes and allow to cook until mushy.

  4. Next add in your spices like turmeric powder, red chilli powder, garam masala powder and mix well.
  5. Pour the water to deglaze the pan, check for salt.

  6. Finally add in your chopped soya Chunks and combine well.

  7. To this, add your frozen peas and corn (Optional).

  8. Place the dried fenugreek leaves in your palm and rub and add to the burji. Mix well.
  9. Garnish with chopped coriander leaves and finish off with a squeeze of lemon and enjoy warm!


Do try this recipe and don't forget to share your experience/feedback with me here in the comments or feel free to send me a mail. Also, do tag me at #taystedit if you try out my recipes on Facebook, Instagram etc so that I can see when you make it. ♡♡♡♡


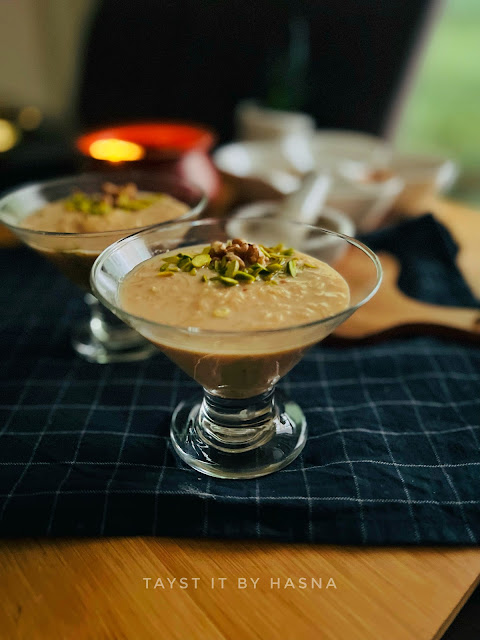
Halava inspired Vermicelli Kheer


Who doesn’t like Kheer?! This recipe was developed as I suddenly got obsessed with eating the famous middle eastern Halava which is like a Halwa (like Indian Sweet) but this one is crumbly made using milk powder, tahini, cardamom powder and nuts.
I just love how nutty and delicious the flavors are.

Tahini is basically sesame paste and the ground sesame paste takes the Kheer to a whole new rich nutty flavor. Ps: If you do not like the flavor of Tahini I can’t assure you that you will like it but this is a treat for the tahini/ Halava lovers! 😍

The color comes from the caramel which is made by melting sugar, and butter is added to which condensed milk is added to get a butterscotchy color and smells divine! I like to serve the Kheer chilled, as it’s summer here in Dubai. The crunch from the different nuts takes the Kheer to a next level. Unlike payasam (South Indian Kheer), cashews and raisins aren’t fried in ghee. 

Next time you make this version of Kheer, do let me know how you liked it! 😃

Ingredients:

  • 1/4 cup roasted Vermicelli 
  • 1/2 litre warm Milk
  • 3 tbsp sugar
  • 2 tbsp butter, room temperature 
  • 2 tbsp condensed milk, room temperature 
  • 1/2 tsp Cardamom powder
  • 2 tbsp Tahini
  • 1/4 cup Sugar or as required 
  • Salt, required
  • 2 tbsp each of Almond, Walnuts, Pistachios (chopped)
  • Hot water, to loosen if required 
  • Pistachio Cream for decorating 

Instructions:

  1. Roast vermicelli, if not roasted.

  2. Make the caramel by melting sugar, do not stir, allow to melt, once it starts to melt from the sides, mix gently and add in your room temperature butter and mix.
  3. Now on low heat, add the room temperature condensed milk and stir. 
  4. Pour the warm milk to the caramel, stir and add the vermicelli, and allow to thicken.

  5. Finally add in tahini, cardamom powder, salt and chopped nuts and loosen with water if required (do not over pour water as this will make the Kheer very watery and flavorless). 
  6. Bring to a slight boil and allow to cool and refrigerate.
  7. Make lines of pistachio cream in your serving individual bowls and pour the chilled Kheer and garnish with nuts. Enjoy!


Do try this recipe and don't forget to share your experience/feedback with me here in the comments or feel free to send me a mail. Also, do tag me at #taystedit if you try out my recipes on Facebook, Instagram etc so that I can see when you make it. ♡♡♡♡

 Crispy Beef Chilly


Indo Chinese is one of my favorite cuisines. This Crispy Beef chilly is everything.. Goes well with Noodles, fried rice etc. On lazy days I even have it with Khubz (Arabic pita bread). Unlike the South Indian version of beef chilly, the beef is not pressure cooked rather made into very thin long strips and fried raw with corn flour, all purpose flour, salt pepper and egg to help coat the beef strips well.

I have always been asked why I fry the beef without cooking it first , this method ensures all the juices from the beef are stored well within, and the flavors from the beef does not dim away. Think of it as a steak, similarly, the beef strips are fried raw (preferably deep fried) but I do not like to waste oil that has the residue of the flours in it, so I shallow fry the battered beef strips. Do not cook the beef strips more than 5-6 minutes as the beef would turn chewy.

The condiments, other than the condiments that I mentioned here, sometimes I like to add green Chilli sauce too and maybe a dash of white pepper powder. As soy sauce is concentrated with salt, be careful not to add too much of salt, either in the batter or in the final stage. Once the dish is done, serve immediately as the coating of the beef absorbs the moisture from the sauce, and makes the beef not so crispy. If you want to serve the dish at a later time, prepare the sauce and the beef and set aside, and combine only at the time of serving.

Crispy Beef Chilli is one of husband's favorites. Now that everyone has their sacrificial meat from Eid AL Adha, do give this recipe a try. You can never go wrong with this dish, it's super delicious 😋

Ingredients : (Makes for 3- 4 people)


  • 350 gms Boneless Beef, sliced to thin strips
  • 6-7 Garlic cloves, finely minced
  • 1 inch Ginger, finely minced
  • 1 large Onion, cubed
  • 1/2 of a large Capsicum, cubed
  • 1 Red Chili Pepper, sliced
  • 2 tbsp All Purpose Flour
  • 3 tbsp Corn Flour + 1 tsp Corn flour for slurry
  • 1 Egg, large
  • Salt, as required
  • 1 tsp Black Pepper, crused
  • 1/2 tsp Red Chilli Flakes
  • Vegetable oil
  • 3 tbsp Soy Sauce
  • 2 tsp Red Chilli paste/ any red Chilli sauce
  • 1/2 tsp Black Pepper, crushed
  • 1 tbsp White Vinegar
  • 1/2 tsp Sugar
  • Salt, if required
  • 3 tbsp water, for slurry 
  • Spring onions , chopped, for garnishing 
  • Sesame seeds, for garnishing 

Instructions:

  1. In a large bowl, add in your beef strips, all purpose flour, corn flour, egg, crushed black pepper and salt. Combine well, to coat the beef strips.  


  2. In an Iron Kadai/ wok, pour the vegetable oil to shallow fry the beef, for no more than 5-6 minutes.
  3. Strain the crispy beef strips from oil and keep aside, let's prepare the sauce.
  4. For the sauce, in the same wok, add more oil if required, add in the minced garlic and ginger. Saute on medium high for 10 seconds and immediately add the cubed onion, and saute well for 2-3 minutes on high flame.

  5. Now add the cubed Capsicum and mix well for 1 minute.
  6. Add the soy sauce and red Chilli paste, mix well.
  7. Keep the wok on high flame add in your beef strips and stir well.

  8. Now make a corn flour slurry and pour and immediately mix well.
  9. Finally add white vinegar, salt and pepper, as required.
  10. Garnish with chopped spring onions and sesame seeds and serve immediately with fried rice, noodles, etc.


Do try this recipe and don't forget to share your experience/feedback with me here in the comments or feel free to send me a mail. Also, do tag me at #taystedit if you try out my recipes on Facebook, Instagram etc so that I can see when you make it. ♡♡♡♡

 Café Style Smoky Chicken Burger


I am all in for juicy home made burgers and if it is made ahead of time, aaah the perfect treat on a lazy day! I prefer making my burger patties at home, as we know what goes into our body and helps us play with flavors. One among my favorite burger flavors is the Smoky chicken burger, the smokiness coming from the smoked and powdered Paprika is a game changer. It has a sweet, tangy and a hint of spicy tone to it. To help the flavors shine through I like to add Jalapeño slices to the final burger, which adds to the spiciness and tanginess. And the sauce with crispy fried onions is what brings the chicken burger alive with flavors!

This is one of the recipes I invented really long back. A time, when I started playing with flavors and textures, kept trying different variations until I was satisfies with the final outcome. There are a gazillion recipes on the net, but I tell you this one is a must try, I promise! Just make sure you don't over cook orundercook your chicken burger patties. This recipe is one of my inventions that I am smug about because it takes a lot of tries to nail one recipe, I am proud of this one!


Well, one of the first impressions from my siblings when I made this was, this is better than the one's you get in expensive restaurants and cafés. What better feedbacks can one expect from a burger recipe invention. :D
I add the coriander leaves its roots, as the flavor of coriander leaves are very strong and fragrant at its roots.  


Ingredients: (makes 6-7 patties)

  • 500 gms tender Chicken breasts, cubed
  • Handful of Coriander Leaves with cleaned roots, chopped
  • 2 small Garlic cloves
  • Salt , as required
  • 1/2 tsp Crushed black Pepper
  • 1/2 tsp dried Parsley (you may use fresh)  
  • 1/4 tsp Oregano
  • 1 tsp Smoked Paprika powder 
  • 1 tsp Onion powder, optional 
  • 1/4 tsp Red Chilli flakes 
  • 1/2 tbsp Soy Sauce 
  • 1/2 tbsp Mayonaise
  • Baking sheet/ Parchment paper
  • 1 Ziplock bag
  • 1 Onion, sliced thinely
  • 1/4 Cup Vegetable oil
  • Lettuce, preferably Ice berg lettuce
  • Jalapeños, sliced
  • 2 tbsp Unsatled butter
  • 6 Burger buns, with sesame seed
  • 5 tbsp Mayo 
  • 2 tsp Dijon Mustard (optional)
  • 2-3 tsp Tomato ketchup
  • 6 Cheddar Cheese Slices

Instructions:

  1. In a food processor/ chopper, add in cubes of chicken breast, chopped coriander leaves with roots, minced garlic cloves, salt, freshly crushed black pepper and spices like dried parsley, oregano, Smoked Paprika , Onion powder, Crushed red chilli flakes, and condiments like Soy sauce and Mayonnaise. Grind using the pulse function, not to a paste, but with small chunks of chicken pieces.

  2. Next prep your baking sheet into squares and set aside.
  3. Oil your hands and make golf ball sized balls of the chicken mixture and pat one ball at a time on one small square sheet of the baking sheet into a round patty and make an impression in the middle using your thumb.** 

  4. Place another sheet of the baking sheet over the burger patty and repeat the process for all other 5 burger patties. Place in the freezer for future use.

  5. To make the café style burger, in a pan pour the vegetable oil and fry the sliced onion on medium high until golden and crisp (keep an eye after it starts browning as it burns very quickly, keep stirring to get perfect color)
  6. Thaw your burger patties for at least 10 minutes.*
  7. Chop your lettuce and set aside.
  8. In a grill pan, using the same oil that you used to fry your onions, place your burger patties and fry 4 minutes each side, for a total of 8 minutes and no more.
  9. Spread a tsp of butter in the insides of your burger bun and grill on the grill pan, whilst the patties get done.
  10. Let's make the sauce by mixing the Mayonnaise, Dijon mustard and Tomato Ketchup in a bowl and crumble the crispy golden onions and add to the sauce prepared.

  11. Onto the grilled burger patties, place the cheddar cheese slices and allow it melt while the flame is off.

  12. Now to the grilled buns, spread the onion sauce generously, place the chopped lettuce and the melted cheese burger patty, over that place the sliced Jalapeños and finally place the sesame seeded side of the bun. Serve with fries and ketchup!


Notes:

  • Do not overcook the burger patties, as the patties would not be juicy and would turn hard.
  • If you plan to make beef burger patties, you need not all the spices and condiments to the beef mince, rather salt, pepper, and smoked paprika would do, as beef has its own beautiful Smoky flavor.
  • *If you thaw longer, the burger patties might stick to the baking paper, making it difficult for you to transfer to the pan for frying.
  • **The impression in the middle is made as the middle part of the burger tends to thicken while cooking, this helps maintain its shape. 

Do try this recipe and don't forget to share your experience/feedback with me here in the comments or feel free to send me a mail. Also, do tag me at #taystedit if you try out my recipes on Facebook, Instagram etc so that I can see when you make it. ♡♡♡♡

 Breakfast Cheddar Biscuits


Since it's the vacation season, kids are always at home, and this makes a great garb and go breakfast idea when you have made plans with your family. These biscuits when paired with some veggies and fresh juice, makes a great breakfast meal. These buscuits comes together very easily, no effort at all, I guarantee. 

The aroma that sits in the house is just, aaaah, sooo good. Well, of course, you have butter as the star ingredient. You can make them ahead and store it in the frezeer, so that you have something ready for your kids snack time. These are much similar to buttermilk biscuits that are my favorite, Popeyes biscuits. The crisp from the scallions are just so good. If you can get hold of some shredded cheddar cheese, do try this recipe. If you have made ahead, and frozen them, thaw the biscuits in the refrigerator overnight and bake them for 15 minutes and have it warm, and enjoy. 😋

Ingredients:

  • 1 1/2 cup All purpose flour
  • 1 tsp baking powder 
  • 1/2 tsp baking soda
  • Black pepper, crushed
  • Salt, as required 
  • 1/2 cup cold butter, cubed
  • 1 tbsp butter, melted
  • 1/4 cup Scallions, chopped
  • 1/2 cup shredded cheddar cheese
  • 3/4 cup buttermilk

Instructions:

In a large bowl add flour, baking powder, baking soda, black pepper and salt.
Work the cold butter into the flour, using fork/finger until crumbly in texture.
Add in the chopped scallions and cheddar cheese, mix well.
Now pour the buttermilk, little at a time and bring to a dough until not too sticky or too crumbly.

Transfer the dough to a lightly floured counter top and kneed well, just until the dough comes together.
Flatten into a rectangle shape and fold the short sides overlapping each other and press down and flatten and repeat the process again.

Now flatten a little and using a dough scrapper/knife , cut the dough into 6 equal squares.

On a baking paper lined sheet, place a little cheddar cheese just before placing each biscuit. The cheese comes underneath each biscuit.
Brush the biscuits with melted butter and bake the biscuits in a preheated oven at 210 deg C for 15 minutes until golden brown.
Enjoy with semi boiled eggs and fresh fruits and juice for breakfast! 😋😍


Do try this recipe and don't forget to share your experience/feedback with me here in the comments or feel free to send me a mail. Also, do tag me at #taystedit if you try out my recipes on Facebook, Instagram etc so that I can see when you make it. ♡♡♡♡

Newer Posts
Older Posts

Search This Blog

My name is Hasna Haneef, a mommy to a toddler, hailing from Thalassery, Kerala. Welcome to my humble abode on the Internet; wherein I share all my recipes and experiments. I am glad to have you on board!

TRENDING POSTS

  • Emirati Chebab
  • Chicken Steak with Creamy Mushroom Sauce
  • Kerala Style Squid Roast
  • Regag - Emirati Flat bread
  • Kerala Beef Fry/ Nadan beef dry fry
  • Junglee Chicken Sandwich

About Me

May peace be with you!

Welcome to my blog.

I am delighted to have you on board. My name is Hasna Haneef, a mommy to a toddler, hailing from Thalassery, Kerala. My homeplace being Dubai, as I am born and brought up here and I am very influenced by the lifestyle and the variety of authentic cuisines I get to try from here, which has made me try anything that comes across me
, click here →

Stay Connected!

Join Our Madness!

Join with Thousands Of Subscribers ! Get Our Latest Recipes Delivered to Your email Inbox!

Powered by follow.it
  • Home
  • About Me
  • Recipes

    • Main Course
    • Desserts
    • Snacks

    Uncategorized

    • Chicken
    • Meat
    • Vegetarian
    • Rice
    • Malabar Food
    • Baking
    • Breakfasts
    • Snacks
    • Drinks
    • Pasta
    • Fish
    • Soups
    • Desserts
  • Contact Me

Featured Post

Triple Chocolate Hazelnut Skillet Cookie

Blog Archive

  • ►  2025 (4)
    • ►  April (2)
    • ►  March (1)
    • ►  February (1)
  • ►  2024 (36)
    • ►  October (4)
    • ►  September (5)
    • ►  July (1)
    • ►  June (2)
    • ►  May (4)
    • ►  April (3)
    • ►  March (10)
    • ►  January (7)
  • ►  2023 (47)
    • ►  December (3)
    • ►  September (2)
    • ►  August (6)
    • ►  July (6)
    • ►  June (9)
    • ►  May (4)
    • ►  April (5)
    • ►  March (6)
    • ►  February (3)
    • ►  January (3)
  • ▼  2022 (69)
    • ►  November (4)
    • ►  October (6)
    • ►  September (7)
    • ►  August (9)
    • ▼  July (12)
      • Mango Watermelon Mojito
      • Dhaba Style Mutton Karahi
      • Mutta Pettiyappam/ Chethappam
      • Soya Chunks Burji
      • Halava inspired Vermicelli Kheer
      • Crispy Beef Chilly
      • Café Style Smoky Chicken Burger
      • Breakfast Cheddar Biscuits
      • Malabar Kaayi Curry
      • No Oven Chocolate Soufflé
      • Szechuan Upma
      • Mango Pavlova with Coconut Cream
    • ►  June (5)
    • ►  May (5)
    • ►  April (12)
    • ►  March (4)
    • ►  February (2)
    • ►  January (3)
  • ►  2021 (24)
    • ►  November (1)
    • ►  October (2)
    • ►  July (1)
    • ►  June (4)
    • ►  May (6)
    • ►  April (4)
    • ►  February (4)
    • ►  January (2)
  • ►  2020 (82)
    • ►  December (5)
    • ►  November (6)
    • ►  October (4)
    • ►  September (2)
    • ►  August (5)
    • ►  July (10)
    • ►  June (10)
    • ►  May (13)
    • ►  April (12)
    • ►  March (8)
    • ►  February (4)
    • ►  January (3)
  • ►  2019 (22)
    • ►  December (1)
    • ►  November (2)
    • ►  October (6)
    • ►  September (1)
    • ►  August (1)
    • ►  February (3)
    • ►  January (8)
  • ►  2018 (15)
    • ►  December (4)
    • ►  November (6)
    • ►  October (3)
    • ►  September (2)

Subscribe Us

Labels

Bake Biscuits Breakfast Brown rice Burger Cheese Chocolate Dal Egg Emirati Fish Iftar Indonesian Japanese Jeerakashala rice Kerala Keto Kuwait food Lunch Milk Mutton Thai food UAE food afghan cuisine arabic beef biryani bread burnt cheesecake cake chicken cream dessert dinner greek healthy indo chinese lamb malabar prawns pudding puffs quick dinner ideas recipe refreshing drink rice salad sandwich stir fry vegetables vegetarian veggies yemeni

Contact Form


POPULAR POSTS AND PAGES

Emirati Chebab

Emirati Chebab

June 01, 2023
Chicken Steak with Creamy Mushroom Sauce

Chicken Steak with Creamy Mushroom Sauce

November 05, 2018
Kerala Style Squid Roast

Kerala Style Squid Roast

June 18, 2020
Regag - Emirati Flat bread

Regag - Emirati Flat bread

December 02, 2020
Kerala Beef Fry/ Nadan beef dry fry

Kerala Beef Fry/ Nadan beef dry fry

October 08, 2019

Pages

  • Home
  • About Me
  • Privacy Policy
  • Contact Me

Copywrite © 2023 TermsFeed®. All rights reserved.

Created By Sora Templates | Distributed By Gooyaabi Templates

Back to top