Search This Blog

Taystit by Hasna

Food, Recipes, and Beyond

  • Home
  • About Me
  • Recipes
    • Main Course
    • Snacks
    • Desserts
  • Uncategorized
    • Chicken
    • Meat
    • Vegetarian
    • Rice
    • Malabar Food
    • Baking
    • Breakfasts
    • Snacks
    • Fish
    • Pasta
    • Drinks
    • Soups
    • Desserts
  • Contact Me


 Malabar Style Mutta Curry/ Mutta Aanam Vechadh


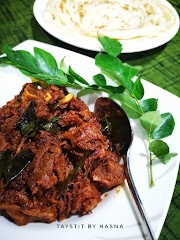
I have always been asked to share the recipes of the food the usual food we malabaris have. I kept delaying it, as I am someone who loves trying and sharing experimental food. Finally taking baby steps to make this page helpful for beginners in cooking as well. This egg curry is the easiest to prepare. No crushing of ginger garlic, and with basic pantry ingredients you can make this delicious curry that goes well with soft ari rotti (a malabar rice pancake), that is smeared with lots of ghee and/ Chappattis. This curry goes very well alongside some delicious meen mulagittadh/ meen varattiyadh, spicy fish curry made using red chilly powder and tamrind. 

We, here, usually like to pair it with some fried fish to compliment the curry. We also prepare a seafood version of this curry, will share the recipe as another post, in Sha Allah. It is very delicious too. I always like to prepare this curry durimg lazy days as it is effortless, yet delicious too. Make sure to cook the egg as per your liking keeping the time in mind to boil the coconut paste too. If you keep the coconut paste boiling for too long it might come out a little curdle-like. Once the curry starts boiling switch off and place lid as the earthen pot will do the rest of the cooking.

The last time I shared a pic of my breakfast plate with this curry and ari roti, I was bombarded with recipe requests. So here you go guys.. Do try and let me know you liked it.


Ingredients:

  • 1/2 medium size Onion, sliced
  • 2 sprigs Curry leaves
  • 3 tbsp Coconut Oil
  • 3 green Chillies, slit
  • 1/2 medium size Tomato, chopped
  • 3 Eggs
  • 1/2 cup Shredded Coconut 
  • 1/2 tsp Turmeric Powder 
  • 1 tbsp Fennel Seeds
  • Salt, as required
  • 1 tsp ghee

Instructions :

  1. In an earthen pot, pour the coconut oil and Sautee your sliced onion.
  2. Add salt for the onions to turn translucent .
  3. Next add in your curry leaves, and slit green chilies, Sautee well.
  4. Now add in the chopped tomato, mix well and close lid, allow to become mushy.
  5. Next make a coconut paste by grinding shredded coconut, turmeric powder, fennel seeds and little water and grind to a smooth paste.*
  6. Open the lid, and crack in your eggs and allow to cook for around 2 minutes and add in your ground paste, cook for around 3 minutes on medium low and you are done!
  7. Add in a tsp of ghee for that extra richness.
  8. Enjoy with mabalar Ari rotti/ Chappathi and some delicious fish fry like this. 
 

Notes:

  • Make sure to add enough water, as the earthen pot drains the moisture.
  • *Do not add too much water, as you will get a smooth fine paste. 
  • Do not keep the coconut paste boiling for too long it might come out a little curdle-like. Once the curry starts boiling switch off and place lid as the earthen pot will do the rest of the cooking.


Do try this recipe and don't forget to share your experience/feedback with me here in the comments or feel free to send me a mail. Also, do tag me at #taystedit if you try out my recipes on Facebook, Instagram etc so that I can see when you make it. ♡♡♡♡


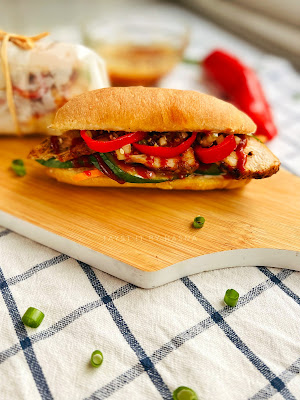
 Vietnamese Bahn Mi with Chilli oil 


I love making food from scratch and this is one such recipe that I attempted everything from scratch. Baking the buns are so much fun, never disappoints (even though there migh be unsuccessful attempts if you are new to baking breads, but that's how you learn to do things) and the bonus being the house smells amazing.

 I felt these Bahn Mi are more like Vietnam based Baguette bread, with a crispy crust and super soft airy texture inside. The baguette bread/ Bahn Mi is madeccrusty by spraying water during the process of baking.


As for the filling, it is usually smeared with mayo, ham, pickled veggies, a drizzle of your favorite seasoning, here I used home made chilli oil. Bahn Mi is split lengthwise and stuffed with ingredients that your heart desires , with your favorite protein, so it makes a great meal itself. We have this for lunch usually , if I prepare the buns, the night before. I like my sandwich to feel fresh and feel good. So I added in sliced cucumbers along with pickled veggies.

Though the recipe looks like it has a lot of steps, it's very easy to prepare yet s delicious, with all the sweet, sour ,salty flavors marrying into each other.

Ingredients :

For Bahn Mi -

  • 2 cups Flour / Patent Flour
  • 1 cup Water
  • 1 1/2 tsp Instant Yeast
  • 1 1/2 tsp Salt
  • 1 tsp Sugar
  • 2 1/2 tbsp Butter
  • 1 Large egg

For the Chilli oil:

  • 3-4 Garlic cloves, chopped finely
  • 2 tsp Red chilli flakes
  • 1 Tsp White Sesame seeds
  • 1 tsp Black pepper, crushed
  • 1/4 Cup Vegetable Oil, boiling hot

For the chicken marinade:

  • 250 gms Tender Chicken Breast
  • 1 Garlic clove, minced
  • 1 tsp Black Pepper Powder
  • 1 tsp Honey
  • 1 Tbsp Soy Sauce 
  • 1 tsp Tomato Ketchup

For the Filling:

  • 1 Carrot, sliced thin (pickled by adding the carrots to a solution of 1/2 cup sugar, 1/4 cup white vinegar, 1 tsp salt, and 1 cup water for 10 minutes)
  • 1 Cucumber, sliced lengthwise
  • Mayo, as required
  • Sriracha sauce, as required
  • Red Chilies, sliced into round

Instructions :

  1. In a stand mixer, or a large bowl mix the dry ingredients and add in your melted butter, mix well again.
  2. Next add in your water and egg and place your dough hook.
  3. For around 2 minutes, put the speed setting to 2, until well combined.    
  4. After that your dough will be teary and falling apart.
  5. Knead the dough for 10 minutes on speed setting 6, it should be elastic and not falling apart.
  6. If the dough still falls from the hook, continue to knead for anoth 4-5 minutes . Your dough be elastic, yet might be a little sticky.
  7. Scrape the dough from the stand mixer and place on a greased bowl by shaping into a smooth ball.

  8. Spray the dough with oil and seal the bowl with a cling wrap and allow to rise for 30 minutes. 

  9. Grease the counter top/ working mat and divide the dough into 6 equal parts , which will now look like fat triangles. Bang the dough on the counter top so that you get an elongated triangle. 

  10. Now roll the dough from the pointy area to the inside and keep pinching from the sides while you do that. Place on a baking paper lined baking pan.
  11. Grease the prepared Bahn Mis, cover with a towel and allow to rest for around 1 hour.

  12. Preheat the oven to 210 deg C and place a water bath to create steam, it is placed at the lowest rack.
  13. Spray the Bahn Mi with water so that the blade/rzor can glide through easily. Cut the bread slightly from a 45 deg angle and spray the openings with water again. 
  14. Now place the Bahn Mis in the oven and bake for around 25 minutes, keeping an eye after 23 minutes. (different oven have different temperature)
  15. Remove the water bath/ tray from the oven around 10 minutes before removing the bread from the oven.
  16. Brush with melted butter. Once cool, you may wrap the Bahn Mis in foil if ypu do not intend to use immediately .Slit lengthwise, and enjoy the crispy outer cover with a soft and fluffy insides. Enjoy with your picked veggies, favorite protein and dressing of your choice.

  17. To make the chicken, marinate the chicken with the ingredients mentioned above and grill for around 5-6 minutes until cooked well. Slice into thin strips.

  18. To make the chilli oil, into a heat proof bowl place all your ingredients under chilli oil and pour in your hot oil and allow the flavors to infuse in the oil.


To assemble :

After slicing the bread, remove the inside soft portion so that filling sits in, (optional)
Spread the mayo, place the pickled carrots, next place the cucumber, and the sliced chicken pieces, squeeze some Sriracha sauce and drizzle the chilli oil prepared earlier and finally place your red peppers and you are ready to enjoy your meal!


Do try this recipe and don't forget to share your experience/feedback with me here in the comments or feel free to send me a mail. Also, do tag me at #taystedit if you try out my recipes on Facebook, Instagram etc so that I can see when you make it. ♡♡♡♡


 Plantain Sushi Rolls with Caramel Sauce


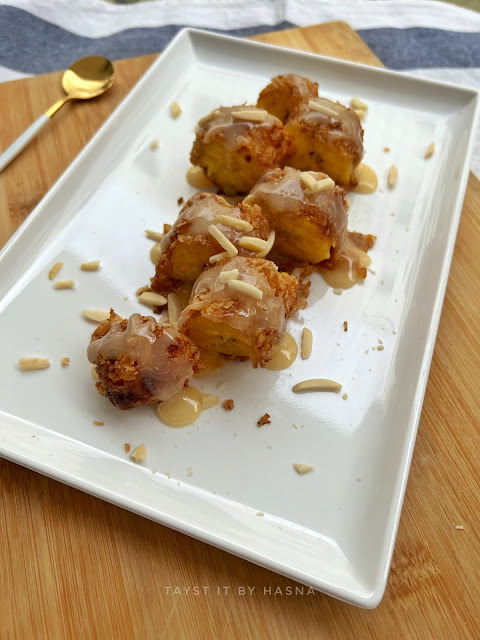
This is one recipe that was developed while I went to bed to sleep, sometimes the best recipes comes to my mind when I switch off myself for the day. I sometimes feel like preparing it and devouring it right away and note down the recipe in my book then and there. Let me tell you, this is one snack/dessert that is definitely a treat to your taste buds.
 
Make this to impress your guests and they are gonna love it! This is preferably made using ripe plantains. Once you start frying the oats coated plantains, your house is going to smell like baskin robbins to top that, the aroma of the caramel sauce is like the cherry to your cake.
 
This is probably a fusion recipe, as it involves frying of plantains aka nendra pazham/ Kerala bananas, which is then smothered/ drizzled with Caramel sauce with a final touch of blanched and chopped almonds.
 
Since I invented the recipe, I was going about to put a name for this dish, finally settled for sushi rolls, teehee, forgive my quirkiness :) 

This is such an easy recipe, I urge you to try it. After all it is hubby approved and my girl loves it! 


Ingredients :


  • 3 Ripe Plantains
  • 1/2 cup All Purpose Flour
  • Salt, as required
  • 1/2 cup water
  • 1 cup Quick Oats
  • Oil, for frying

Caramel Sauce

  • 1/2 cup White granulated Sugar
  • 2 tbsp Butter, room temperature
  • 1/4 cup heavy cream/ thick cream, room temperature 
  • 1/4 tsp Salt
  • 1/2 tsp Vanilla Essence, optional
  • Blanched and Chopped Almonds, for garnish 

Instructions:

  1. To prepare the Caramel Sauce, in a heavy duty sauce pan, heat sugar, stirring comstantly. Sugar will start to melt and once it reaches an amber color, reduce heat as you don't want to burn it.
  2. Ps: Please be precautions when you make caramel sauce, as it bubbles rapidly and can cause burns if distance is not maintained.
  3. Next, add your room temperature butter and stir in until melted and combined.
  4. Allow to cook for half a minute, slowly pour the heavy cream, little at a time and stir it in.
  5. Remove from heat and add salt and vanilla essence if desired.
  6. Allow to cool slightly before using the sauce.
  7. To prepare the plantain sushi rolls, dip the plantains in the all purpose flour slurry (made using flour+water+salt) and then coat in the oats well.
  8. Shallow fry/ deep fry until golden and crisp.
  9. Serve immediately with the caramel sauce prepared earlier and top with blanched and chopped almonds.


Notes:

  • Make sure to use room temperature butter and whipping cream / thick cream for better results.
  • The sugar might look like it’s crumbling when it’s starts to melt, it’s quite normal, it will melt completely after a while.
  • My caramel sauce looks a bit pale as I was in a hurry and did not wait the sugar to turn amber in color. 
  • You may also add a scoop of vanilla ice cream for added deliciousness.


Do try this recipe and don't forget to share your experience/feedback with me here in the comments or feel free to send me a mail. Also, do tag me at #taystedit if you try out my recipes on Facebook, Instagram etc so that I can see when you make it. ♡♡♡♡

 Hariyali Chicken Biryani


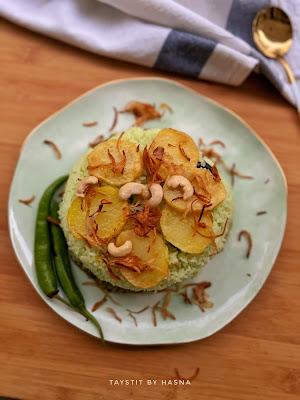
Hariyali Chicken Biryani/ Green Chicken Biryani is a recipe that I grasped/ learned from my in laws, basically my aunt-in-law, called Shabna. This is a special biryani that they make especially only during special celebrations like birthdays and anniversaries. So the last time I went to India my MIL and SIL was all praises about a special biryani that my aunt in law makes during such occasions. They said, the house smells amazing when she makes that biryani, and that unlike usual biryani, this had everything green in it and fried potatoes that made it extra special. I sooo wanted to try it. And finally I got a chance to taste it when it was their daughter's birthday and to my surprise I loved how flavorful the biryani was and of course it looked all green. Even the chicken, I was sure it was food color, and yes it was! That is why the biryani is only prepared during special occasions. So I wondered once in a while a little color won't hurt, but if preparing this biryani once every week, I'd suggest not to use the color.

Well, coming back to the flavors, one big mouthful and I could identify all the flavors, unlike in my recipe she had added capsicum pieces too. I didn't have capsicum/ bell pepper. Instead I added Spinach leaves (palak), this is totally optional, if you do not like the flavor of palak you can completely avoid it and still tastes sooo good*. Ever since I was back in Dubai, I wanted to replicate it, she was someone who found it difficult to explain the recipe like me. For me, I add spices and seasonings each time according to the flavor of the dish, so it will vary. So I almost made out the recipe in my head, noted down what I thought it would be like and it was a success. Just make sure you allow the green chicken masala and rice to stay in dum for some time .


Also, in the video I haven't allowed the onions to be translucent as to my liking, (as sun was setting and I wanted to finish filming in day light), so I pressure cooked the just the onion masala for 1 whistle, because we here like our biryani masala quite mushy, if you like the onions to stay without being smashy, just avoid this step. And that's it! Let's make this delicious Hariyali Chicken Biryani or as the kids call it, HULK Biryani! 😂

Ingredients : (makes for 3 people)

2 Large potatoes, sliced 

For the Masala:

  • 2 tsp Ghee/ Clarified Butter
  • 3 onions, sliced finely
  • 1 tbsp Garlic, crushed
  • 1 tsp Ginger, crushed
  • 2 medium Tomatoes, chopped
  • 1/2 bunch Spinach/ palak, blanched in salted hot water, cooled in ice water and pureed
  • Mint and Coriander leaves, as required, pureed
  • Salt, as required
  • 1 tsp Garam Masala 

Chicken Marination:

  • 1/2 cup oil for frying
  • 1/2 kg chicken  
  • 1 tsp ginger garlic paste
  • 1 tsp Lemon Juice 
  • Salt, as required
  • Green Food Coloring (optional)

For the Rice:

  • 3 tsp Ghee
  • 3 tbsp Vegetable Oil
  • 1 Onion, finely sliced
  • 8-10 Cashews
  • 3 Cloves
  • 1 inch piece Cinnamon Stick
  • 2 Cardamoms
  • 2 sprigs Curry leaves
  • 3 cups Jeerakashala Rice, washed and drained
  • 4 1/2 cups water
  • 2 Maggi Chicken Cube
  • 1 tsp Green Food Coloring (optional)
  • Salt, as required
  • Lemon juice, as required
 

Instructions:

  1. Marinate chicken as per the ingredients mentioned below chicken marination and set aside.
  2. Slice Potatoes, sprinkle salt and fry them in oil, set aside.
  3. Fry the chicken pieces for around 15- 20 minutes , drain and set aside.
  4. Now to make the masala, blanch the spinach and cool with ice water, puree along with coriander and mint leaves.
  5. In a large pot, pour the oil that was used to fry chicken and ghee.
  6. Next, saute the sliced onions with some salt until translucent.
  7. Next add the crushed ginger garlic and saute until raw aroma disappears.
  8. Now add your chopped tomatoes, allow to cook well.
  9. Next add in the pureed leaves and herbs, saute with salt and garam masala. Pressure cook the masala for 1 whistle if not mushy enough.
  10. In a large non stick rice pot, fry the onion until golden brown and crispy for the rice in ghee and vegetable oil and set aside.
  11. Now add in the whole spices like cloves, cinnamon stick and cardamom, add in your washed and drained rice and Sautee for a couple of minutes, to that add in the curry leaves, Maggi chicken cube, green food color ( if required) and salt, as required .
  12. Pour water and allow to cook for 15 minutes and gently turn the rice over to check if cooked.
  13. To the cooked masala, add in your fried chicken pieces and allow to boil on simmer for 5 minutes.
  14. Squeeze lemon juice as required, check for seasonings, put on dum by putting the rice as a layer over the masal over which some fried onion and cashews are sprinkled.
  15. Place the fried potatoes.
  16. Cover the pot with aluminum foil, place lid and allow to be on dum for 1/2 hour at least.
  17. Mix everything together. Serve hot and enjoy!


Notes:

  • If using palak make sure to add a lot of lemon juice to balance out the bitter flavor of palak.
  • You will only require half a bunch of palak.  
  • The video shows recipe made for 6 people.

Do try this recipe and don't forget to share your experience/feedback with me here in the comments or feel free to send me a mail. Also, do tag me at #taystedit if you try out my recipes on Facebook, Instagram etc so that I can see when you make it. ♡♡♡♡


Marble Cake Pudding


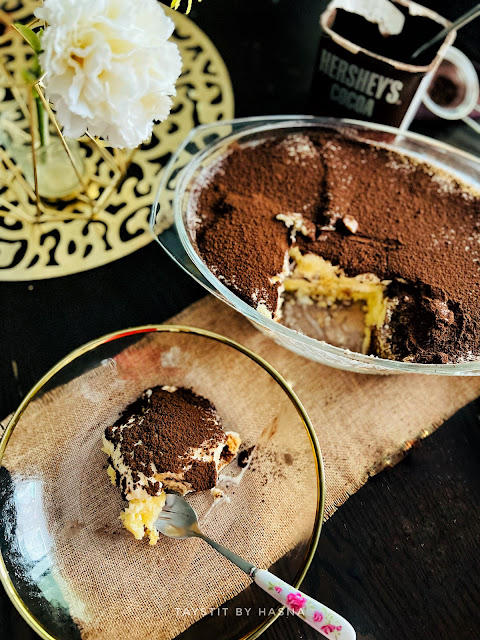
One of the most nostalgic pudding/ dessert from my childhood is this delicious marble cake pudding. It is my mom's most popular dessert, and undoubtedly the best. It's so simple to make. The marble cake is store bought , you may use home made cake, but I usually make this pudding as a last moment dessert,so that it doesn't get complicated and saves time.

Similar to tiramisu, the marble cake pudding tastes better the more it sits in the fridge. The cake soaks up all the cream and the cocoa powder that is dusted gives it that chocolatey taste. This marble cake pudding is like the OG milk cake of my childhood. The marble cake is tightly layered over which a custard cream is prepared poured and make a couple of layers which is set overnight. The pudding can be topped up with fresh fruits, funfetti, chocolate sprinkles etc.
Whenever mama makes this dessert for a party at home, the dessert dish is always wiped clean.
 
This was a dessert that mama prepared from what a friend of hers was saying in their usual conversation, about a dessert she had at a party. In an Era when there was no google/ YouTube for her to check and try recipes. Basically she was not told the entire ingredients, she made out and made it on her own, voila ! The perfect dessert for parties. I need to try out more recipes from her recipe book, since it's in malayalam, I find it very difficult to read them, yet my sheer curiosity in cooking has helped me learn reading malayalam by reading her recipes. LOL .


Ingredients :

  • 400 gms Marble Cake, store bought
  • 2 Crème Caramel Sachet (prepare as per package instructions )
  • 500 ml + 500 ml milk (for the crème caramel)
  • 120 ml Milk (for the dream whip)
  • 1 Sachet Dream Whip (prepare according to package instructions)
  • 1 tsp Vanilla Essence
  • 1/2 can Sweetened Condensed Milk
  • 1/4 cup Thick Cream
  • Cocoa powder, for dusting 


Instructions:

  1. Slice the marble cake and layer the cake slices tightly without any gap.
  2. Next, prepare the Creme Caramel according to package instructions and allow to cool, set aside.
  3. Next prepare the cream mixture by beating the dream whip powder mix in some milk, according to package instructions, beat until thickens.
  4. Next add in your condensed milk and thick cream, mix well. 
  5. Finally add the cooled custard prepared earlier and combine well.
  6. Pour the prepared custard cream over the marble cake and make another layer with the same method.
  7. Seal and wrap well using a cling film and allow to set in the refrigerator overnight.*
  8. Finally, right before serving dust some cocoa powder and enjoy!

* Tastes best the more it sits in the fridge.
** The brand I used for the marble cake is Modern Bakery. It comes as 730 gms, you will only require around half of the cake.
  

Do try this recipe and don't forget to share your experience/feedback with me here in the comments or feel free to send me a mail. Also, do tag me at #taystedit if you try out my recipes on Facebook, Instagram etc so that I can see when you make it. ♡♡♡♡

Newer Posts
Older Posts

Search This Blog

My name is Hasna Haneef, a mommy to a toddler, hailing from Thalassery, Kerala. Welcome to my humble abode on the Internet; wherein I share all my recipes and experiments. I am glad to have you on board!

TRENDING POSTS

  • Emirati Chebab
  • Chicken Steak with Creamy Mushroom Sauce
  • Kerala Style Squid Roast
  • Regag - Emirati Flat bread
  • Kerala Beef Fry/ Nadan beef dry fry
  • Junglee Chicken Sandwich

About Me

May peace be with you!

Welcome to my blog.

I am delighted to have you on board. My name is Hasna Haneef, a mommy to a toddler, hailing from Thalassery, Kerala. My homeplace being Dubai, as I am born and brought up here and I am very influenced by the lifestyle and the variety of authentic cuisines I get to try from here, which has made me try anything that comes across me
, click here →

Stay Connected!

Join Our Madness!

Join with Thousands Of Subscribers ! Get Our Latest Recipes Delivered to Your email Inbox!

Powered by follow.it
  • Home
  • About Me
  • Recipes

    • Main Course
    • Desserts
    • Snacks

    Uncategorized

    • Chicken
    • Meat
    • Vegetarian
    • Rice
    • Malabar Food
    • Baking
    • Breakfasts
    • Snacks
    • Drinks
    • Pasta
    • Fish
    • Soups
    • Desserts
  • Contact Me

Featured Post

Triple Chocolate Hazelnut Skillet Cookie

Blog Archive

  • ►  2025 (4)
    • ►  April (2)
    • ►  March (1)
    • ►  February (1)
  • ►  2024 (36)
    • ►  October (4)
    • ►  September (5)
    • ►  July (1)
    • ►  June (2)
    • ►  May (4)
    • ►  April (3)
    • ►  March (10)
    • ►  January (7)
  • ►  2023 (47)
    • ►  December (3)
    • ►  September (2)
    • ►  August (6)
    • ►  July (6)
    • ►  June (9)
    • ►  May (4)
    • ►  April (5)
    • ►  March (6)
    • ►  February (3)
    • ►  January (3)
  • ▼  2022 (69)
    • ►  November (4)
    • ►  October (6)
    • ►  September (7)
    • ►  August (9)
    • ►  July (12)
    • ▼  June (5)
      • Malabar Style Mutta Curry/ Mutta Aanam Vechadh
      • Vietnamese Bahn Mi with Chilli oil
      • Plantain Sushi Rolls with Caramel Sauce
      • Hariyali Chicken Biryani
      • Marble Cake Pudding
    • ►  May (5)
    • ►  April (12)
    • ►  March (4)
    • ►  February (2)
    • ►  January (3)
  • ►  2021 (24)
    • ►  November (1)
    • ►  October (2)
    • ►  July (1)
    • ►  June (4)
    • ►  May (6)
    • ►  April (4)
    • ►  February (4)
    • ►  January (2)
  • ►  2020 (82)
    • ►  December (5)
    • ►  November (6)
    • ►  October (4)
    • ►  September (2)
    • ►  August (5)
    • ►  July (10)
    • ►  June (10)
    • ►  May (13)
    • ►  April (12)
    • ►  March (8)
    • ►  February (4)
    • ►  January (3)
  • ►  2019 (22)
    • ►  December (1)
    • ►  November (2)
    • ►  October (6)
    • ►  September (1)
    • ►  August (1)
    • ►  February (3)
    • ►  January (8)
  • ►  2018 (15)
    • ►  December (4)
    • ►  November (6)
    • ►  October (3)
    • ►  September (2)

Subscribe Us

Labels

Bake Biscuits Breakfast Brown rice Burger Cheese Chocolate Dal Egg Emirati Fish Iftar Indonesian Japanese Jeerakashala rice Kerala Keto Kuwait food Lunch Milk Mutton Thai food UAE food afghan cuisine arabic beef biryani bread burnt cheesecake cake chicken cream dessert dinner greek healthy indo chinese lamb malabar prawns pudding puffs quick dinner ideas recipe refreshing drink rice salad sandwich stir fry vegetables vegetarian veggies yemeni

Contact Form


POPULAR POSTS AND PAGES

Emirati Chebab

Emirati Chebab

June 01, 2023
Chicken Steak with Creamy Mushroom Sauce

Chicken Steak with Creamy Mushroom Sauce

November 05, 2018
Kerala Style Squid Roast

Kerala Style Squid Roast

June 18, 2020
Regag - Emirati Flat bread

Regag - Emirati Flat bread

December 02, 2020
Kerala Beef Fry/ Nadan beef dry fry

Kerala Beef Fry/ Nadan beef dry fry

October 08, 2019

Pages

  • Home
  • About Me
  • Privacy Policy
  • Contact Me

Copywrite © 2023 TermsFeed®. All rights reserved.

Created By Sora Templates | Distributed By Gooyaabi Templates

Back to top