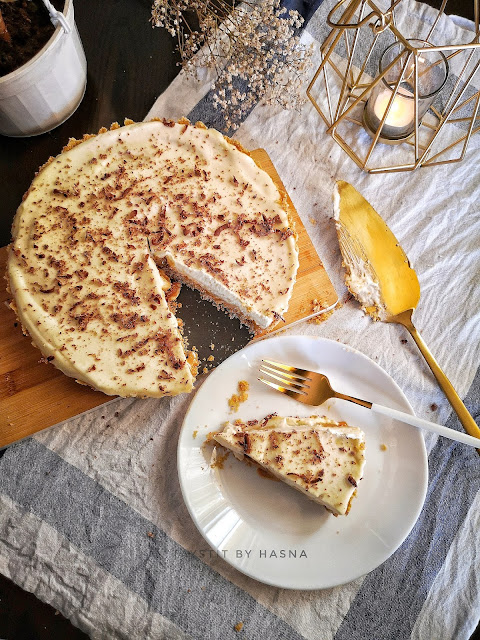
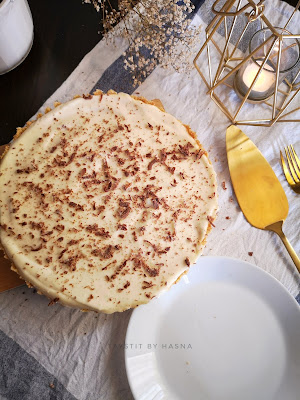
Classic Bannoffee Pie
I made this yummilicious dessert last week to celebrate my win for a dessert competition where I attained 2nd prize from among 2000 entries and 30 contestants. Bannoffee pie is a dessert I like to make when I have some good just ripped bananas in my fruit basket.
I always undermine the flavor of fresh banana fruit in dessert, somehow I cannot stand it. But this dessert and Magnolia Bakery's Banana Pudding are my favorites when it comes to bananas.

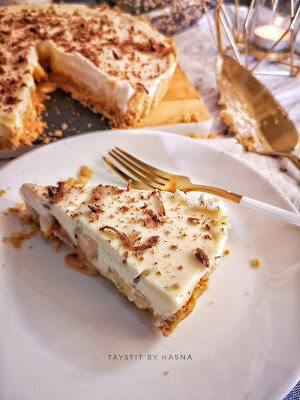
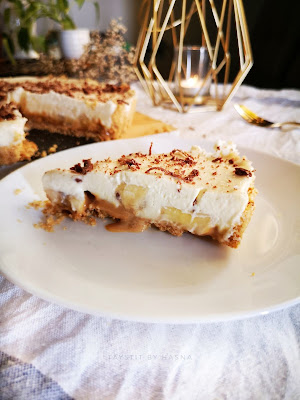
The ingredients are basic and the method is simple that even kids can prepare this no Bake pie! The Toffee in Bannoffee is what gives the dessert the special flavor. The first layer consists of a crushed biscuits layer with melted butter, then a layer of dulce de Leche (cooked Condensed milk) is spread, after which sliced bananas are placed in a sequence and a layer of whipped cream is smothered, and finally garnished with grated chocolate or dusted with cocoa powder.
This pie is done in no time as it doesn't require any cooking. My lil one and siblings always wipe the pie dish clean whenever I prepare Bannoffee pie. The more the banooffe pie sits in the fridge, the more delicious it becomes (but I never get a chance to do that).
I am always a fan of light desserts and Bannoffee pie is one such dessert. It's a treat for everyone, even if you dislike bananas, definitely give this dessert a try, I am sure you will love it!
Let's get started!
Ingredients ;
1 can Condensed milk (cooked) *
2 bananas
10-12 Mcvities Digestive Biscuits, crushed
2 tbsp Butter, melted
200 ml whipped cream, unsweetened
1 tsp Vanilla Essence/ extract
4 tbsp Icing sugar
Chocolate, grated
Instructions:
Dulce de leche:
- Remove the label of the sweetened Condensed milk and place it in a pressure cooker with water that fills half the pressure cooker. Cook for 1 whistle and allow to simmer on low at least for 20 minutes.
- Allow the cooker to release its pressure on its own and allow the pressure cooker and its contents to cool down at leat for 4 hours. **
Bannoffee Pie:
- In a food processor, crush the biscuits with melted butter or in a zip lock bag pound the biscuits using a rolling pin.
- Now transfer the contents to a loose bottom pie dish and level using the back of a measuring cup.
- Allow to refrigerate for at least 10 minutes.
- Now whip the cream in a stand mixer or a hand held mixer, add in your vanilla essence and gradually add in your Icing sugar 1 tbsp at a time.
- Allow to whip well. Do not over beat.
- Now beat the dulce de Leche/Toffee in a bowl using a fork and spread the Toffee over the crushed biscuit layer.
- Now layer the sliced bananas in a sequence (like in the image).
- Spread the whipped cream, and level it using a spatula.
- Finally grate the chocolate as garnish or dust some cocoa powder.
- Place in the refrigerator, allow to set.


Notes :
- *The steps to prepare dulce de Leche has been explained above.
- ** I like to prepare the dulce de Leche the night before
- I used a loose bottom pie pan, you may use a cheesecake pan too.