Search This Blog

Taystit by Hasna

Food, Recipes, and Beyond

  • Home
  • About Me
  • Recipes
    • Main Course
    • Snacks
    • Desserts
  • Uncategorized
    • Chicken
    • Meat
    • Vegetarian
    • Rice
    • Malabar Food
    • Baking
    • Breakfasts
    • Snacks
    • Fish
    • Pasta
    • Drinks
    • Soups
    • Desserts
  • Contact Me

    Pulivaaral/ Tamarind shaped Snack


Chai time means snack time. I am usually not too fond of sweet snacks when having tea. But this one is an exception. ( I just decrease the amount of sugar in my tea, as anyways I wouldn’t be able to make out the difference; if the chai has sugar or not, when having sweet snack with chai. Pulivaaral; Puli means tamarind and vaaral means to pull, so basically it is a fried dough, more like Kerala Churros, well that's what my sister likes to call it! :D Though the snack has nothing to do with Puli (tamrind), the shape demonstrates otherwise. They are traditionally made with mysore banana or any ripened cheru pazham (small banana), but I have used robust variety here, as in the gulf, the robust ones are easily available , yet the final product tastes the same, anyhow.

Traditionally my grandmother and my hub's grandmother, they squeeze the dough through their hands and pull into long strips, and fried until brown. It is not easy to get it right with bare hands, you need practice. So most of the new generation use piping bags to easily squeeze the dough to the hot oil. Hub's grandmother is an expert in making them, this may not be anywhere close to hers, and this is my version, more on the crisper side, as I like it that way. The ripe bananas are Mashed and sugar is added as a sweetener, and flours like whole wheat flour and roce flour are added too. 

Rice flour gives the pulivaaral the extra crisp, so make sure you don't add it too much. I have demonstrated here a small batch with just one banana, you may prepare a large batch. I like to fry my pulivaaral in coconut oil, which adds an extra flavor to it. Though they do not look quite appealing, everyone, including kids will love it and you get to save an over ripe banana, so it's a win-win situation!


Ingredients:

  • 1 Large ripe Robust Banana/any small banana like mysore banana (8-9 pieces)*
  • 1/4 Cup Sugar
  • 1/4 Cup Wheat Flour
  • 2 tbsp Rice Flour
  • Cardamom powder, a pinch
  • Salt, as required
  • Coconut oil, to fry

Instructions :

  1. Mash the ripe banana and make to a paste.
  2. Add sugar, wheat flour, rice flour, a pinch of cardamom powder and salt.

  3. Now incorporate all ingredients well and form a semi loose dough.
  4. Now using a piping bag, fill the contents into it.
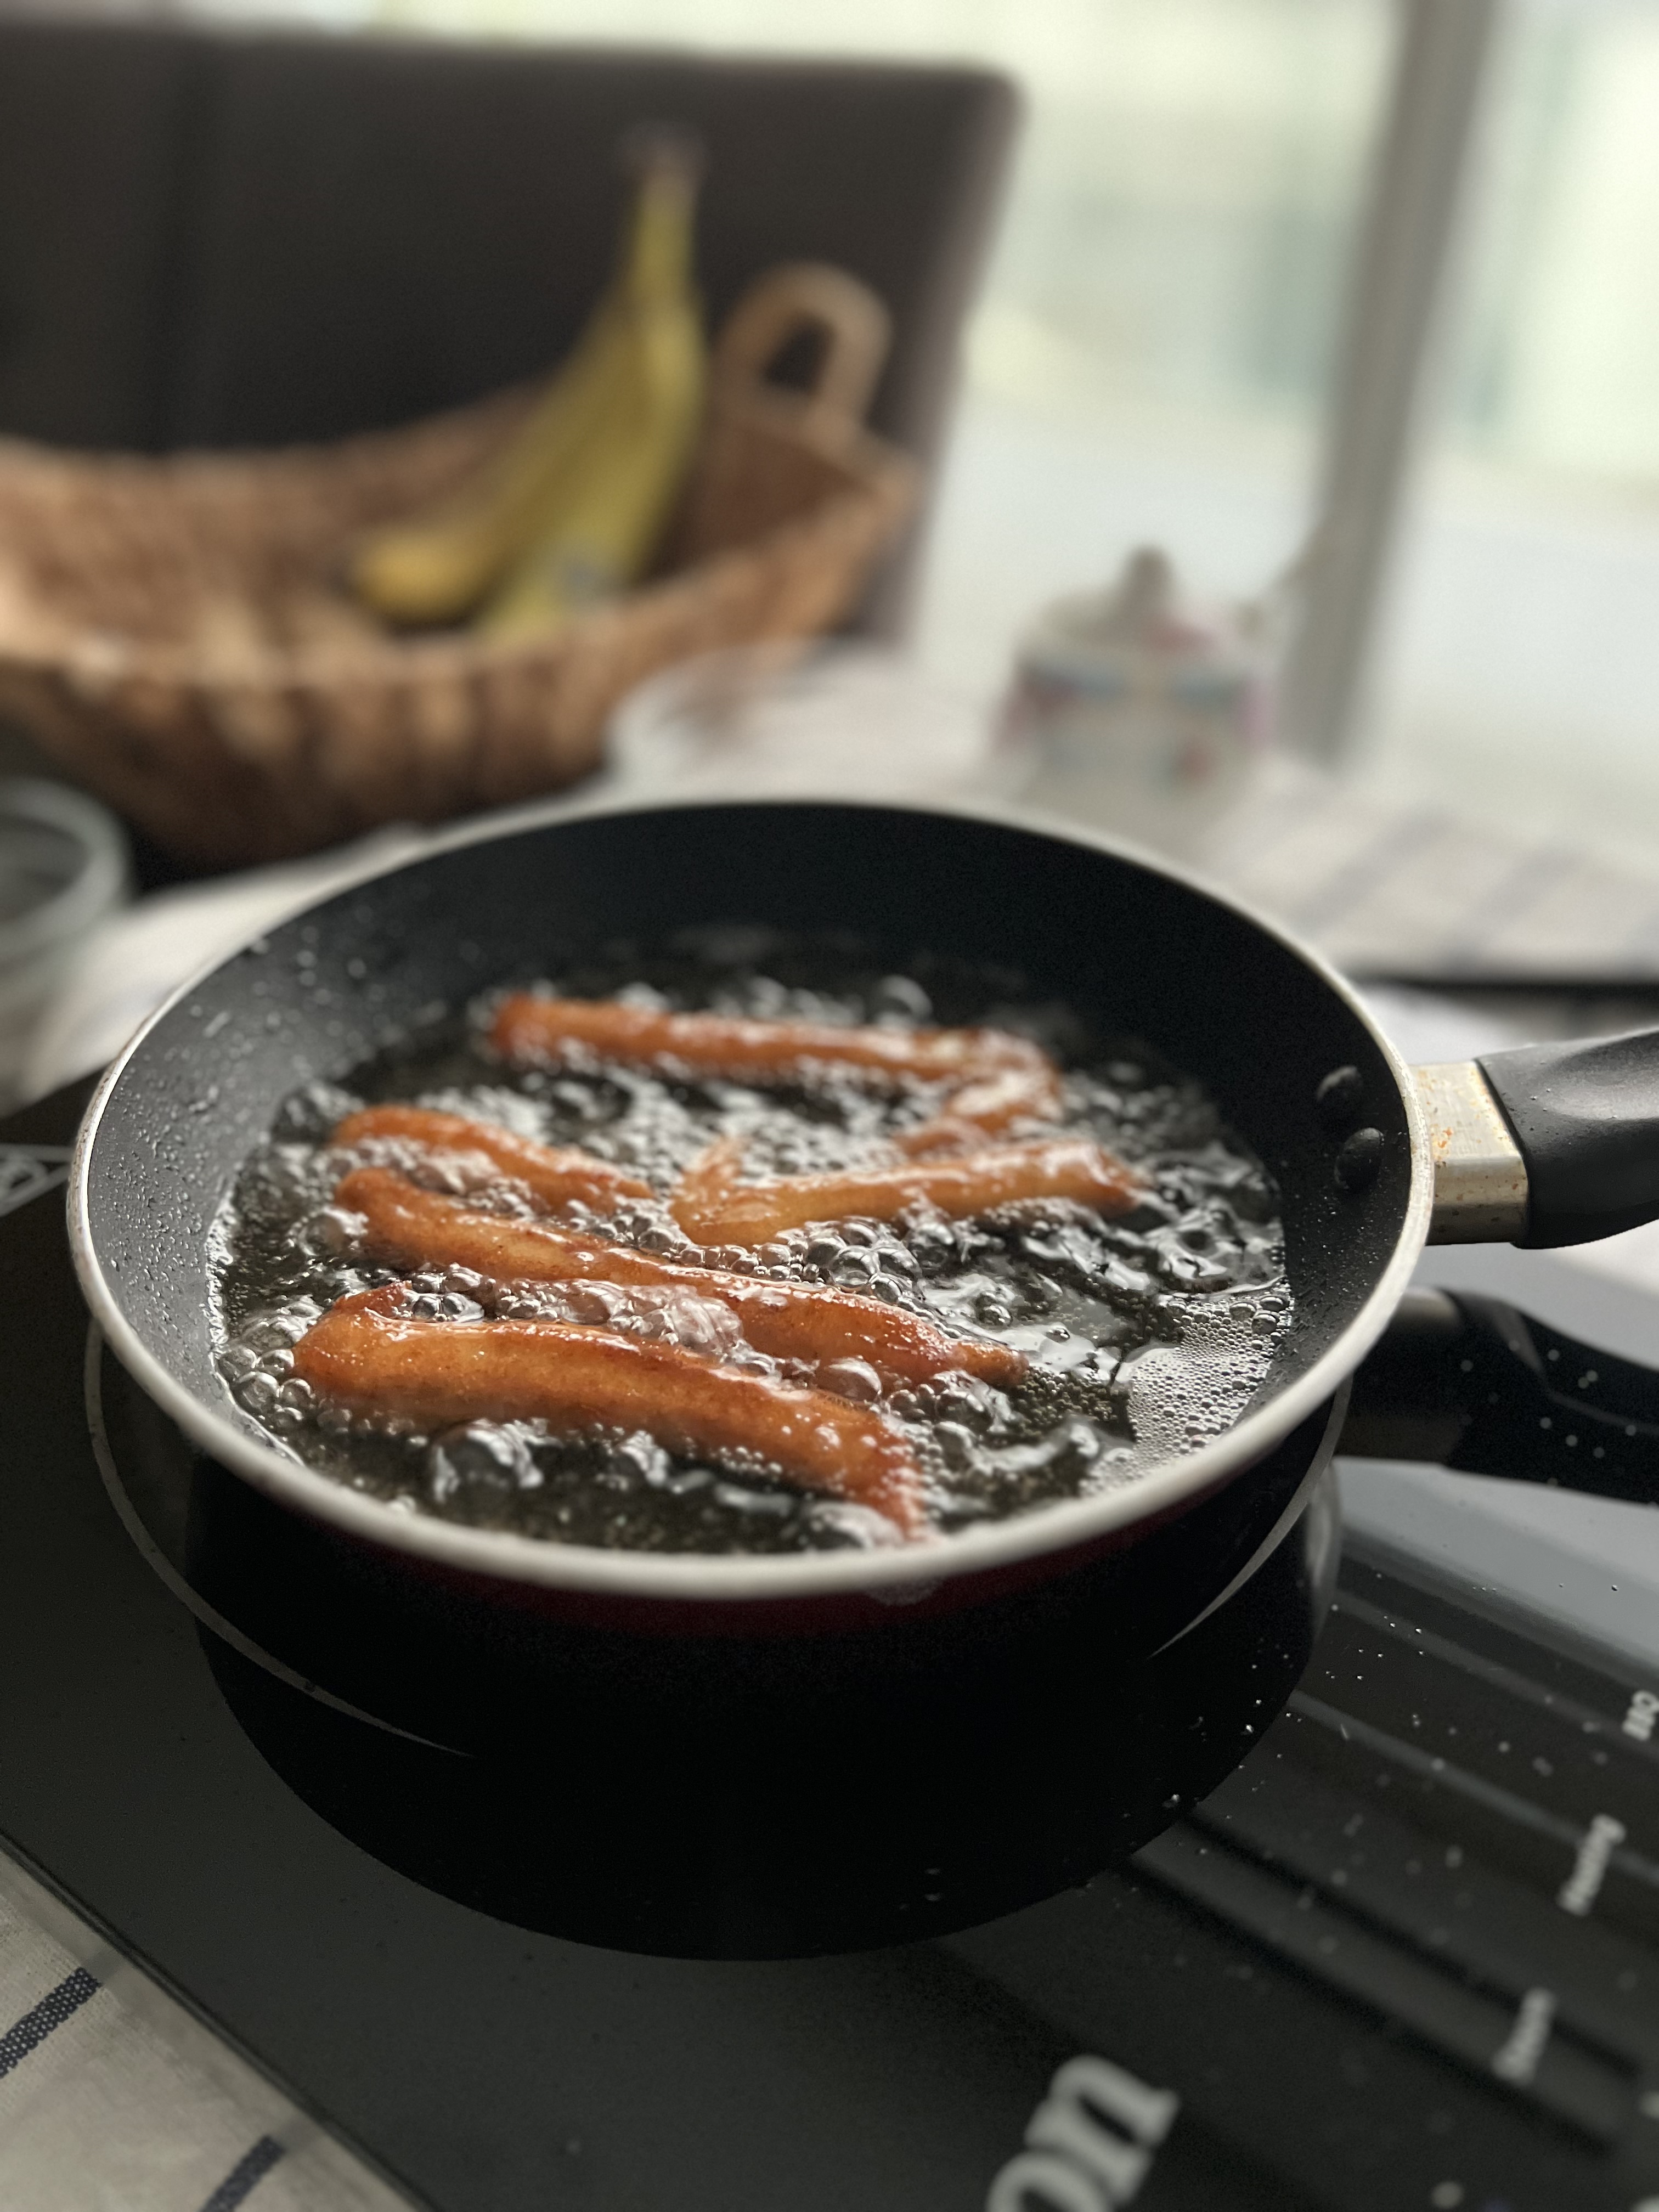
  5. In a large flat base pan, pour coconut oil and pipe into long stick shapes directly over hot oil, be careful while doing this. 

  6. Fry until brown and store in casserole for retaining heat. Enjoy with a cup of chai.

Notes: 

*If using 8-9 small bananas, use 1/2 cup wheat flour and around 4 tbsp rice flour.

If you feel the batter is a bit too loose you may add some more wheat flour.


Do try this recipe and don't forget to share your experience/feedback with me here in the comments or feel free to send me a mail. Also, do tag me at #taystedit if you try out my recipes on Facebook, Instagram etc so that I can see when you make it. ♡♡♡♡

Tofu and Bok Choy Stir Fry - Healthy recipe


Howdy folks?! This healthy version of Tofu and Bok Choy stir fry is simply easy to prepare yet very nutritious. It makes a great breakfast or a quick meal. 

You may use add ons like oyster sauce or soy sauce, but to keep it on the healthier side, I did not add any. Yes, the sauces does make it even delicious, but this recipe is for those who want to eat clean and fresh. 

Tofu - aka Bean curd is a natural source of protein, in addition to other nutrients. The tofu usually comes packaged in some water. Rinse it off and dab off the excess water using a kitchen towel and cut them into cubes and fry them in olive oil. For adding flavor to the dish I used mushrooms too, which by default brings in an umami flavor.

I have added red kidney beans and bok choy are good sources of iron, potassium and Vitamin C respectively. Since this recipe is almost raw, without any additives, you will feel really good once you have it. 

Let’s see how to prepare the stir fry!

Ingredients:

  • 3-4 tbsp Extra Virgin Olive Oil
  • 250 gms Tofu, small cubes
  • 2 small Garlic, cloves
  • A handful of Bok Choy, washed and chopped 
  • 100 gms Mushroom, sliced
  • Salt, as required 
  • 1/4 tsp black pepper, crushed
  • 1 tsp White Vinegar
  • 1/4 cup Red Kidney Beans, boiled

Instructions:

  1. In a hot pan, pour olive oil and add minced garlic, almost immediately add in the tofu cubes. Season with salt.
  2. Once all sides are cooked and has a crust like feel, transfer to a plate and set aside.
  3. Now in the same pan, pour olive oil and add in minced garlic and add in the sliced mushroom, salt and black pepper.
  4. When the mushroom almost looks cooked, make a well in the middle, pour olive oil and add in the chopped bok choy, season with salt.
  5. Deglaze the pan with a couple of tbsp of water so that it helps to cook the bok choy easily.
  6. Add a dash of white vinegar to balance the flavor and add the cooked red kidney beans. Sauté and to cook for a couple of minutes.
  7. Finally add in your fried tofu and serve immediately and enjoy the stir fry hot! 


Notes:

To cook the red kidney beans, in a cooker add washed beans, to that, add an inch more of water and pressure cook for 1 whistle. Allow the pressure to cook the beans for around 5 minutes, after which, place the cooker under cool running water and slowly pull up the whistle (this will help release the pressure).
Drain over a colander. Once drained, transfer to an air tight container and add in a dash of olive oil place lid and shake to cover the beans with the oil, and store the cooked red kidney beans for up to 5 days in the refrigerator and use as and when required.


Do try this recipe and don't forget to share your experience/feedback with me here in the comments or feel free to send me a mail. Also, do tag me at #taystedit if you try out my recipes on Facebook, Instagram etc so that I can see when you make it. ♡♡♡♡

 Carrot Slice Baklava with Ice cream 


This Turkish delight is so drool worthy that no one can deny a piece of carrot Slice baklava. Baklava being one of my favorite sweets is something I would love to indulge any day! The smell of the clarified butter/ ghee smeared phyllo sheets baking is just too much aroma to handle.
 
I  have always been fascinated when this dish is served in restaurants. The art of serving carrot Slice Baklava with a slice of ice cream is definitely an art. I tried replicating it, but like I said it's an art, you need practice to nail it. :D
 
The first time I had this baklawa was for global village. I knew what all went into the sweet in the first bite itself. Also, it was pretty expensive for a slice, they served for 35 aed (if I am not wrong) and for a huge family like us, it was unfeasible. I tried replication it at home, was it worth it? Like hell it was! With very limited ingredients and suvh easy steps any one could easily replicate it at home! We all love it here, especially after a spicy meal, this sweet is heaven in your mouth!!

And the ice cream adds on to a creamy and cool texture. Let's see how it's done! 


Ingredients :

  • 20-25 sheets of Phyllo sheets
  • 200 gms Clarified Butter/ Ghee
  • 200 gms Pistachio, shelled and skin peeled (by soaking in warm water)
 

For the Sugar Syrup:

  • 2 cups Sugar
  • 1 1/2 cups water
  •  A slice of lemon

Instructions:

  1. Peel the skin of the pistachios by soaking them in warm water.
  2. In a sauce pan, make sugar syrup by combining sugar and water, stirring occasionally , make sure the sugar melts completely and slowly increase the flame, add the slice of lemon and bring to a boil.
  3. Now simmer the sugar syrup for around 15-17 minutes. (do not forget to add the slice of lemon, as it helps the sugar syrup from crystalizing.)
  4. In a large round tray, smear the ghee using a brush and place a phyllo sheet and smear the sheet with ghee again and repeat the process for around 10 phyllo sheets.

  5. Now blitz the skin peeled (optional) Pistachios and place the crushed pistachios over the 10th layer, a bit away from the edges.

  6. Now place a phyllo sheet and continue layering as mentioned and trim off/ tuck in the edges of the phyllo sheets using a wooden knife etc.
  7. Preheat oven to 170 deg C. 
  8. Using a sharp knife, score the baklawa into 16 equal slices, by cutting into quarters.

  9. After cutting, to give the baklawa an extra dimension, pinch the edges of each carrot baklawa and puff up.

  10. Brush all the remaining ghee over the prepared baklawa and place in oven and bake for 35- 40 minutes until golden.

  11. Take out from oven and pour the warm sugar syrup (not hot not cold) over the hot baklawa, and allow to sit at least for 1 hour at room temperature so that the baklawa soaks up all the syrup.

  12. Once cooled, place a slice of baklawa on a plate and remove the upmost baklawa layer until the pistachios in one go and place a slice of ice cream and place upmost layers back on the ice cream and enjoy! Afiyet Olsun!


Do try this recipe and don't forget to share your experience/feedback with me here in the comments or feel free to send me a mail. Also, do tag me at #taystedit if you try out my recipes on Facebook, Instagram etc so that I can see when you make it. ♡♡♡♡


 Easy Homemade Chicken Nuggets


We are all in search of the best recipes when it comes to pack lunch for kids. I completely detest the frozen chicken Nuggets that come in the supermarkets, as we do not know what all goes into it. So I try and make these ahead of time, super easy to make too. I made the chicken Nuggets with hormone free boneless chicken cubes.
 
The addition of mayonnaise helps the chicken to tenderize and makes the Nuggets even more delicious. Make these Nuggets ahead of time (during the weekend) and your kids are going to love their lunch time. And for us mommies, we can feel guilt free too. I served the Nuggets on lettuce, you may place them inside bread slices as a sandwich or however you desire. 
 
Chicken Nuggets are loved by kids worldwide. So I am sure your kids will love them! It is always a hit here. To bring in the right coating texture I used 3 different ingredients to bring out the texture, I used plain cornflakes, rolled oats and a little amount of bread crumbs. Do try and let me know how your kids liked them!
 

Ingredients : (makes 12 Nuggets)

  • 250 gms Boneless chicken
  • 1 tbsp Mayonnaise 
  • 1 tsp Garlic powder
  • 1/2 tsp Paprika Powder
  • 1 tsp White Pepper Powder
  • 1/4 tsp Parsley (dried, optional)
  • Salt, as required
  • 1-2 tbsp Bread Crumbs, if required

For coating:

  • 2 Eggs 
  • 1/2 cup Maida/ All Purpose Flour 
  • 1/2 cup Cornflakes
  • 1/4 cup Rolled Oats
  • 1/4 cup Bread Crumbs

Instructions:

  1. In a food processor, pulse boneless chicken cubes with mayonnaise , garlic powder, paprika powder, white pepper powder, and dried parsley. Pulse and check the consistency, if required add a couple of tablespoons of bread crumbs and pulse once again. (make sure not make a paste)
  2. Onto a parchment paper/ baking paper add the chicken mixture and with the help of oiled hands flatten using using your fingers and shape the nugget mixture to a neat square, cover using the overlying baking paper from all sides and store in the freezer for around 20-30 minutes, this step will help you slice the chicken nugget block into perfect sized Nuggets.
  3. Remove the nugget block from the freezer and using a sharp and oiled knife, cut the chicken nugget block into equal sized nuggets.

  4. In a dry grinder, pulse cornflakes, rolled oats and bread or bread crumbs.

  5. Now dip the nugget into beaten eggs and then dip in the flour and repeat the process, now dip in egg again and coat in the cornflake mix. 


  6. In a freezer safe container place the prepared Nuggets using a baking paper before placing another layer of nuggets, or immediately fry for 3-4 minutes each side on medium flame.


  7. Serve with ketchup or any of your favorite dips.

Do try this recipe and don't forget to share your experience/feedback with me here in the comments or feel free to send me a mail. Also, do tag me at #taystedit if you try out my recipes on Facebook, Instagram etc so that I can see when you make it. ♡♡♡♡

 Soy Chunk Balls in Marinara Sauce


Don't you love food that tastes delicious, yet helps you in eating clean?! Well, this recipe I developed with the thought of weight reduction (not for me xD), by including ample amount of nutrients in the diet. Recently, many have been messaging me to share recipes that help in weight reduction. You need not only have salads, you can always include ingredients you love into your meals, by ingredients , I meant the healthy ones; for example, if you dislike Broccoli you may add in spinach etc.
 
I love Marinara sauce, it has tomatoes as a main ingredient which has an umami flavor with asslight tanginess, with the addition of honey/ sugar with a dash of black pepper, the sauce comes to a beautiful balance of flavors (also make sure you add the right amount of salt to the sauce, as once, in one of my attempts, I forgot to add enough salt and it did not taste very good). Also to keep the nutrients intact, I have used fresh tomatoes to prepare the Marinara sauce, you may use canned tomatoes too.

To make the soy Chunk balls, you may use your favorite veggies (play around with the veggies you like). Store the extra balls in the freezer and transfer them to a zip lock bag, just shallow fry them when required and add them to Marinara Sauce or any of your favorite sauce and voila! Your healthy meal is ready!!

Whenever I make this dish here, everyone fights to have it, as it tastes so much like meatballs and smells amazing! They are also called VEGAN MEATBALLS! 
Hack: You may make some extras, so that you can give your kids Soy chunks balls in their lunch boxes too.
 

Ingredients : (3 people)

  • 1 1/2 cups Soya Chunks (soaked in water for around 20 minutes)
  • 1/2 Onions, roughly chopped
  • 2 Garlic cloves
  • 1/2 cup Broccoli 
  • 1/2 cup Carrot, chopped roughly 
  • Salt, as required 
  • 1 tsp Black Pepper, crushed
  • 3-4 tbsp Jowar Flour preferably/ Rice flour
  • 4-5  tbsp Olive oil

Marinara Sauce:

  • 2 large Tomatoes
  • 2 Garlic cloves
  • 1 tsp Paprika powder/ red chilli powder
  • Oregano, a pinch
  • 1 tsp Honey
  • 1 tsp Black Pepper, crushed
  • Salt, as required
  • 1 tsp Arrowroot powder/ Corn Flour
  • Basil Leaves, for garnish

Instructions:

  1. Soak the Soya beans for around 20 minutes, squeeze the swollen soya chunks and remove excess liquid, and chop the soya chunks using a food processor and set aside.
  2. In the same food processor, add in the onion, garlic cloves, Broccoli and carrot, blitz and add to the finely chopped soya chunks.
  3. Next add Jowar flour/ rice flour as a binding agent, salt and pepper. Mix ans knead well.
  4. Squeeze a small ball size inside your hand palm to see if the ball holds the shape, if not add more jowar flour.
  5. Make small balls of same size, and freeze the balls for around 15-20 minutes .

  6. To make the Marinara sauce, in a blender, add in your tomatoes, garlic cloves and blend to a smooth paste and set aside.
  7. In a pan, pour some olive oil and shallow fry the slightly frozen soya chunk balls. Shaking the pan from time to time, so that all sides cook and brown equally. 

  8. Transfer the bowls to a deep dish.
  9. In the same pan, pour some olive oil and pour in the tomato paste, and add seasonings like paprika powder, oregano, honey, crushed black pepper and salt as required, and allow the sauce to cook well.
  10. Make an arrowroot slurry and add to the sauce, mixing vigorously using a ladle/ spatula so that the sauce thickens (not too thick nor watery). Check for seasoning .
  11. Add the sauce to the meatballs and garnish with basil leaves, serve hot. Buon Appétito !


Notes:
To make it even more healthier, you may air fry the soya chunk balls at 180 for 10-12 mins with a spritz of oil 

Do try this recipe and don't forget to share your experience/feedback with me here in the comments or feel free to send me a mail. Also, do tag me at #taystedit if you try out my recipes on Facebook, Instagram etc so that I can see when you make it. ♡♡♡♡


 Mac n Cheese with Chicken, Broccoli and Mushrooms (Lunch box friendly)


I have always been asked to share lunch box ideas and recipes. A few days back I happened to post this Mac n Cheese that I kept in my girl's lunch box. Since there was a lot of requests for the same, I thought to share it as a video. So finally here you go! This recipe is delicious and you may deduct the veggies or chicken (protein) from the recipe. I added them so that the meal is wholesome and filling. I love how versatile Mac n Cheese is. No matter how wrong you make it, you can't go wrong with this one!
 
To make your morning packing easier, you may boil and keep the pasta in the fridge for easier cooking in the morning. Usually, all purpose flour is used as aa thickening agent, but here, I haven't used any! As cooking down the milk makes the sauce thick. Also, if you plan to cook this, you may make it less thicker and saucier by decreasing the boiling time of the milk. I like to cook up the milk well, so that it is mess free and non sticky when the Mac n Cheese cools down.
 
Make this for your kid's lunch box and see how they bring back an empty box. What makes a mommy happier than seeing their kids finish their lunch boxes?! =D
Also you may add chopped onions (or onion powder) to the butter before adding the veggies for better flavor, and if your child dislikes the flavor of garlic, feel free to not add garlic too. Still tastes amazing!!

Ingredients :
  • 1 cup Elbow pasta
  • 4 cups Boiling water
  • Salt, as required 
  • 1/2 cup Broccoli, chopped
  • 1/2 cup Mushrooms, chopped
  • 2 small Garlic cloves, finely chopped (optional)
  • 100 gms Chicken Breast, sliced
  • 2 tbsp Butter
  • 1/2 tsp White Pepper Powder
  • 1 cup milk
  • 1/4- 1/2 cup Cheddar Cheese (shredded)
  • A dash of Oregano

Instructions:
  1. In a pot boil water, add salt and boil pasta according to package instructions ( do not over cook), drain and set aside.
  2. In a pan, add butter and finely chopped garlic, sauté for a few seconds and add in chicken breast pieces.
  3. Next add white pepper powder and salt as required. Sauté for around 5 minutes. 
  4. Move the chicken pieces to a side on the pan itself and add another tbsp of butter and add in your mushrooms and sauté well with a dash of water to chele cook the mushroom easily. Add broccoli and salt as required.
  5. Next add the milk and allow to come to a boil, and add in the shredded cheddar cheese. Allow the sauce to thicken well.
  6. Finally finish off with a dash of Oregano and add in your pasta and combine everything well and enjoy! Bon appetite!
 

Notes:

If you want it saucier do not boil the milk for too long, the cheese will help bind the sauce together.

Do try this recipe and don't forget to share your experience/feedback with me here in the comments or feel free to send me a mail. Also, do tag me at #taystedit if you try out my recipes on Facebook, Instagram etc so that I can see when you make it. ♡♡♡♡

Unnakaya Sabudana Payasam


It's that time of the year again! The festival of Onam is celebrated all across Kerala without religious conflicts. It is said that Onam is celebrated as part of agricultural practices, as during this time of the year, the farmers yield a bountiful harvest. As a part of the celebration, food plays an important role. Sadhya; Rice is served on a banana leaf with variants of vegetable curries and stir fries along with pappadam, banana and ends on a beautiful delicious note with Payasam (term for kheer in malayalam)

Everyone has a favorite payasam. For me, it has always been Semiya payasam, until I came across this one. I happened to be breaking my head to bring something innovative for you guys, that's when my mom explained to me about a payasam that she used to have at her aunt's house and she attempted that for a party and everyone was blown away with how delicious it tasted. So ever since, I have always wanted to try this recipe and oh boy! I just can't get enough of it. Unnakaya is steamed/ boiled planatins, mashed into a paste, which is then rolled and fried in ghee. The smell of the process is just *unexplainable*. The rolled unnakaya are sometimes stuffed with Coconut filling to give it even more texture. The soaked sago pearls/ sabudana is cooked in thin coconut milk, which is sweetened with Condensed milk, to which thick coconut milk is added and the fried unnakaya and finished off with tempered cashews and raisins.
 
The sago is used so that the payasam gets a thick texture. And it gets thicker as it stays. Also, make sure to use just ripen plantains, so that they maintain shape even after the shaped unnakaya are fried. Usually it is palada payasam (made from rice) or parippu pradhanam (lentil payasam made with jaggery) for Onam Sadhya. Give this delicious payasam a try and you are going to be bonkers! Super divine! Words aren't enough to explain !!


Ingredients : (6-8 persons)

  • 1 Large just ripe Plantain
  • 1/4 cup Sago seeds/ Sabudana
  • 3-4 + 3-4 tbsp Ghee/ Clarified butter (for frying and tempering)
  • 2 cups Coconut, shredded
  • 2 1/2 cups warm water
  • 1/2 cup Sweetened Condensed milk
  • Sugar, if required 
  • Salt, a pinch 
  • 1/4 tsp Cardamom powder 
  • 2 tbsp Cashew
  • 1 tbsp Raisins

Instructions:

  1. Soak the sago seeds and set aside.
  2. Cut the plantain into medium chunks and steam or boil them and mash them well using a potato masher or a food processor into a paste.
  3. Now roll them into mini unnakaya (spindle shape) and fry them in ghee just about brown and set aside.
  4. Now extract coconut milk from shredded coconut by pouring warm water to the shredded coconut in a mixer (pour water little at a time or else the contents might leak when the machine starts) and extract the milk by placing a strainer in a bowl and muslin cloth over the strainer.
  5. Set the thick coconut milk aside and repeat th eprocess to the same coconut and extract its thin milk.
  6. In a wide shallow pan, pou rthe thin coconut milk and boil/cook the soaked sago pearls (drain excess water) for around 10 minutes on medium low flame.
  7. Once the sabudana is cooked, add sweetened Condensed milk, sugar if required and salt to balance the sweetness and a dash of cardamom powder.
  8. Give it a quick stir, the payasam should slightly look thicker now.
  9. Now add in your fried mini unnakaya and finish off with ghee tempered cashews and raisins.
  10. Enjoy warm or cooled!


Do try this recipe and don't forget to share your experience/feedback with me here in the comments or feel free to send me a mail. Also, do tag me at #taystedit if you try out my recipes on Facebook, Instagram etc so that I can see when you make it. ♡♡♡♡

Newer Posts
Older Posts

Search This Blog

My name is Hasna Haneef, a mommy to a toddler, hailing from Thalassery, Kerala. Welcome to my humble abode on the Internet; wherein I share all my recipes and experiments. I am glad to have you on board!

TRENDING POSTS

  • Emirati Chebab
  • Chicken Steak with Creamy Mushroom Sauce
  • Kerala Style Squid Roast
  • Regag - Emirati Flat bread
  • Kerala Beef Fry/ Nadan beef dry fry
  • Junglee Chicken Sandwich

About Me

May peace be with you!

Welcome to my blog.

I am delighted to have you on board. My name is Hasna Haneef, a mommy to a toddler, hailing from Thalassery, Kerala. My homeplace being Dubai, as I am born and brought up here and I am very influenced by the lifestyle and the variety of authentic cuisines I get to try from here, which has made me try anything that comes across me
, click here →

Stay Connected!

Join Our Madness!

Join with Thousands Of Subscribers ! Get Our Latest Recipes Delivered to Your email Inbox!

Powered by follow.it
  • Home
  • About Me
  • Recipes

    • Main Course
    • Desserts
    • Snacks

    Uncategorized

    • Chicken
    • Meat
    • Vegetarian
    • Rice
    • Malabar Food
    • Baking
    • Breakfasts
    • Snacks
    • Drinks
    • Pasta
    • Fish
    • Soups
    • Desserts
  • Contact Me

Featured Post

Triple Chocolate Hazelnut Skillet Cookie

Blog Archive

  • ►  2025 (4)
    • ►  April (2)
    • ►  March (1)
    • ►  February (1)
  • ►  2024 (36)
    • ►  October (4)
    • ►  September (5)
    • ►  July (1)
    • ►  June (2)
    • ►  May (4)
    • ►  April (3)
    • ►  March (10)
    • ►  January (7)
  • ►  2023 (47)
    • ►  December (3)
    • ►  September (2)
    • ►  August (6)
    • ►  July (6)
    • ►  June (9)
    • ►  May (4)
    • ►  April (5)
    • ►  March (6)
    • ►  February (3)
    • ►  January (3)
  • ▼  2022 (69)
    • ►  November (4)
    • ►  October (6)
    • ▼  September (7)
      • Pulivaaral/ Tamarind shaped snack
      • Tofu and Bok Choy Stir Fry - Healthy recipe
      • Carrot Slice Baklava with Ice cream
      • Easy Homemade Chicken Nuggets
      • Soy Chunk Balls in Marinara Sauce
      • Mac n Cheese with Chicken, Broccoli and Mushrooms ...
      • Unnakaya Sabudana Payasam
    • ►  August (9)
    • ►  July (12)
    • ►  June (5)
    • ►  May (5)
    • ►  April (12)
    • ►  March (4)
    • ►  February (2)
    • ►  January (3)
  • ►  2021 (24)
    • ►  November (1)
    • ►  October (2)
    • ►  July (1)
    • ►  June (4)
    • ►  May (6)
    • ►  April (4)
    • ►  February (4)
    • ►  January (2)
  • ►  2020 (82)
    • ►  December (5)
    • ►  November (6)
    • ►  October (4)
    • ►  September (2)
    • ►  August (5)
    • ►  July (10)
    • ►  June (10)
    • ►  May (13)
    • ►  April (12)
    • ►  March (8)
    • ►  February (4)
    • ►  January (3)
  • ►  2019 (22)
    • ►  December (1)
    • ►  November (2)
    • ►  October (6)
    • ►  September (1)
    • ►  August (1)
    • ►  February (3)
    • ►  January (8)
  • ►  2018 (15)
    • ►  December (4)
    • ►  November (6)
    • ►  October (3)
    • ►  September (2)

Subscribe Us

Labels

Bake Biscuits Breakfast Brown rice Burger Cheese Chocolate Dal Egg Emirati Fish Iftar Indonesian Japanese Jeerakashala rice Kerala Keto Kuwait food Lunch Milk Mutton Thai food UAE food afghan cuisine arabic beef biryani bread burnt cheesecake cake chicken cream dessert dinner greek healthy indo chinese lamb malabar prawns pudding puffs quick dinner ideas recipe refreshing drink rice salad sandwich stir fry vegetables vegetarian veggies yemeni

Contact Form


POPULAR POSTS AND PAGES

Emirati Chebab

Emirati Chebab

June 01, 2023
Chicken Steak with Creamy Mushroom Sauce

Chicken Steak with Creamy Mushroom Sauce

November 05, 2018
Kerala Style Squid Roast

Kerala Style Squid Roast

June 18, 2020
Regag - Emirati Flat bread

Regag - Emirati Flat bread

December 02, 2020
Kerala Beef Fry/ Nadan beef dry fry

Kerala Beef Fry/ Nadan beef dry fry

October 08, 2019

Pages

  • Home
  • About Me
  • Privacy Policy
  • Contact Me

Copywrite © 2023 TermsFeed®. All rights reserved.

Created By Sora Templates | Distributed By Gooyaabi Templates

Back to top