Search This Blog

Taystit by Hasna

Food, Recipes, and Beyond

  • Home
  • About Me
  • Recipes
    • Main Course
    • Snacks
    • Desserts
  • Uncategorized
    • Chicken
    • Meat
    • Vegetarian
    • Rice
    • Malabar Food
    • Baking
    • Breakfasts
    • Snacks
    • Fish
    • Pasta
    • Drinks
    • Soups
    • Desserts
  • Contact Me

Street Style Fast food
Paav Bhaji 


Good evening folks. Do you get this sudden cravings for Indian Street food style chat? Well I am someone who loves any kind of street food/ fast food, but to my dismay, the Mister hates Indian Chat! Well, thanks to all the viral videos that showed the unhygienic preparation of street food. So to satisfy my cravings, I make some them from home. 

Pav is basically the bread rolls that are served along with the bhaji (a Marathi word which indicates a vegetarian dish). Bhaji is basically prepared by cooking vegetables and adding spices, mashing the vegetables to form a gravy. A special combination of spices are used to prepare the paav bhaji masala which brings out the authentic taste. Though this spice mix (Pav bhaji masala powder) can be found in Indian stores and supermarkets, I like to prepare them from scratch, which helps to bring better flavors. 

It is said that Pav bhaji was invented as a quick lunch option for the textile mill laborers in Mumbai that is now enjoyed as a street - fast food and in restaurants. Though my recipe doesn't use red food color, you may use if required, I used kashmiri red chilli powder instead, sautéed them in butter to bring out the color.

Here, I have incorporated the street style way of cooking by sautéing a tbsp of the prepared masala in butter along with chopped Coriander leaves and toast the paav on an iron griddle. It takes the pav to a next level. I bet this recipe can fill your tummy and soul! 

*The picture displayed is a random capture for the time being , which will be replaced soon. 

Ingredients :

For 3-4 people

  • 1 tbsp vegetable oil
  • 1 tbsp butter
  • 1 large Potato (boiled and mashed)
  • 1 large tomato, chopped
  • 1/4 cup green Peas (I used frozen) 
  • 1 medium Onion chopped finely
  • 1/2 green Capsicum chopped finely
  • 2 tsp Pav bhaji masala powder (to make from scratch I will mention below)
  • 1 tsp Kashmiri Red chilli powder
  • 1/2 dry Fenugreek leaves, powder it by rubbing between palms
  • 1 green chili, finely chopped (if required)
  • Coriander leaves, finely chopped
  • 1 tsp Ginger garlic paste
  • 2 tbsp lemon juice
  • Around 1 cup water
  • Salt as required

For paav:

  • 1 tbsp butter
  • Coriander leaves, chopped
  • 1 tbsp prepared Pav bhaji masala (not powder) 

Instructions :

  1. In a wide bottom thick pan, pour 1 tbsp vegetable oil and 2 tbsp butter.
  2. Sautee the onion and Capsicum till the wetness from them dry around 2-3 minutes.
  3. Add salt as required. 
  4. Add in Pav bhaji masala powder, kashmiri chilli powder and dry Fenugreek leaves.
  5. Sautee and add in green chillies, Coriander leaves and ginger garlic paste. Sautee well. 
  6. Finally add in your tomatoes and green Peas. 
  7. Sautee and finally pour lemon juice.
  8. Add your mashed potato. Mix well.
  9. Pour around 1 glass of water, you want it the gravy loose. Close the lid and allow to boil for around 5 minutes and open the lid and mash using a masher and adjust water and salt as required. 
  10. In an iron tawa, place a tbsp butter, drop Coriander leaves and add the prepared Pav bhaji masala and Sautee for a few seconds and place the Pav and nicely toast both sides.
  11. Serve the paav and masala with a slice of lemon and chopped onion.


To prepare Pav bhaji masala powder from scratch : (can use this measurement to prepare the above recipe 2 - 3 times) 

  • 2 tbsp Coriander seeds
  • 1 tbsp cumin seeds
  • 1 cinnamon stick
  • 1 cardamom pod 
  • 2 cloves
  • 2 Bay leaves 
  • 2 tsp whole black pepper 
  • 1 tsp fennel seeds
  • 3 whole dried kashmiri chilli/ 1 normal dried chilli
  • 1/2 tsp Turmeric powder 
  • 1 tsp dry Mango powder/amchur powder. 

Instructions :

  1. Dry roast the above ingredients except for Turmeric powder and dry Mango powder and allow to cool completely.
  2. Grind well and finally add the Turmeric powder and dry Mango powder and give a couple of blitz and store in a dry and clean container.

Note:
  • If you want super mashed up veggies in your bhaji, you may cook them well in a pressure cooker before you prepare the masala.
  • The usage of the type of veggies used in Pav bhaji can make a slight difference in taste, if you like a sweeter taste you may use carrot, for extra color you may use beetroot. I personally like more Capsicum which helps bring out the flavors better.

Do try this recipe and don't forget to share your experience/feedback with me here in the comments or feel free to send me a mail. Also, do tag me at #taystedit if you try out my recipes on Facebook, Instagram etc so that I can see when you make it. ♡♡♡♡

Kerala Beef Dry Fry


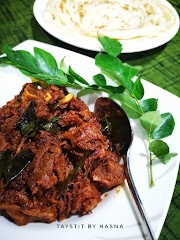
Kerala Beef fry and Malabar Porotta is the national dish of Kerala. Unlike other foods that are enjoyed all over the different parts of the state, Kerala Beef fry is relished all over the state. Like often said, it is not just food for us, it is an emotion. 🤩

I love those beef fry that you find on the streets; road side vendors take them to a next level and serve them with kappa (tapioca). This with a glass of hot tea is all you need.

I have heard that Kerala beef fry and pazham porichat (plantains batter fried) is a sensation at Kerala. Made gag just giving a thought about the combination but it every one seems to love it. That's my next mission, to try this fusion.😁

Kerala style beef is normally slow cooked with a medley of aromatic spices. But since we are always short in time I made this in a cooker. Easy job! Quite frankly, I was nowhere near the cooker when the beef got cooked. Got some time to chill. Thank god for pressure cookers. Always to the rescue.🤩

My cooker is the no-whistle type, now if you ask me the number of whistles I cannot assure you but it has to get done in about 7-8 whistles.

I pressure cooked my beef for about 20 minutes which was timed after my cooker starting giving the screeching sound (might be helpful if you have the same cooker as mine). I will insert a picture of my cooker too. After 20 minutes done, cook on simmer for another 5 minutes. Turn off the heat and wait for the pressure to depart on its own.


Apart from how it is traditionally made, with coconut bits (thenga kothu), this recipe has my own special touch to it. It is super easy, well the ingredients are nothing! When it comes to the cooking of beef you might think you need a lot of spices. But this dish is really a simple one. Before we start, remeber that the more you add curry leaves the better. 
Let's get cooking.! 😍


Ingredients:


  • 700 gm beef (small cuts)
  • 2 big garlic cloves, paste
  • 1-inch ginger, paste
  • 1/4 tsp Turmeric powder
  • 4 tsp Chilli powder
  • 1 tsp meat masala
  • 1 1/4 tsp garam masala
  • Salt as required
  • 1 cup of water
  • 1 garlic clove, minced/paste
  • 5-6  twigs of curry leaves
  • Tomato paste 4-5 tbsp (Optional)
  • 4-5 tbsp pure coconut oil


Instructions :


  • Mix the beef with all the spices, until salt from the ingredients list. Add 1 cup of water or until the beef is immersed in water.


  • Now pressure cook for about 7-8 whistles and let the pressure depart on its own.


  • Take an iron pan or kadai and add the coconut oil. Once the oil is just about hot, decrease the flame and add the garlic paste and curry leaves, fry the Curry leaves well.
  • Add the tomato paste and sauté well.
  • Now add the beef stock water from the pressure cooked beef and let it reduce well.


  • Next, add the cooked beef and fry the beef well until its about dry. Not completely dry.  Your naadan beef dry fry is ready to have with flakey Malabar Porotta! 😍😋


  • Fry curry leaves in coconut oil and add to the dish as a garnish for extra elegance.
Please check notes for tips and tricks.


Notes:


  1. Fry in an iron pan or kadhai for better flavor on medium-high heat tossing every other minute till it reaches your desired consistency.
  2. I used Pakistani beef here, I normally use Indian beef. But it still did turn out good. Alhamdulilah.
  3. I have used both the cuts of beef, boneless and with bone. The beef with bone is more flavorful with all the juices from the bone marrow makes it super delish.
  4. I added the tomato paste for that rich dry gravy texture also for a light tanginess. You may totally omit that. It's up to you.
  5. I had to add about 2 tsp of salt and a little extra in total in the end.
  6. Pressure cook for about 7-8 whistles, each cooker is different, so is the meat so check and cook more if required. Do not cook too long because you don't want it to be so tender that when you dry fry, all the beef gets squashed.
  7. Enjoy! 


Do try this recipe and don't forget to share your experience/feedback with me here in the comments or feel free to send me an mail. Also, do tag me at #taystedit if you try out my recipes on Facebook, Instagram etc so that I can see when you make it. ♡♡♡♡

Chicken Reshmi Kebab


The new year is around the corner. What is your new year resolution? If you'd ask mine I'd say nothing. NOTHING at all. Do good, do better. After, all we have no idea if we are going to live this whole coming year. So go with the flow! Don't pressurize yourselves, take a deep breath and try being a better person than you were this year. You are going to be happy with the change. Be inspired and keep inspiring others. Try to spend more time with your parents and family. It's worth is more than money could ever buy. Speak Love, Do Love, Let Love. 😊💓

Coming back to the recipe, if you love kebabs and BBQ you are gonna love the fact you found this recipe. I personally think this is the best kebab recipe I came across. So succulent and juicy that these hot kebabs are going to get over in a blink of an eye. So watch out! hahaha (Keep some for yourself, or else you will regret it later, I did!) 🙍 


Hard and dry Kebabs are my pet peeves! I found this recipe from a group of sisters and it was the trending dish, so I knew I had to make it! I would have regretted if I hadn't tried it. You just can't enjoy your kebabs if they aren't tender and juicy. Kebabs are like the staple food in middle eastern cuisine and the origin is also stated to be from the middle east. Yet they are relished, cooked and enjoyed all over the world. There are many variants and styles kebabs are prepared in. For me its always sheesh kebab. I just love them. I am sure you will love them too.


Kebabs are so delicious yet the easiest to prepare; it isn't deep fried and so doesn't require a lot of oil. I have used a grill pan here, you may use a non-stick fry pan. I love those stripes on my kebabs and grilling on a grill pan makes it even more succulent. The coconut powder and cream are the secrets to a successful tummy-kush kebab. The tender Chicken breasts is a game changer, you get them in supermarkets, it plays a big role to make the chicken even juicier. If you can't find them, you may brine them for half an hour to 45 minutes. You can do this by soaking the chicken in a solution of 4 cups of warm water and 1/4 cup of salt and a couple of tablespoon of sugar and 2 tablespoons of olive oil. This step isn't necessary but will help you attain juicy kebabs, you can totally omit it, it doesn't matter, it's just a tip of mine. I have been wanting to share this recipe since so long now. And finally, it is time to reveal the RECIPE OF THE JUCIEST KEBABS you are ever going to make!
Let's get started...


INGREDIENTS

  • 700 gm Tender Chicken Breasts
  • Salt (As Needed)
  • 4 Green Chilies
  • 1 Onion (Finely Chopped)
  • 5 gm Green Coriander leaves 
  • 35 gm Butter
  • 2 Garlic Cloves
  • 1 small piece Ginger (Chopped)
  • 2 tsp Coriander Powder
  • 1 tsp Cumin Powder
  • 1 tsp Garam Masala Powder
  • 1 tsp Black Pepper Powder
  • 1 tsp white pepper Powder
  • ¼ tsp Red Chilli Flakes
  • 2 tbsp Coconut Powder
  • 1 2 tsp Cream
  • Cooking Oil (As Needed)

INSTRUCTIONS


  1. First of all, take a Blender, add chicken (after removing excessive water with paper towels), Butter, White Pepper Powder, Salt, Black Pepper Powder, Green Coriander, Onion, Coconut Powder, Cream, Red Chilli Flakes, Coriander Crushed, Garam Masala Powder, Cumin Powder, Ginger, Garlic, Green Chili. Now Blend these all ingredients with chicken. And Keep it in the fridge for 30 Minutes
  2. Apply the oil at the hands, make kababs from the marinated chicken
  3. Take a pan, add oil and fry the kababs lightly
  4. Take oven tray and keep these kababs in this tray now oven bake for 10 minutes at 180 °C or grill them on a grill pan for 6 minutes on one side and flip and let it get done for 4 minutes on a medium-low flame. Serve Hot with creamy hummus and khubz.

Recipe Adapted from sooperchef.

Do try this recipe and don't forget to share your experience/feedback with me here in the comments or feel free to send me a mail. Also, do tag me at #taystedit if you try out my recipes on Facebook, Instagram etc so that I can see when you make it. 
Also, share my recipes with your family and friends. ♡♡♡♡

Goan Recheado Fish Fry


Racheado means 'Stuffed' in Portuguese. Use this marinade to fry your fish, and you are going to stock up the marinade in your pantry. This spicy, sour and tangy masala is going to take your taste buds on a ride. The masala/stuffing can be used with any fish like the Mackerel, Pomfret, Prawns, Kingfish etc. 


I am using king fish in this recipe because I had fresh ones. And this recipe is the perfect one to go for a fry. The chilies and spices are soaked in white vinegar for a few minutes before you grind them to a thick paste. You will love how the spices and the tanginess come together. Also, try to marinate and keep for at least an hour or overnight, this will help to bring out the flavors. If you want it to be crispy, just before frying, coat it with semolina and flour.



Goan cuisine is one among my most desired options for dining in. If you haven't yet tried their food, you are missing out on some great experience. Moreover, if you love spicy food (like my mama), you will definitely love Goan food. 


The traditional Goan cuisine is majorly influenced by Portuguese and African recipes; that explains the name of the dish. This is spicy, crispy and hot shallow fried fish that can go along with steamed rice and veggies for lunch or along with rotis and curry for dinner. Perfect combo! 


I have no roots from Goa but definitely crave for their food every now and then. This might not be an authentic Goan recipe, but an amazing recipe. Try it, Tayst it and let me know how you like it.


INGREDIENTS

  • 4 King Fish rinsed
  • 15 Kashmiri Red Chilies
  • 1 tsp Kashmiri Chilli Powder
  • 2.5 Tbsp White Vinegar or as required
  • 1 Garlic Bulb
  • 1 inch Ginger chopped
  • 1/4 tsp Mustard Seeds
  • 1 tsp Cumin Seeds
  • 1/2 tsp Black Peppercorns
  • a pinch Fenugreek seeds
  • 6 Cloves
  • 2 Marble sized Tamarind Balls soaked in 20 ml Hot Water
  • Salt
  • Turmeric
  • Semolina (Optional)
  • Flour (Optional)
  • Oil for frying

Instructions

  1. Soak all the spices, ginger, garlic, tamarind pulp and Kashmiri chilies except oil in vinegar.
  2. Add salt.
  3. Also, add turmeric powder and chilli powder.
  4. Combine all nicely and soak for 35-40 mins.
  5. Grind the mixture until soft and smooth. Add more vinegar if required but ensure the paste has to be thick so add vinegar accordingly. If the masala paste is thin then it would not stick to the fish.
  6. Coat the entire fish with this paste. Marinate the fish for at least 30 mins.
  7. Place oil in a shallow pan, once oil is quite hot, shallow fry the stuffed Kingfish. If you want it to be crispy coat the fish with semolina and/ flour. Fry until 3 - 4 minutes each side.
  8. Serve the Recheado kingfish hot with salad, lime wedges, rice, and curry.


Do try this recipe and don't forget to share your experience/feedback with me here in the comments or feel free to send me a mail. Also, do tag me at #taystedit if you try out my recipes on Facebook, Instagram etc so that I can see when you make it. ♡♡♡♡
Older Posts

Search This Blog

My name is Hasna Haneef, a mommy to a toddler, hailing from Thalassery, Kerala. Welcome to my humble abode on the Internet; wherein I share all my recipes and experiments. I am glad to have you on board!

TRENDING POSTS

  • Emirati Chebab
  • Kerala Style Squid Roast
  • Chicken Steak with Creamy Mushroom Sauce
  • Kethel's Chicken
  • Yemeni Mutton Haneeth
  • Copy Cat Caesars Mini Pizza

About Me

May peace be with you!

Welcome to my blog.

I am delighted to have you on board. My name is Hasna Haneef, a mommy to a toddler, hailing from Thalassery, Kerala. My homeplace being Dubai, as I am born and brought up here and I am very influenced by the lifestyle and the variety of authentic cuisines I get to try from here, which has made me try anything that comes across me
, click here →

Stay Connected!

Join Our Madness!

Join with Thousands Of Subscribers ! Get Our Latest Recipes Delivered to Your email Inbox!

Powered by follow.it
  • Home
  • About Me
  • Recipes

    • Main Course
    • Desserts
    • Snacks

    Uncategorized

    • Chicken
    • Meat
    • Vegetarian
    • Rice
    • Malabar Food
    • Baking
    • Breakfasts
    • Snacks
    • Drinks
    • Pasta
    • Fish
    • Soups
    • Desserts
  • Contact Me

Featured Post

Triple Chocolate Hazelnut Skillet Cookie

Blog Archive

  • ▼  2026 (3)
    • ▼  September (1)
      • Homemade Cerelac for Babies
    • ►  May (1)
    • ►  April (1)
  • ►  2025 (4)
    • ►  April (2)
    • ►  March (1)
    • ►  February (1)
  • ►  2024 (36)
    • ►  October (4)
    • ►  September (5)
    • ►  July (1)
    • ►  June (2)
    • ►  May (4)
    • ►  April (3)
    • ►  March (10)
    • ►  January (7)
  • ►  2023 (47)
    • ►  December (3)
    • ►  September (2)
    • ►  August (6)
    • ►  July (6)
    • ►  June (9)
    • ►  May (4)
    • ►  April (5)
    • ►  March (6)
    • ►  February (3)
    • ►  January (3)
  • ►  2022 (69)
    • ►  November (4)
    • ►  October (6)
    • ►  September (7)
    • ►  August (9)
    • ►  July (12)
    • ►  June (5)
    • ►  May (5)
    • ►  April (12)
    • ►  March (4)
    • ►  February (2)
    • ►  January (3)
  • ►  2021 (24)
    • ►  November (1)
    • ►  October (2)
    • ►  July (1)
    • ►  June (4)
    • ►  May (6)
    • ►  April (4)
    • ►  February (4)
    • ►  January (2)
  • ►  2020 (82)
    • ►  December (5)
    • ►  November (6)
    • ►  October (4)
    • ►  September (2)
    • ►  August (5)
    • ►  July (10)
    • ►  June (10)
    • ►  May (13)
    • ►  April (12)
    • ►  March (8)
    • ►  February (4)
    • ►  January (3)
  • ►  2019 (22)
    • ►  December (1)
    • ►  November (2)
    • ►  October (6)
    • ►  September (1)
    • ►  August (1)
    • ►  February (3)
    • ►  January (8)
  • ►  2018 (15)
    • ►  December (4)
    • ►  November (6)
    • ►  October (3)
    • ►  September (2)

Subscribe Us

Labels

Bake Biscuits Breakfast Brown rice Burger Cheese Chocolate Dal Egg Emirati Fish Iftar Indonesian Japanese Jeerakashala rice Kerala Keto Kuwait food Lunch Milk Mutton Thai food UAE food afghan cuisine arabic beef biryani bread burnt cheesecake cake chicken cream dessert dinner greek healthy indo chinese lamb malabar prawns pudding puffs quick dinner ideas recipe refreshing drink rice salad sandwich stir fry vegetables vegetarian veggies yemeni

Contact Form


POPULAR POSTS AND PAGES

Kerala Style Squid Roast

Kerala Style Squid Roast

June 18, 2020
Emirati Chebab

Emirati Chebab

June 01, 2023
Copy Cat Caesars Mini Pizza

Copy Cat Caesars Mini Pizza

March 12, 2024
Yemeni Mutton Haneeth

Yemeni Mutton Haneeth

October 20, 2022
Kerala Beef Fry/ Nadan beef dry fry

Kerala Beef Fry/ Nadan beef dry fry

October 08, 2019

Pages

  • Home
  • About Me
  • Privacy Policy
  • Contact Me

Copywrite © 2023 TermsFeed®. All rights reserved.

Created By Sora Templates | Distributed By Gooyaabi Templates

Back to top