Search This Blog

Taystit by Hasna

Food, Recipes, and Beyond

  • Home
  • About Me
  • Recipes
    • Main Course
    • Snacks
    • Desserts
  • Uncategorized
    • Chicken
    • Meat
    • Vegetarian
    • Rice
    • Malabar Food
    • Baking
    • Breakfasts
    • Snacks
    • Fish
    • Pasta
    • Drinks
    • Soups
    • Desserts
  • Contact Me


 Deconstructed Mango Falooda with Semiya Payasam


It's the mango season and Eid Al Adha is right around the corner, what better way to celebrate it with this innovative falooda. This deconstructed mango falooda is my mastermind, as I love falooda, but mixing everything always makes a mess, that's how this deconstructed falooda was born. I was craving for semiya payasam, so thought why not have two desserts in one and oh boy! The chilled payasam and falooda was exactly what I wanted to beat the heat.

Deconstructed Mango Falooda with Semiya Payasam is a must try!! Make this, flip it and let the action unfold, your family will love this!


Ingredients: (one serving)

  • 1 tbsp Sabja seeds
  • 3 tbsp Water 
  • 2 tbsp Ghee
  • 2 tbsp Cashews 
  • 1/4 cup Pakistani Vermicelli 
  • 3/4 cup Milk
  • 1/4 Condensed Milk
  • A pinch of Cardamom powder
  • A pinch of Salt
  • Pulp of 1 Mango 
  • Condensed Milk (if required, for added sweetness) 
  • Pomegranate seeds, for garnish 
  • Ice Cream as topping


Instructions: 

  1. Soak the Sabja seeds in water and set aside. 
  2. Roast the cashews in ghee and transfer to a bowl to cool and roughly chop the roasted cashews and set aside.
  3. In the same pan with ghee, break the Pakistani vermicelli and roast them in the ghee for a minute and pour the milk and cook the vermicelli in milk. Add more milk if required. 
  4. Finish off with the condensed milk, cardamom powder and a pinch of salt. 
  5. In a glass, layer the falooda by adding the Semiya Payasam as the first layer, next add the soaked sabja seeds, mango chunks, mango pulp, and repeat the layers until the glass is full, allow the falooda to chill. 
  6. Just before serving, for ease to release the falooda, simply dip the glass in warm water.
  7. Now take a pasta bowl, invert the bowl of the glass and flip, now slowly release the glasss upward and you now have deconstructed mango falooda. 
  8. Place a scoop of ice cream on top and garnish with mango chunks, pomegranate seeds, chopped ghee roasted cashews and mint leaves (optional). 
  9. Enjoy!! 


Do try this recipe and don't forget to share your experience/feedback with me here in the comments or feel free to send me a mail. Also, do tag me at #taystedit if you try out my recipes on Facebook, Instagram etc so that I can see when you make it. ♡♡♡♡

Mango Basbousa


Mango season has just begun and I loooove Mangoes in any form, be it fresh or as a dessert! We are all in search of different mango recipes to try when all we can see are mangoes around us and this recipe was a trial but was a super hit at home. The crusty semolina adds texture and mingles well with the flavors from the mango cream and the biscuit layer. 

Unlike the usual Basbousa recipes where the first layer is that of the Basbousa batter, here I am using a biscuit layer to make it much more easier and delicious!! 

The filling consists of mango purée, condensed milk and cream. Once the Basbousa is baked, allow it to cool to give you precision to cut, or you will end up with a liquidy mess, (if you have no patience like me, haha) 

Ingredients: Serves 4 people 

Layer 1:

  • 100 gms Milkbikis Biscuits (can use digestive biscuits too)
  • 50 gms Butter, melted

Layer 2:

  • 160 gms Cream 
  • 1 Ripened Sweet Mango (preferably fiber less ones), puréed 
  • 3 tbsp Condensed Milk

Layer 3:

  • 1/4 cup Semolina
  • 2 tbsp Sugar
  • 3 tbsp Milk powder
  • 1 tsp Baking powder
  • 2 tbsp Vegetable Oil
  • 3 tbsp Water
  • 1/2 tsp Vanilla extract 

Sugar Syrup :

  • 1/2 cup Sugar 
  • 1/2 cup Water 
  • A squeeze of lemon 

Instructions: 

  1. Mix biscuit powder with melted butter and press and level it in a baking dish.
  2. Combine the cream, mango purée and condensed milk and spread evenly on the biscuit layer.
  3. Mix every ingredient under the layer 3 list and pour gently over the cream layer.
  4. Bake at 180 deg C for around 15 minutes. Bake on the top rack for 10 minutes and the rest 5 minutes on the bottom rack. 
  5. Prepare the sugar syrup by boiling water, sugar and lemon juice. Once combined and starts bubbling keep timer for around 8 minutes, allow to cool and pour over the Basbousa.
  6. Enjoy warm or cooled.


Do try this recipe and don't forget to share your experience/feedback with me here in the comments or feel free to send me a mail. Also, do tag me at #taystedit if you try out my recipes on Facebook, Instagram etc so that I can see when you make it. ♡♡♡♡

 Mango Swiss roll


One of my favorites and successful bakes in the recent times! I must say this one was "next level", like the husband exclaimed. While editing the video/reel of the recipe, my little one comes to me saying, my tummy says that it wants the cake you made yesterday again! You know what such compliments mean, It was craaazy good! Mango Swiss roll right out of a cafe/ bakers shop! I mean it!

This mango Swiss roll shouts summer like no OTHER! I mean, I wanted to play around with flavors, but this one was as good as it was being plain in itself. I would try to add tropical favors like coconut the nect time, for added texture, but otherwise, we loved the Swiss roll with a generous spread of Mango coulis, and chantilly cream (comprises of whipped cream, vanilla and icing sugar).


I happened to buy this R2e2 Mango from Carrefour, it's a huge sized variety of mango family. I had so many ideas to try using this mango, finally I settled for this swissroll that I have been procrastinating since a long time now. Next time I make this Mango Swiss roll, I would probably use a smaller mago for the decoration, as the weight of the Mango slices weighs down the Swiss roll, this R2e2 Mango of Australian origin was delicious otherwise! The best part is that, since the cake is made completely using vegetable oil, the cake stays soft and moist even when taken right out of the refrigerator, and also most ingredients are easily available at home. I am definitely making this for the next party at home, I mean it is such a show stopper that just melts in the mouth. If you haven't tried making Swiss rolls yet, give this Mango Swiss roll a try, everyone is going to be all praises. You can thank me later! <3


Recipe adapted from Mattadlard

Ingredients:

For the Sponge :

4 Large Eggs (yolks and whites separated)
  • 1/4 Cup Sugar, for the yolk
  • 1/4 Cup Sugar, for the white
  • 1/4+1 tsp Cup Plain Flour
  • 1/4 Cup Corn Flour
  • 1/4 tsp Baking powder 
  • 1/4 Cup +1 tsp Whole milk
  • 1/4 Cup Vegetable Oil
  • 1 tsp Vanilla
  • 1/4 tsp Lemon Zest
 

Chantilly Cream:

  • 1 Cup Whipping Cream
  • 2 tbsp Sugar
  • 1/2 tsp Vanilla 
  • 1/2 cup Mascarpone (optional)

Mango Coulis:

  • 1 Mango, peeled abd chopped 
  • 3 tsp Sugar
  • 2 tsp Lemon juice

Mango slices and Strawberries for topping

Instructions:

  1. Separate the Egg yolks from the egg whites, and whip the egg yolks, lemon zest with sugar and in another bowl, whip the egg whites and sugar until stiff peaks, now fold the egg whites into the egg yolks.
  2. Using a strainer, sift the plain flour, corn flour and baking powder and very gently fold the dry ingredients.
  3. Now add in the milk and vegetable oil, and make sure you go well under there and scoop and fold the wet ingredients wellaas they tend to stay at the bottom.        
  4. Preheat the oevn at 170 deg C, line a 33*33 cm baking tray with baking paper and pour the cake batter and evel using a off set spatula.
  5. Bake for 25 minutes and broil for the last 5 minutes for that perfect baked tops.

  6. Prepare the coulis by cooking Mango pieces with sugar and lemon juice on simmer for around 10 minutes and once cooled make a paste using an emulsion blender.
  7. Next prepare the Chantilly cream, whip the cream with sugar and vanilla and fold in the beaten Mascarpone if you have it! Whip everything well till you have medium peaks.
  8. Once the sponge cake has baked, drop the baked top facing on a new baking paper and remove the baking paper used for baking, trim off the edges using a knife and smear the cake generously with the Mango coulis, this is where the flavor comes from!

  9. Spread the chantilly cream, be careful not to over do it, as it will be difficult to roll otherwise!
  10. Roll it up real tight, as shown in the video on my Instagram reel, and allow to chill for 30 minutes, covered.

  11. Spread the remaining chantilly over the Swiss roll and decorate as per your liking. 


  12. Enjoy chilled!


 Mango Watermelon Mojito

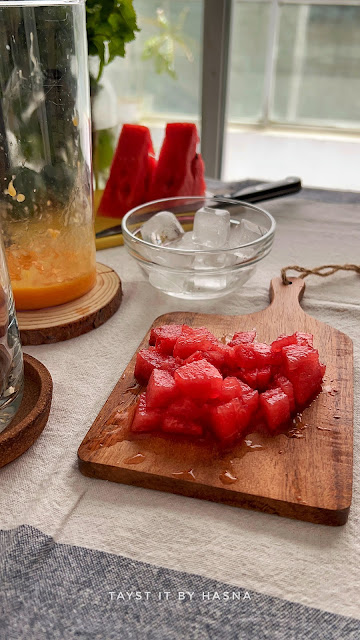
It's peak summer here in Dubai and anything refreshing really makes a difference. I love Mojito. Mint and lemon is my all time favorite mojito. The mango puree elevates the flavor and the watermelon cubes is what makes it even more refreshing and colorful.

You have to blend the Mango really well, and make a fine paste and make sure to use low fibrous mango. You may crush the water melon before adding the soda, but I like to have bite while drinking it, so I used a stirrer that is a straw as well as has a spoon at the end of it, so I can drink the mojito as well as scoop up some water melon cubes for that crunch.

Muh-hee-tow is how it's pronounced. So next time, make this mojito in the afternoon for yourself or your folks and feel the freshness! 


Ingredients: (makes for 2)

  • 1 cup Watermelon cubes
  • 1 low fibrous mango, pureed
  • 3 tsp Sugar
  • 1 Lemon, slices
  • Few Fresh Mint leaves
  • 1 Can Soda
  • Ice cubes
 

Instructions

  1. Chop the watermelon to cubes and set aside.
  2. Puree the Mango and pour it to a tall tumbler.
  3. Next add the watermelon cubes, the lemon slices, sugar, and tear the mint leaves and add to the tumbler.
  4. Add some ice cubes. 
  5. Pour the soda and enjoy! 
 

 Notes:

You may add lemon juice instead of lemon slices.


Do try this recipe and don't forget to share your experience/feedback with me here in the comments or feel free to send me a mail. Also, do tag me at #taystedit if you try out my recipes on Facebook, Instagram etc so that I can see when you make it. ♡♡♡♡

 Mango Pavlova with Coconut Cream


Eid Al Adha is right around the corner, and what better way to present a show stopper on your Eid dessert table with this marshmallowy Pavlova with contrasting and tropical flavors from the coconut, mangoes and cherries. The tropical flavor from coconut, the sweetness from the mangoes and sourness from the cherries marries so well together. I am not a big fan of Mango desserts, as Mango in itself is so delicious, but this one has my heart. Just perfectly delicious.
 
Egg whites are whipped to stiff peaks with the addition of sugar, which is then folded in with some lemon juice, corn flour, and vanilla essence. Plop the meringue mix over a baking sheet with a circle marking and bake it at the lowest temperature possible (140-150 deg c). If you are planning to make the pavlova for a party, prepare the Pavlova a day ahead, so that the Pavlova easily snaps out of the baking sheet after it cools down. The main step is to allow the Pavlova to sit in the oven even after the baking is done, for at least an hour or so. So that the texture of the Pavlova is retained, with a crispy outer cover and marshmallowy insides. 

For the coconut cream, I used Coconut milk powder (as I only had the milk powder in my pantry). You may use canned coconut cream, store it in the refrigerator and use it the next day, so that it is thick. I suggest to prepare the cream ahead of time and store it in the refrigerator, so that the cream thickens before scooping it over the pavlova. There is something about fresh cream that brings the essence to a dessert. I prefer fresh cream over any other creams in desserts. 

This dessert is definetly a must try, as there is no hard rule to follow in making shapes with the meringue. Play along and enjoy making this beautiful and deliciously refreshing dessert for your dessert table.


Ingredients : 

For the Pavlova:

  • 1/2 cup/ 4 Egg whites (must not contain egg yolks)
  • 1/2 cup - Fine sugar
  • 1 tsp lemon juice  
  • 1 1/2 tsp Corn Flour
  • 1 tsp Vanilla Essence
  • A pinch of salt

For the Coconut Cream:

  • 1/4 Cup of Coconut milk powder/ store bought Coconut Cream
  • 1-2 tbsp warm water
  • 100 gms Fresh Cream
  • 2- 3 tbsp Sweetened Condensed Milk 
  • 1 tbsp Dessicated Coconut

For the topping:

  • Mango, cubed and scooped
  • Sour Cherries
  • Mint leaves, for garnishing

Instructions :

  1. Make sure to wipe the bowl clean with lemon so that no grease remains in your mixing bowl, (if grease remains, the egg whites will not get whipped with stiff peaks).
  2. Draw a cirle of 7-8 inches using a plate etc on a baking sheet and fip the baking sheet.
  3. Beat the egg whites using a whisk attachment and once it starts to look frothy, sprinkle the sugar 1 tbsp at a time and whip the egg whites to stiff peaks.


  4. Next, add in your lemon juice, corn flour, vanilla and salt and fold the ingredients gently.
  5. Transfer the prepared meringue to your baking sheet, using a spatula, carve the meringue with the cirl drawn earlier. Make a slight depression/ using the spatula, swipe the spatula upwards to make markings all over the sides to make it look like a crown.

  6. In a preheated oven, of 140 deg C, allow the Pavlova to bake for around 1 hour and 15 minutes and allow the Pavlova to sit and cool in the oven itself, for at least an hour or preferably overnight. The Pavlova will have a slight change in shade of color and the outer will feel dry and hard, while the insides remain soft.
 

To make the Coconut cream:

  1. Mix the coconut milk powder with little warm water and make a paste. 
  2. Add the fresh cream to the coconut milk paste and fold in the fresh cream.
  3. Pour the condensed milk and add the Dessicated coconut and combine.
  4. Place in refrigerator and allow to cool and thicken before filling the meringue.
  5. Fill the Pavlova wuth the coconut cream, right before serving and top with cubed mangoes and place cherries. 
  6. Garnish with mint leaves and Enjoy!

Notes:

  • I have made my coconut cream here, you may use whipped cream if you like.
  • Make sure not to peep inside the oven while the oven bakes your meringue/pavlova as the resultant temperature differences can cause the pavlova to crack and notattain the perfect texture.
  • The baked pavlova can stay in the oven preferably overnight, so that it cools down completely.
  • You may store the baked meringue in an airtight container for a few days if not using immediately. 
  • Once you add in your whipped cream you have to consume immediately. 
  • If you want to store in the fridge, you may do so, but the meringue will not remain crisp and crunchy.


Do try this recipe and don't forget to share your experience/feedback with me here in the comments or feel free to send me a mail. Also, do tag me at #taystedit if you try out my recipes on Facebook, Instagram etc so that I can see when you make it. ♡♡♡♡

Mango Mousse Float


It is Mango season here and to be frank this is the only time I splurge on mangoes because you get the finest, juiciest, tastiest mangoes in season time. Mango is called the king of fruits, no wonder why! I just love it! It instantly mingles with anything you add it to, be it juices, cakes, ice creams, etc, and uplifts its flavor profile instantly. Mango Mousse float is a dessert that can be easily be prepared even by kids.

When you get hold of ripe, juicy preferably Alphonso mangoes, look no further, try my mango mousse float. Basically, this was an experiment to try a technique that had dawned on me a few days earlier. Since I had ripe mangoes in hand, I had to make my delicious mango mousse float. This dessert is more like an ice cream cake, the biscuits give you that cake texture and the whipping cream gives you the ice cream feel. I have used Digestive biscuits here to make my technique build up easier, I would suggest you use thinner biscuits like ulker tea biscuits, graham crackers, or Marie biscuits. And for the mousse layer, I had used dream whip sachets as I had run out of whipping cream, I would recommend using fresh whipping cream for better taste, to give that ice cream feel.


Mangoes are a fruit that is loved worldwide. Mango float also called mango royale is basically a Filipino dessert that consists of biscuit layers with whipped cream, condensed milk, and mangoes. In the actual recipe, you have pieces of mangoes going in between the layers, instead, I added a mango mousse layer. Also as the recipe is an easy one, I tried the technique of round desserts. Since I did not have ring molds, I used a plastic mineral water bottle alternatively and cut it in the shape of a ring, then cut it lengthwise and taped it, filled it with the dessert, and set in the fridge. Once set, you just have to remove the tape and pull off the plastic bottle mold and voila! You have your round looking dessert. This is a technique that I came up with, solely something that came up in my mind. If you will not be consuming the dessert immediately use gelatin or china grass to get that perfection without melting.
I haven't used it here as I completely dislike using gelatin for a regular dessert session unlike for parties.


This is the easiest dessert recipe one can make, a perfect recipe where you can ask your kids to join in for some fun making this dessert. I am someone who is very anxious when it comes to allowing my little one to help me! There was a time when she used to ask me if she could help me. That is around 2 years old, Allahumma Baarik; I know you might be thinking that she is too small for that, but I have noticed she grasps everything quickly maa sha Allah. So now when she is 3 and a half years old, I see a little grown up in her, she just pushes the chair to me and helps me in my chores. I just can't accept the fact of how fast kids grow. 

Basically, this dessert involves no cooking, so what is better than involving your little stars in such recipes. Like I said when she saw me prepping this dessert she just pushed the chair and start helping me with the process, It felt so good to have a fun kitchen session with my little one, even though it makes me uneasy. I urge you, you need to try easy recipes with your kids, it strengthens the bond between you and your kids.

Ingredients:


  • 1 old Mineral plastic bottle (for making ring molds)
  • 3 ripe Mangoes, preferably Alphonso
  • 12-15 Digestive biscuits (or any thin tea biscuits, preferably)
  • 2 cups whipping cream or 2 dream whip sachets
  • 1/2 cup condensed milk (1/4 cup each, for cream mixture and mango mousse)
  • 1 cup milk if using dream whip sachets*
  • 1 tsp vanilla essence
  • 10 gms Gelatin/ China grass (optional)
  • 3 tbsp cream (fresh or thick cream)
  • 1/2 cup milk (for dipping biscuits)

Instructions:


  1. Take an old mineral plastic bottle and cut two similar-sized discs, and cut vertically.
  2. Now tape the opening according to the size of your biscuits and set aside.
  3. In a bowl, whip 2 cups whipping cream separately, add 1/2 tsp vanilla essence each, and set aside.
  4. In one bowl of whipped cream, add puree of one mango and add fresh cream in the other bowl of whipped cream.
  5. Next add in 1/4 cup of condensed milk in each of the bowl if using dream whip or use 1/2 cup each if using whipping cream.
  6. Pour your mango mousse and cream mixture in two piping bags and place it in the freezer for 1 hour or 3 hours in the refrigerator for added stability. **


  7. Now dip your biscuits in milk for about 10 seconds and place in your ring molds and pipe in your mango mousse and next add in your dipped biscuit and pipe in your cream mixture. 
  8. Similarly, complete the process until done.
  9. Top the dessert with cube-shaped mangoes.

Notes:
  • Use ripe Alphonso mangoes, for best results use strandless mangoes (mangoes that have thin strands inside)
  • For added stability use 10 gms ( 5 gms each for 1 cup of whipping cream) of powdered agar-agar/china grass or gelatin. (I do not like to use gelatin for normal use, as we consume them immediately).**
  • Use thin tea biscuits if possible, like ulker tea biscuits etc. (I only had digestive biscuits so used them).
  • I used dream whip as I had run out of whipping cream, use fresh whipping cream if possible, whipping cream gives better taste and results.*


Do try this recipe and don't forget to share your experience/feedback with me here in the comments or feel free to send me a mail. Also, do tag me at #taystedit if you try out my recipes on Facebook, Instagram etc so that I can see when you make it. ♡♡♡♡
Older Posts

Search This Blog

My name is Hasna Haneef, a mommy to a toddler, hailing from Thalassery, Kerala. Welcome to my humble abode on the Internet; wherein I share all my recipes and experiments. I am glad to have you on board!

TRENDING POSTS

  • Kerala Style Squid Roast
  • Chicken Steak with Creamy Mushroom Sauce
  • Emirati Chebab
  • Regag - Emirati Flat bread
  • Copy Cat Caesars Mini Pizza
  • Kerala Beef Fry/ Nadan beef dry fry

About Me

May peace be with you!

Welcome to my blog.

I am delighted to have you on board. My name is Hasna Haneef, a mommy to a toddler, hailing from Thalassery, Kerala. My homeplace being Dubai, as I am born and brought up here and I am very influenced by the lifestyle and the variety of authentic cuisines I get to try from here, which has made me try anything that comes across me
, click here →

Stay Connected!

Join Our Madness!

Join with Thousands Of Subscribers ! Get Our Latest Recipes Delivered to Your email Inbox!

Powered by follow.it
  • Home
  • About Me
  • Recipes

    • Main Course
    • Desserts
    • Snacks

    Uncategorized

    • Chicken
    • Meat
    • Vegetarian
    • Rice
    • Malabar Food
    • Baking
    • Breakfasts
    • Snacks
    • Drinks
    • Pasta
    • Fish
    • Soups
    • Desserts
  • Contact Me

Featured Post

Triple Chocolate Hazelnut Skillet Cookie

Blog Archive

  • ▼  2025 (4)
    • ▼  April (2)
      • 1 minute Chocolate Mug Cake
      • Grilled Cheese California Burrito
    • ►  March (1)
    • ►  February (1)
  • ►  2024 (36)
    • ►  October (4)
    • ►  September (5)
    • ►  July (1)
    • ►  June (2)
    • ►  May (4)
    • ►  April (3)
    • ►  March (10)
    • ►  January (7)
  • ►  2023 (47)
    • ►  December (3)
    • ►  September (2)
    • ►  August (6)
    • ►  July (6)
    • ►  June (9)
    • ►  May (4)
    • ►  April (5)
    • ►  March (6)
    • ►  February (3)
    • ►  January (3)
  • ►  2022 (69)
    • ►  November (4)
    • ►  October (6)
    • ►  September (7)
    • ►  August (9)
    • ►  July (12)
    • ►  June (5)
    • ►  May (5)
    • ►  April (12)
    • ►  March (4)
    • ►  February (2)
    • ►  January (3)
  • ►  2021 (24)
    • ►  November (1)
    • ►  October (2)
    • ►  July (1)
    • ►  June (4)
    • ►  May (6)
    • ►  April (4)
    • ►  February (4)
    • ►  January (2)
  • ►  2020 (82)
    • ►  December (5)
    • ►  November (6)
    • ►  October (4)
    • ►  September (2)
    • ►  August (5)
    • ►  July (10)
    • ►  June (10)
    • ►  May (13)
    • ►  April (12)
    • ►  March (8)
    • ►  February (4)
    • ►  January (3)
  • ►  2019 (22)
    • ►  December (1)
    • ►  November (2)
    • ►  October (6)
    • ►  September (1)
    • ►  August (1)
    • ►  February (3)
    • ►  January (8)
  • ►  2018 (15)
    • ►  December (4)
    • ►  November (6)
    • ►  October (3)
    • ►  September (2)

Subscribe Us

Labels

Bake Biscuits Breakfast Brown rice Burger Cheese Chocolate Dal Egg Emirati Fish Iftar Indonesian Japanese Jeerakashala rice Kerala Keto Kuwait food Lunch Milk Mutton Thai food UAE food afghan cuisine arabic beef biryani bread burnt cheesecake cake chicken cream dessert dinner greek healthy indo chinese lamb malabar prawns pudding puffs quick dinner ideas recipe refreshing drink rice salad sandwich stir fry vegetables vegetarian veggies yemeni

Contact Form


POPULAR POSTS AND PAGES

Kerala Style Squid Roast

Kerala Style Squid Roast

June 18, 2020
Chicken Steak with Creamy Mushroom Sauce

Chicken Steak with Creamy Mushroom Sauce

November 05, 2018
Emirati Chebab

Emirati Chebab

June 01, 2023
Regag - Emirati Flat bread

Regag - Emirati Flat bread

December 02, 2020
Copy Cat Caesars Mini Pizza

Copy Cat Caesars Mini Pizza

March 12, 2024

Pages

  • Home
  • About Me
  • Privacy Policy
  • Contact Me

Copywrite © 2023 TermsFeed®. All rights reserved.

Created By Sora Templates | Distributed By Gooyaabi Templates

Back to top