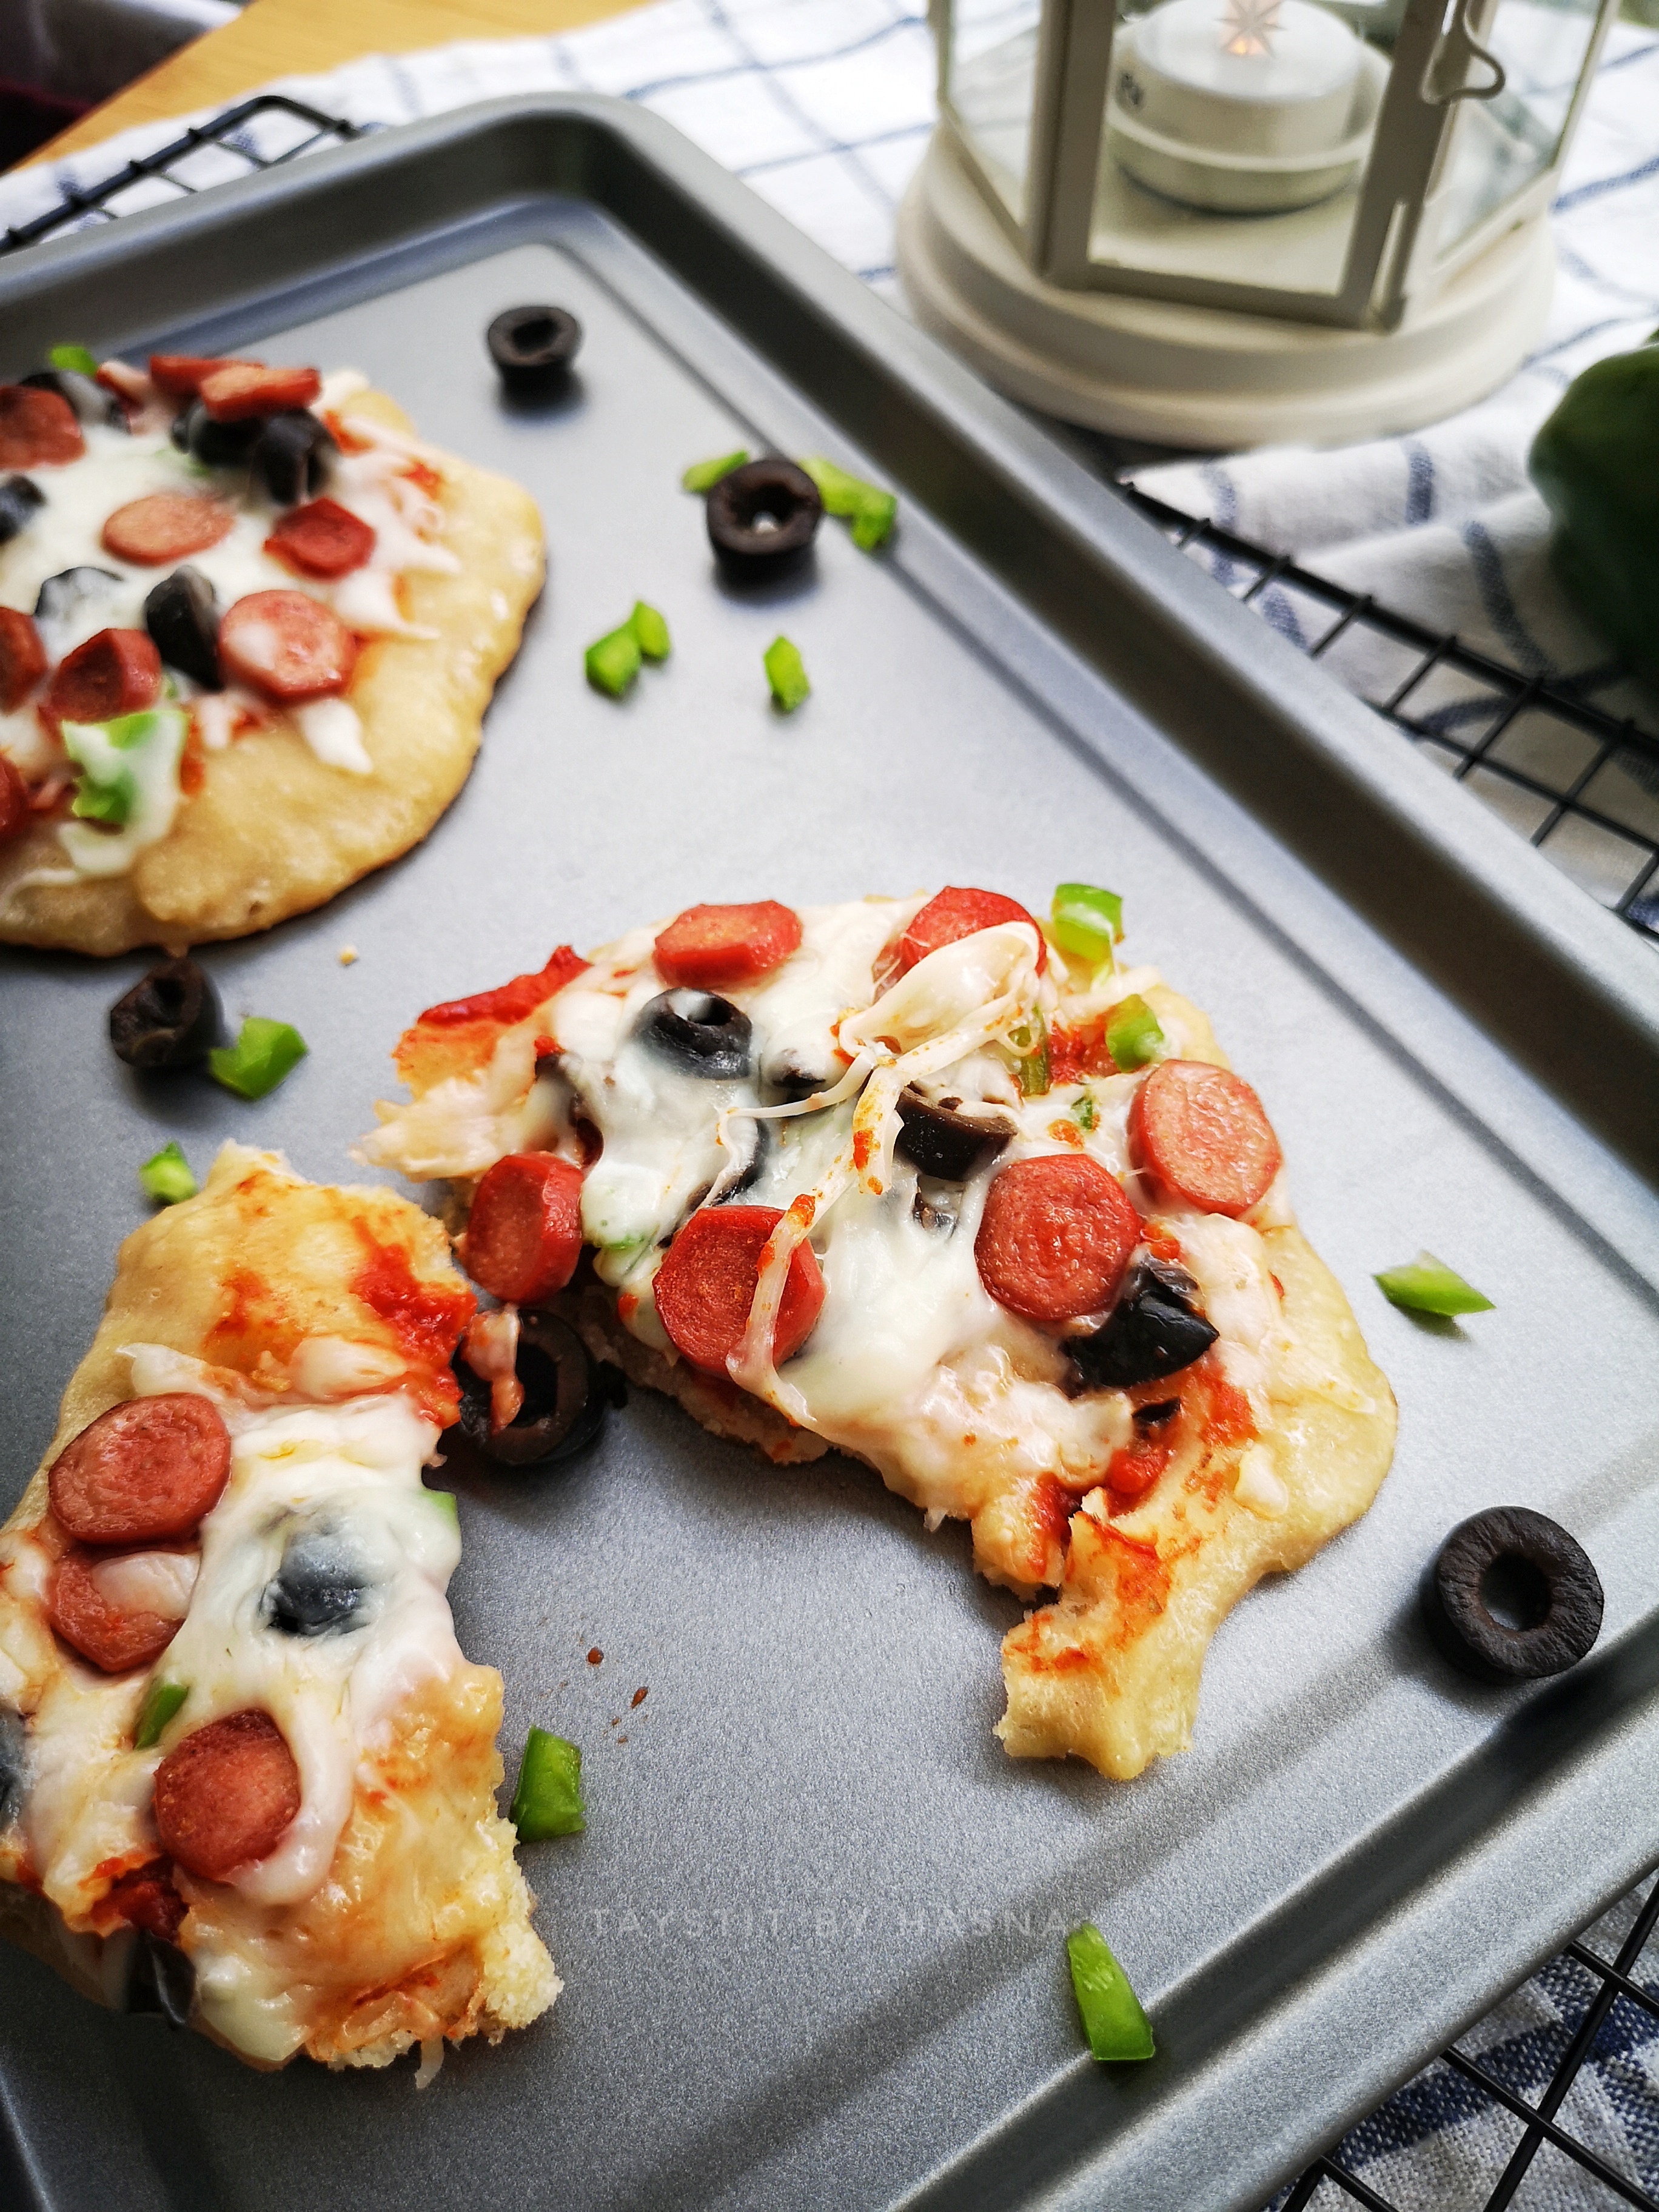
Search This Blog

Taystit by Hasna

Food, Recipes, and Beyond

  • Home
  • About Me
  • Recipes
    • Main Course
    • Snacks
    • Desserts
  • Uncategorized
    • Chicken
    • Meat
    • Vegetarian
    • Rice
    • Malabar Food
    • Baking
    • Breakfasts
    • Snacks
    • Fish
    • Pasta
    • Drinks
    • Soups
    • Desserts
  • Contact Me

Pizza Bombs


It’s not easy to impress little kids that are fasting. So this little pizza bomb is here to their rescue. Kids love pizza! And this has to be the perfect snack for the little ones to open their fast. 

The dough is made using the Caesar style pizza dough (recipe already in my blog) and stuffed with a saucy filling and mozzarella cheese.

If you make the dough ahead of time, it’s an easy snack to prepare. Without further a do, let’s get started!

Ingredients:

  • 150 gms Boneless Chicken 
  • 1 tsp White pepper 
  • 1 tsp Paprika powder/ Red Chilli powder 
  • 1/4 tsp Garlic powder
  • Salt
  • Olive oil- to shallow fry the chicken 
  • 1 tbsp Butter
  • 1 tbsp Flour
  • 1/4-1/2 cup Milk
  • 1/4 tsp Red Chilli Flakes
  • 1/4 tsp Oregano
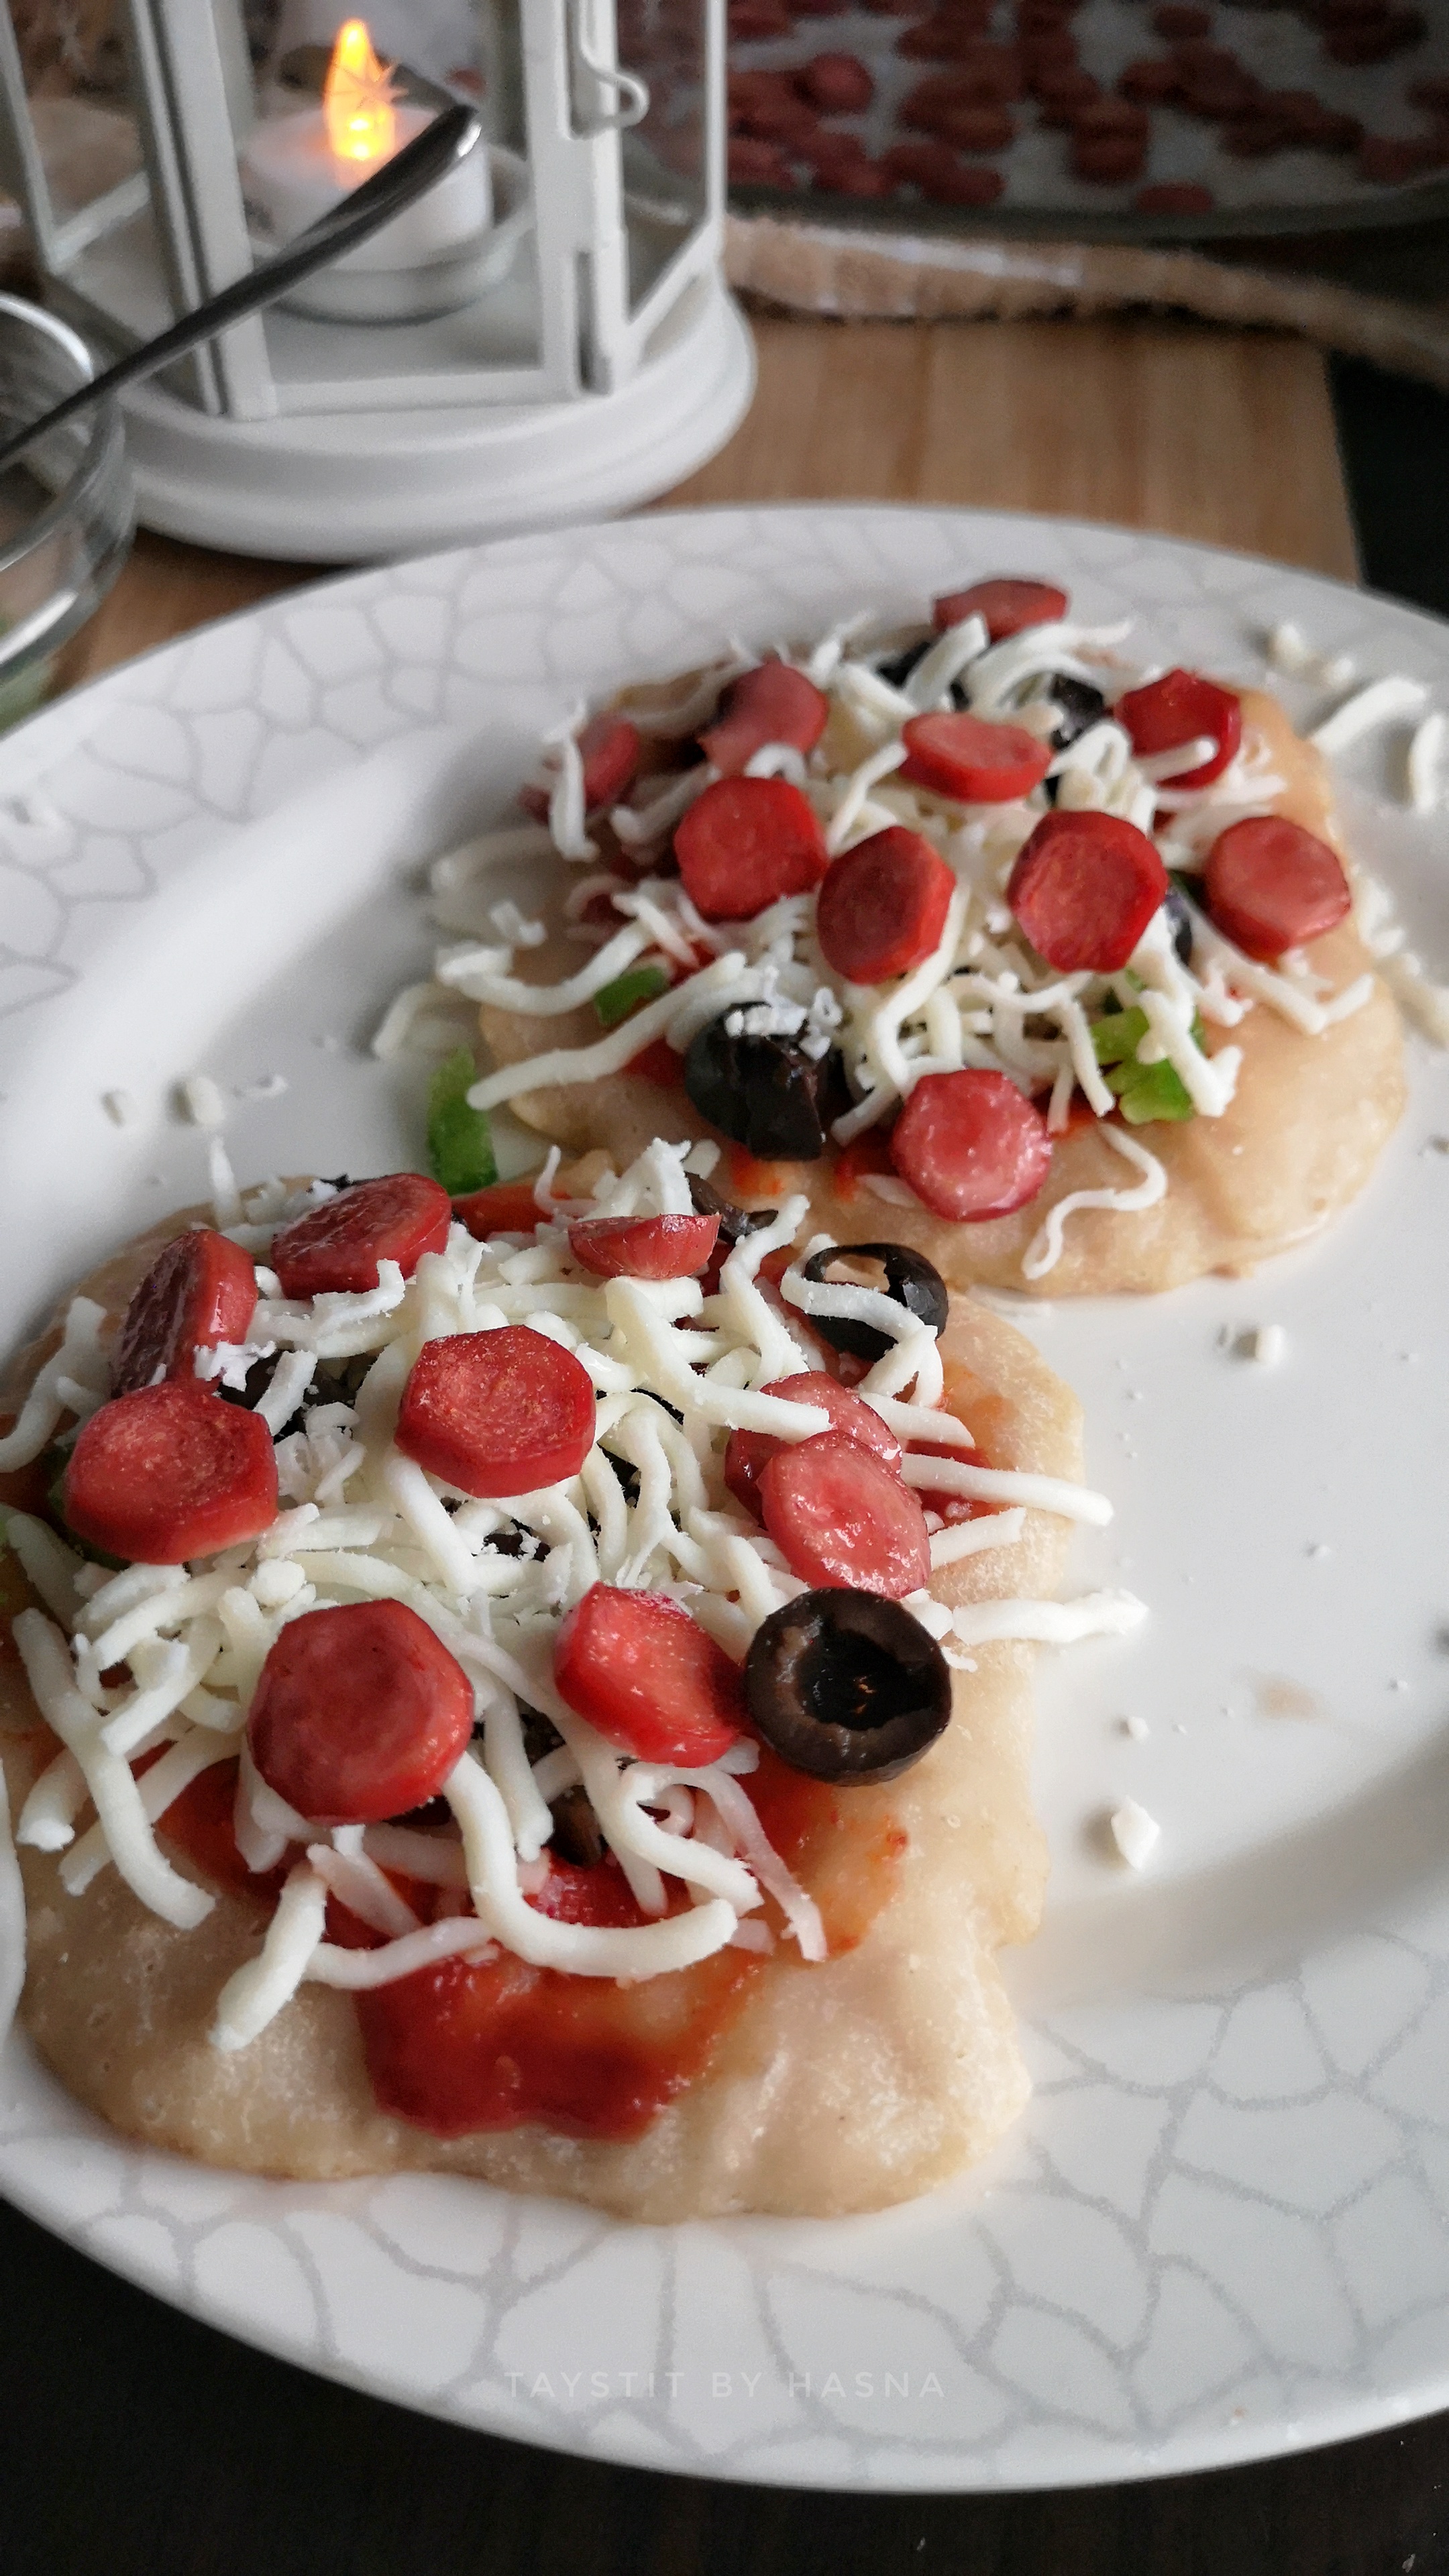
  • 1/4 cup Capsicum, chopped finely (optional)
  • 1 tbsp Black Olives, sliced (optional)
  • 2 tbsp Tomato Ketchup 
  • Mozzarella Cheese
  • Egg whites 
  • Bread Crumbs 
  • Vegetable Oil for frying

Instructions :

  1. Marinate the chicken pieces with white pepper, garlic powder, paprika powder and salt and shallow fry in olive oil no more than 5 minutes and set aside and chop with finely once cooled. 

  2. In to the same pan, add a butter slice, sauté the flour and switch off the flame and pour the milk little by little, whilst stirring constantly. 
  3. Into the bechamel/ white sauce, add your chilli flakes, Oregano, White pepper powder and salt. 
  4. Chop up the chicken pieces and add the chicken to the prepared sauce. 
  5. Next add in your capsicum, olives and tomato ketchup.
  6. Onto a clean counter top, place your risen dough and make small balls from it and flatten using a rolling pin and add in the thickened filling and Mozzarella Cheese and roll into balls and remove the excess dough if necessary.
  7. Finally dip and roll the ball in egg whites and coat in bread crumbs.


  8. Fry in a deep curved wok (to get the pizza bombs cooked thoroughly). - Make sure the flame is not too high or too low. 
  9. Enjoy with some ketchup! 

Do try this recipe and don't forget to share your experience/feedback with me here in the comments or feel free to send me a mail. Also, do tag me at #taystedit if you try out my recipes on Facebook, Instagram etc so that I can see when you make it. ♡♡♡♡

 Cheesy Chicken Drumsticks


Are you concerned about your intake of veggies during Ramadan? Well, it's a bit tricky to convince kids to eat veggies during Iftar. So I thought of making these cute little drumsticks (that look like chicken drumsticks but aren't haha), whose inspiration I got from some random reel I saw of Thalassery street snacks I saw as a forward. I immediately wanted to try my version.

So I came up with the idea of adding finely minced fibrous cauliflower to make the snack, you may totally skip this step if you dislike the flavor of cauliflower. These are a different version of Chicken Cutlet, where potato sticks acts as the bone of the drumstick. I also stuffed the drumstick with Mozzarella cheese cubes, that makes it extra delicious, especially for the kids. The original Thalassery: Malabar Snack actually includes covering the drumstick shaped cutlets with a sheet of flour (which I omitted as I didnt want to complicate it any further :D)

Enjoy this yummy snack hot with a cup of chai! Without further a do, let's check the ingredients !

Ingredients :

  • 2 medium sized potatoes, cubed, boiled with salt and mashed
  • 1 Potato (sliced to make sticks)/ Frozen French fries
  • 200 gms Boneless Chicken, boiled with salt, pepper and Turmeric powder
  • Few florets of Cauliflower, chopped finely
  • 1/2 Onion, minced
  • 2 Garlic, small, minced
  • 1 very small piece Ginger, minced
  • Green chillies (optional)
  • 1/4 tsp Turmeric Powder
  • 1/2 tsp Kashmir Chilli powder
  • 1 tsp Ghee/ clarified butter
  • 1/4 tsp Garam masala
  • Mozzarella Cheese, cubes/ shredded

Coating:

  • Egg, whisked with salt and pepper
  • Bread crumbs+Oats+Corn flakes *

Instructions:

  1. In a pan pour some oil and add in the finely chopped/ minced Onion, ginger garlic and saute until translucent and aromatic.
  2. Next add in the finely chopped Cauliflower and add salt as required.
  3. Next add in the shredded chicken and the spices mentioned above.
  4. Finish off with ghee and garam masala.
  5. Add in the Mashed potatoes and combine well.

  6. Sprinkle salt on the potato sticks.
  7. Once the potato chicken mix has slightly cooled, make small balls out of it, using your index finger , make a small dent and add the small cheese cube and make a ball.
  8. Next push in a potato stick and press well to form a shape of drumstick.

  9. Next, coat the drumsticks in the egg wash and coat in the bread crumbs mix.


  10. Fry on high, until golden (be careful not to burn them).

  11. Enjoy warm (for the cheesy texture) with a hot cup of chai!


Notes:

*You may simply use bread crumbs only.
These are freezer friendly, you can make ahead and store them too! 
* I have used potato sticks as I ran out of frozen French fries.

Do try this recipe and don't forget to share your experience/feedback with me here in the comments or feel free to send me a mail. Also, do tag me at #taystedit if you try out my recipes on Facebook, Instagram etc so that I can see when you make it. ♡♡♡♡

 Pizza Rolls Bake 


It's not easy to please kids with snacks that they can devour when they open their fast. Well, you can be sure, they are going to love this one! With some basic ingredients available at home, you can win the hearts of your little ones! I did win my picky eater girl's heart! :D

The pizza rolls are made usimg bread slices, that are moistened and rolled to flatten to which the prepared pizza sauce is spread, onto that, add Mozzarella cheese, chopped veggies and the fried chicken pieces. These rolls are so yum! I feel like making them again already! (especially because it's so easy to prepare, hehe) Slice the rolls and place them on a baking tray, so read the remaining sauce, and sprinkle Mozzarella cheese and bake until the cheese melts. Soo good I must say!

Let's get the ingredients :

Ingredients:

  • 6-7 Bread slices 
  • 150 grams Boneless Chicken, sliced
  • 1/2 tsp Garlic paste
  • 1 tsp Kashmiri Chilli powder 
  • 1/4 tsp Pepper powder
  • Salt, as required 
  • 1/2 Onion, chopped 
  • 1/2 Capsicum, chopped
  • 4-5 tbsp Tomato Ketchup
  • 1 tsp Tomato paste
  • Freshly minced garlic, a pinch
  • 1/4 tsp Oregano
  • 3-4 tbsp Black Olives, sliced
  • Mozzarella Cheese
  • Red Chilli flakes, a pinch (optional)
  • 2 tbsp Butter 
  • 1/2 tsp garlic, freshly minced
  • Salt

Instructions:

  1. Marinate the sliced chicken with Kashmiri Chilli powder, garlic paste, black pepper powder and salt.
  2. Fry the chicken pieces in vegetable oil and set aside.

  3. To make the pizza sauce, to a small bowl, add the tomato ketchup, tomato paste, oregano, minced garlic (only a pinch, as the garlic can over power)
  4. Next, trim the sides of the bread slices. 
  5. Moisten the bread with fingertips, and flatten using a roller.

  6. Spread the pizza sauce over the bread, sprinkle mozzarella cheese, add the chopped onion and capsicum, and top up with sliced black olives. Place 2-3 pieces of the fried chicken pieces and roll them. At the end of the bread,dampen with water and press the roll to the end and seal it.
  7. Cut the roll into half and place both the roll on a small baking dish, cut side facing up. Similarly do rest of the bread slices and fill the baking dish.

  8. Finally, mix softened butter with minced garlic and salt and apply over the rolls and spread the remaining pizza sauce over the rolls and add leftover chicken pieces and chopped veggies.
  9. Now sprinkle mozzarella cheese generously, and sprinkle little red Chilli flakes (avoid if children can’t stand spice)
  10. Bake/ microwave until the cheese melts and serve warm! 


Do try this recipe and don't forget to share your experience/feedback with me here in the comments or feel free to send me a mail. Also, do tag me at #taystedit if you try out my recipes on Facebook, Instagram etc so that I can see when you make it. ♡♡♡♡

Cheesy Chatti Chicken


Oil free snacks call for dishes like these that are delicious yet very simple to prepare. Chatti Chicken basically involves an oven baked/ fried layer of potato which is then layered with a layer of minced chicken masala, which is finally smothered with bechamel sauce. Garnished with any type of cheese of your choice, which is then broiled and topped off with some chili flakes.

These are perfect for ramadan, hassle free and loved by everyone. Let me tell you when I made this here at home, everything was wiped clean, it was a big hit! So you can imagine. I happened to see almost a similar recipe online which was in Spanish, I assume. And they seemed to have prepared in an earthen pot too. I have always seen this street food that we get in a Chatti that I am yet to try. So with my own ideas I came up with Chatti Chicken, where Chatti means Earthern pot. If you do not have an Earthern pot, do not fret. You may prepare the same in a pan or any vessel available. The Chatti helps to retain heat, which in turn helps to bring the flavors together.


The aroma that comes while the Chatti chicken is placed in the oven is commendable! The Bechamel sauce bubbling with the cheese melting and drooping.. Ah! What a sight! To my surperise, I loved it too. Let's get to the recipe!

Ingredients :

  • 2 Potatoes, chopped
  • 2 Garlic Cloves
  • 1 Medium Onion, chopped finely
  • 1/4 tsp Red Chilli Flaked
  • 1/4 tsp Freshly Crushed Pepper Powder
  • 1 1/2 tsp Kashmiri Red Chilli Powder
  • 1 tbsp Butter
  • 2 tbsp All Purpose Flour
  • 1 cup Milk
  • 1 tsp Paprika Powder / Red Chilli Powder
  • 2 tbsp Olive oil
  • 1 tbsp Butter
  • Salt as required
  • Cheese Slice
  • Mozzarella cheese

Instructions :

  1. Parboil your potatoes that has been chopped into cubes, in water with some salt. Drain and set aside.

  2. In a food processor / grinder, drop in the chicken breast pieces with roughly chopped garlic clove, red chilli flakes, black pepper powder, and red chilli powder, mince coarsely and set aside. 
  3. In a pan, make a roux by dropping a knob of butter and add in the flour and mix well while keeping the flame on low.
  4. Next, pour the milk gradually and mix without lumps, allowing the roux to thicken slowly, your bechamel sauce is ready, set aside.
  5. Now, in a baking pan, place baking paper and drop in the parboiled potatoes and add in the minced garlic, paprika/ red chilli powder, salt, and drizzle olive oil and allow to roast for 5-8 minutes at 180°C.*

  6. In a pan, drop in butter, chopped onions, salt as required and minced chicken mix.
  7. Now take an earthern pot/ Chatti and assemble the prepared layers.
  8. In the Chatti, pour a ladleful of bechamel sauce. 

  9. Next add in your roasted potatoes, the chicken mince masala layer and generously pour the bechamel sauce. **
  10. Next add in the cheese slice and top with Mozzarella Cheese and broil the chatti in the oven until cheese melts and flavors come together. 
  11. Your Cheesy Chatti Chicken is ready to devour! 🤤🤤


Notes:

  • * You may deep fry the potatoes too.
  • ** You may repeat the layerimg process.
  • I did not add salt in my bechamel sauce as all other layers had enough salt in it.
  • You may prepare the same in a pan, if you do not have a chatti/ earthen pot. Just place lid and put on simmer in the final stage to allow the cheese to melt
  • Do not place your Eathern pot in a preheated oven, only broil the Chatti for the cheese to melt. You may alternatively simply place the Chatti on the gas stove, place a lid and put on simmer until cheese melts (around 5 minutes). 

Do try this recipe and don't forget to share your experience/feedback with me here in the comments or feel free to send me a mail. Also, do tag me at #taystedit if you try out my recipes on Facebook, Instagram etc so that I can see when you make it. ♡♡♡♡

Pepperoni Pizza Pancakes


I am all in for easy recipes especially for iftar and if it is oil free and healthy double points! 😍 😍

I made a batter that can be used as a pizza base and requires no oven.. Pizza made on a pan with a simple batter. To make it healthy I have used half wheat flour and half of all Purpose Flour* and just a tbsp of olive oil. 

For toppings you may use any pizza sauce/bbq/ ranch sauce. I just used a basic pizza sauce here, that I demonstrate in the video/ recipe. I wanted to make mini pepperoni Pizza. But since the real pepperonis were too big for these mini pizza pancakes, I dehydrated my sliced sausage in the oven, for that crispy pepperoni look. Pepperonis are basically sausages with pepper. You may add pepper prior to baking if you like. 


This pancake pizza was such a hit! I was so happy to see the happy faces. The batter shouldn't be too thick not too thin, just make sure to prepare a batter with no lumps. The dry ingredients are gradually added one tbsp at a time to the wet ingredients. This batter method is easy during iftar preps so that you don't end up with messy hands, which happens while making the real pizza. 

You may use onions and other toppings as per your taste. Pizza is something that adults and kids unanimously love, so it is definitely going to be a hit on your iftar table and healthy and oil free too. 


Ingredients :

  • 7-8 Chicken Sausages / Franks
  • 1 Cup All Purpose Flour 
  • 1 Cup Whole wheat flour
  • 1 egg
  • 1 cup warm milk
  • 1/2 cup warm water
  • 1 tbsp melted butter 
  • 1 tsp baking powder 
  • 1 tsp instant yeast 
  • 3 tsp Sugar
  • Salt as required 
  • 1/4 cup Chopped Capsicum 
  • 1/4 cup Black Olives, sliced
  • 1 cup Shredded Mozzarella 

Tomato Sauce Base:

  • 3 tbsp Tomato paste
  • 2 tbsp Tomato Ketchup 
  • 1/4 tsp Oregano 
  • 1/2 of a Garlic clove, minced
  • 3 tbsp Water 
  • Salt, as required 

Instructions :

  1. To prepare your Pizza Sauce, in a bowl, add tomato paste, tomato ketchup, Oregano, minced garlic clove, salt and water, mix well. 
  2. Slice your sausages thin and place on your baking tray lined with baking paper, sprsy some oil and bake for around 10 minutes or until almost crisp. *

  3. In a bowl prepare your dry ingredients, ie, all Purpose Flour, whole wheat flour, baking powder, instant yeast, sugar and salt and mix well with a dry whisk and set aside. 
  4. In another bowl, pour your lukewarm milk, lukewarm water, melted butter, egg and mix well. 
  5. Slowly and gradually add in your dry ingredients to your wet ingredients bowl, 1 tbsp at a time, so that no lumps form. 
  6. Mix well and make sure there are no lumps. 
  7. In a pan, greased with some olive oil/ butter pour your batter and cook covered for 3-4 minutes on low. 
  8. Open the lid and spread your pizza sauce, add in your toppings, here I have used finely chopped Capsicum and sliced black Olives, Shredded Mozzarella and Pepperoni (prepared earlier).

  9. Cover and cook until cheese melts. 
  10. Your no Bake, 20 minute Pepperoni Pizza Pancakes are ready! 😋😋🍕

Notes:

  • *You may add pepper powder on your sausage prior to baking. 
  • You may also shallow fry the sliced sausages if you do not have an oven. 
  • You may use only all Purpose Flour for better texture and results. But since it's for iftar, I wouldn't want to have it that way.
  • For easier pouring of pizza batter, to get perfect rounds, you may use a small pan for it, in which you will to pour one pizza base at a time. 
  • You may use toppings like cooked chicken, Mushroom, sliced onions etc. 


Do try this recipe and don't forget to share your experience/feedback with me here in the comments or feel free to send me a mail. Also, do tag me at #taystedit if you try out my recipes on Facebook, Instagram etc so that I can see when you make it. ♡♡♡♡

Cheesy Murtabak with Chilli Mayo dip


Day 7 of Ramadan already? Where did the first 6 go? Jokes apart, time is ticking away and we need to utilize our valuable time to the maximum for Ibadah etc. Keep your tongue moist with zikr and adhkars. Also doing your chores, cooking food and being of some help to the family are also considered Ibadah and rewarded in the holy month. Just don't be extreme. Moderation is the key.

I have been asked to share oil free iftar dishes and I have come up with Cheesy Murtabak in my style. It is also called Muthabaq. Oh boy is it yummm?! 

Murtabak or mutabbaq is a stuffed Paratha with your favorite fillings like spicy minced meat and for that extra cheesiness I have added a ton load of cheese 🤪 (you know you can never go wrong with cheese). The classic, Saudi style matabak consists of green onions and leeks. But I kept it very simple. Just eggs and cheese with the spicy minced meat. And instead of adding in chopped onion, I have simply substituted by adding in some onion powder. 


It is a street food specialty especially seen in Saudi, Kuwait, Malaysia etc. Mini pockets  of these non fried Paratha are the best snack for iftar, coz these use little to no oil.
Now I won't call it healthy but definitely a step towards healthy eating for iftar. These little pockets are so delicious and filling. The chilli Mayo dip adds on to its yumminess, and a karak chai! Aaaaah, definition of bliss... Sooo soooo good. I cannot stress enough!

Here I have used meat mince, you may use chicken Mince also if you like, but traditionally mince meat is used for Murtabak. 

Let's get on to the ingredients to prepare this easy and delicious iftar dish. 


Ingredients :

Dough:

  • 1 cup all purpose flour
  • 1 tsp oil
  • 1/2 cup water 
  • Salt, as required 

Filling :

  • 300 grams minced meat
  • 3 small green chillies, chopped
  • 1 tsp Onion powder
  • 1 tsp Garlic paste
  • 1/2 tsp red Chilli flakes
  • 1/2 tsp Black Pepper po]]] wder
  • 1 tsp Cumin powder
  • 2 tsp paprika powder*
  • 1/2 of a tomato* (chopped fine) 
  • 3 tbsp Cream cheese 
  • 1/2 cup Mozzarella
  • 2 eggs
  • Salt, as required 

Instructions :

  1. Mix all the ingredients under dough by adding water little at a time, the dough should not be sticky, yet soft. Pour some oil over the dough ball, cover with a plastic wrap and to set for around 1 hour. 
  2. In a cast iron pan or any heavy bottom pan, pour a dash of olive oil add in your minced meat with a pinch of salt and break the minced meat using a wooden spoon.
  3. Once the color of the minced meat changes from red to brown, add in your garlic paste.
  4. Allow to cook for a couple of minutes, at this stage it is normal to see a lot of water ooze out of the meat.
  5. Next add in your chopped green chillies and sauté.
  6. Now add in your spices like onion powder, paprika powder, red chilli flakes, pepper powder, and cumin powder.  


  7. Allow your filling to cool, whilst at that in a bowl Crack 2 eggs, Mozzarella cheese and the cream cheese. 


  8. Next dump in all the contents of the filling to the bowl with eggs and cheese. 


  9. Add a tad bit of salt if required. 
  10. Make lemon sized small balls out if the dough. 
  11. Pour some oil in your Countertop and press and spread using your fingers and a rolling pin until it is very thin and see through. 
  12. Add 2 tbsp of the prepared filling and fold overlapping inner sides and outer sides. 

  13. Place the murtabaq on a pan with med high heat pan, seam side down, flip and cook 2 minutes each side or  until a sizzle starts coming, this indicates that the murtabaq is done. Using thongs, cook the sides of the murtabaq too (which only takes seconds). 
  14. Serve with your choice of sauce/dip or serve it just like that right away! *


Note:

  • You may substitute paprika with Kashmiri Red Chilli powder if you cannot find paprika.
  • You may use more tomato if you like. Or you may also add it after the meat cooking process.
  • I made a chilli Mayo dip, prepared by mixing hot sauce, Mayo and garlic powder. 

Do try this recipe and don't forget to share your experience/feedback with me here in the comments or feel free to send me a mail. Also, do tag me at #taystedit if you try out my recipes on Facebook, Instagram etc so that I can see when you make it. ♡♡♡♡

Tamale Pie


As weird as Tamale may sound, I weirdly loved the name given to this dish. Tamale Pie is a comfort food that originates from US in the early 1900. Though it has its origin from US, the flavors are totally Mexican inspired. 

It is said that the original recipe of Tamale takes hours of labor and due to the time consuming process, the authentic recipe isn't followed as much. After hours of researching I understood that Tamale isn't actually a pie, it is more like a casserole; never mind the name. This corn bread casserole is super easy to prepare, more like a shepherd's pie, corn version.

Interesting yea?!

Well, I wasn't quite aware of this dish, until lately when I happened to read about Tamale Pie… I wanted to try it right away! Usually, the dish is prepared using any red meat or minced chicken, or  can be done using only veggies. This dish makes a great veg/keto dish too if made slight variations in the ingredients.

Generally, the pie has its corn crust as the top layer, but I wanted to try it with a twist and made the corn layer as the base. Even though I love Mexican flavors, I don't usually stock up on Mexican ingredients so for the base, I used Masa Harina/cornmeal crust; flour made using dried corn kernels, and I had some cauliflower in the fridge waiting to be used. So I immediately blitzed the cauliflower and used it along with the base. Though I was quite unsure if the base would become soggy, I took the wrong road without the seatbelt. And oh boy was it a success! Alhamdulilah!

Also I made my own red enchilada sauce too from scratch! I am so happy that this dish turned out exactly like the comfort food I had in mind. I had to share the recipe today itself, before I forget how I prepared it!

The best part is that, if you prepare this dish, you will always have an additional casserole to save, which calls for a meal that is ready to it! For the cheesy layer I only used mozzarella cheese. You may use a combination of Monterey jack. cheddar cheese, mozzarella etc.

This recipe is definitely a keeper! Without further a-do lets gets started!

Ingredients:


Corn Base:

  • 1 cup Cornmeal/ Masa Harina
  • 1/2 cup Blitzed Cauliflower (optional)
  • 1/4 cup All Purpose Flour
  • A pinch of sugar
  • 1/2 cup canned creamed corn or corn niblets
  • 1 tbsp butter, room temperature
  • 1/4 cup heavy cream
  • 1 large egg
  • Salt as required.

Red Enchilada Sauce:

  • 3 tbsp vegetable oil 
  • 2 tbsp all purpose flour
  • 3 tbsp red chilly powder
  • 1 tsp cumin powder
  • 1/4 tsp dried oregano
  • 1 cup low-sodium beef broth
  • 1 Large Tomato, blended**/ 1 store bought canned tomato sauce
  • 1 clove garlic, minced/ 1 tsp garlic powder
  • Salt, as required

Meat Filling:

  • 250 gms ground beef
  • 1 Onion, chopped
  • 2 Garlic Cloves, minced
  • 2 tsp Red Chilli Powder
  • 1 tsp Cumin Powder
  • Freshly Ground Pepper
  • Salt, as required
  • 1 cup Mozarella*
  • Sliced Pickled Jalapenos, for garnish
  • Finely chopped Tomatoes, for garnish (without the inner core)

Instructions:

  1. Prepare your enchilada sauce, by stiring your oil, flour, chilli powder, cumin powder and oregano in a sauce pan on sim and allow to bubble.


  2. Add in your beef broth, tomato sauce, garlic and salt as required.
  3. Allow to simmer for 5-10 minutes, stir occasionally. Set aside, allow to cool.
  4. Preheat oven to 210 deg C. Grease a large casserole dish with butter or cooking spray.
  5. In a large bowl, mix all the ingredients under corn base. Now, into the prepared casserole dish, transfer the corn base and bake for around 15-20 minutes, or until golden. Allow to cool.

  6. In a skillet, over pour olive oil and sauté your chopped onions and minced garlic , once fragrant add in your seasonings like chilly powder, cumin powder, salt and pepper. Now add in your ground beef, break the meat using your wooden spoon, for around 6-7 minutes, until no pink color in visible. Drain the residual fat, that oozes out.


  7. Once your corn base has cooled, poke in using a fork and pour in your prepared enchilada sauce.


  8. Add your prepared beef and top with cheese.

  9. Cover with foil and bake for around 15-20 minutes. Allow to broil after removing the foil, so that cheese turns golden, for around 5 minutes.
  10. Your delicious Tamale Pie is ready to serve. Garnish with chopped tomatoes and sliced pickled jalapenos and a dollop of sour cream if you have or a sprinkle of chopped parsley will do. 


Note:

Other recipes calls for baking powder, I did not use here.
*You may use a combination of Monterey jack. cheddar cheese, mozzarella etc.
**If using fresh tomatoes, use a dash of Tomato ketchup to balance the tanginess.
The above recipe I divided into two medium casserole dishes so that I could use the other one later.


Do try this recipe and don't forget to share your experience/feedback with me here in the comments or feel free to send me a mail. Also, do tag me at #taystedit if you try out my recipes on Facebook, Instagram etc so that I can see when you make it. ♡♡♡♡

Dynamite Tortilla Wraps


Good evening folks!

When breakfast can be made scrumptious in a jiffy, why skip breakfasts. A wholesome breakfast is what is required to boost your energy levels to be productive the entire day.

Just in time, few days back, a brand named 'Kawan' approached me. They sent me their sample products which included just heat chappathis, Paratha, protein Paratha, tortillas, Puff pastry etc. Their Tortillas fascinated me, coz I haven't seen frozen tortillas before.

The idea of having Tortilla wraps for breakfast is my favorite, as they are simple to prepare right in the morning, when you have less time but you need to eat like a king. These tortilla wraps are super easy to make. The fillings can be customized, but here I demonstrate using Mexican flavors. And being a lover of any food spicy, I added. A packet of crushed Oman chips which added to the flavor and texture. You may play around with the fillings as you like. You may also use leftover chicken.

The sauce that is used in this recipe plays a major role in bringing out the flavors of this wrap. I use Mayo, tomato ketchup, tobasco, Sriracha and smoked paprika and a squeeze of lemon juice. Basically a DYNAMITE Tortilla wrap. My initial thoughts were to experiment something with authentic Mexican flavors. So here I combined it with everyone's favorite Dynamite sauce.

It is so filling and the flavors are just next level. 🔥 The Crunch from the Oman chips is the Icing on the cake. This is completely an experimental Tortilla wrap that turned out super yum! Not to forget to mention the Kawan Tortilla wraps were super soft, even after toasting on the pan, which gave a Crispy texture outside though super soft inside. This cheesy Tortilla wraps with a fiery sauce is just too good. Do try and let me know your feedback..

Ingredients :
  • Frozen Kawan Tortilla Wraps
  • 2 Omega eggs
  • 1 tbsp finely chopped onion
  • 1 tbsp finely chopped capsicum
  • 1 tsp smoked paprika powder
  • Salt as required
  • 1 tbsp olive oil
  • 2 tbsp Corn niblets
  • 1 tbsp Sliced Black Olives 
  • 1 tsp Chopped Jalapeños 
  • Handful of Shredded Mozzarella Cheese
  • 1 packet Oman Chips
  • Chopped Coriander leaves. 

Dynamite sauce:
  • 2 - 3 tbsp Mayonaise
  • 2 tsp Tomato Ketchup
  • 2 tsp Sriracha sauce/ hot sauce
  • 1 tsp Tobasco sauce
  • A squeeze of lemon juice
  • 1/2 tsp Black Pepper Powder
  • 1 tsp Smoked Paprika


Instructions :
  1. In a bowl, prepare the sauce by mixing the ingredients mentioned below Dynamite sauce and set aside. 
  2. Make an Omlette using chopped onions, capsicum, smoked paprika powder, and salt as required.
  3. Place 1 Kawan Tortilla wrap right away and allow the Omlette to cook for around 2 minutes.
  4. Now flip, and add in your defrosted corn niblets, sliced black olives, chopped jalapeños, shredded Mozzarella cheese, slightly crushed Oman chips and drizzle in your prepared sauce and finally garnish with chopped Coriander leaves.
  5. Now carefully, roll the Tortilla wrap from one side to the other and press down so that the melted cheese allows the wrap to bind together.
  6. Trasfer to a serving plate.
  7. Cut into half and serve hot alongside your favorite sauce or the Dynamite sauce.


Notes:
You may use leftover shredded chicken


Do try this recipe and don't forget to share your experience/feedback with me here in the comments or feel free to send me a mail. Also, do tag me at #taystedit if you try out my recipes on Facebook, Instagram etc so that I can see when you make it. ♡♡♡♡
Older Posts

Search This Blog

My name is Hasna Haneef, a mommy to a toddler, hailing from Thalassery, Kerala. Welcome to my humble abode on the Internet; wherein I share all my recipes and experiments. I am glad to have you on board!

TRENDING POSTS

  • Kerala Style Squid Roast
  • Chicken Steak with Creamy Mushroom Sauce
  • Emirati Chebab
  • Regag - Emirati Flat bread
  • Copy Cat Caesars Mini Pizza
  • Kerala Beef Fry/ Nadan beef dry fry

About Me

May peace be with you!

Welcome to my blog.

I am delighted to have you on board. My name is Hasna Haneef, a mommy to a toddler, hailing from Thalassery, Kerala. My homeplace being Dubai, as I am born and brought up here and I am very influenced by the lifestyle and the variety of authentic cuisines I get to try from here, which has made me try anything that comes across me
, click here →

Stay Connected!

Join Our Madness!

Join with Thousands Of Subscribers ! Get Our Latest Recipes Delivered to Your email Inbox!

Powered by follow.it
  • Home
  • About Me
  • Recipes

    • Main Course
    • Desserts
    • Snacks

    Uncategorized

    • Chicken
    • Meat
    • Vegetarian
    • Rice
    • Malabar Food
    • Baking
    • Breakfasts
    • Snacks
    • Drinks
    • Pasta
    • Fish
    • Soups
    • Desserts
  • Contact Me

Featured Post

Triple Chocolate Hazelnut Skillet Cookie

Blog Archive

  • ▼  2025 (4)
    • ▼  April (2)
      • 1 minute Chocolate Mug Cake
      • Grilled Cheese California Burrito
    • ►  March (1)
    • ►  February (1)
  • ►  2024 (36)
    • ►  October (4)
    • ►  September (5)
    • ►  July (1)
    • ►  June (2)
    • ►  May (4)
    • ►  April (3)
    • ►  March (10)
    • ►  January (7)
  • ►  2023 (47)
    • ►  December (3)
    • ►  September (2)
    • ►  August (6)
    • ►  July (6)
    • ►  June (9)
    • ►  May (4)
    • ►  April (5)
    • ►  March (6)
    • ►  February (3)
    • ►  January (3)
  • ►  2022 (69)
    • ►  November (4)
    • ►  October (6)
    • ►  September (7)
    • ►  August (9)
    • ►  July (12)
    • ►  June (5)
    • ►  May (5)
    • ►  April (12)
    • ►  March (4)
    • ►  February (2)
    • ►  January (3)
  • ►  2021 (24)
    • ►  November (1)
    • ►  October (2)
    • ►  July (1)
    • ►  June (4)
    • ►  May (6)
    • ►  April (4)
    • ►  February (4)
    • ►  January (2)
  • ►  2020 (82)
    • ►  December (5)
    • ►  November (6)
    • ►  October (4)
    • ►  September (2)
    • ►  August (5)
    • ►  July (10)
    • ►  June (10)
    • ►  May (13)
    • ►  April (12)
    • ►  March (8)
    • ►  February (4)
    • ►  January (3)
  • ►  2019 (22)
    • ►  December (1)
    • ►  November (2)
    • ►  October (6)
    • ►  September (1)
    • ►  August (1)
    • ►  February (3)
    • ►  January (8)
  • ►  2018 (15)
    • ►  December (4)
    • ►  November (6)
    • ►  October (3)
    • ►  September (2)

Subscribe Us

Labels

Bake Biscuits Breakfast Brown rice Burger Cheese Chocolate Dal Egg Emirati Fish Iftar Indonesian Japanese Jeerakashala rice Kerala Keto Kuwait food Lunch Milk Mutton Thai food UAE food afghan cuisine arabic beef biryani bread burnt cheesecake cake chicken cream dessert dinner greek healthy indo chinese lamb malabar prawns pudding puffs quick dinner ideas recipe refreshing drink rice salad sandwich stir fry vegetables vegetarian veggies yemeni

Contact Form


POPULAR POSTS AND PAGES

Kerala Style Squid Roast

Kerala Style Squid Roast

June 18, 2020
Chicken Steak with Creamy Mushroom Sauce

Chicken Steak with Creamy Mushroom Sauce

November 05, 2018
Emirati Chebab

Emirati Chebab

June 01, 2023
Regag - Emirati Flat bread

Regag - Emirati Flat bread

December 02, 2020
Copy Cat Caesars Mini Pizza

Copy Cat Caesars Mini Pizza

March 12, 2024

Pages

  • Home
  • About Me
  • Privacy Policy
  • Contact Me

Copywrite © 2023 TermsFeed®. All rights reserved.

Created By Sora Templates | Distributed By Gooyaabi Templates

Back to top