Search This Blog

Taystit by Hasna

Food, Recipes, and Beyond

  • Home
  • About Me
  • Recipes
    • Main Course
    • Snacks
    • Desserts
  • Uncategorized
    • Chicken
    • Meat
    • Vegetarian
    • Rice
    • Malabar Food
    • Baking
    • Breakfasts
    • Snacks
    • Fish
    • Pasta
    • Drinks
    • Soups
    • Desserts
  • Contact Me

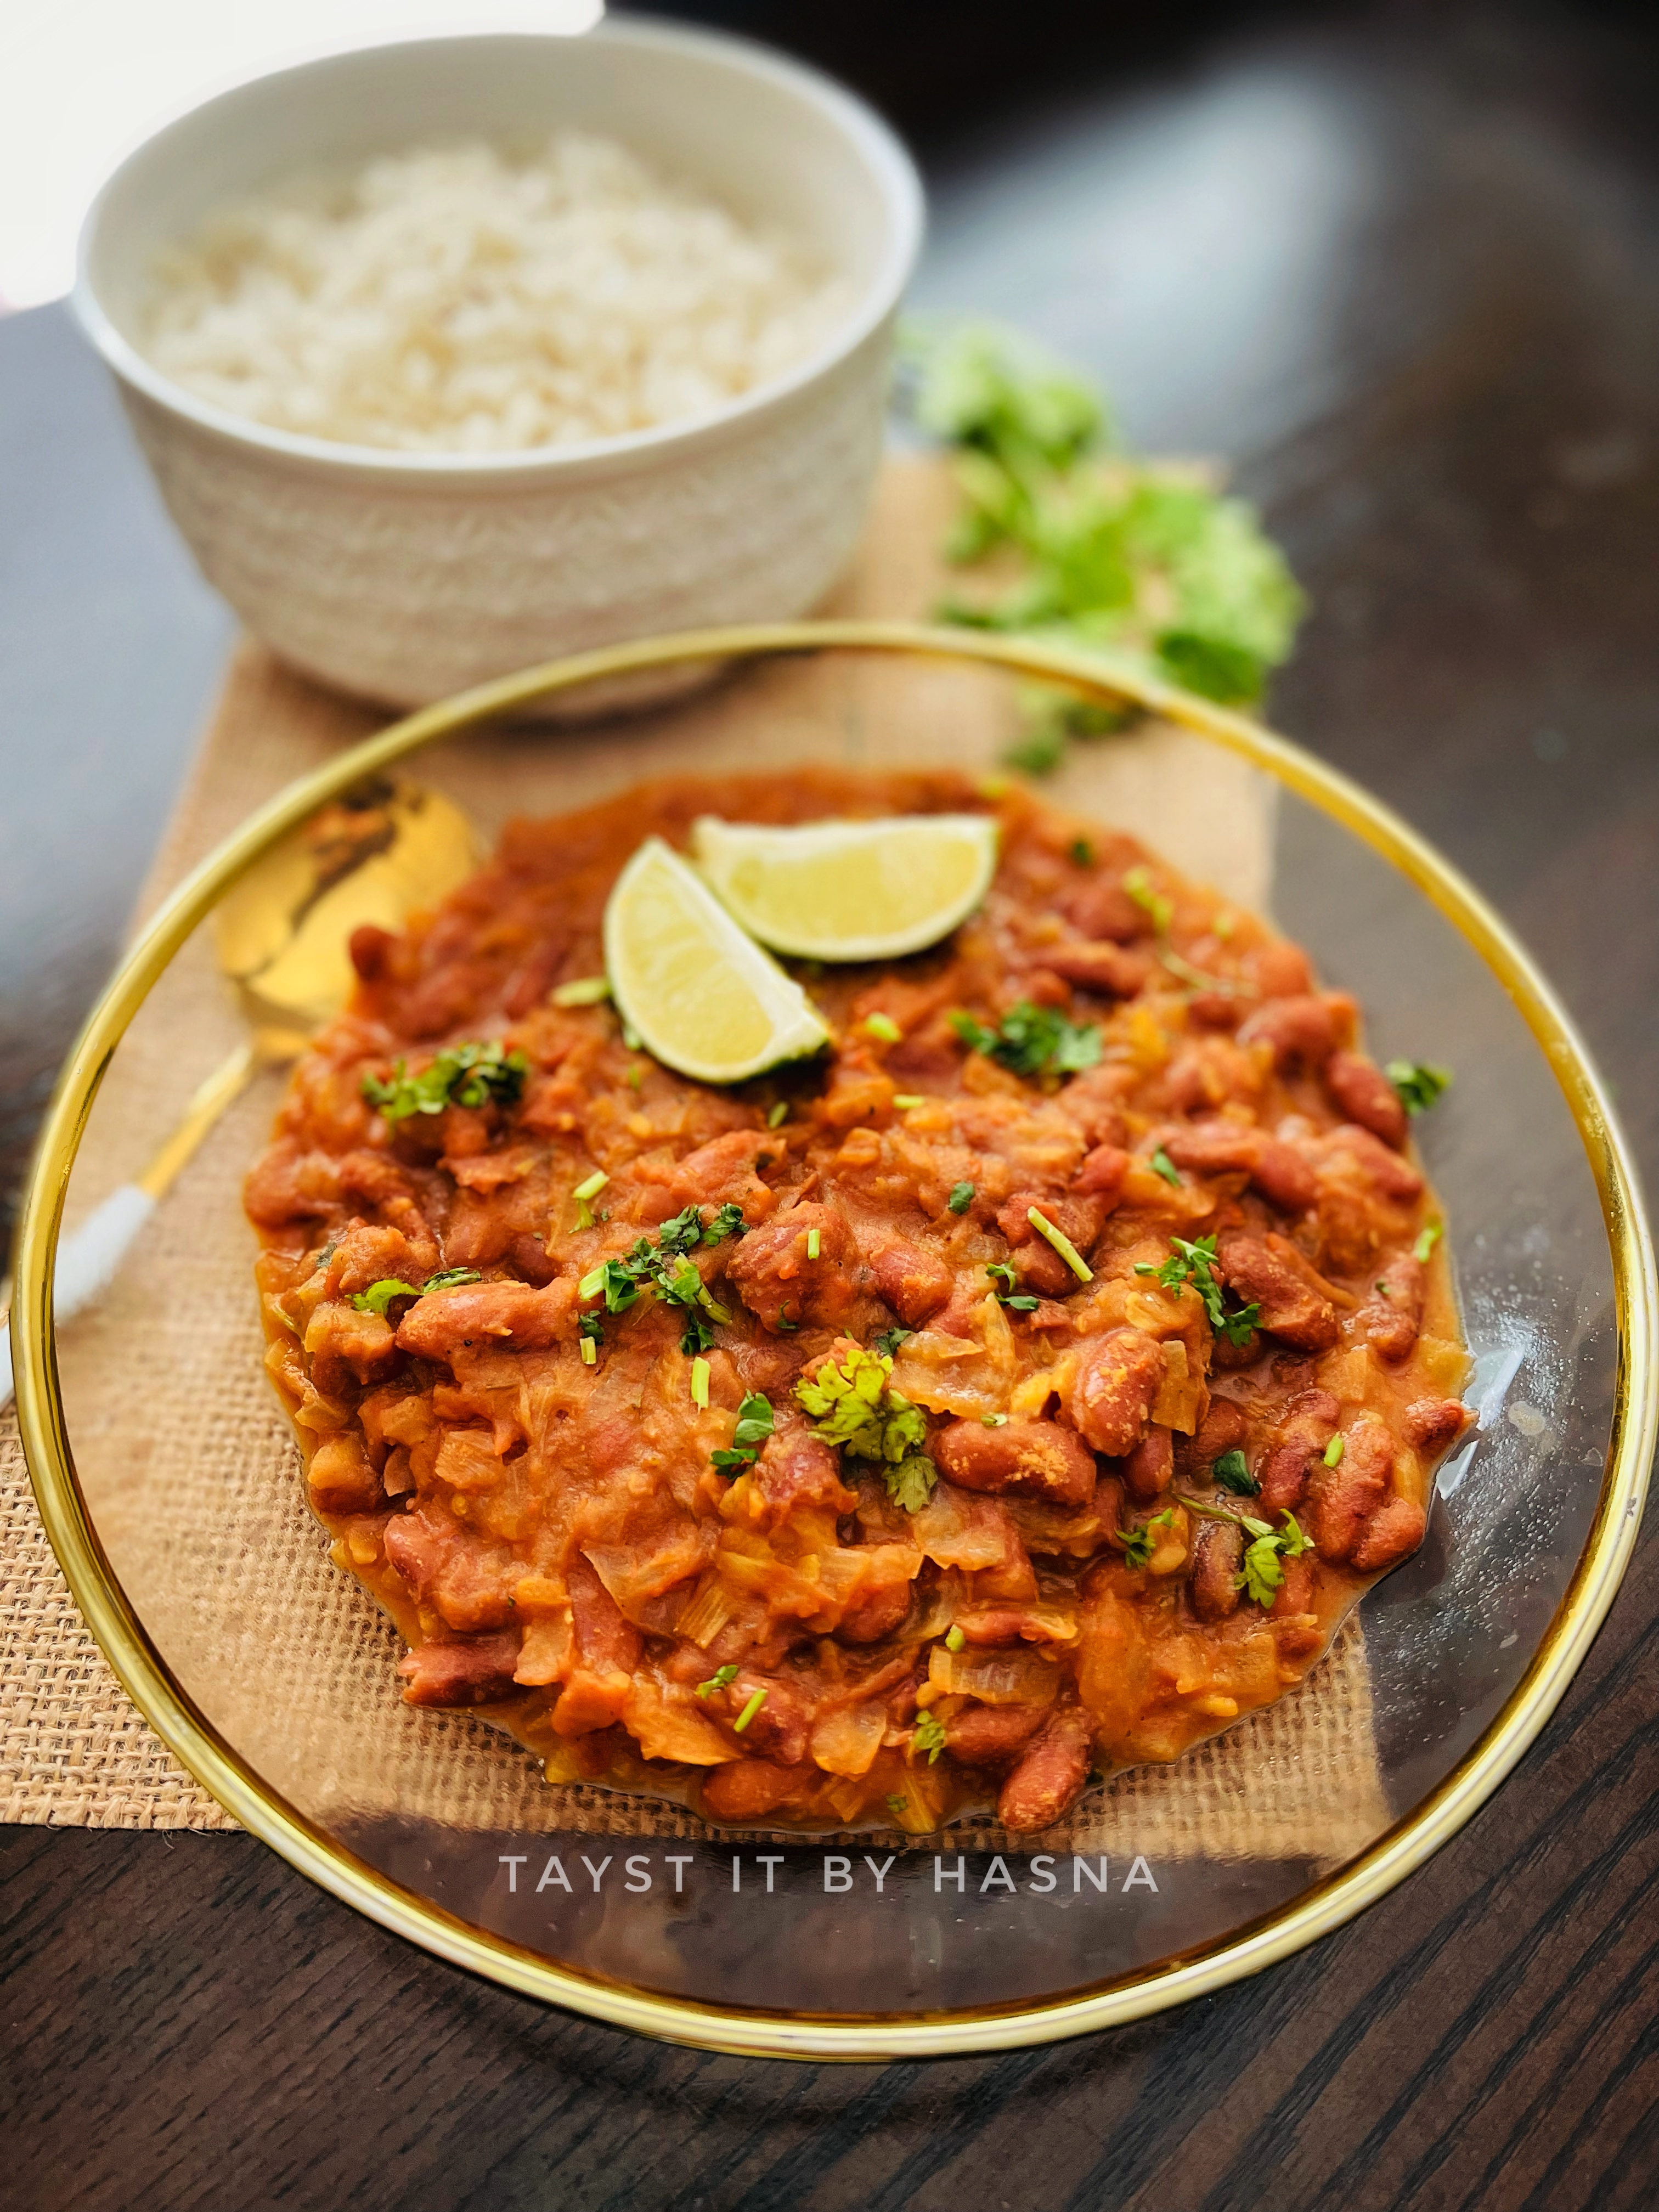
North Indian Style Dal Tadka


I am all about easy recipes that are EASY at the same time COMFORTING. For me, a plate of perfectly cooked rice, dal tadka, and chicken or any seafood fry is something very much that tells me home cooked meal. In North India, this is combination is very popular and is called Dal-Chawal (lentil-rice), a favorite among many.

Dal tadka is something I prepare once a week, it's wholesome, filling and keeps one content. This recipe is so easy and gets done in a jiffy! For lentils, I have used toor dal here. You may use red lentils, masoor dal, a mix or a combination of the lentils. There is no sautéing involved, only a tadka / tempering is prepared to give the dal its oomph!

You can have DAL TADKA with chappati, roti, rice or as a side curry. It will definitely be your family's favorite.

Ingredients :

  • 1/2 cup Toor Dal
  • 1/2 Onion, sliced
  • 1/2 Tomato, chopped
  • 1-2 Green chillies, slit
  • 1/4 tsp Turmeric powder
  • Salt, as required 
  • 3/4 cup Water
  • Coriander leaves, chopped 

Tadka:

  • 2 tbsp Butter
  • 1/2 tsp Cumin seeds
  • 1 tsp Ginger Garlic paste
  • 2 sprig Curry leaves
  • 1 tsp Kashmiri Red Chilli Powder
  • A squeeze of Lemon juice
  • Coriander leaves, chopped 

Instructions:

  1. Wash toor dal well and add to a pressure cooker. 


  2. Pressure cook all the ingredients except for the ingredients under tadka for 1 whistle. Allow the pressure to release naturally.
  3. In a small tadka pan, add in butter, allow to melt. 
  4. Splutter the cumin seeds, add ginger garlic paste, curry leaves, chopped coriander leaves and sauté well. 
  5. Pour the cooked dal, add in the Kashmiri Red Chilli powder, and adjust seasoning if required.
  6. Allow to simmer well. Finally squeeze lemon juice, garnish with chopped coriander leaves and add in a blob of butter.
  7. Enjoy with cooked rice, and your favorite sides like chicken or fried seafood!


Do try this recipe and don't forget to share your experience/feedback with me here in the comments or feel free to send me a mail. Also, do tag me at #taystedit if you try out my recipes on Facebook, Instagram etc so that I can see when you make it. ♡♡♡♡

Punjabi Rajma Masala


Rajma masala is most commonly known as a comfort food. The flavors are subtle yet very fulfilling. Usually paired with boiled rice, also known as Rajma Chawal is quite popular throughout India. Rajma/ red kidney beans are known to have been brought to India from Mexico. This North Indian dish is a staple on weekends, weddings etc.

The recipe doesn't involve many ingredients, mostly basic ingredients that are available in every Indian kitchen. If you reduce the amount of ghee used, it becomes a healthy dish too. This is such an energy packed dish. Red kidney beans are an excellent source of protein. Soaking the kidney beans, helps the beans to cook faster and helps our body to absorb the minerals more easily.

I like my gravy in a fine paste form, but here I demonstrate the onions being chopped, if you like Rajma masala with a fine texture, you may blend the onions too. I have paired the Rajma masala with Jeera rice, you may enjoy with boiled rice, roti etc.


Ingredients : (2 people)

  • 1/2 cup Rajma/ red kidney beans, soaked for 6-8 hours or overnight (Reserve stock water)
  • 1 tbsp Ghee/ clarified butter
  • 1 tsp Ginger garlic, crushed using mortar and pestle
  • 1 medium Onion, chopped finely or pureed 
  • 1 1/2 Tomatoes, pureed
  • 1 tsp Kashmiri Chilli Powder
  • 1/4 tsp Cumin powder
  • 1/4 tsp Turmeric powder
  • 1 tsp Coriander powder
  • 3/4 tsp Garam masala powder
  • Salt, as required
  • 1/2 tsp Dried Fenugreek leaves
  • Coriander leaves, chopped
  • 1/2 tsp Sugar/ honey
  • Lemon wedges, garnish

Instructions:

  1. Wash and soak the rajma/ red kidney beans for 6-8 hours or overnight.Pressure cook for 1 whistle, let the pressure stay for 5 minutes and place the cooker under running water and slowly remove whistle and lid.

  2. In a kadai, add in your ghee and crushed ginger garlic, Sautee until raw aroma disappears.
  3. Add cumin powder and sauté for 30 seconds. Add your finely chopped onions/ pureed onion and add salt, helps the onion to become translucent quickly.
  4. Add spices like turmeric powder, Kashmiri red chilli powder, coriander powder and garam masala powder, Sautee for few seconds.
  5. Next, add in the tomato puree and cook well, until water evaporates.

  6. Next add in the cooked kidney beans, add rajma stock water, salt, dried Fenugreek leaves, and chopped coriander leaves.
  7. Cover with lid and cook for 5-10 minutes on low flame, until all masala gets married with the Rajma well.
  8. Check if gravy requires more stock water or salt and add as required.
  9. Finaly serve the Rajma masala in a bowl, and garnish with chopped coriander leaves and lemon wedges.

Do try this recipe and don't forget to share your experience/feedback with me here in the comments or feel free to send me a mail. Also, do tag me at #taystedit if you try out my recipes on Facebook, Instagram etc so that I can see when you make it. ♡♡♡♡

Kheema Pav Wreath


Howdy folks?! Like promised I am going to try and share more innovative recipes to you guys.. And this is one among my innovations.. How pretty does this look for a ladies Night or a game night.. What say eh?

When the westerners does their pull apart bread with cheese, bolognese sauce etc, I thought why not Indian food? And Mutton Kheema masala is what popped right in my head.

When basic ingredients that can found home can make a difference, I thought to myself, why not be the difference. The Mutton mince /kheema is cooked for 15- 20 minutes in Indian spices and Masalas that gives in its beautiful aroma. 


I have noticed that what I hate in Kheema is that when it's dry and the mince doesn't feel succulent in the mouth. Ever since, I have been adding a dash of milk or cream to my kheema that not only makes my kheema masala succulent and Juicy, but also makes it fit for a king! Psst psst.. Let me tell you, not only was it delicious, it is also very filling. I usually don't like mattar/ green Peas in my kheema. But I like the vibrancy from the green color that it gives to the dish. 

My initial plan was to fill the kheema inside the Pav. But I wanted the kheema to get kore exposure, that's when the wreath idea came into existence. I am sure this will be a hit for a party table too! 

Soft, buttery and pillowy Pav buns is what the wreath is made of. The combination is so rewarding to the palate. I have always been fond of bread baking and let this be a beginning to it.


Ingredients :

  • 800 gms/ 3 1/2 cups of bread flour/ all purpose flour
  • 4 tbsp milk powder
  • 2 tsp instant yeast
  • 2 tsp sugar
  • 1 1/2 - 2 cups water **
  • Salt, as required 

Kheema Masala:

  • 500 gms minced Mutton 
  • 3 tbsp oil
  • 1 tsp Gheem clarified butter
  • 2 medium onions, chopped
  • 3 green chillies, chopped
  • Salt, as required 
  • 1 tbsp ginger garlic paste 
  • 1/4 tsp Turmeric powder 
  • 1 tsp Chilli powder
  • 1 tsp Coriander Powder 
  • 1 tsp Garam Masala
  • 1/2 tsp Cumin powder 
  • 2 tomato, ground to paste
  • 1/4 frozen green peas
  • 1/2 cup milk + 3 tbsp for brushing

Instructions:


  1. In a bowl or on a clean counter top, add your flour and other dry ingredients like yeast, milk powder, sugar and salt. 
  2. Mix the dry ingredients with hand gently, now slowly add in your water gradually. 
  3. Allow the gluten to work so that you get a stretchy dough. *
  4. Allow to rise in a dry and warm place with a kitchen towel over the dough for at least 1/2 and to 1 hour. 
  5. To prepare the kheema masala, take a pan and add oil and ghee/clarified butter. 
  6. Add in your chopped onions, green chillies and Sautee well. 
  7. Next add in your ginger garlic paste and saute until the raw smell disappears. 
  8. Next add in your masala powders and saute for around 30 seconds. 
  9. Next add in your freshly ground tomato paste and mix until combined and allow to cook well for 5 minutes. 
  10. Now add in your minced meat and season with salt and mix well using a spatula or a wooden spoon. 
  11. Add in your green peas in the last 5 minutes of cooking meat. 
  12. Cook the minced meat with masalas for around 20 minutes until cooked well. 
  13. Finally drop in a piece of butter and set aside. 
  14. Now the dough would have doubled the size, using a bench scrapper cut the dough into 8 equal parts and tuck them into a ball shape, roll well and place them in a springfoam pan, placing a dessert ring in the middle, place the shaped balls around the ring in the shape of a wreath with an inch gap in between for the Pav hub's to rise while baking. 

  15. Brush milk over the buns and allow to bake for 30-35 minutes in a preheated oven at 180 degrees C. 
  16. Remove from oven and immediately brush butter oven the hot baked bread 😍
  17. Allow to cool for 5 minutes and remove the ring and fill the ring with the prepared Kheema masala and garnish with onion rings, lemon wedges and chopped Coriander leaves. 


Notes :

** water quantity depends on how sticky or dry your dough is. You need a dough that is sticky, stretchy and that does does break when you pull or stretch. When you touch the dough with a dry finger, the dough shouldnt stick to your finger. If your water content is less, chances are your dough will break. 

*If you plan to keep your baked Pav buns out, transfer to plate/bowl and cover with kitchen towel trapping the warmth inside and hence will keep your Pav buns soft and warm


Do try this recipe and don't forget to share your experience/feedback with me here in the comments or feel free to send me a mail. Also, do tag me at #taystedit if you try out my recipes on Facebook, Instagram etc so that I can see when you make it. ♡♡♡♡
Older Posts

Search This Blog

My name is Hasna Haneef, a mommy to a toddler, hailing from Thalassery, Kerala. Welcome to my humble abode on the Internet; wherein I share all my recipes and experiments. I am glad to have you on board!

TRENDING POSTS

  • Kerala Style Squid Roast
  • Chicken Steak with Creamy Mushroom Sauce
  • Emirati Chebab
  • Regag - Emirati Flat bread
  • Copy Cat Caesars Mini Pizza
  • Kerala Beef Fry/ Nadan beef dry fry

About Me

May peace be with you!

Welcome to my blog.

I am delighted to have you on board. My name is Hasna Haneef, a mommy to a toddler, hailing from Thalassery, Kerala. My homeplace being Dubai, as I am born and brought up here and I am very influenced by the lifestyle and the variety of authentic cuisines I get to try from here, which has made me try anything that comes across me
, click here →

Stay Connected!

Join Our Madness!

Join with Thousands Of Subscribers ! Get Our Latest Recipes Delivered to Your email Inbox!

Powered by follow.it
  • Home
  • About Me
  • Recipes

    • Main Course
    • Desserts
    • Snacks

    Uncategorized

    • Chicken
    • Meat
    • Vegetarian
    • Rice
    • Malabar Food
    • Baking
    • Breakfasts
    • Snacks
    • Drinks
    • Pasta
    • Fish
    • Soups
    • Desserts
  • Contact Me

Featured Post

Triple Chocolate Hazelnut Skillet Cookie

Blog Archive

  • ▼  2025 (4)
    • ▼  April (2)
      • 1 minute Chocolate Mug Cake
      • Grilled Cheese California Burrito
    • ►  March (1)
    • ►  February (1)
  • ►  2024 (36)
    • ►  October (4)
    • ►  September (5)
    • ►  July (1)
    • ►  June (2)
    • ►  May (4)
    • ►  April (3)
    • ►  March (10)
    • ►  January (7)
  • ►  2023 (47)
    • ►  December (3)
    • ►  September (2)
    • ►  August (6)
    • ►  July (6)
    • ►  June (9)
    • ►  May (4)
    • ►  April (5)
    • ►  March (6)
    • ►  February (3)
    • ►  January (3)
  • ►  2022 (69)
    • ►  November (4)
    • ►  October (6)
    • ►  September (7)
    • ►  August (9)
    • ►  July (12)
    • ►  June (5)
    • ►  May (5)
    • ►  April (12)
    • ►  March (4)
    • ►  February (2)
    • ►  January (3)
  • ►  2021 (24)
    • ►  November (1)
    • ►  October (2)
    • ►  July (1)
    • ►  June (4)
    • ►  May (6)
    • ►  April (4)
    • ►  February (4)
    • ►  January (2)
  • ►  2020 (82)
    • ►  December (5)
    • ►  November (6)
    • ►  October (4)
    • ►  September (2)
    • ►  August (5)
    • ►  July (10)
    • ►  June (10)
    • ►  May (13)
    • ►  April (12)
    • ►  March (8)
    • ►  February (4)
    • ►  January (3)
  • ►  2019 (22)
    • ►  December (1)
    • ►  November (2)
    • ►  October (6)
    • ►  September (1)
    • ►  August (1)
    • ►  February (3)
    • ►  January (8)
  • ►  2018 (15)
    • ►  December (4)
    • ►  November (6)
    • ►  October (3)
    • ►  September (2)

Subscribe Us

Labels

Bake Biscuits Breakfast Brown rice Burger Cheese Chocolate Dal Egg Emirati Fish Iftar Indonesian Japanese Jeerakashala rice Kerala Keto Kuwait food Lunch Milk Mutton Thai food UAE food afghan cuisine arabic beef biryani bread burnt cheesecake cake chicken cream dessert dinner greek healthy indo chinese lamb malabar prawns pudding puffs quick dinner ideas recipe refreshing drink rice salad sandwich stir fry vegetables vegetarian veggies yemeni

Contact Form


POPULAR POSTS AND PAGES

Kerala Style Squid Roast

Kerala Style Squid Roast

June 18, 2020
Chicken Steak with Creamy Mushroom Sauce

Chicken Steak with Creamy Mushroom Sauce

November 05, 2018
Emirati Chebab

Emirati Chebab

June 01, 2023
Regag - Emirati Flat bread

Regag - Emirati Flat bread

December 02, 2020
Copy Cat Caesars Mini Pizza

Copy Cat Caesars Mini Pizza

March 12, 2024

Pages

  • Home
  • About Me
  • Privacy Policy
  • Contact Me

Copywrite © 2023 TermsFeed®. All rights reserved.

Created By Sora Templates | Distributed By Gooyaabi Templates

Back to top