Search This Blog

Taystit by Hasna

Food, Recipes, and Beyond

  • Home
  • About Me
  • Recipes
    • Main Course
    • Snacks
    • Desserts
  • Uncategorized
    • Chicken
    • Meat
    • Vegetarian
    • Rice
    • Malabar Food
    • Baking
    • Breakfasts
    • Snacks
    • Fish
    • Pasta
    • Drinks
    • Soups
    • Desserts
  • Contact Me

Easy Chocolate Traybake Cake


Its winter vacation and kids tend to ask for treats every now and then. And who doesn't fancy a chocolate cake?! I thought of baking a cake that doesn't involve too much of hardwork or precision. This one is super easy, just make the cake cake mix dump onto tray and bake it. Enjoy it with chocolate frosting or spread any chocolate spread and khalas, enjoy! 

Well, I took the extra step of making the chocolate frosting. The cake is soft, spongey and delicious, but tastes better with frosting. I baked it in a 9x13 inches baking tray, and there will be a lot of cake. This is the perfect cake that you can make in a jiffy and your kids can share with their friends too. 

The cake stays good to eat for 3 days, but I would suggest to enjoy it the same day. Tastes best when its fresh and just baked. You may top it with strawberries (since strawberries is in the season now), chocolate sprinkles etc. 

The recipe is adapted from www.supergoldenbakes.com


Ingredients:

  • 2 1/2 cups All purpose Flour
  • 1/2 cup unsweetened Cocoa powder
  • 1 1/4 cup Sugar (you may use half brown sugar and half white sugar)
  • 1/2 tsp Instant Coffee powder (optional)
  • 1 tsp Vanilla Essence
  • 1 tbsp Baking powder
  • 1/2 tbsp Baking soda
  • 100 gms Unsalted Butter, softened
  • 1/4 Vegetable Oil
  • 3 medium Eggs
  • 3/4 cup Milk
  • 2 tbsp white Vinegar

Chocolate Frosting:

  • 1 cup Icing Sugar
  • 3 tbsp Cocoa powder
  • 70 gms Unsalted Butter, softened
  • 60 ml warm Milk
  • 100 gms Dark Chocolate, melted 

Instructions:

  1. Preheat the oven at 170 deg C and line a 9x13 inches tray with baking paper.
  2. Combine the milk and white vinegar in a jar, mix and set aside for 5 minutes.
  3. In a large mixing bowl, combine the dry ingredients like flour, cocoa powder, sugar, baking powder, baking soda and a pinch of salt and mix with a balloon whisk.

  4. Add in the butter, eggs, and butter milk.


  5. Beat on the lowest setting until the ingredients come together.
  6. Scrape the bowl and increase the speed gradually until everything is incorporated well.
  7. Transfer the batter into the prepared tray and level out.

  8. Bake for 35-40 minutes or until the skewer comes out clean. 


Chocolate Frosting:

  1. Melt the dark cholate in a microwave for 30 second bursts or until melted. Or you may double boil the chocolate over a saucepan with boiling water and melt the chocolate. Set aside to cool.
  2. In a bowl combine icing sugar (sifted), Cocoa powder (sifted), add in the softened butter and mix well.

  3. Gradually add milk little by little, as required.
  4. Finally add in the melted and cooled chocolate and beat well until the frosting holds stiff peaks. (I like mine as ganache, so I did not do this step)

  5. Finally, once the cake has cooled on a cooling rack, spread the frosting/ ganache and add your desired toppings like strawberries (if eating immediately), chocolate sprinkles etc.


Make sure to make a batch when you have many people/ kids over, they will love it!


Do try this recipe and don't forget to share your experience/feedback with me here in the comments or feel free to send me a mail. Also, do tag me at #taystedit if you try out my recipes on Facebook, Instagram etc so that I can see when you make it. ♡♡♡♡

Strawberry Turnovers 


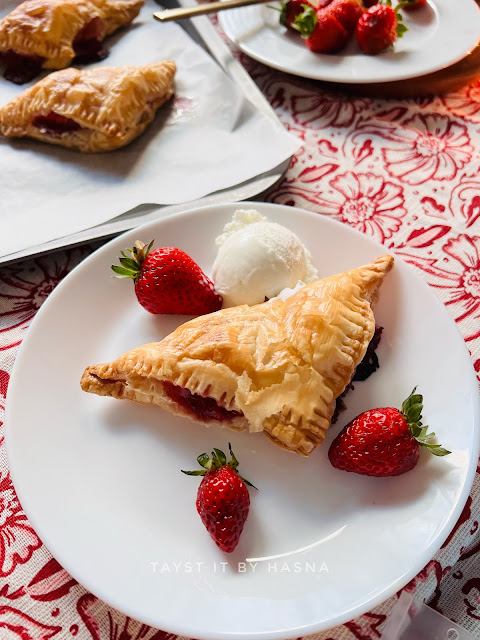
As much as I love strawberries, I hate the super sour ones (obvious when strawberries are not in season anymore). My girl loves strawberries but since these were too sour for both of us, I was thinking of ways to use up the strawberries.

These turnovers have been a ‘thing’ of the past, as we have so many innovative recipes around, that we forget to cherish the golden ones. These turnovers are so easy to make and so scrumptious too! I gave it my touch by adding in pieces of Kinder Chocolate in a couple of them and some had Cream cheese. I loveeed the chocolate ones. My hubsy loved both, though my girl complained that I could have added a couple more pieces in each turnover. 😄 

Let’s make these easy yet delicious treats right away! 


Ingredients:


  • 1 cup Fresh Strawberries, chopped
  • 1 1/2 tsp Corn Flour
  • 2-3 tbsp Granulated Sugar
  • 1/2 tsp Vanilla Essence 
  • 1/2 tsp Lemon Juice
  • Lemon Zest (optional)
  • Salt, a pinch
  • 7-8 Frozen Puff pastry sheets
  • Kinder Chocolate Bars (optional)
  • Cream cheese spread/ Kiri Cheese (optional)
  • 1 egg, for egg wash/ mayonnaise *
  • Vanilla Ice cream to serve

Instructions:

  1. In a sauce pan, add in your chopped strawberries, sugar, corn flour, and lemon juice. 
  2. Cook on low for 2-3 minutes.
  3. Add in lemon zest, vanilla Essence and a pinch of salt.
  4. Spread the strawberry compote on each puff pastry square and add in kinder chocolate/ cream cheese cubes and overlap to shape into a triangle and seal the ends using the help of a fork and make a small slit on the top of the puff so that air doesn’t get trapped and in turn the filling oozes out from the sides ( I forgot to do that).**

  5. Finally, give it an egg wash/ apply Mayo and bake in a preheated oven at 200 deg C for 25-30 minutes or until golden and puffed.


  6. Enjoy warm with a dollop of ice cream and fresh strawberries.


*Mayonnaise is a great alternative for egg wash, that has minimal egg smell. 
** I forgot to give a slit on the top, so that the filling doesn’t ooze out from the sides when baking.

Do try this recipe and don't forget to share your experience/feedback with me here in the comments or feel free to send me a mail. Also, do tag me at #taystedit if you try out my recipes on Facebook, Instagram etc so that I can see when you make it. ♡♡♡♡

Basque Burnt Cheesecake 


What a lovely day! And winter vacation is finally here.. Moms can relate to the free bird feeling at least for 2 weeks. 😁😁

Since it's the season of joy and happiness, this Basque Burnt Cheesecake also known as the San Sébastien Cheesecake is all you need to celebrate. The cheesecake is said to have originated in San Sébastien, Spain, from which the name is derived. Super easy recipe with just a few steps to keep in mind. It is basically a crustless cheesecake that is baked in a high temperature which gives you a vanilla custard like filling with a caramelized-almost-burnt exterior. The ingredients are simple, so is the process but the flavors from the baked result are so good. Even though my favorite has always been, my good ol' No Bake Blueberry Cheesecake. TAP HERE to check out the easy peesy recipe. The Basque Burnt Cheesecake is no lower, it is just a little different texture and flavor wise. 


You may use fruits, chocolate, caramel etc to top up, which helps to bring out its flavors. It is basically a blank canvas that you may enjoy as it is or add your favorite toppings to help bring out its flavors. I loved to have it with fresh berries like strawberries and Blueberries. I felt the freshness and tartness from the berries helped to bring in a different flavor dimension to the custard like rich cheese cake.

Unlike your basic cheesecake, you don't have to chill them to set. It is like a cheeecake that isn't sturdy but the outer caramelization acts as a mould for the custard like filling. The flavor and texture differed once chilled and otherwise. I like it more without chilling. It all depends on you. 😁

Also what sets this cheesecake apart is that, the bitterness of the burnt exterior and the sweetness from the creamy filling mixed together brings in magic!


The method of preparation is also quite different. As this is a crustless cheesecake, you need to make sure you use a good quality baking paper and two layers of the same, to protect the cheesecake from burning quickly and to help slide the cheesecake from the pan easily.


Coat the pan with butter and place your Parchment paper that is 2 inch more than your pan, as the cheesecake rises and puffs up a bit. Also try to use pure vanilla extract if possible for better results. 

This is a cheesecake where you can never go wrong! The worst that can happen is burn a cheesecake, well, this is a burnt cheesecake for a reason.😜 The ingredients are so simple and easily available. No water bath, just mix the ingredients, pour into a baking paper lined pan and bake. Done! Now is there an excuse to not try the easy peesy recipe? 😍


Basically this is the best cake to gift, share or celebrate any occasion if you have some cream cheese in your fridge readily available! ❤️ No frosting, no setting, only burning🤓

Let's get started! 

Ingredients :

  • 400 gms Cream Cheese, at room temperature *
  • 1/2 cup granulated sugar
  • 1 cup Whipping cream/ thick cream, cold
  • 3 eggs
  • 1 tsp Vanilla Extract 
  • A little less than 1/4 cup Patent flour /All purpose flour (around 3 tbsp) 
  • A pinch of salt to balance


Instructions:

  1. Preheat your oven to 200°C. 
  2. Grease your 7 inch cake pan with butter and line using a baking paper at least 2 inches wider than your pan size, so that your baking paper protrudes at least 2 inches outside the pan, as the cheesecake might puff up while baking. 

  3. Repeat process with a second baking paper and make sure to tuck in the baking paper properly. 
  4. Into a large bowl add in your room temperature cream cheese and beat using a stand mixer or a hand held electric mixer on medium for a minute or two until the cheese is smooth and creamy. 

  5. Next add your sugar and whisk until completely dissolved. 
  6. Now add in your eggs one at a time and scrape the sides of the bowl as you go. 

  7. Next add in your heavy cream/ Whipping cream/thick cream and vanilla extract and whisk until combined for around 30 seconds. 

  8. Slowly sift the flour into the batter and fold in gently using a spatula. Do not over mix, small lumps are totally fine. 

  9. Finally, pour your cheesecake batter to your prepared pan. 

  10. Now place your pan with cheesecake into your preheated oven and bake for around 40-45 minutes. Keep an eye after around 40 minutes, as the cheesecake happens to rise and fluff eventually. Even though there is no worries that the cake would burn, as it is meant to be burnt, but you want a slight jiggle to your cheesecake and the top has to be burnt completely. That is when you know your basque burnt cheesecake is done. 
  11. Let it cool to room temperature for about an hour and remove from the pan. Slice and enjoy with fresh fruits/whipped cream etc**
  12. Bon appétit! 


Notes:
  • If using a larger pan size, you might have to increase the cream cheese and the amount of sugar, as you don't want a flat cheesecake. 
  • *I used Pinar Cream Cheese Tub you may use puck cream cheese tub etc (basically Unsalted cream cheese) 
  • **Serving Suggestions: You may use fresh fruits, chocolate, caramel, whipped cream etc to top up which helps to bring out its flavors.
  • You may store the cheesecake in your fridge for upto 3 days.
  • I preferred it at room temperature.
Do try this recipe and don't forget to share your experience/feedback with me here in the comments or feel free to send me a mail. Also, do tag me at #taystedit if you try out my recipes on Facebook, Instagram etc so that I can see when you make it. ♡♡♡♡

Sparkling Strawberry Mocktail


Hi folks! Howdy? Summer being right up the sleeve, and humidity is already draining after a short while when out, I thought it's the best time to share the recipe of this refreshing Mocktail which is perfect for summer days.
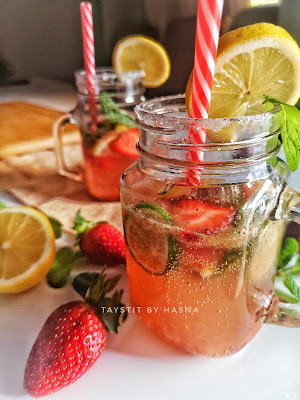
So let's buckle up and prepare for summer! Here I have made it even before the summer has started, because the Mr loves Mocktails and Virgin Mojito. I am not a fan of bare soda, unlike the Mr! Always love adding flavors to it. This time I had a lot of frozen strawberries leftover in the freezer and I wondered how to use them up when I came up with the idea of making the Mocktail. I always loved to serve my guests something different and special. The sparkling strawberry Mojito is definitely eye-catching and keeps your table spread a part higher.


I am sure your family and friends will love it. You have no idea how I had to deal with my family who was literally on their toes to grab a glass of this refreshing mocktail. I bet you this is going to be your favorite summer drink! It is all the zest that is required for you to amaze your folks during the summer days. It has all that is required to freshen you up, antioxidants from the Strawberries and mint and vitamin C from the lemon!
Virgin Mojito is quite familiar with most of us but this one with the strawberry flavor is a game changer!

This is the perfect drink to jazz up your party table with this welcome drink! If you plan to make them for guests muddle up Mint and squeeze in the lemon, set aside and blitz the frozen strawberries with sugar and keep in the fridge in advance until guests arrive. Mix the above mixture to soda and serve immediately! Let's beat the heat in style! 😍


Ingredients 


  • 10-12 frozen Strawberries
  • A few mint leaves
  • 1-2 lemon, squeezed
  • 1/2 cup simple syrup */ 1/4 cup sugar
  • 2 Can Soda
  • Ice, as required
  • Fresh Strawberries for garnishing

Instructions :


  1. In a bowl or Mason jar muddle up the mint leaves, lemon juice and sugar(if using).
  2. Blitz the frozen Strawberries with the ice for 2-3 seconds.
  3. Now to the Mason jar add the above mix, simple syrup (if sugar isn't being used) and more ice, if required.
  4. Stir gently. Garnish with mint leaves and fresh Strawberries! Serve immediately and enjoy! 👌👌

Note: If you have simple syrup you may use that, simple syrup is prepared by boiling equal parts of sugar and water and cooled.


Do try this recipe and don't forget to share your experience/feedback with me here in the comments or feel free to send me a mail. Also, do tag me at #taystedit if you try out my recipes on Facebook, Instagram etc so that I can see when you make it. ♡♡♡♡

Strawberry Vanilla Jelly Pudding

One of my first experiments in the dessert segment was this 'Strawberry Vanilla Jelly Pudding'. Happened when I was a teenager, my mom had gone to India and my brother had invited his friend and his wife over for iftar and she called me up to say that she would cook the main dinner for our day and I took control of the snacks, juices, etc.

I had already planned what to make for the snacks etc, but choosing a dessert was a huge decision as this was the first time I was hosting a party all on my own (with little help from my sister). So now you know how I would have been brainstorming ideas. Finally, I thought to myself that I would make something with the ingredients available at home.


There, I saw a pack of strawberry/ cherry jelly peeping at me from the pantry. I was overjoyed! I started contemplating on how to make this jelly interesting yet uncomplicated. (As I already had so much to do in a short span of time i.e., before Magrib azan, planned the iftar on the same day morning). To get better ideas I opened the fridge to find apples sitting in there. I thought to myself that cutting apples into small cubes and adding to the jelly would add dimension and a fruit crunch in between for the first layer of my pudding and there I began preparing. Once the iftar was over I was overwhelmed by the response I got for this easy peasy dessert. Since then I never stopped experimenting🙈 Alhamdulilah. <3


When I called mama to tell her what happened excitedly she was like had already tried this after she saw a recipe in 'Vanitha' - Women's Weekly magazine which similar to what I explained to her. But anyhow she was happy that it was something that I achieved on my own without referring any recipe. Maa Sha Allah 😍🙈

Now let's go and prepare just the right kind of dessert you need after a heavy party meal!

Ingredients:


  • Bundt pan
  • 1 pack Strawberry/ Cherry flavor Jelly
  • 1 pack Caramel Custard Pudding Mix
  • 275 ml whole milk
  • 1 Apple, Chopped uniformly
  • 8-10 Strawberries, quartered
  • Water, as required, on the pack
  • Sugar, if required

Instructions:


  1. Chop your fruits, (apple and strawberries uniformly) and make the jelly according to the instructions at the backside of the jelly pack.


  1. Pour in the prepared jelly liquid into the bundt pan and drop in the fruits proportionately and place in the fridge to set.
  2. After about half an hour make your caramel custard according to the instructions on the pack and once the mixture is about to boil switch off the flame and let the mixture cool enough to pour over the jelly.
  3. Ps: Do not keep the caramel to cool for too long as it might start to set.
  4. Pour the cooled custard mixture slowly over the now set jelly and place in the fridge to set. At least for 3-4 hours.
  5. Once set place bundt pan in warm water for 5 minutes and slowly invert onto a serving plate by keep the plate upside down on the bundt pan and tilting the plate and pan together to invert and voila! Your pudding is ready to be relished!


  • NOTE: 
  • I like the Green's brand for the Caramel Custard. You may make your own caramel custard if you want. But this is an instant option. (very handy when you have guests coming over)
  • You may add extra sugar before the milk boils if you feel the sweetness of the custard isn't enough.
  • Only use the bundt pan if you are willing to take the risk. If so please do not forget this step, place your bundt pan in warm water for 5 minutes before you invert the pudding onto a serving plate.
  • You may do the same in a glass bowl for more transparency if you do not want to invert and take a risk😊 but the bundt pan version looks so beautiful 😍😍😍


Do try this recipe and don't forget to share your experience/feedback with me here in the comments or feel free to send me a mail. Also, do tag me at #taystedit if you try out my recipes on Facebook, Instagram etc so that I can see when you make it. ♡♡♡♡
Older Posts

Search This Blog

My name is Hasna Haneef, a mommy to a toddler, hailing from Thalassery, Kerala. Welcome to my humble abode on the Internet; wherein I share all my recipes and experiments. I am glad to have you on board!

TRENDING POSTS

  • Kerala Style Squid Roast
  • Chicken Steak with Creamy Mushroom Sauce
  • Emirati Chebab
  • Regag - Emirati Flat bread
  • Copy Cat Caesars Mini Pizza
  • Kerala Beef Fry/ Nadan beef dry fry

About Me

May peace be with you!

Welcome to my blog.

I am delighted to have you on board. My name is Hasna Haneef, a mommy to a toddler, hailing from Thalassery, Kerala. My homeplace being Dubai, as I am born and brought up here and I am very influenced by the lifestyle and the variety of authentic cuisines I get to try from here, which has made me try anything that comes across me
, click here →

Stay Connected!

Join Our Madness!

Join with Thousands Of Subscribers ! Get Our Latest Recipes Delivered to Your email Inbox!

Powered by follow.it
  • Home
  • About Me
  • Recipes

    • Main Course
    • Desserts
    • Snacks

    Uncategorized

    • Chicken
    • Meat
    • Vegetarian
    • Rice
    • Malabar Food
    • Baking
    • Breakfasts
    • Snacks
    • Drinks
    • Pasta
    • Fish
    • Soups
    • Desserts
  • Contact Me

Featured Post

Triple Chocolate Hazelnut Skillet Cookie

Blog Archive

  • ▼  2025 (4)
    • ▼  April (2)
      • 1 minute Chocolate Mug Cake
      • Grilled Cheese California Burrito
    • ►  March (1)
    • ►  February (1)
  • ►  2024 (36)
    • ►  October (4)
    • ►  September (5)
    • ►  July (1)
    • ►  June (2)
    • ►  May (4)
    • ►  April (3)
    • ►  March (10)
    • ►  January (7)
  • ►  2023 (47)
    • ►  December (3)
    • ►  September (2)
    • ►  August (6)
    • ►  July (6)
    • ►  June (9)
    • ►  May (4)
    • ►  April (5)
    • ►  March (6)
    • ►  February (3)
    • ►  January (3)
  • ►  2022 (69)
    • ►  November (4)
    • ►  October (6)
    • ►  September (7)
    • ►  August (9)
    • ►  July (12)
    • ►  June (5)
    • ►  May (5)
    • ►  April (12)
    • ►  March (4)
    • ►  February (2)
    • ►  January (3)
  • ►  2021 (24)
    • ►  November (1)
    • ►  October (2)
    • ►  July (1)
    • ►  June (4)
    • ►  May (6)
    • ►  April (4)
    • ►  February (4)
    • ►  January (2)
  • ►  2020 (82)
    • ►  December (5)
    • ►  November (6)
    • ►  October (4)
    • ►  September (2)
    • ►  August (5)
    • ►  July (10)
    • ►  June (10)
    • ►  May (13)
    • ►  April (12)
    • ►  March (8)
    • ►  February (4)
    • ►  January (3)
  • ►  2019 (22)
    • ►  December (1)
    • ►  November (2)
    • ►  October (6)
    • ►  September (1)
    • ►  August (1)
    • ►  February (3)
    • ►  January (8)
  • ►  2018 (15)
    • ►  December (4)
    • ►  November (6)
    • ►  October (3)
    • ►  September (2)

Subscribe Us

Labels

Bake Biscuits Breakfast Brown rice Burger Cheese Chocolate Dal Egg Emirati Fish Iftar Indonesian Japanese Jeerakashala rice Kerala Keto Kuwait food Lunch Milk Mutton Thai food UAE food afghan cuisine arabic beef biryani bread burnt cheesecake cake chicken cream dessert dinner greek healthy indo chinese lamb malabar prawns pudding puffs quick dinner ideas recipe refreshing drink rice salad sandwich stir fry vegetables vegetarian veggies yemeni

Contact Form


POPULAR POSTS AND PAGES

Kerala Style Squid Roast

Kerala Style Squid Roast

June 18, 2020
Chicken Steak with Creamy Mushroom Sauce

Chicken Steak with Creamy Mushroom Sauce

November 05, 2018
Emirati Chebab

Emirati Chebab

June 01, 2023
Regag - Emirati Flat bread

Regag - Emirati Flat bread

December 02, 2020
Copy Cat Caesars Mini Pizza

Copy Cat Caesars Mini Pizza

March 12, 2024

Pages

  • Home
  • About Me
  • Privacy Policy
  • Contact Me

Copywrite © 2023 TermsFeed®. All rights reserved.

Created By Sora Templates | Distributed By Gooyaabi Templates

Back to top