Search This Blog

Taystit by Hasna

Food, Recipes, and Beyond

  • Home
  • About Me
  • Recipes
    • Main Course
    • Snacks
    • Desserts
  • Uncategorized
    • Chicken
    • Meat
    • Vegetarian
    • Rice
    • Malabar Food
    • Baking
    • Breakfasts
    • Snacks
    • Fish
    • Pasta
    • Drinks
    • Soups
    • Desserts
  • Contact Me

Eid al Adha special 

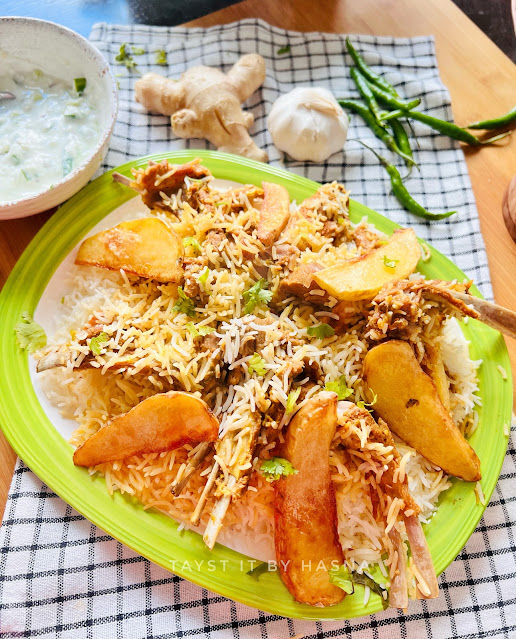
Lamb chops biryani


Eid without biryani it’s like tea without sugar. The gathering of a family on the day of Eid is the most pleasant sight and feeling. And there is no food like biryani that brings a family together. Last week I was looking for ideas to prepare for Eid other than our usual Malabar Thalassery style biryani. 

I had bought a few lamb chops, which gave me the idea of making a lamb chop biryani. Whilst I was developing and Filming the recipe. My parents happened to visit me and I was almost going to drop the idea. All right, then decided to complete the recipe and serve them anyways. It was a hassle because this recipe was not right before. I was worried how it would taste. But I was confident that the flavors will not betray me.

Finally, I was done with the filming and I subbed the biryani and oh boy everyone was all praises for this yummy biryani. The fried potato wedges gives it that extra yumminess to the biryani. I was so happy that it turned out just the way I wanted it, and the best part is that the recipe requires no sautéing and uses no tomatoes. You just got to marinate your lamb, chops and pressure cook them or slow cook it and add the half cooked rice and put it on dum. The fried onion also called birista is the game changer of this biryani. So if you have fried onions ready in your pantry, then this recipe is super duper easy.

Without further ado, let’s get started!

Ingredients: (Serves 3-4 people)

  • I/2 kg Mutton Chops
  • 6 Garlic Cloves 
  • 1 big piece Ginger
  • 4 Green Chillies
  • 2 tbsp Yogurt
  • 1 tsp Kashmiri Chilli powder
  • 1 tsp Coriander powder
  • 1/2 tsp Black pepper powder
  • 3/4 tsp Garam Masala powder
  • 1/2 tsp Cumin powder
  • Handful Birista/ Fried onion**
  • Salt 
  • Coriander leaves, chopped finely
  • Half cup water
  • 2 potatoes, cut into wedges
  • 1 tbsp Lemon Juice
  • Saffron soaked milk *

Rice:

  • 3 cups long grain Basmati Rice 
  • 2 Bay leaves
  • 3-4 Cardamom pods
  • 2-3 Cinnamon sticks
  • 3-4 Cloves
  • 2 tbsp Ghee
  • 2 tbsp oil 
  • Salt
  • Water to cook rice 
  • Birista/ Fried Onion for garnishing 
  • Coriander leaves for garnishing


Instructions:

  1. Wash the lamb chops and set aside. Wash and soak the rice and set aside.
  2. In a small bowl, mix the finely chopped ginger, garlic and green chilies to the yogurt and add the spices like Kashmiri chili powder, coriander powder, black pepper powder, garam masala and cumin powder. Add finely chopped coriander leaves to this and salt as required. 

  3. Combine the marinade and massage the marinade onto the lamb chops and allow it to marinate at least for half an hour.

  4. You may slow cook or pressure cook, takes around seven whistles and natural release for the pressure cooker. 
  5. While the lamb chops are cooking, fry the potato wedges in vegetable oil with salt, drain, and set aside on a kitchen towel.
  6. Open the pressure cooker and add lemon juice to it.
  7. Now, to a pot of water, add in your whole spices, ghee, oil and salt as required. 
  8. Add in the soaked rice and cook half way through for around 7 to 8 minutes.
  9. Transfer the masala to a non stick pot and place the fried potato wedges.
  10. Using a large slotted spoon, transfer the half cooked rice over the masala and pour the saffron soaked milk over the rice.
  11. Finally garnish with fried onions and chopped coriander leaves and place lid.

  12. Allow the rice to soak up the flavors of the masala on simmer for around 20 minutes at least.
  13. Serve hot with raita.


*You may use turmeric water/ milk too. ( just add a pinch of turmeric powder to 1/4 cup of milk or water)
** You will require around 2 large onion for this recipe

Notes:
If you think you want your rice spicy, you may add extra green Chillies to the water you are going to boil the rice.



Do try this recipe and don't forget to share your experience/feedback with me here in the comments or feel free to send me a mail. Also, do tag me at #taystedit if you try out my recipes on Facebook, Instagram etc so that I can see when you make it. ♡♡♡♡

North Indian Style Dal Tadka


I am all about easy recipes that are EASY at the same time COMFORTING. For me, a plate of perfectly cooked rice, dal tadka, and chicken or any seafood fry is something very much that tells me home cooked meal. In North India, this is combination is very popular and is called Dal-Chawal (lentil-rice), a favorite among many.

Dal tadka is something I prepare once a week, it's wholesome, filling and keeps one content. This recipe is so easy and gets done in a jiffy! For lentils, I have used toor dal here. You may use red lentils, masoor dal, a mix or a combination of the lentils. There is no sautéing involved, only a tadka / tempering is prepared to give the dal its oomph!

You can have DAL TADKA with chappati, roti, rice or as a side curry. It will definitely be your family's favorite.

Ingredients :

  • 1/2 cup Toor Dal
  • 1/2 Onion, sliced
  • 1/2 Tomato, chopped
  • 1-2 Green chillies, slit
  • 1/4 tsp Turmeric powder
  • Salt, as required 
  • 3/4 cup Water
  • Coriander leaves, chopped 

Tadka:

  • 2 tbsp Butter
  • 1/2 tsp Cumin seeds
  • 1 tsp Ginger Garlic paste
  • 2 sprig Curry leaves
  • 1 tsp Kashmiri Red Chilli Powder
  • A squeeze of Lemon juice
  • Coriander leaves, chopped 

Instructions:

  1. Wash toor dal well and add to a pressure cooker. 


  2. Pressure cook all the ingredients except for the ingredients under tadka for 1 whistle. Allow the pressure to release naturally.
  3. In a small tadka pan, add in butter, allow to melt. 
  4. Splutter the cumin seeds, add ginger garlic paste, curry leaves, chopped coriander leaves and sauté well. 
  5. Pour the cooked dal, add in the Kashmiri Red Chilli powder, and adjust seasoning if required.
  6. Allow to simmer well. Finally squeeze lemon juice, garnish with chopped coriander leaves and add in a blob of butter.
  7. Enjoy with cooked rice, and your favorite sides like chicken or fried seafood!


Do try this recipe and don't forget to share your experience/feedback with me here in the comments or feel free to send me a mail. Also, do tag me at #taystedit if you try out my recipes on Facebook, Instagram etc so that I can see when you make it. ♡♡♡♡


 Yemeni Mutton Haneeth


Yemeni Mutton Haneeth is a popular dish where lamb meat, preferably ribs cut/ shoulder cut is marinated in a blend of spices with butter and slow roasted until the meat is so tender that it falls off the bone. So the meat is usually cooked for many hours until tender. Since, we live a fast life, it's preferable to cook the meat using the pressure cooking method. But if you have the time, I would suggest to prepare the Haneeth using the slow cook method. The meat becomes so tender either way, that it just melts in the mouth. To give it extra texture, the cooked meat is then roasted in the oven, for the skin to develop a juicy crust.

Since the meat is rubbed with spice rub, you do not want the spice rub to come off completely whilst the meat cooks, so I use a rack/ trivet that helps the meat not to be completely in direct touch with the water, hence the masala stays intact and the meat gets cooked well and also the juices from the meat drops in the water which is used to cook the rice, this helps to make the rice extra flavorful.

Mutton Haneeth is something that I can't have enough of, my husband says that I have an extra tummy when we go and eat haneeth/ mandi from restaurants! xD I am that much of a fan of the flavorful Yemeni dish. I used Basmati Sella rice here, you may use the usual basmati rice too, but I fee texture and flavorwise, sella rice stands out in Haneeth. Let's make this scrumptious main course right away! Or at least it's Fridayyy tomorrow :D Without further ado, let's get started!


 Ingredients :

  • 1 kg Mutton ribs/ shoulder *
  • 50 gms Butter
  • 1 tsp Garlic powder
  • 2 tsp Paprika powder
  • 1 tsp Freshly crushed Black pepper
  • 1 tsp Cumin powder
  • 1/4 tsp Turmeric Powder
  • 2 tsp Arabic Spice powder (store bought), optional
  • 1 tsp Rock salt
  • 1 MAGGI Chicken cube (less salt)
  • 2 tbsp warm Water
  • 1 cup Water

For Rice:

  • 1/2 cup oil 
  • 2 tbsp Cashews
  • 2 tsp Raisins
  • 2 Onion, 1 sliced and 1 chopped
  • 3 cups Sella Basmati Rice
  • 2 tsp Cumin seeds
  • 1 tsp Coriander Seeds
  • 2-3 Bay leaves
  • 2 Cinnamon sticks
  • 3-4 Cardamom pods
  • 4-5 Garlic, slightly pound  
  • 1 tsp Whole Peppercorns
  • 1 Dry Lemon
  • 1 Chicken Cube
  • 1/2 Capsicum, sliced
  • 4 1/2 Boiling water
  • 1/2 cup mutton broth 
  • Salt, as required
  • 3 whole Green Chillies, Large
  • A pinch of Saffron strands, soaked in warm water

Instructions:

  1. In a blender, blend all the spices, rock salt, chicken cube along with room temperature butter and warm water.

  2. Poke the mutton ribs using fork and rub the marinade well onto the ribs.
  3. In a pressure cooker, place a trivet or a stand that helps elevate the meat from the water.
  4. Place the marianted meat over the trivet and pour water and allow to pressure cook for 7-10 whistles depending on how tender the meat is, allow the pressure to release naturally.
  5. To make the rice, fry the sliced onions in the oil until golden and crisp, drain and set aside. 
  6. To the same oil, add in your cashews and raisins, drain and set aside.
  7. Now add the whole spices to the oil, along with lightly pound garlic, dry lemon, Maggi chicken cube and capsicum. Mix everything well and now add in the washed and drained rice.

  8. Check the mutton ribs, once the pressure is released naturalluy, set aside the broth water and roast the ribs in oven at 180 Deg C for around 10 minutes, or until the skin is golden and crisp.
  9. Pour water and the mutton broth water. Place lid and allow the water to evaporate.
  10. Open the lid, give the rice a good mix, place whole green chillies and pour the saffron soaked water. Close the lid and allow the rice to cook well on simmer for 20-25 minutes. *

  11. Check tenderness of the rice and transfer to a large platter and place the oven roasted mutton ribs and sprinkle the crispy Fried onion, raisins and cashews.
  12. Serve Haneeth piping hot, super tender ribs with Shatta** (tomato chutney).


** Shatta recipe - Blend tomato, green chilli, salt, paprika powder and set aside. 
Prepare the Shatta early, as the blending makes teh tomato chutney frothy, so when done eariler, helps the bubbles and foam to settle on its own. 
 

Notes:

  • You may soak the sella basmati rice, but it is not necessary .
  • Rock salt is preferred to use when marinating in the spice rub, as rock salt helps to marinate the meat thoroughly, (I did not keep the marinated meat overnight or even a few hours, yet the meat was perfectly marinated)
  • Do not open lid in between the cooking process, allow the heat to cook the rice really well. 
  • *I used mutton racks in this, you may choose any cut that is tender. 
  • Please note that different brand rice require differ amounts of water, but to stay on the safer side I take the ratio 1: 1 1/2 ratio for rice and water respectively and add an extra 1/2 cup water, and the additional broth water makes it perfect.
  • You may smoke the rice by adding a hot piece of charcoal and pouring oil over it in a small disposable aluminum/ steel container and closing the lid. But I prefer otherwise, without doing this step, as I feel the flavors feel very artificial whenever I smoke the rice and gives me a very bad headache, so you may do it if you like smoking the rice 👍🏼

Ps: This may not be the authentic recipe, but it definitely is the best!


Do try this recipe and don't forget to share your experience/feedback with me here in the comments or feel free to send me a mail. Also, do tag me at #taystedit if you try out my recipes on Facebook, Instagram etc so that I can see when you make it. ♡♡♡♡


Malai Mutton Biryani


Taqabbal Allahu minna wa minkum.. Eid Mubarak!! 💝

It was a beautiful 30 days,sad that Ramadan just flew away, now it is time to live by the life we have been living the past one month (reminding myself first). 

I love mutton, for how tender it is when slow cooked. The process of slow cooking mutton is a tedious job, but the flavors attained is worth the while. While I usually prepare mutton in the pressure cooker, I totally dislike it. I prefer slow cooking mutton (if it is a tender lamb, much easier to cook and is tender).

The recipe doesn't require tomatoes. The rice prepared in the oil that was used to fry the onions, takes the flavor of the rice to a whole new level. Even though I did not use saffron, the flavor from the fried onions gave the rice a very nice aroma and taste.

Malai/ cream when added to any dish makes the dish delectable. It does the same job here. You may use the same recipe for preparing malai chicken biryani, just keep track of the cooking time of chicken.

This is a delicious and easy biryani. Do try and let mem know how you liked it.

Ingredients: (makes for 4)


  • 500 gms mutton
  • 3 medium Onions, chopped
  • 2 tbsp ginger garlic paste
  • 7-8 green chillies, crushed
  • 1 tsp ginger garlic paste
  • 2 tbsp Yogurt
  • Chopped coriander
  • Chopped mInt
  • 1 tsp Garam Masala
  • 2 1/2 cups Basmati Rice, soaked and drained
  • 2 tsp ghee (clarified butter)
  • 1/4 Cup oil
  • 1 tsp Shahi jeera
  • Whole spices - 2 cardamom, 3 cloves, 2 cinnamon pieces, 3-4 Bay leaves
  • 3 3/4 cups Water
  • 3 tbsp Cream
  • Squeezed Lemon
  • Salt, as required
  • Turmeric water/ milk (you may use saffron)

Instructions:

 
  1. Marinate the mutton pieces with ginger garlic paste, yogurt, herbs (coriander & mint), garam masala, crushed ginger garlic paste, and salt as required.
  2. Soak Basmati rice at least for 25- 30 mins.
  3. In a large non stick pan, add ghee and oil and fry the onions, till golden and crisp.
  4. While the onions fry, in a medium non stick pan, add ghee and crushed ginger garlic paste, Shahi jeera, and your marinated mutton, allow to cook for at least 1/2 an hour on simmer and check if meat is cooked. Add the cream and half of the fried onions and mix well. 


  5. If the water has drained, add in 1/2 cup f water and allow to simmer for 15 minutes until the gravy thickens.
  6. Drain the fried onions once golden and crisp and set aside. Now, to the fried onion oil, add in your whole spices, and add your soaked and drained rice, mix and make sure the grains of rice are covered in oil and pour water and allow to cook for 25 mins until cooked. (for detailed instructions check here).
  7. To the cooked malai mutton masala, squeeze lemon and add salt as required, garnish with chopped coriander leaves.
  8. Transfer the rice to a large bowl, now start layering the rice as the first layer, then add in the mutton masala, then again add the rice layer and garnish with fried onions and coriander leaves and sprinkle turmeric water/ milk for added natural colour. 
  9. Cover with an aluminum foil and let it sit on dum at least for 1/2 an hr and serve with raita/ pickle.

Notes:
You may give the mutton masala a charcoal effect by heating a piece of charcoal and placing in a steel/ aluminum container that has oil and allow the fumes from the charcoal to seep into the rice by closing the pan with aluminum foil and lid. I am not a fan of this method, so did not do it here.


Do try this recipe and don't forget to share your experience/feedback with me here in the comments or feel free to send me a mail. Also, do tag me at #taystedit if you try out my recipes on Facebook, Instagram etc so that I can see when you make it. ♡♡♡♡


Chicken Maqluba 


With all the overwhelming news around, I have been feeble and weak just by glancing through the images of the inhuman and brutal acts of the Israeli's in Palestine. As a gesture of solidarity, I was contemplating to share the recipe of the delicious Upside Down Chicken and Rice, which is one of the most cooked meals in Palestin#.
Ps: If keeping mum would have helped Palestine in any way, I would have definitely done the same. Spread awareness, be it any sort of page, with minimal to millions of followers. Spread love and not hate. This isn't about religion. This is about humanity.
Educate yourself and be the change. Raising our voices for them, boycotting Israel products and keeping the innocent souls in our duaa is the least we can do. But remember, they are the most powerful weapons, so don't ever undermine them.
.
In honor of Palestinian's rich culture and heritage, I present to you MAQLOUBA, which is a Levant dish that has its origins from Palestine too.
. 
Years ago when my sister made this, we weren't quite fond of it. Later I deleveloped a liking towards it, over the years, when I prepared it the Way I wanted it. This is a rice dish where you can use any of your favorite vegetables. Though brinjal/eggplant is commonly and initially used, gradually all sorts of veggies were added which includes Cauliflower, carrots, potatoes, eggplants, onion, tomato etc. 
. 

Maqluba means 'upside down'. It is a beautiful upside down rice that is not only beautiful but delicious too..a pot dish with layers of veggies, rice and chicken. The way the veggies sit on the rice when you flip the casserole onto a platter is truly spectacular.
A beautiful dish where families gather around to relish at least every week in Palestine. While I share Palestinian's most popular rice dish, Maqluba, I sincerely make duaa (prayers), and I hope Palestinians get victory from all the inhuman practices, genocide and all sufferings they have been going through since 73 years. 
. 
Without further a do, let's get started. 


Ingredients:

  • 1kg chicken
  • 3 glass Basmati rice
  • 1 large onion
  • 3 tbsp ginger garlic paste (6 cloves garlic and 1 inch ginger) 
  • 1/2 small green Capsicum, chopped finely
  • 2 cinnamon sticks
  • 2 Cardamom
  • 1 Clove
  • 3 tsp Arabic Masala Powder *
  • 1 tsp Black Pepper Powder 
  • Salt, as required 
  • 1 large potato, sliced
  • 1 aubergine/eggplant, sliced 
  • 1 carrot, sliced
  • 1 non ripe tomato, sliced
  • 1 onion, sliced
  • 1 green bell pepper, sliced
  • 3 cups Basmati rice (preferably soaked for 30 minutes before cooking for longer grains) 
  • 4 1/2 cups water
  • 4 tbsp tomato paste 
  • 1 tsp arabic masala powder
  • 1 tsp Black pepper
  • 1 tbsp oil
  • 4 tbsp water 


Instructions :

  1. In a large casserole, pour some oil and ghee and add in your chopped onions, add salt and cook until translucent. 
  2. Next add in your chopped Capsicum, ginger garlic paste and saute well until raw smell disappears. 
  3. Next place in your chicken pieces, sprinkle the arabic spices masala, add in salt and pepper * and Turmeric if required. 
  4. Pour in water. 
  5. Close the lid and allow for the chicken to cook well for around 20-25 minutes. 
  6. Whislt the chicken gets done, fry each of your chopped vegetables in batches and set them aside. Sprinkle salt over the fried veggies. 

  7. Once done, drain the chicken pieces, reserve 1/2 cup of stock and set aside. 
  8. Now in the chicken broth, add in your cleaned, soaked and drained rice, add salt as required and cook on low for around 10 minutes. (the rice will cook completely once layered and cooked on low) 
  9. To prepare the tomato gravy for the rice, in a small pan, add your tomato paste, salt, pepper, arabic masala powder, oil and water and allow to come to a boil. 
  10. Once done, mix it into the cooked rice. 
  11. Now let's assemble and layer the Maqluba. Into your large casserole, start by adding your fried potatoes as the base and building up with any of the fried veggies. 
  12. Layer your cooked chicken pieces. 
  13. Next add a layer of cooked rice mixed with the tomato gravy. 
  14. And add any leftover veggies and finish off with a layer of rice and gently run the back off your spatula over the rice (do not press) and pour the reserved chicken stock, close lid and allow to cook for at least 20-25 minutes. 
  15. Now for the moment of reveal, place a rice platter or a large plate over the casserole and flip the casserole carefully and tap around the casserole using a wooden spoon, so that all remains of the Maqluba falls into the plate. 
  16. Carefully remove the casserole slowly, so that the layers remain intact and you get to witness a beautiful Maqluba. 


Notes :

* To make Homemade Arabic Masala Powder :
In a pan, dry roast 2 tbsp Coriander seeds, 2 tbsp cumin seeds, 2 tbsp black peppercorns, 1 tsp cinnamon, 1 tsp cloves, 1 tsp cardamom, and 1 dried lemon (torn by hand) and once the spices have roasted well, switch off flame, set aside to cool and add 1/2 tsp Turmeric powder. Once the spices have cooled, grind well to fine powder and store in a air tight container in a cool and dry place. Can be used until 1 month and can be used for 3 months if stored in the fridge. 

* You may marinate the chicken pieces with salt and pepper before cooking. 
 * I usually like to use Cauliflower and potatoes mainly for the dish, but since I had no Cauliflower with me, I prepared with whatever I had in hand. 
* I have prepared makluba using half cooked rice, you may cook raw rice in the process, just add 2 cups of water for 1 glass of rice instead of 1 and half cups of water. 


Do try this recipe and don't forget to share your experience/feedback with me here in the comments or feel free to send me a mail. Also, do tag me at #taystedit if you try out my recipes on Facebook, Instagram etc so that I can see when you make it. ♡♡♡♡

Chicken Tikka Masala


Hi guys! I was least expecting to post this recipe here but Oh boy! Was I overwhelmed with joy to see the responses on the boomerang I posted on IG while making *Chicken Tikka Masala*? My DM was literally bombarded with recipe requests for the same! I was hesitant to share the recipe here as I did not capture or shoot the step by step cooking process, but I shall update the post the next time I prepare it. Like who doesn't love Chicken Tikka Masala? It is one of the most popular dishes from around the world. (maybe of course after butter chicken, teehee). No wonder it became popular for the flavors are divine leaving the tongue captivated.

A common confusion is the difference between Chicken Tikka Masala and Butter chicken as they are similar in preparation. Though Chicken Tikka Masala contains more spiciness while butter chicken is more on the sweeter buttery side.

Have you had that rice and chicken tikka masala combi from flights, the best part of flying on Emirates? The basmati rice and chicken tikka masala combination. Throwback to the good old days (when almost all flights served yummy and hot food). When I received all the recipe requests and I had some leftover Masala, I immediately made some basmati rice to go with it for lunch (and for the gram). It was so nostalgic. 😍😍😍


This dish is mostly prepared when in a mood for some North Indian dish and this was what happened yesterday when I was craving some Indian food and I was going blank on what to cook for dinner. So without a second thought, I convinced myself to prepare this and it was completely spontaneous! We normally prefer bone pieces of chicken unlike the usual boneless used for Chicken tikka. And to go with it I made this butter naan/tandoori roti which my hubsy was all praises of! In sha Allah (if Allah wills) will try to post the instant Naan recipe ASAP :)
Not to brag but he actually said it tasted as good as having from a restaurant. What else does a wife want, the approval of our husbands is what we all strive for. You won't believe if I said it wasn't a recipe I followed, nor did I refer anywhere, I felt like it and made it the way I wanted. I guarantee you everyone is going to love it!

Ingredients :

Chicken Tikka:

  • 600 gms Chicken (small cuts)
  • 2-3 tbsp Yogurt
  • 1 tsp Ginger garlic paste
  • 1/4 tsp Turmeric powder
  • 1 tsp Kashmiri Chilli powder
  • 2 tbsp Tandoori Chicken Powder (for substitute check notes)
  • Salt
  • 1/2 tsp lemon juice
  • Vegetable oil for frying


Gravy:

  • 1 medium onion chopped coarsely
  • 2 medium tomatoes chopped coarsely
  • 1 tsp Ginger garlic paste
  • 1/4 tsp Turmeric powder
  • 2-3 tsp Kashmiri Chilli powder
  • 1 tbsp Tandoori Masala powder, (or check notes for substitute)
  • 1 clove
  • 1 cardamom
  • 1/2 glass water
  • 1/2 tsp Cumin powder
  • 1/2 tsp dried fenugreek leaves
  • 2 tbsp fresh cream/ thick cream
  • 1 tbsp butter
  • Salt, to taste
  • Sugar, a pinch

Instructions:


  1. To begin with, heat oil in a Kadai and fry in the marinated chicken pieces in 2-3 batches without overcrowding for 15 minutes on medium-low turning over every 5 minutes.
  2. Next, in a pan/ skillet pour in the oil from the Kadai used for frying, about 2 - 3 tbsp.
  3. Add your dry spices, cardamom, and cloves into the oil and sauté for a minute and add in the chopped onion and sprinkle some salt and let it get translucent.
  4. Next, add in the ginger-garlic paste and sauté till the raw smell disappears and add in the chopped tomatoes. Close and cook for 2 minutes.
  5. Now add the powders - Turmeric, Chilli powder, tandoori masala powder, mix for a minute and pour in the water and let it boil for a couple of minutes and set aside.
  6. Once cooled, grind in a mixer and strain to get the residual smooth paste.
  7. Next in a pan /skillet add the butter and add in 2 tsp of Chilli powder to the butter for that rich color.
  8. Now add the strained paste to the butter and once boiled add in the cream and salt.
  9. Depending on the consistency pour in water if required.
  10. Add in the dried Fenugreek leaves by placing it in your palm and rubbing your hands to make it into powder and add in a pinch of sugar to balance out the flavours.
  11. Finally, add your fried chicken tikka to the Masala and let it boil for 5 minutes on simmer. Ta-da! Your Chicken Tikka Masala is ready to devour. 🤤🤤


Notes-

  1. If you do not have tandoori chicken Masala feel free to use 1 tsp Coriander powder, 1 tsp chili powder, 1/2 tsp pepper powder, 1/2 tsp garam masala for the same.
  2. Even though I cooked it spontaneously I had cleaned and marinated the chicken with salt earlier.
  3. The oil is going to look burnt as the yogurt in the marination will turn black while frying, so do not pour in too much oil for frying.
  4. For that charred look, I fried the chicken on a high flame in the last 2 minutes.


Do try this recipe and don't forget to share your experience/feedback with me here in the comments or feel free to send me a mail. Also, do tag me at #taystedit if you try out my recipes on Facebook, Instagram etc so that I can see when you make it. ♡♡♡♡

Street Food Style Easy Thai Stir-Fried Rice 


Who doesn't like easy recipes to cook for weeknights or a spontaneous late lunch when you feel like it. I love such recipes. This is definitely one among the lot that I cook often to content my Thai cravings. Thai food has a special place in my heart, I would explain it as the amalgamation of my native Kerala cooking and my favorite Chinese cuisine. And when it combines, it is simply the best. 

I say it has some connection to do with Kerala cooking because of the coconut milk (which is used predominantly in most of the Keralite dishes), then the palm sugar (which is pretty much the same as Jaggery (bellam), then the bird's eye chili which our very own Kanthari mulaku which is super hot and has many health benefits which is commonly used both in Keralite dishes as well as Thai food. And Indo-Chinese food I just lurrrveeee. So now you know how much I love Thai food. Its a flavor explosion in your mouth. No kidding!

I have always longed to try Thai food, like I said if you have been following me being bought up in Dubai I have been able to try and blend with all the varieties of cuisines in the world. Always very blessed for that. Alhamdulilah. 

So one fine day, years back, me and my family were on a wait to go to our favorite family restaurant "Emirates Seafood". Noticing the queue we were totally disappointed and we were really hungry. Right next to this restaurant we find an eatery saying Thai food. We were muddled if it was the best time to try a totally new cuisine. As a very ardent food lover, I very well knew the renowned items to order. Oh boy! Was I super delighted to try the food? Finally found food for the soul, it was so heartwarming, so homely, so DELICIOUS! Ever since I never missed a chance to have Thai food.


Okay, enough of the intro! Moving along now. Thai rice is normally cooked using Jasmine rice, but here since I was craving Thai food so badly and didn't have any Jasmine rice in the pantry Basmati rice was my go-to solution. It pretty much did the job, which means you guys may try it this recipe with Basmati but Jasmine is the authentic one.

Thai Street food comes with a parcel of a flavor-boosting condiment called the 'Prik Nam Pla' (Chillies in Fish Sauce). This is the BOMB that you have to try with this fried rice, it simply takes you on a flavor ride and makes you want for more. It is a combination of garlic, fish sauce, red chilly and lemon. The tangy spiciness is out-of-the-world good.

Disclaimer: This isn't the authentic Thai fried rice recipe, adapted to my choices and resources available. So please make sure, even if you don't have any Thai ingredients you must have the fish sauce in your pantry which is the main ingredient that gives the amazing flavor. If you don't have one, go get one! It is super useful. 

I was so hesitant to buy fish sauce initially, wish someone told me earlier, wondered what I could do with it, but Thai food is all about fish sauce, you can make Tom Yum soup which is the bestest soup (will post the recipe once I make it soon), Thai Rice noodles (recipe is sitting in the drafts will post soon in sha Allah), etc.

For the protein in this dish, you may use chicken/ prawns, I have used both. This rice has an orange-pinkish brown shade to it because of the oils from the prawn.

This Thai fried rice is not only delicious, but it is also super easy, as it is a stir fried rice it is done so fast on high heat, within minutes your lunch is served. All you need is some fish sauce and all the other ingredients, I am sure pretty much all the households must have it! This rice smells amazing, I am already drooling thinking about it.

A plate of this Thai Stir-fried rice right from the wok with a squeeze of lemon and a drizzle of Prik Nam Pla.. is DELECTABLE.😋

Let's get started!


Ingredients:

For the Thai Stir-Fried Rice:


  • 2 cups day-old/ 2 cups cooked Basmati rice/ Jasmine rice
  • 2+1 garlic cloves chopped finely (2 for sauteeing and 1 for the sauce mixture)
  • 200 gms tender chicken breasts sliced and marinated in salt and pepper
  • 1/2 tsp white pepper powder
  • 10 -12 shrimps/ prawns deveined and cleaned
  • 2 eggs
  • 1 small carrot chopped
  • 10-12 french beans chopped
  • 1/3 cup sweet corn
  • 2 tsp sriracha sauce (optional)
  • 1 tsp soy sauce
  • 1 tsp fish sauce
  • 1 garlic clove (chopped finely)
  • A pinch of sugar
  • 2 tbsp green spring onions chopped
  • 1/2 tsp Black Pepper Powder
  • Salt as required

For Prik Nam Pla (Red chilis in Fish sauce):


  • 1-2 tsp sriracha sauce (optional)
  • 3/4 tsp red chili flakes / Red bird's eye chili 3-4 (I substituted red bird's eye chili with red chili flakes)
  • 3 tbsp fish sauce
  • 1/2 lemon juice
  • 1 tsp soy sauce


Instructions:


  1. Cook 2 cups basmati rice (cooking method here - tips for cooking Basmati Rice at the end of the page) and set aside to cool.
  2. Combine the ingredients under Prik Nam Pla in a bowl and set aside for the end.
  3. In a bowl mix together soy sauce, fish sauce, sriracha sauce, garlic cloves, and sugar.
  4. In a wok or skillet, pour vegetable oil and saute the garlic cloves until fragrant.
  5. Now, add the sliced chicken pieces that have been marinated and sautee for about 4 minutes and add the prawns and saute for about 3 minutes.
  6. Next, add 1/2 cup rice to the sauteeing chicken and prawns so that the rice soaks up all the juices from them.
  7. Move aside the rice mixture and add the eggs one at a time and scramble them adding some salt.
  8. Now set aside this egg mixture and in the same pan stir fry the veggies- carrot, beans, sweet corn and lastly the green onions on high heat for about 2-3 minutes or until just done. The veggies should be crisp. 
  9. Combine the egg, chicken, prawn, and veggies and add the rice in batches and pour in the sauces prepared earlier (soy sauce, fish sauce and sriracha sauce) and stir everything on high heat. 
  10. Serve hot with the Prik Nam Pla condiment, a lemon wedge and sprinkle a pinch of pepper powder. 
  11. Your delicious Street Food Style Easy Thai Stir-Fried Rice is ready! Enjoy!


Do try this recipe and don't forget to share your experience/feedback with me here in the comments or feel free to send me a mail. Also, do tag me at #taystedit if you try out my recipes on Facebook, Instagram etc so that I can see when you make it. ♡♡♡♡

Bukhari rice with Salata Hara


To begin with, who all are aware of Bukhari Rice? I was completely ignorant of this dish until 4-5 years back. Since then whenever I wanted to cook chicken and rice, other than biryani my mind automatically diverts to making Bukhari rice.

It is so intensely flavorful and aromatic that the whole house smells like you are at some Arabic eatery. Ingredients are very mainstream. Nothing new. But one extra step would be that of grating the carrots. The orange color gives it that oomph factor when it comes to visual attraction.

So it is a win-win whenever I cook this rice for it is delicious, heartful and visually appealing, which means the kids are going to love it. 

Especially for parties, this makes a great potluck dish. Everyone is going to be bananas over this dish, I bet. When I first made this rice, I wasn't so sure if it would be a hit, as I didn't feel anything new about the ingredients but everyone loved it and was fighting for more to my delight.


When you go through the recipe, you can see that its the basic ingredients any Indian household pantry would have other than the Arabic spices/mixed spices/baharat. It's all the same. Every household might not have this one ingredient, for that you may substitute with garam masala, not the same but will give almost the same taste. Along with the garam masala add in paprika if you have some. I would suggest to buy the Arabic spices itself if you can get hold of it.

Also, you might wonder just to make this dish how you would be able to finish 1 packet of the mixed spices. That's when these 'Bayara' counters in Carrefour etc comes to the rescue. Just tell them the amount you might require, and voila you have your tension-free spice! 😎 *just kidding * 😁

This rice originates from The Kingdom of Saudi Arabia, (that's what Google says, also heard it has origins from Persia). 

Bukhari rice is prepared by in the chicken broth itself, somewhat like mandi, majboos, etc. That's what makes the rice so flavorful. But don't get me wrong, this might not be an authentic recipe to making Bukhari rice but I have done my own justice to it by adding flavors to the chicken smear for 'that' final touch.  I have always felt adding your own touch to a dish in a way always adds a personalized flavor.


Ingredients :

For the marination:


  • 1 kg whole chicken (preferably with skin)
  • 1 tsp gg paste
  • Salt
  • 1 tsp chings Szechuan chutney


For the masala:


  • 2 onions chopped coarsely
  • 3 cardamom, 3 cloves, 1-2 cinnamon sticks, 3-4 dry bay leaves
  • 2 tsp gg paste
  • 3-4 green chillies slit, or ground
  • 2 tsp Arabic spice
  • 1 tsp pepper powder
  • 1 big tomato chopped
  • Salt
  • 1 dry lemon
  • 2 carrots grated
  • Coriander leaves
  • 2 cup/glass basmati rice
  • 3 cups of water
  • 2 tbsp tomato paste

For basting the chicken:


  • 3 tbsp Sriracha sauce
  • Salt
  • 1/4tsp pepper powder
  • 2 tbsp soy sauce


Instructions :


  1. Smear and apply the marinade on the chicken well for at least ½ an hour.
  2. Now to cook the masala mixture, take a large pot or casserole that is big enough to cook rice in. Add in some ghee, and sauté the onions and whole spices. And add gg paste and green chilies.


  3. Next, add the Arabic spice and pepper powder. Once the spices are Sautéed well add a big chopped tomato and salt.


  4. Place the lid and let it cook for a couple of minutes on low.
  5. Meanwhile, grate the carrots.
  6. Next, add in the chicken and coat the chicken in the mixture and pour 1 glass of water.

  7. Cook covered for 15 - 20 minutes each side. (Since they are big cuts, you don't want raw chicken)
  8. Once done, remove the pieces of chicken. And check the water if more is required (see notes). Next add the grated carrots, extra water, and coriander leaves.
  9. Next, add a couple of tbsp of tomato paste and add the rice, close lid till the rice gets done (check tips for cooking Basmati Rice).
  10. Now baste the chicken with the mixture (given in the ingredients list) and grill the chicken on a grill pan or a frying pan while the rice gets cooked. (check notes) 


  11. After about 20-25 minutes your rice will be ready. 


  12. Serve the rice on a platter.
  13. Once the chicken is grilled, place the chicken on the rice platter.
  14. Meanwhile, you may also make Salata Hara (the tomato chutney that is an accompaniment with mandi). Check notes.
  15. And you are done! Perfectly done flavorful Arabic Bukhari rice is ready. Garnish with grated Carrot and Coriander leaves. Enjoy! 😋


Notes :


  • I added Chings Szechuan chutney to the chicken marinade along with gg paste and salt. You may substitute with chili flakes instead of Szechuan sauce/ chutney. You also may totally omit it if you don't have these in your pantry.
  • If you are a beginner at cooking you might want to measure the water left in the pot so that you may add extra water as required for cooking the rice.
  • Using chicken with skin helps attain tender chicken.
  • Fry the chicken just for a bit until the coating gets just done, do not over fry, you don't want your chicken to be hard and chewy, the cooking process of the chicken is already done previously.

Tips on Cooking Basmati Rice:

  • For 1 cup of rice use 1½ cups of water. 
  • Do not keep checking on the rice, at least for about 20-25 or until the water has drained up on med-low flame, it will do its work on its own.
  • Once done, do not use a spoon or ladle to mix, instead use a fork to fluff up the rice, you don't want to break the rice.
  • But for bigger quantities, you may use a ladle but with utmost care.
  • The recipe I make for Salata hara is the easiest and the best. 

Do try this recipe and don't forget to share your experience/feedback with me here in the comments or feel free to send me a mail. Also, do tag me at #taystedit if you try out my recipes on Facebook, Instagram, etc so that I can see when you make it. ♡♡♡♡
Older Posts

Search This Blog

My name is Hasna Haneef, a mommy to a toddler, hailing from Thalassery, Kerala. Welcome to my humble abode on the Internet; wherein I share all my recipes and experiments. I am glad to have you on board!

TRENDING POSTS

  • Kerala Style Squid Roast
  • Chicken Steak with Creamy Mushroom Sauce
  • Emirati Chebab
  • Regag - Emirati Flat bread
  • Copy Cat Caesars Mini Pizza
  • Kerala Beef Fry/ Nadan beef dry fry

About Me

May peace be with you!

Welcome to my blog.

I am delighted to have you on board. My name is Hasna Haneef, a mommy to a toddler, hailing from Thalassery, Kerala. My homeplace being Dubai, as I am born and brought up here and I am very influenced by the lifestyle and the variety of authentic cuisines I get to try from here, which has made me try anything that comes across me
, click here →

Stay Connected!

Join Our Madness!

Join with Thousands Of Subscribers ! Get Our Latest Recipes Delivered to Your email Inbox!

Powered by follow.it
  • Home
  • About Me
  • Recipes

    • Main Course
    • Desserts
    • Snacks

    Uncategorized

    • Chicken
    • Meat
    • Vegetarian
    • Rice
    • Malabar Food
    • Baking
    • Breakfasts
    • Snacks
    • Drinks
    • Pasta
    • Fish
    • Soups
    • Desserts
  • Contact Me

Featured Post

Triple Chocolate Hazelnut Skillet Cookie

Blog Archive

  • ▼  2025 (4)
    • ▼  April (2)
      • 1 minute Chocolate Mug Cake
      • Grilled Cheese California Burrito
    • ►  March (1)
    • ►  February (1)
  • ►  2024 (36)
    • ►  October (4)
    • ►  September (5)
    • ►  July (1)
    • ►  June (2)
    • ►  May (4)
    • ►  April (3)
    • ►  March (10)
    • ►  January (7)
  • ►  2023 (47)
    • ►  December (3)
    • ►  September (2)
    • ►  August (6)
    • ►  July (6)
    • ►  June (9)
    • ►  May (4)
    • ►  April (5)
    • ►  March (6)
    • ►  February (3)
    • ►  January (3)
  • ►  2022 (69)
    • ►  November (4)
    • ►  October (6)
    • ►  September (7)
    • ►  August (9)
    • ►  July (12)
    • ►  June (5)
    • ►  May (5)
    • ►  April (12)
    • ►  March (4)
    • ►  February (2)
    • ►  January (3)
  • ►  2021 (24)
    • ►  November (1)
    • ►  October (2)
    • ►  July (1)
    • ►  June (4)
    • ►  May (6)
    • ►  April (4)
    • ►  February (4)
    • ►  January (2)
  • ►  2020 (82)
    • ►  December (5)
    • ►  November (6)
    • ►  October (4)
    • ►  September (2)
    • ►  August (5)
    • ►  July (10)
    • ►  June (10)
    • ►  May (13)
    • ►  April (12)
    • ►  March (8)
    • ►  February (4)
    • ►  January (3)
  • ►  2019 (22)
    • ►  December (1)
    • ►  November (2)
    • ►  October (6)
    • ►  September (1)
    • ►  August (1)
    • ►  February (3)
    • ►  January (8)
  • ►  2018 (15)
    • ►  December (4)
    • ►  November (6)
    • ►  October (3)
    • ►  September (2)

Subscribe Us

Labels

Bake Biscuits Breakfast Brown rice Burger Cheese Chocolate Dal Egg Emirati Fish Iftar Indonesian Japanese Jeerakashala rice Kerala Keto Kuwait food Lunch Milk Mutton Thai food UAE food afghan cuisine arabic beef biryani bread burnt cheesecake cake chicken cream dessert dinner greek healthy indo chinese lamb malabar prawns pudding puffs quick dinner ideas recipe refreshing drink rice salad sandwich stir fry vegetables vegetarian veggies yemeni

Contact Form


POPULAR POSTS AND PAGES

Kerala Style Squid Roast

Kerala Style Squid Roast

June 18, 2020
Chicken Steak with Creamy Mushroom Sauce

Chicken Steak with Creamy Mushroom Sauce

November 05, 2018
Emirati Chebab

Emirati Chebab

June 01, 2023
Regag - Emirati Flat bread

Regag - Emirati Flat bread

December 02, 2020
Copy Cat Caesars Mini Pizza

Copy Cat Caesars Mini Pizza

March 12, 2024

Pages

  • Home
  • About Me
  • Privacy Policy
  • Contact Me

Copywrite © 2023 TermsFeed®. All rights reserved.

Created By Sora Templates | Distributed By Gooyaabi Templates

Back to top