Search This Blog

Taystit by Hasna

Food, Recipes, and Beyond

  • Home
  • About Me
  • Recipes
    • Main Course
    • Snacks
    • Desserts
  • Uncategorized
    • Chicken
    • Meat
    • Vegetarian
    • Rice
    • Malabar Food
    • Baking
    • Breakfasts
    • Snacks
    • Fish
    • Pasta
    • Drinks
    • Soups
    • Desserts
  • Contact Me

North Indian Style Dal Tadka


I am all about easy recipes that are EASY at the same time COMFORTING. For me, a plate of perfectly cooked rice, dal tadka, and chicken or any seafood fry is something very much that tells me home cooked meal. In North India, this is combination is very popular and is called Dal-Chawal (lentil-rice), a favorite among many.

Dal tadka is something I prepare once a week, it's wholesome, filling and keeps one content. This recipe is so easy and gets done in a jiffy! For lentils, I have used toor dal here. You may use red lentils, masoor dal, a mix or a combination of the lentils. There is no sautéing involved, only a tadka / tempering is prepared to give the dal its oomph!

You can have DAL TADKA with chappati, roti, rice or as a side curry. It will definitely be your family's favorite.

Ingredients :

  • 1/2 cup Toor Dal
  • 1/2 Onion, sliced
  • 1/2 Tomato, chopped
  • 1-2 Green chillies, slit
  • 1/4 tsp Turmeric powder
  • Salt, as required 
  • 3/4 cup Water
  • Coriander leaves, chopped 

Tadka:

  • 2 tbsp Butter
  • 1/2 tsp Cumin seeds
  • 1 tsp Ginger Garlic paste
  • 2 sprig Curry leaves
  • 1 tsp Kashmiri Red Chilli Powder
  • A squeeze of Lemon juice
  • Coriander leaves, chopped 

Instructions:

  1. Wash toor dal well and add to a pressure cooker. 


  2. Pressure cook all the ingredients except for the ingredients under tadka for 1 whistle. Allow the pressure to release naturally.
  3. In a small tadka pan, add in butter, allow to melt. 
  4. Splutter the cumin seeds, add ginger garlic paste, curry leaves, chopped coriander leaves and sauté well. 
  5. Pour the cooked dal, add in the Kashmiri Red Chilli powder, and adjust seasoning if required.
  6. Allow to simmer well. Finally squeeze lemon juice, garnish with chopped coriander leaves and add in a blob of butter.
  7. Enjoy with cooked rice, and your favorite sides like chicken or fried seafood!


Do try this recipe and don't forget to share your experience/feedback with me here in the comments or feel free to send me a mail. Also, do tag me at #taystedit if you try out my recipes on Facebook, Instagram etc so that I can see when you make it. ♡♡♡♡

 Najaf Style Chicken 65


A very fond memory of Dubai, has to be the Chicken 65 from Najaf Restaurant, Deira, for so many of us expats. It is slightly tangy, sweet, spicy, vibrant and a firework of flavors! Once you have had Chicken65 from Najaf, you can never see Chicken 65 as a dry fry, like how it's usually served in restaurants. This recipe, has a story behind it, its not completely mine, it's a compilation of 3 different recipes, which includes mine. 

The story begins like this - My mom in her young days, used to love experimenting with food. One fine day, she happened to smell the beautiful aroma of curry leaves sautéed in butter coming in from the flat underneath, the aroma just held the air still. Then a few days later, when she had the Najaf 65, she immediately remensced the aroma of the curry leaves sautéed in butter. So she started experimenting on her own - she knew there was yogurt in it, and the spices she played with and almost got hold of it. This recipe was developed years ago, where marinated chicken is cooked in the marinated yogurt masala itself and the rest of the steps are similar to mine, but mom doesn't add ginger garlic paste. 

Recently I saw a recipe of a fellow blogger (sweetandsavoryfood.com) frying the chicken pieces, so I tried this and felt that the sauce held onto the chicken much better when fried and her recipe so much like mine and my moms.

I have used butter to splutter the curry leaves and the mild green chillies, you may use ghee too, but I felt butter gives that intense flavor. What I love about the recipe is that, with very few ingredients you can make a curry that is delicious and finger licking good. I did not use any form of food color in the recipe, so you can be sure that you can serve your kids happily too and they will love it, in Sha Allah! 


Ingredients :

  • 500 gms Chicken, curry cut
  • 1/4 tsp Turmeric powder
  • 2 tsp Kashmiri Chilli powder
  • Salt, as required

For the gravy:

  • 2 large Green chillies, mild, chopped (more if you like it spicy)
  • 2 sprigs Curry leaves, chopped
  • 1/2 of a peeled onion, chopped roughly
  • 1/4 inch ginger piece
  • 3 cloves of Garlic
  • 1/2 cup Yogurt 
  • 2 tbsp Tomato paste
  • 1 tsp Kashmiri Chilli powder
  • 1/2 tsp Coriander powder
  • 1 tbsp Tomato Ketchup
  • 1/2 cup water 
  • 1 large knob of butter 
  • Salt,as required 
  • Pinch of sugar 
 

Instructions :

  1. Marinate the chicken with Kashmiri Chilli powder, Turmeric Chilli powder, and salt as required.
  2. Fry the marinated chicken pieces in vegetable oil and do not over crowd the pan while frying, for around 10-12 minutes .
  3. Chop the green chillies and curry leaves and set aside.
  4. In a mixer jar, add in the chopped onions, ginger pieces, garlic, yogurt, tomato paste, tomato ketchup, red chilli powder and coriander powder. Blend well to a fine paste.
  5. In another pan, add a knob of butter and add a couple of tablespoons of the fried oil to the butter (so that the butter does not burn).
  6. Now add in the chopped curry leaves and chopped green chillies, saute for a couple of minutes.
  7. Add in the prepared yogurt-tomato paste. Mix well and allow the gravy to cook well.

  8. Next add in the fried chicken pieces and pour water and allow to come to a boil, add salt, as required. And a pinch of sugar.
  9. Let the gravy reduce and come to a boil and when the color of the gravy changes to a bright red and the oil separates from the gravy, you know your curry is done!

  10. Enjoy with a hot flakey porotta! Yummmm...
 

Do try this recipe and don't forget to share your experience/feedback with me here in the comments or feel free to send me a mail. Also, do tag me at #taystedit if you try out my recipes on Facebook, Instagram etc so that I can see when you make it. ♡♡♡♡

 Breakfast Cheddar Biscuits


Since it's the vacation season, kids are always at home, and this makes a great garb and go breakfast idea when you have made plans with your family. These biscuits when paired with some veggies and fresh juice, makes a great breakfast meal. These buscuits comes together very easily, no effort at all, I guarantee. 

The aroma that sits in the house is just, aaaah, sooo good. Well, of course, you have butter as the star ingredient. You can make them ahead and store it in the frezeer, so that you have something ready for your kids snack time. These are much similar to buttermilk biscuits that are my favorite, Popeyes biscuits. The crisp from the scallions are just so good. If you can get hold of some shredded cheddar cheese, do try this recipe. If you have made ahead, and frozen them, thaw the biscuits in the refrigerator overnight and bake them for 15 minutes and have it warm, and enjoy. 😋

Ingredients:

  • 1 1/2 cup All purpose flour
  • 1 tsp baking powder 
  • 1/2 tsp baking soda
  • Black pepper, crushed
  • Salt, as required 
  • 1/2 cup cold butter, cubed
  • 1 tbsp butter, melted
  • 1/4 cup Scallions, chopped
  • 1/2 cup shredded cheddar cheese
  • 3/4 cup buttermilk

Instructions:

In a large bowl add flour, baking powder, baking soda, black pepper and salt.
Work the cold butter into the flour, using fork/finger until crumbly in texture.
Add in the chopped scallions and cheddar cheese, mix well.
Now pour the buttermilk, little at a time and bring to a dough until not too sticky or too crumbly.

Transfer the dough to a lightly floured counter top and kneed well, just until the dough comes together.
Flatten into a rectangle shape and fold the short sides overlapping each other and press down and flatten and repeat the process again.

Now flatten a little and using a dough scrapper/knife , cut the dough into 6 equal squares.

On a baking paper lined sheet, place a little cheddar cheese just before placing each biscuit. The cheese comes underneath each biscuit.
Brush the biscuits with melted butter and bake the biscuits in a preheated oven at 210 deg C for 15 minutes until golden brown.
Enjoy with semi boiled eggs and fresh fruits and juice for breakfast! 😋😍


Do try this recipe and don't forget to share your experience/feedback with me here in the comments or feel free to send me a mail. Also, do tag me at #taystedit if you try out my recipes on Facebook, Instagram etc so that I can see when you make it. ♡♡♡♡

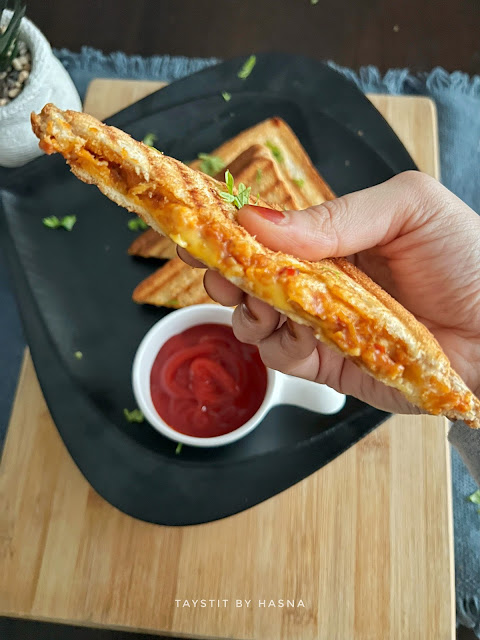
Creamy Chicken Sandwich


Since Monday was a holiday, regular working days starts from tomorrow, so if you are in search of lunch box ideas, or snacks that you can make for children in the evening, do give this sandwich a try. With a bite of the sandwich in your mouth, it's all things delicious that runs in your mouth. 

I would sometimes like to pair it with a salad and it makes a delicious, filling and nutritional dinner too. I love to keep this sandwich for lunchbox, as it's filling and no dropping of contents of the sandwich on uniform by kids while grabbing a bite, as the filling sets and yet still feels creamy to the mouth.

I bet you, once you make this for your kids lunch box, they will keep asking for more. So, without further ado, let's get started!


Ingredients: (makes around 3 sandwiches)


  • 6 Slices of White/ Milk bread
  • 1 med Onion, chopped finely
  • 2 Garlic cloves, chopped finely
  • 1+1 tbsp Butter
  • 150 gms Boneless Chicken
  • Salt, as required
  • 1/2 tsp Black Pepper Powder, crushed
  • 1/2 Paprika/ Red chilli powder
  • 1 tbsp All Purpose Flour
  • 1/4 Cup Milk
  • 2 tbsp Mayonnaise 
  • 1 tbsp Tomato Paste
  • 1/4 tsp Oregano
  • 1/4 tsp Red chilli flakes
  • Cheese Slices, as required 

Instructions:

  1. In a pan, drop a tbsp of butter and add in your onion and garlic, chopped in the food processor.
  2. Next, pulse your boneless chicken pieces in the same processor and mince the chicken.
  3. Add the minced chicken to the onions and add salt as required.
  4. Add spices like black pepper powder, paprika/ red chili powder.
  5. Drop a piece of butter to the chicken add in your flour, give it a mix, reduce heat and pour in the milk, allow to cook on low heat.
  6. Next, add in mayo and tomato paste, combine well.
  7. Lastly add in oregano and red chili flakes.

  8. Place the bread on a griller and add in your creamy chicken masala and place a cheese slice and place your other slice of bread, allow to grill.
  9. Spread some butter and grill for a couple of minutes and your sandwich is ready to serve.
  10. Slice the sandwich diagonally and enjoy with some ketchup.


Do try this recipe and don't forget to share your experience/feedback with me here in the comments or feel free to send me a mail. Also, do tag me at #taystedit if you try out my recipes on Facebook, Instagram etc so that I can see when you make it. ♡♡♡♡

Butterscotch Blondies studded with chocolate chips featuring Butterscotch Sauce


I mean, I never knew there was something better than brownies. The best part is that these are easier to prepare than brownies., coz there is no beating of eggs involved nor any specialised kitchen machinery required.

My mom loves butterscotch, and that's how I got my inspiration to prepare these blondies. She always frowns whenever I make a brownies. The other day I happened to prepare some butterscotch sauce and I was craving for some warm and cold combination, then it dawned on me all that I wanted to make was some warm blondies that will go along with some ice cream and a drizzle of butterscotch sauce. And to balance the flavors I added a pinch of salt. Aaah blisss!


Just like brownies are made of chocolate and are called brownies for a reason, blondies are more of a hue of blond and yellow as there is no chocolate in them and it's more of the flavor that comes from the butter and dark brown sugar. I have used browned my butter to bring out the butterscotch flavors. This process has to be done carefully. Browning butter has a science behind it, Butter when boiled brings out the moisture in it, and this is why the butter bubbles when boiled, causing the solid particles in the butter to brown, so in a fraction of seconds, the brown butter can turn into burnt butter. So once the butter has browned lightly, immediately transfer to a heat proof bowl. It is recommended to make the brown butter in a light colored pan, so that it's easier to identify when the butter browns. 


My blondies look a bit darker than usual as my dark brown sugar gave the effect and for added drama I dropped in some choco chips.. Ohh boyyy! The gooey butterscotch blondies along with the melted choco chips is soooo good! So happy with the results.. Can't wait to share with you guys!

And please be careful with the temperatures and bake time, you don't want a greasy and hard blondie. When you bake for longer your results might not be the best. When the blondie is baked in the middle just about done, not fully baked, stop baking. This took my oven around 30 minutes, every oven temperature varies, sometimes you might require less or more. Baking time.

Without further a do let's get started.

Ingredients :

Blondies:

  • 100 gms unsalted butter, browned (check notes) **
  • 1 cup/ 200.gms dark brown sugar 
  • 1 large egg and 1 egg yolk
  • 1 tsp Vanilla Essence 
  • A pinch of salt
  • 1 cup patent flour 
  • 2-3 tbsp semi sweet chocolate chips

Butterscotch sauce :

  • 2 tbsp butter
  • 1/4 cup dark brown sugar
  • 1/4 cup Whipping cream / heavy cream 
  • A pinch of salt
  • 1/2 tsp vanilla essence

Instructions:

  1. To prepare your butterscotch sauce, in a sauce pan, swirl your butter, before it completely melts and add in your dark brown sugar and Whipping cream. 
  2. Using a rubber whisk, combine well and allow to simmer for 4 minutes stirring occasionally. *

  3. To bake the blondies, preheat the oven to 180°C and line your 8*8 inch baking dish with Parchment paper.
  4. In a bowl, add your dark brown sugar, eggs and combine using a whisk.
  5. Next add a pinch of salt and vanilla essence.
  6. Now add your flour in and fold well using a spatula.
  7. Add in your choco chips and transfer the batter to your lined baking dish and spread uniformly. 

  8. Finally sprinkle some choco chips and bake for around 25 to 30 mins depending upon your oven temperature until still Goey and just about done.
  9. Remove from oven and allow to cool. Serve large square pieces with a dollop of ice cream and the prepared home made butter scotch sauce.


Notes :

*Do not simmer the butterscotch sauce for too long, as the sauce would then not be pourable.
** If you use salted butter, omit the addition of salt.
*Browning of butter is done by cooking the butter on medium low and storing continously in a light colored sauce pan. Within a fraction of seconds the brown butter may turn to burnt butter. Once the butter develops a nice aroma and the color has changed, immediately transfer the brown butter to a heat proof bowl and allow to cool. 


Do try this recipe and don't forget to share your experience/feedback with me here in the comments or feel free to send me a mail. Also, do tag me at #taystedit if you try out my recipes on Facebook, Instagram etc so that I can see when you make it. ♡♡♡♡

Mutton Makhni


And we have reached the end of the year 2020, even though it might have not been as great as we anticipated it to be, we have made it Alive! Alhamdulilah (Praise is to God) for all the blessings we still have. My heart goes out to all those who have faced calamities during this pandemic. Let us begin this new year by being grateful for all that we have.

Okay, coming to the recipe of the day, it is mutton makhni, something similar to butter chicken but way easier! This recipe was an inspiration from my bhabhi (sister-in-law)'s mom. One day, when she happened to stay with us she prepared something that looked like butter chicken but without the chicken, instead, the meat was mutton. I was surprised and wondered why I never thought of this idea before. When I asked her, what the name of the dish was, she said there was no specific name. Recently, I decided to re-create the dish, from what I understood by tasting it. And to my surprise, I nailed it!

The gravy is a thick concoction of every Indian basic curry flavors, which comprises of onion, ginger-garlic, green chilies, tomatoes, turmeric powder, chili powder, and garam masala. The sauteed and pressure cooked meat is then fished out from the prepared gravy. The gravy is ground to a fine paste which goes through a mesh strainer to give you a butter-like sauce, which is why I named the dish - Mutton Makhni. The gravy is velvety smooth and the mutton (lamb meat) is so tender that I felt no other name would have matched better!


Such a royal and rich gravy that you can't get enough! Try this recipe the next time you have a party and I am sure you are bound to please your crowd! And best part is that, this gravy is super easy to prepare unlike the classic butter chicken, which involves another step of frying the chicken.


Ingredients :

  • 500 gms mutton
  • 1 large onion, sliced
  • 1 1/2 tbsp garlic paste
  • 1 tbsp ginger paste
  • 2 - 3 green chillies, slit (depending on spice level, I prefer less chillies as this dish isn't on the spicy side) 
  • 1 large tomato, chopped 
  • 1/4 tsp Turmeric powder 
  • 2 tsp Kashmiri Red chilli powder 
  • 1 tsp Garam masala powder 
  • 8-10 cashews 
  • 1 tbsp butter
  • 1 tsp Kashmiri Red Chilli powder
  • 1/2 cup milk
  • 1 tbsp Tomato ketchup
  • 1/4 tsp Garam masala
  • 1/4 tsp dried Fenugreek leaves 
  • 2 tbsp cream 
 

Instructions :

  1. In a pressure cooler, add in a tbsp of oil and Sautee your onions until translucent. 
  2. Now add in your ginger-garlic paste and green chillies. Saute for around 30 seconds. 
  3. Next add in your chopped tomatoes and cahsews, Sautee. 
  4. Add your spice powders - Turmeric powder, Kashmiri Red Chilli powder, and Garam masala. Sautee for a minute on simmer. 
  5. Add in your cleaned mutton pieces and add salt as required. (around a tsp and 1/4)
  6. Pour 1/2 cup water or until the mutton pieces are almost covered in water. 
  7. After around 5-7 whistles (depending on the maturity of the meat), switch off and allow the pressure to release on its own. 
  8. Once the pressure has released and you open the lid, fish out your mutton pieces and set aside. 
  9. After allowing your curry to cool a bit, add the contents to a mixer grinder and grind to paste. 
  10. Now into a steel skillet or casserole add in a tbsp of butter, and add in a tsp of Kashmiri Red Chilli powder for that extra deep color on the lowest heat setting. 
  11. Immediately strain the ground paste using a steel strainer into the skillet or casserole and mix well. 
  12. Pour in your milk to make your gravy thin but without losing its richness. 
  13. Finish off with your garam masala and dried Fenugreek leaves. 
  14. Add in your tomato ketchup or sugar for balancing. Check and adjust seasoning as required. 
  15. Garnish with cream and Coriander leaves. 
  16. Enjoy with ghee rice, chappathi or any rotis of your choice! 😋


Do try this recipe and don't forget to share your experience/feedback with me here in the comments or feel free to send me a mail. Also, do tag me at #taystedit if you try out my recipes on Facebook, Instagram etc so that I can see when you make it. ♡♡♡♡

Street Style Fast food
Paav Bhaji 


Good evening folks. Do you get this sudden cravings for Indian Street food style chat? Well I am someone who loves any kind of street food/ fast food, but to my dismay, the Mister hates Indian Chat! Well, thanks to all the viral videos that showed the unhygienic preparation of street food. So to satisfy my cravings, I make some them from home. 

Pav is basically the bread rolls that are served along with the bhaji (a Marathi word which indicates a vegetarian dish). Bhaji is basically prepared by cooking vegetables and adding spices, mashing the vegetables to form a gravy. A special combination of spices are used to prepare the paav bhaji masala which brings out the authentic taste. Though this spice mix (Pav bhaji masala powder) can be found in Indian stores and supermarkets, I like to prepare them from scratch, which helps to bring better flavors. 

It is said that Pav bhaji was invented as a quick lunch option for the textile mill laborers in Mumbai that is now enjoyed as a street - fast food and in restaurants. Though my recipe doesn't use red food color, you may use if required, I used kashmiri red chilli powder instead, sautéed them in butter to bring out the color.

Here, I have incorporated the street style way of cooking by sautéing a tbsp of the prepared masala in butter along with chopped Coriander leaves and toast the paav on an iron griddle. It takes the pav to a next level. I bet this recipe can fill your tummy and soul! 

*The picture displayed is a random capture for the time being , which will be replaced soon. 

Ingredients :

For 3-4 people

  • 1 tbsp vegetable oil
  • 1 tbsp butter
  • 1 large Potato (boiled and mashed)
  • 1 large tomato, chopped
  • 1/4 cup green Peas (I used frozen) 
  • 1 medium Onion chopped finely
  • 1/2 green Capsicum chopped finely
  • 2 tsp Pav bhaji masala powder (to make from scratch I will mention below)
  • 1 tsp Kashmiri Red chilli powder
  • 1/2 dry Fenugreek leaves, powder it by rubbing between palms
  • 1 green chili, finely chopped (if required)
  • Coriander leaves, finely chopped
  • 1 tsp Ginger garlic paste
  • 2 tbsp lemon juice
  • Around 1 cup water
  • Salt as required

For paav:

  • 1 tbsp butter
  • Coriander leaves, chopped
  • 1 tbsp prepared Pav bhaji masala (not powder) 

Instructions :

  1. In a wide bottom thick pan, pour 1 tbsp vegetable oil and 2 tbsp butter.
  2. Sautee the onion and Capsicum till the wetness from them dry around 2-3 minutes.
  3. Add salt as required. 
  4. Add in Pav bhaji masala powder, kashmiri chilli powder and dry Fenugreek leaves.
  5. Sautee and add in green chillies, Coriander leaves and ginger garlic paste. Sautee well. 
  6. Finally add in your tomatoes and green Peas. 
  7. Sautee and finally pour lemon juice.
  8. Add your mashed potato. Mix well.
  9. Pour around 1 glass of water, you want it the gravy loose. Close the lid and allow to boil for around 5 minutes and open the lid and mash using a masher and adjust water and salt as required. 
  10. In an iron tawa, place a tbsp butter, drop Coriander leaves and add the prepared Pav bhaji masala and Sautee for a few seconds and place the Pav and nicely toast both sides.
  11. Serve the paav and masala with a slice of lemon and chopped onion.


To prepare Pav bhaji masala powder from scratch : (can use this measurement to prepare the above recipe 2 - 3 times) 

  • 2 tbsp Coriander seeds
  • 1 tbsp cumin seeds
  • 1 cinnamon stick
  • 1 cardamom pod 
  • 2 cloves
  • 2 Bay leaves 
  • 2 tsp whole black pepper 
  • 1 tsp fennel seeds
  • 3 whole dried kashmiri chilli/ 1 normal dried chilli
  • 1/2 tsp Turmeric powder 
  • 1 tsp dry Mango powder/amchur powder. 

Instructions :

  1. Dry roast the above ingredients except for Turmeric powder and dry Mango powder and allow to cool completely.
  2. Grind well and finally add the Turmeric powder and dry Mango powder and give a couple of blitz and store in a dry and clean container.

Note:
  • If you want super mashed up veggies in your bhaji, you may cook them well in a pressure cooker before you prepare the masala.
  • The usage of the type of veggies used in Pav bhaji can make a slight difference in taste, if you like a sweeter taste you may use carrot, for extra color you may use beetroot. I personally like more Capsicum which helps bring out the flavors better.

Do try this recipe and don't forget to share your experience/feedback with me here in the comments or feel free to send me a mail. Also, do tag me at #taystedit if you try out my recipes on Facebook, Instagram etc so that I can see when you make it. ♡♡♡♡

Warm and Sticky toffee pudding


If not everyday, Ramadan is when you get to find a whole lot of dates at home. So why not utilize it? I have been wanting to share this recipe since a while now. This is bomb.com when it comes to warm desserts! Really.. I just can't get over it.

This pudding was first introduced to me when I was at an iftar party at my brother's office at world trade centre. They had showcased many dishes like the stuffed grapevine leaves, kibbeh (which I will soon share the recipe), saffron rice, arabic harees, dumplings, some crazy Flavored macarons! All so tempting 😍 Finally in the dessert section there was muhallabia , like certainly, but this sizzling, warm sticky toffe pudding caught my eyes and my taste buds. This was kind blowing, how truly delicious it TASTED. I instantly knew there was dates in it. The amalgamation of butter with dates was next level. So I had to try this from home! (If you know me, you know! 😅)

Well, prepping the 1st time for sticky toffee pudding wasn't easy, as I thought pitting dates was a pain, especially if they are quite sticky. But as you make it you realize, that's the fun part! After mixing all the ingredients, I poured the batter to a Parchment lined Loaf tray and let it do the magic while I prepared the toffee/sauce. The house was smelling so good with the butter and dates getting baked in the oven, it smelled fascinating. I was even more in joy while preparing the Toffee sauce. The Toffee sauce is what takes the pudding to a next level👌👌😋


Let me tell you, if you love dates, you are going to live this pudding. I also use this as a base for desserts, as this is super easy and flavorful. One such dessert is the Kulfi Toffee Mousse pudding that is on my YouTube. Will be posting the recipe of the mousse pudding here, in Sha Allah! As written recipe requests are coming in for the same❤️

Well, after baking them I poured the sauce over it and gave some to my mom and sister. My sister came asking me what is this heaven even? What more of a remark does one need! It truly tastes like heaven; bliss! 

Now let's get to the recipe! 

Ingredients :


For the cake/pudding:
  • 150 gms dates, pitted 
  • 1 cup hot water
  • 3/4 baking powder 
  • 3/4 baking soda
  • 1 egg
  • 3/4 Cup All purpose flour 
  • 80 gms softened butter
  • 1/4 brown sugar

For the toffee sauce:
  • 50 gms Unsalted butter
  • 1/2 cup brown sugar
  • 3/4 cup heavy cream
  • 1/2 tsp vanilla extract 

Instructions :


For pudding :
  1. Preheat your oven to 180°C. 
  2. In a heat proof bowl, add your pitted dates, baking soda and pour in the hot water. 
  3. Smash the soaked dates using a potato masher. 
  4. Next, in a separate bowl, cream butter and brown sugar using an electric mixer. 
  5. Add the egg and beat until incorporated.
  6. Add the flour and Sprinkle the baking powder and beat lightly until combined. 
  7. Next add your mashed dates to the butter-egg mix. And fold until well combined.
  8. I like to add a pinch of salt to balance the sweetness. 
  9. Pour the batter to a pre lined Loaf pan with Parchment paper. 
  10. Bake for 40-45 minutes or until skewer comes out clean. 

For Toffee sauce:
  1. In a heavy bottom sauce pan, add brown sugar, butter, heavy cream, and allow to boil. 
  2. Do not mix continuously, give a stir, or swirl the pan and let it simmer for 2 minutes, switch off the flame. And the toffee sauce is done! 

Serve the pudding warm, pour the warm Toffee sauce and enjoy! 


Notes:
  • Have it warm for extra yummy points! 
  • This recipe can be doubled to make in a cake pan, the initial recipe which I followed was that of a cake pan. I wanted to make only for two, so halved the quantities and made in a Loaf pan. 
  • You can bake in individual moulds too, just that pour 2/3 of the way up and bake for 25 minutes or until skewer comes out clean. 


Do try this recipe and don't forget to share 
your experience/feedback with me here in the comments or feel free to send me a mail. Also, do tag me at #taystedit if you try out my recipes on Facebook, Instagram etc so that I can see when you make it. ♡♡♡♡

Lemon Glazed Salmon with Garlic-Butter Sauce


Oh boy! Oh boy! And the end of the year and the season of celebrations has finally called in. And so does it make for a reason to cook some comfort food. This is one simple dish with some amazing aftertaste, that you and your family cannot get enough of, definitely!
Let me add some light to this, if you are going to go to a restaurant and order this same thing it is going cost you a fortune yet with seemingly less or more salt and other spices etc. Cooking this meal served with some roasted rosemary potatoes (about which I will come around in a new post - the best flavorsome potatoes you are going to try!), steamed corn on the cob and broccoli; definitely a wholesome lunch/dinner and a win-win meal. Take my word for this. Of course, you may give in a try with your own idea for sides, can be some creamy mashed potatoes, home-made french fries etc.

Let me break this down for you, I don't really like the taste of lemon, but this lemon-butter sauce is exceptional. You may use a cube of Maggi Chicken Cube with 1 cup of water if you do not have freshly made chicken broth. This sauce truly enhances the taste of salmon. Salmon is a very good source of Omega 3 fatty acids. It is also a good source of protein and high in vitamin B.

FUN FACT: Omega-3 fatty acids are essential nutrients that are important in preventing and managing heart disease. Findings show omega-3 fatty acids may help to lower blood pressure. Basically, it is very good for the heart; prevents and protects from heart problems. 

It is advised to have an intake of fatty fish twice a week. So if you want to include salmon in your diet and you have no idea how to do; this recipe is for you! And I am sure you're going to make them quite often. Teehee. The fish is basically pan-fried and drizzled with this ah-may-zing garlic-lemon-butter sauce. Drooling already? Let's move on to the ingredients.


INGREDIENTS:

2 tbsp extra-virgin olive oil
600gm, salmon fillets, patted dry with a paper towel
Salt to taste
Freshly ground black pepper
3 tbsp unsalted butter
2 cloves garlic, minced
Half the juice and zest of 1 lemon, plus 1 thinly sliced lemon
1 cup chicken broth
2 tbsp chopped fresh parsley


Instructions 

  • 1. In a large skillet over medium-high heat, heat oil. When the oil is hot but not smoking, add salmon skin-side up and season with salt and pepper. Cook salmon until deeply golden, about 6 minutes, then flip over and cook 2 minutes more. Transfer to a plate.


  • 2. Reduce heat to medium, then add 1 tablespoon butter, garlic, and lemon juice and zest and cook 2 minutes. Add lemon slices and chicken broth to skillet and season with salt and pepper. Simmer on low until reduced, 3 to 5 minutes.


  • 3. Return salmon back to skillet and simmer until salmon is cooked through, 3 to 4 minutes. Please be mindful not to over cook or under cook the salmon. Add remaining 2 tablespoons butter and stir to create a creamy sauce.

  • 4. Garnish with parsley and serve immediately with steamed broccoli and corn on the cob and Roasted Rosemary Potatoes, or you may add your own sides to the dish.


Bon Appétit!
Do try this recipe and don't forget to share your experience/feedback with me here in the comments or feel free to send me a mail. Also, do tag me at #taystedit if you try out my recipes on Facebook, Instagram etc so that I can see when you make it. ♡♡♡♡

Chicken Steak with Creamy Mushroom Sauce


Sudden plans/ideas are always the best! Aren't they? This dish was one such concept that just happened to be. I was planning on cooking a healthy meal and I was indeed missing on some comfort food. Chicken brown fried rice was the initial idea, but I swapped it to Chicken Steak with Creamy Mushroom Sauce with Teriyaki Brown Rice with Veggies, to please my taste buds. If you want the recipe to the Teriyaki Brown Rice, let me know! 💗

The climate is changing, Alhamdulillah. Dubai winters are the best, but so does flu and fever come along with it. 😟 Hope everyone is well and stay safe. Take good care of your kids too. Also, a good heartwarming soup is up to be uploaded. The precise one when you can't think of what to give your kids when they are not well and you yourself can enjoy too. Coming back to the Mushroom Sauce - Thank goodness I gave it a go. It was out of this world. The heavy cream mushroom gravy was finger-lickin' good. Though it is rich in flavors and calories😛 you won't regret making this, I assure you.


The mushrooms are sautéed to perfection in the garlic infused butter. Oh my! The aroma is just undeniable. You got to try it to know how fragrant it is and the depth of the sapidity, you'll love it. #comfortfoodatitsbest

This sauce is so elementary but the flavors are immense. It's that simple.

Like I said, this was an impromptu attempt so excuse me for not sharing the step by step photos of this recipe.

So let's move on to the ingredients to get started:

CHICKEN STEAK 

INGREDIENTS :

  • 1 Tablespoon Unsalted Butter
  • 2 Tablespoon Olive Oil
  • 500 grams Boneless Tender Chicken Breast, pounded lightly to flatten
  • 1 Teaspoon Garlic Powder 
  • ½ teaspoon crushed Black Pepper 
  • ½ cup All- Purpose Flour
  • Salt to taste

INSTRUCTIONS:

  1. Marinate the chicken using Garlic Powder, Black Pepper, and Salt for 15 minutes.
  2. In a hot steak pan or heavy griddle, drizzle in the Olive oil and let the butter melt away.
    1. Pat the Chicken Breast with some All-Purpose Flour and fry the steak on medium heat for about 10 minutes per side. Then increase the heat and give it a final fry of about 3-4 minutes per side or until it begins to slightly char. Do not crowd the pan, fry a few pieces at a time.

    MUSHROOM SAUCE

    INGREDIENTS:

    250 grams mushrooms
    1½ tablespoon unsalted Butter
    1 clove Garlic minced
    ½ medium sized Onion finely chopped
    ½ tablespoon All-Purpose Flour
    ½ cup Heavy cream/ Whipping cream
    ¼ cup Milk
    ½ teaspoon White pepper powder
    2 teaspoon Soy Sauce/ Worcestershire sauce

    Salt to taste

    INSTRUCTIONS:

    1. Place a non-stick/ceramic pan on medium-low flame and drop in the butter and sauté the minced garlic until fragrant. 
    2. Next, sauté the onions until soft and translucent. Add the garlic and saute till fragrant. Now add the mushrooms and stir-fry for a couple of minutes till its done.
    3. Now put the flame on simmer and add the All purpose flour and mix for about 30 seconds in the mushroom butter gravy.
    4. Now add the heavy cream and milk couple of tablespoons at a time and keep stirring without fail or else clumps will be formed. Once uniformly done, and the sauce starts to boil, add in the White pepper powder and Soy sauce/ Worcestershire sauce.
    5. Let this simmer for a minute or so, adjust taste and turn off.
    Serve your steak with the sauce drizzled over it, and with the sides of your choice! 

    Bon appetit!


    Note:


    •  You may decrease or increase the quantity of milk or heavy cream depending on how much sauce you want. For me, the more the sauce, the better.
    • The steak can be served with rice, or mashed potatoes, or even roasted baby potatoes.
    • To make it a wholesome meal you may roast veggies or steam some corn on the cob to go with it.


    Do try this recipe and don't forget to share your experience/feedback with me here in the comments or feel free to send me a mail. Also, do tag me at #taystedit if you try out my recipes on Facebook, Instagram etc so that I can see when you make it. ♡♡♡♡
    Older Posts

    Search This Blog

    My name is Hasna Haneef, a mommy to a toddler, hailing from Thalassery, Kerala. Welcome to my humble abode on the Internet; wherein I share all my recipes and experiments. I am glad to have you on board!

    TRENDING POSTS

    • Kerala Style Squid Roast
    • Chicken Steak with Creamy Mushroom Sauce
    • Emirati Chebab
    • Regag - Emirati Flat bread
    • Copy Cat Caesars Mini Pizza
    • Kerala Beef Fry/ Nadan beef dry fry

    About Me

    May peace be with you!

    Welcome to my blog.

    I am delighted to have you on board. My name is Hasna Haneef, a mommy to a toddler, hailing from Thalassery, Kerala. My homeplace being Dubai, as I am born and brought up here and I am very influenced by the lifestyle and the variety of authentic cuisines I get to try from here, which has made me try anything that comes across me
    , click here →

    Stay Connected!

    Join Our Madness!

    Join with Thousands Of Subscribers ! Get Our Latest Recipes Delivered to Your email Inbox!

    Powered by follow.it
    • Home
    • About Me
    • Recipes

      • Main Course
      • Desserts
      • Snacks

      Uncategorized

      • Chicken
      • Meat
      • Vegetarian
      • Rice
      • Malabar Food
      • Baking
      • Breakfasts
      • Snacks
      • Drinks
      • Pasta
      • Fish
      • Soups
      • Desserts
    • Contact Me

    Featured Post

    Triple Chocolate Hazelnut Skillet Cookie

    Blog Archive

    • ▼  2025 (4)
      • ▼  April (2)
        • 1 minute Chocolate Mug Cake
        • Grilled Cheese California Burrito
      • ►  March (1)
      • ►  February (1)
    • ►  2024 (36)
      • ►  October (4)
      • ►  September (5)
      • ►  July (1)
      • ►  June (2)
      • ►  May (4)
      • ►  April (3)
      • ►  March (10)
      • ►  January (7)
    • ►  2023 (47)
      • ►  December (3)
      • ►  September (2)
      • ►  August (6)
      • ►  July (6)
      • ►  June (9)
      • ►  May (4)
      • ►  April (5)
      • ►  March (6)
      • ►  February (3)
      • ►  January (3)
    • ►  2022 (69)
      • ►  November (4)
      • ►  October (6)
      • ►  September (7)
      • ►  August (9)
      • ►  July (12)
      • ►  June (5)
      • ►  May (5)
      • ►  April (12)
      • ►  March (4)
      • ►  February (2)
      • ►  January (3)
    • ►  2021 (24)
      • ►  November (1)
      • ►  October (2)
      • ►  July (1)
      • ►  June (4)
      • ►  May (6)
      • ►  April (4)
      • ►  February (4)
      • ►  January (2)
    • ►  2020 (82)
      • ►  December (5)
      • ►  November (6)
      • ►  October (4)
      • ►  September (2)
      • ►  August (5)
      • ►  July (10)
      • ►  June (10)
      • ►  May (13)
      • ►  April (12)
      • ►  March (8)
      • ►  February (4)
      • ►  January (3)
    • ►  2019 (22)
      • ►  December (1)
      • ►  November (2)
      • ►  October (6)
      • ►  September (1)
      • ►  August (1)
      • ►  February (3)
      • ►  January (8)
    • ►  2018 (15)
      • ►  December (4)
      • ►  November (6)
      • ►  October (3)
      • ►  September (2)

    Subscribe Us

    Labels

    Bake Biscuits Breakfast Brown rice Burger Cheese Chocolate Dal Egg Emirati Fish Iftar Indonesian Japanese Jeerakashala rice Kerala Keto Kuwait food Lunch Milk Mutton Thai food UAE food afghan cuisine arabic beef biryani bread burnt cheesecake cake chicken cream dessert dinner greek healthy indo chinese lamb malabar prawns pudding puffs quick dinner ideas recipe refreshing drink rice salad sandwich stir fry vegetables vegetarian veggies yemeni

    Contact Form


    POPULAR POSTS AND PAGES

    Kerala Style Squid Roast

    Kerala Style Squid Roast

    June 18, 2020
    Chicken Steak with Creamy Mushroom Sauce

    Chicken Steak with Creamy Mushroom Sauce

    November 05, 2018
    Emirati Chebab

    Emirati Chebab

    June 01, 2023
    Regag - Emirati Flat bread

    Regag - Emirati Flat bread

    December 02, 2020
    Copy Cat Caesars Mini Pizza

    Copy Cat Caesars Mini Pizza

    March 12, 2024

    Pages

    • Home
    • About Me
    • Privacy Policy
    • Contact Me

    Copywrite © 2023 TermsFeed®. All rights reserved.

    Created By Sora Templates | Distributed By Gooyaabi Templates

    Back to top