Search This Blog

Taystit by Hasna

Food, Recipes, and Beyond

  • Home
  • About Me
  • Recipes
    • Main Course
    • Snacks
    • Desserts
  • Uncategorized
    • Chicken
    • Meat
    • Vegetarian
    • Rice
    • Malabar Food
    • Baking
    • Breakfasts
    • Snacks
    • Fish
    • Pasta
    • Drinks
    • Soups
    • Desserts
  • Contact Me

Pastel de nata
(pastéis de nata)


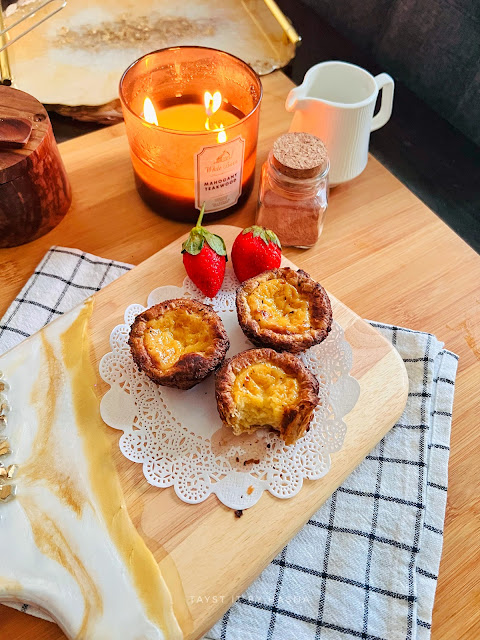
My first post for the new year, let’s start the year with this famous portugal dessert called pastel de nata. It’s crunchy, goey, yet not very sweet but satisfies your sweet tooth. The crunchiness from the puff pastry and the cooked milk custard is the main highlight of this dish where two different textures marry each other! 

Pastel de nata is popular all around the world. I tried it couple of years back and immediately knew it was easy to make at home. The caramelized custard and the flaky puff pastry is a match made made in heaven. 

You will have to bake these custard tarts at the highest temperature setting on your oven. I used store-bought whole wheat puff pastry, you may use the normal puff pastry sheets (or if you have the time and willing to take that extra effort, can make the puff pastry sheets at home) why take the hassle when you get ready made puff pastry sheets?! 😉

These cute little caramelized custard tart babies will make a beautiful addition to your dessert table too, don’t forget to impress your guests with these delicious pastel de nata !😍


Ingredients:

  • 20 gms All purpose Flour
  • 3 Eggs (separate the yolks from the whites)
  • 25 ml Whole Milk 
  • 1 tsp Vanilla Extract 
  • 1/4 tsp Cinnamon powder 
  • Salt, a pinch
  • 125 ml whole Milk
  • Puff pastry Sheets

Sugar syrup:

  • 85 ml Water
  • 120 gm Sugar

Instructions:

  1. Measure the flour and set aside. 
  2. Depart the egg yolks from the whites and set aside. 
  3. In a saucepan, pour in the 125 ml milk and add in the vanilla extract and allow to heat, until almost boiling.
  4. In a bowl, add in the measured flour, cinnamon powder, and salt, mix using a whisk. Now gradually add in the 25 ml milk and combine without any lumps. 
  5. Next add in the egg yolks and mix well.
  6. In another saucepan, add the sugar and water and allow to come to a boil or until the sugar melts into the water and forms sugar syrup.
  7. To the flour and milk slurry, add in the warm milk, whilst rigorously whisking (or else the eggs will get get lumpy and cooked).
  8. Similarly add in the sugar syrup and whisk continuously while pouring the hot syrup. 
  9. Preheat oven at 290 deg C or the highest temperature setting on your oven.
  10. In a muffin pan, press the puff pastry sheets into the cavities without tearing them. Cut off the excess dough using an offset spatula.


  11. Dip your fingers in cold water and press the inner sides of the tarts to keep the tarts cool when pouring the custard.
  12. Fill the tart cups halfway through and bake them for around 10-12 minutes or until the top of the tarts get caramelized.

  13. Enjoy warm with a cup of coffee! ☕️ 


(recipe adapted from @bakingnicky)

Ps: *Try not make ahead, it’s best enjoyed right out of the oven or the same day itself.
*Pastel de nata can be frozen, make them and place the muffin pan in Tupperware containers or ziplock bags and freeze. Thaw and use them as and when required. (But know that they won’t taste the same and freshly made)
*It is best to bake them in a convection oven (if you have then please use the convection oven)
*I used whole wheat puff pastry sheets, you may use the regular (but good quality) ones too.
* I enjoyed having them slightly warm!



Do try this recipe and don't forget to share your experience/feedback with me here in the comments or feel free to send me a mail. Also, do tag me at #taystedit if you try out my recipes on Facebook, Instagram etc so that I can see when you make it. ♡♡♡♡

Crema Catalana


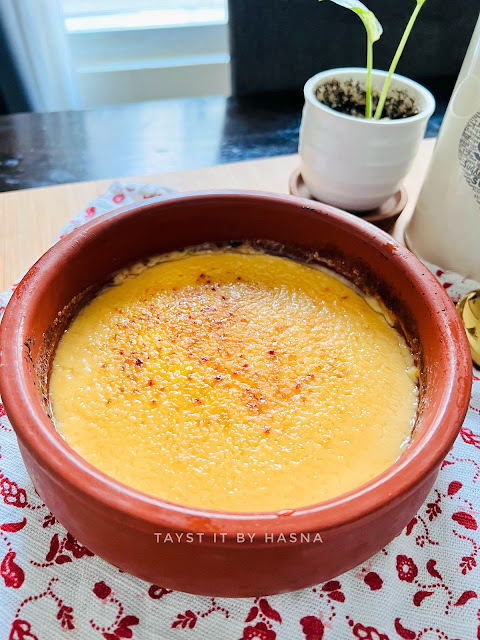
A Spanish dessert that is similar to Crème Brûlée, though they look a lot alike, Crema Catalana is made with milk and the latter is made with cream. 

Crema Catalana’s recipe way more easier. Requires very few ingredients and the method is much more easier. Crema Catalana is basically a custard prepared using egg yolks, milk, cornflour, lemon peels, cinnamon and vanilla. Similar to Creme Brûlée, Crema Catalana also has a crust made from sugar using blow torch. Since I do not own one, I tried replicating the same using the grilled in the oven, though the results were not what I wanted, works just fine. If you have a blow torch, this is one recipe that you can use it for other than Creme Brûlée 😄

Ingredients: (recipe adapted from Spain on a fork)

  • 2 cups Full fat Milk 
  • Few Lemon peels
  • 1 Cinnamon Stick
  • 1 tsp Vanilla Essence/ Extract (ideally 1 vanilla pod)
  • 2 tbsp White Sugar
  • 4 egg yolks
  • 2 tbsp White Sugar
  • 1/2 cup Cold Milk
  • 1 tbsp Corn Starch

Instructions:

  1. In a saucepan add in the milk, add in the lemon peels (without the white part), cinnamon stick, vanilla and Sugar. Allow to heat on medium and mix.
  2. Once it comes to a light boil, switch off flame and allow the lemon, cinnamon and vanilla flavors to infuse in the milk.
  3. In a bowl add in the egg yolks and sugar, mix well.
  4. In another bowl, pour the half cup cold milk and add in the corn flour and mix well.
  5. Add the cornflour milk to the egg yolks and mix well until well combined.
  6. Next, pour the infused milk that has been sitting on the stove and pour the milk using a strainer to the egg yolk mix. Combine well using a whisk.
  7. Pour this mix back to the saucepan and stir continuously for 9-10 minutes, or else the eggs will cook to form lumps.
  8. To know if the Crema Catalana is done, use the back of a wooden spoon and dip it in the custard and run your finger through it, if the custard stays separated it means the Crema Catalana is ready to be poured to serving bowls or a large bowl.


  9. Cover with a cling wrap and allow to set for 4 hours or overnight.
  10. Sprinkle a tablespoon of sugar on the top and using a blow torch, burn the sugar to create a crust.
  11. Enjoy immediately! 


Ps: 
If you store back in the fridge, the crust will soften.
You can use up the egg whites to make meringues, macarons or whip up a yummy omelette. 😍

Do try this recipe and don't forget to share your experience/feedback with me here in the comments or feel free to send me a mail. Also, do tag me at #taystedit if you try out my recipes on Facebook, Instagram etc so that I can see when you make it. ♡♡♡♡

Arrowroot Custard Milkshake


Arrowroot is a root vegetable that is known for its easy digestive properties and fully packed with protein, Fibre and healthy fats. Arrowroot does not have a distinct flavor profile, it is usually used as a thickening agent in desserts, soups, sauces, etc due to its thickening properties.

I always like to use arrowroot powder instead of corn flour slurry in most of my dishes, as arrowroot has more health benefits. So I thought of trying out a milkshake using arrowroot (koova). Arrowroot drink is usually prepared as a hot drink, here I demonstrate a Milkshake version. Arrowroot slurry is prepared and poured to boiled milk, which is constantly mixed till you get a thick consistency. Allow to cool the thick Custard which is prepared. Next blend the arrowroot Custard with chilled milk and coconut milk and set aside. Sabudana pearls are added as the first layer of the Milkshake for added texture, this step is optional. I added soaked basil seeds/ tuk malenga seeds too, as it has good health benefits, high in iron etc. 
For added flavor I used a pinch of cardamom powder. You may use vanilla essence or any other flavoring agent, as per your liking. Finally topped off with a scoop of vanilla ice cream and garnished with toasted shredded coconut.

This Custard milkshake is going to make you feel refreshed for iftar. I tell you! It had a feel of Elaaner (tender coconut) Milkshake flavor to it.. definitely a super hit here!

Let's prepare this easy and refreshing arrowroot Custard milkshake,

Ingredients:


  • 1 tbsp basil seeds, soaked in water
  • 2 tbsp Arrowroot powder, made into a slurry with some water
  • 1/2 cup milk
  • 1/2 cup coconut milk (store bought/ freshly squeezed)
  • Cardamom powder, a pinch
  • 4 - 5 tbsp Sugar
  • A scoop of Vanilla Ice cream
  • 1 tsp of toasted shredded coconut (for garnishing, optional)
  • 2 tbsp Sabudana pearls (soaked in water at least for 3-4 hours), optional 

Instructions:

  1. Boil and drain the sabudana pearls that has been soaked and set aside.
  2. Into a saucepan, add in your arrowroot slurry, milk, sugar and cardamom powder and bring to a boil, whilst stirring constantly, so that no lumps form.
  3. Set the arrowroot custard aside to cool.
  4. Blend the arrowroot Custard with coconut milk and chilled milk.
  5. Into a tall glass, drop your boiled and cooled sabudana pearls, then pour some of your arrowroot Custard milkshake, drop in some soaked basil seeds, and pour your milkshake, finally drop 1 scoop of vanilla ice cream and pour in your Custard Milkshake.
  6. Finally garnish with toasted, sweetened shredded coconut and enjoy!


Notes: 
You may add frozen milk cubes and pulse for added chillness (don’t know if there is even a word like that) 😁 

Do try this recipe and don't forget to share your experience/feedback with me here in the comments or feel free to send me a mail. Also, do tag me at #taystedit if you try out my recipes on Facebook, Instagram etc so that I can see when you make it. ♡♡♡♡

Galaktoboureko - Milk Custard Pie


Assalamualaikum wa rahmathullahi wa barakathuh

With less than 10 days left for Ramadan, the anticipation is getting real. Can't wait for the months blessings and happiness from Allah to be bestowed on us and may Allah accept all our Ibadah and duaa.

Let's come to the point now, the question; what's for iftar? This year I have decided not to over indulge in oily food, rather prepare 1 or 2 healthy dishes everyday. Also since I have been asked to share more healthy recipes for iftar, I have been doing a lot of experimenting lately, which is WHY I haven't been sharing many recipes recently.

That being said, I do not say that I will not be sharing yummy delicious snacks here. I have shared a few recipes already and I will be making a new selection in the menu bar for Ramadan recipe. This will help my dearest readers to have easy access to iftar/suhoor recipes like Butter Chicken Parcel and Malabar mini Vella pola.

Let's begin the Iftar recipe series with something sweet, as the elders say, it's always best to begin something with anything sweet. After much thought process, I came up with a delicious snack/dessert, to my surprise, a similar dish is already on the internet on the name Gulaktoboreko, which is a Greek dessert. So I kept the name the same 😁 Thanks to the Greek name, it came to my rescue to create a new name for the dish😝

Galaktoboreko gala means milk in greek and boreko means pie. First you have to prepare the sugar syrup and then the custard filling is prepared. It is similar to baklava, the layers are made using Phyllo dough and ghee is drizzled over the layers, and a filling made from milk, Semolina, vanilla and lemon zest is made and covered using the overflowing extras of Phyllo sheets and tucked in, which is then scored using a knife, carefully without cutting all the way to the base. This helps the hot air to escape and keeps the Phyllo crisp. Once baked, pour in your Cinnamon sugar syrup* and enjoy! It is very difficult to convince my momma when it comes to sweet dishes, but one bite of this and her face made my day! ✨ This one is too good, I tell you! 🤤😍😍

Ingredients :

  • Phyllo dough sheets, thawed
  • 3 tbsp Unsalted Butter
  • 2 cups milk
  • Little more than 1/4 cup sugar 
  • 1/4 cup semolina/ rava
  • 1 whole egg 
  • 1 egg yolk
  • 1 tsp vanilla essence
  • Zest of lemon or orange
  • Salt, a pinch 

For Syrup:

  • 3/4 cup sugar
  • 1/4 cup honey 
  • 1/2 water
  • A Cinnamon stick
  • 2 tbsp lemon juice
  • 1 tsp vanilla essence

Instructions :

  1. In a sauce pan, combine sugar, water, lemon juice and Cinnamon stick. 
  2. Bring to a boil and allow to boil for around 30 seconds. 
  3. Remove from heat and pour your honey to the sugar syrup prepared and mix well and set aside to cool. 

To make the custard :

  1. Beat the egg, yolk, half the sugar, salt, Semolina and corn starch for around 3 minutes until thick and pale. 

  2. Next pour the milk in the saucepan and allow the milk to heat on low.
  3. Next add the egg mixture to the milk and slowly cook over low heat while stirring constantly until it thickens. 
  4. Remove from heat and add vanilla extract and lemon zest. Mix well and set aside. 
  5. Grease your 4" by 7" baking dish, with melted butter. 
  6. Preheat your oven to 180°C.
  7. Line the first layer of Phyllo sheet on your baking dish, keeping in mind to allow half the sheet to hang out of the baking dish and drizzle melted butter on each layer. 
  8. After your first set of about 4 layers are done, pour the custard layer in the middle and fold the Phyllo sheets hanging over the sides, while drizzling melted butter on each layer of Phyllo sheet as you go. **

  9.  Score the resultant pie into the desired number of squares, keeping in mind not to score too deep into the pie, all way to the bottom. 

  10. Use up all the remaining butter brushing the Phyllo on all sides.
  11. Bake for 40 minutes or more, depending on your oven until it turn deep golden in colour. 
  12. As soon as the pie is done, cut deep through the scored areas to the bottom, so that it's easier to take portions as required. 
  13. Pour the prepared and cooled sugar syrup over the pie. 
  14. Sprinkle silvered pistachios or powdered Cinnamon, allow to set for 30 minutes or according to your liking you may have it warm and oozing, or if you like it set, have it after 30 minutes and enjoy! 


Notes:

  • Be careful to only pour sugar syrup that has been cooled and pour over the baked galaktoboureko allow to soak.. And enjoy!
  • **You may use extra sheets and tuck in if necessary, I forgot to allow to hang the sheets a bit over the dish, so I had to place extra sheets on top. 


Do try this recipe and don't forget to share your experience/feedback with me here in the comments or feel free to send me a mail. Also, do tag me at #taystedit if you try out my recipes on Facebook, Instagram etc so that I can see when you make it. ♡♡♡♡

Old fashioned Fruit Salad


One of my favorite summer dessert is this delicious yet so simple Fruit Salad. Especially for the weekends when you have had a heavy meal like biryani, this chilled fruit Salad is all that you want. Childhood memories were that of weekends where the fruit salad wouldn't be spared - Mama's way of getting some fruits into our tummies. Yes! You read that right we were a bunch of kids who hated fruits. Lol. Thinking back I know we should have eaten them fruits. So weekends were incomplete without finding a bowl of fruit salad in the fridge, and that made us so happy after all the play time with friends. Recently I happened to eat this at my bhabhi's place which brought back all the memories. Sometimes the easiest recipes are the best! 


My mom basically used to use the custard powder that came in a tin to make these oh-so-sophisticated dessert, pun intended! I promise you it's super easy! So while this scorching heat made me crave this dessert, to my horror, the custard powder was over. I was so desperate and depressed that I remembered I had stacks of the vanilla dessert mix that I had bought on offer and was waiting to be used. So I immediately thought of using the dessert mix for the custard.

The dessert mix is more Jelly like and may not come to the desired consisI thought to myself. So I decided to add my magic to it. Lol, just kidding! The magic is done by corn flour. I added corn flour slurry mixed in milk to the vanilla dessert milk that was coming to a boil (done as per package instructions), some extra sweetened Condensed milk and a dash of vanilla Essence! Transfered to a bowl, waited to cool and placed a cling film so that the pudding mix does not create a thin layer when it sets. Voila! To my surprise it came out the exact way I wanted. I hand whisked it and added in my chopped fruits, dry fruits, and nuts. (be careful not to add citric and acidic fruits like orange, pineapple). You may instead use canned fruits too, which may include pineapple.

Ingredients :

  • 575 ml full fat fresh milk
  • 1 pack vanilla dessert mix (pic inserted) 
  • 4 tbsp Corn Flour + 3 tbsp milk
  • 1/4 cup Condensed milk
  • 1 cup cut fresh fruits **
  • 1/2 cup dry fruits, chopped (dry Fig, dates etc)
  • 1/4 cup nuts, chopped


Instructions :

  1. In a saucepan (not steel, heavy bottom) , pour milk and the contents of the sachet and mix well.
  2. Before the mix comes to a boil add in your corn flour slurry (corn flour mixed in milk) while stirring constantly.
  3. Now once the mix comes to a boil, switch off the flame and add in your Condensed milk. Stir well.
  4. Now transfer to a bowl and allow to cool.
  5. Once almost cool, place a cling wrap touching the upper layer of the custard, so that a thin layer doesn't form in the top. 
  6. Allow to refrigerate at least for 3 hours or more depending on the consistency of the custard after 3 hrs. *
  7. Once the custard is set, hand whisk the custard well until you see no more lumps and then add in your fruits, dry fruits and nuts. 
  8. Mix well. 
  9. To decorate your serving bowl/glass, pour some hersheys strawberry syrup in your serving bowl/glass and add your prepared fruit salad to your decorated bowl.


Notes:
*To fasten the process of setting, I placed the custard in the freezer for 1/2 an hour and then left in the fridge for around 2 hrs.
** Do jot add in citrus and acidic in nature fruits like fresh orange, pineapple etc. 


Do try this recipe and don't forget to share your experience/feedback with me here in the comments or feel free to send me a mail. Also, do tag me at #taystedit if you try out my recipes on Facebook, Instagram etc so that I can see when you make it. ♡♡♡♡


Strawberry Vanilla Jelly Pudding

One of my first experiments in the dessert segment was this 'Strawberry Vanilla Jelly Pudding'. Happened when I was a teenager, my mom had gone to India and my brother had invited his friend and his wife over for iftar and she called me up to say that she would cook the main dinner for our day and I took control of the snacks, juices, etc.

I had already planned what to make for the snacks etc, but choosing a dessert was a huge decision as this was the first time I was hosting a party all on my own (with little help from my sister). So now you know how I would have been brainstorming ideas. Finally, I thought to myself that I would make something with the ingredients available at home.


There, I saw a pack of strawberry/ cherry jelly peeping at me from the pantry. I was overjoyed! I started contemplating on how to make this jelly interesting yet uncomplicated. (As I already had so much to do in a short span of time i.e., before Magrib azan, planned the iftar on the same day morning). To get better ideas I opened the fridge to find apples sitting in there. I thought to myself that cutting apples into small cubes and adding to the jelly would add dimension and a fruit crunch in between for the first layer of my pudding and there I began preparing. Once the iftar was over I was overwhelmed by the response I got for this easy peasy dessert. Since then I never stopped experimenting🙈 Alhamdulilah. <3


When I called mama to tell her what happened excitedly she was like had already tried this after she saw a recipe in 'Vanitha' - Women's Weekly magazine which similar to what I explained to her. But anyhow she was happy that it was something that I achieved on my own without referring any recipe. Maa Sha Allah 😍🙈

Now let's go and prepare just the right kind of dessert you need after a heavy party meal!

Ingredients:


  • Bundt pan
  • 1 pack Strawberry/ Cherry flavor Jelly
  • 1 pack Caramel Custard Pudding Mix
  • 275 ml whole milk
  • 1 Apple, Chopped uniformly
  • 8-10 Strawberries, quartered
  • Water, as required, on the pack
  • Sugar, if required

Instructions:


  1. Chop your fruits, (apple and strawberries uniformly) and make the jelly according to the instructions at the backside of the jelly pack.


  1. Pour in the prepared jelly liquid into the bundt pan and drop in the fruits proportionately and place in the fridge to set.
  2. After about half an hour make your caramel custard according to the instructions on the pack and once the mixture is about to boil switch off the flame and let the mixture cool enough to pour over the jelly.
  3. Ps: Do not keep the caramel to cool for too long as it might start to set.
  4. Pour the cooled custard mixture slowly over the now set jelly and place in the fridge to set. At least for 3-4 hours.
  5. Once set place bundt pan in warm water for 5 minutes and slowly invert onto a serving plate by keep the plate upside down on the bundt pan and tilting the plate and pan together to invert and voila! Your pudding is ready to be relished!


  • NOTE: 
  • I like the Green's brand for the Caramel Custard. You may make your own caramel custard if you want. But this is an instant option. (very handy when you have guests coming over)
  • You may add extra sugar before the milk boils if you feel the sweetness of the custard isn't enough.
  • Only use the bundt pan if you are willing to take the risk. If so please do not forget this step, place your bundt pan in warm water for 5 minutes before you invert the pudding onto a serving plate.
  • You may do the same in a glass bowl for more transparency if you do not want to invert and take a risk😊 but the bundt pan version looks so beautiful 😍😍😍


Do try this recipe and don't forget to share your experience/feedback with me here in the comments or feel free to send me a mail. Also, do tag me at #taystedit if you try out my recipes on Facebook, Instagram etc so that I can see when you make it. ♡♡♡♡
Older Posts

Search This Blog

My name is Hasna Haneef, a mommy to a toddler, hailing from Thalassery, Kerala. Welcome to my humble abode on the Internet; wherein I share all my recipes and experiments. I am glad to have you on board!

TRENDING POSTS

  • Kerala Style Squid Roast
  • Chicken Steak with Creamy Mushroom Sauce
  • Emirati Chebab
  • Regag - Emirati Flat bread
  • Copy Cat Caesars Mini Pizza
  • Kerala Beef Fry/ Nadan beef dry fry

About Me

May peace be with you!

Welcome to my blog.

I am delighted to have you on board. My name is Hasna Haneef, a mommy to a toddler, hailing from Thalassery, Kerala. My homeplace being Dubai, as I am born and brought up here and I am very influenced by the lifestyle and the variety of authentic cuisines I get to try from here, which has made me try anything that comes across me
, click here →

Stay Connected!

Join Our Madness!

Join with Thousands Of Subscribers ! Get Our Latest Recipes Delivered to Your email Inbox!

Powered by follow.it
  • Home
  • About Me
  • Recipes

    • Main Course
    • Desserts
    • Snacks

    Uncategorized

    • Chicken
    • Meat
    • Vegetarian
    • Rice
    • Malabar Food
    • Baking
    • Breakfasts
    • Snacks
    • Drinks
    • Pasta
    • Fish
    • Soups
    • Desserts
  • Contact Me

Featured Post

Triple Chocolate Hazelnut Skillet Cookie

Blog Archive

  • ▼  2025 (4)
    • ▼  April (2)
      • 1 minute Chocolate Mug Cake
      • Grilled Cheese California Burrito
    • ►  March (1)
    • ►  February (1)
  • ►  2024 (36)
    • ►  October (4)
    • ►  September (5)
    • ►  July (1)
    • ►  June (2)
    • ►  May (4)
    • ►  April (3)
    • ►  March (10)
    • ►  January (7)
  • ►  2023 (47)
    • ►  December (3)
    • ►  September (2)
    • ►  August (6)
    • ►  July (6)
    • ►  June (9)
    • ►  May (4)
    • ►  April (5)
    • ►  March (6)
    • ►  February (3)
    • ►  January (3)
  • ►  2022 (69)
    • ►  November (4)
    • ►  October (6)
    • ►  September (7)
    • ►  August (9)
    • ►  July (12)
    • ►  June (5)
    • ►  May (5)
    • ►  April (12)
    • ►  March (4)
    • ►  February (2)
    • ►  January (3)
  • ►  2021 (24)
    • ►  November (1)
    • ►  October (2)
    • ►  July (1)
    • ►  June (4)
    • ►  May (6)
    • ►  April (4)
    • ►  February (4)
    • ►  January (2)
  • ►  2020 (82)
    • ►  December (5)
    • ►  November (6)
    • ►  October (4)
    • ►  September (2)
    • ►  August (5)
    • ►  July (10)
    • ►  June (10)
    • ►  May (13)
    • ►  April (12)
    • ►  March (8)
    • ►  February (4)
    • ►  January (3)
  • ►  2019 (22)
    • ►  December (1)
    • ►  November (2)
    • ►  October (6)
    • ►  September (1)
    • ►  August (1)
    • ►  February (3)
    • ►  January (8)
  • ►  2018 (15)
    • ►  December (4)
    • ►  November (6)
    • ►  October (3)
    • ►  September (2)

Subscribe Us

Labels

Bake Biscuits Breakfast Brown rice Burger Cheese Chocolate Dal Egg Emirati Fish Iftar Indonesian Japanese Jeerakashala rice Kerala Keto Kuwait food Lunch Milk Mutton Thai food UAE food afghan cuisine arabic beef biryani bread burnt cheesecake cake chicken cream dessert dinner greek healthy indo chinese lamb malabar prawns pudding puffs quick dinner ideas recipe refreshing drink rice salad sandwich stir fry vegetables vegetarian veggies yemeni

Contact Form


POPULAR POSTS AND PAGES

Kerala Style Squid Roast

Kerala Style Squid Roast

June 18, 2020
Chicken Steak with Creamy Mushroom Sauce

Chicken Steak with Creamy Mushroom Sauce

November 05, 2018
Emirati Chebab

Emirati Chebab

June 01, 2023
Regag - Emirati Flat bread

Regag - Emirati Flat bread

December 02, 2020
Copy Cat Caesars Mini Pizza

Copy Cat Caesars Mini Pizza

March 12, 2024

Pages

  • Home
  • About Me
  • Privacy Policy
  • Contact Me

Copywrite © 2023 TermsFeed®. All rights reserved.

Created By Sora Templates | Distributed By Gooyaabi Templates

Back to top