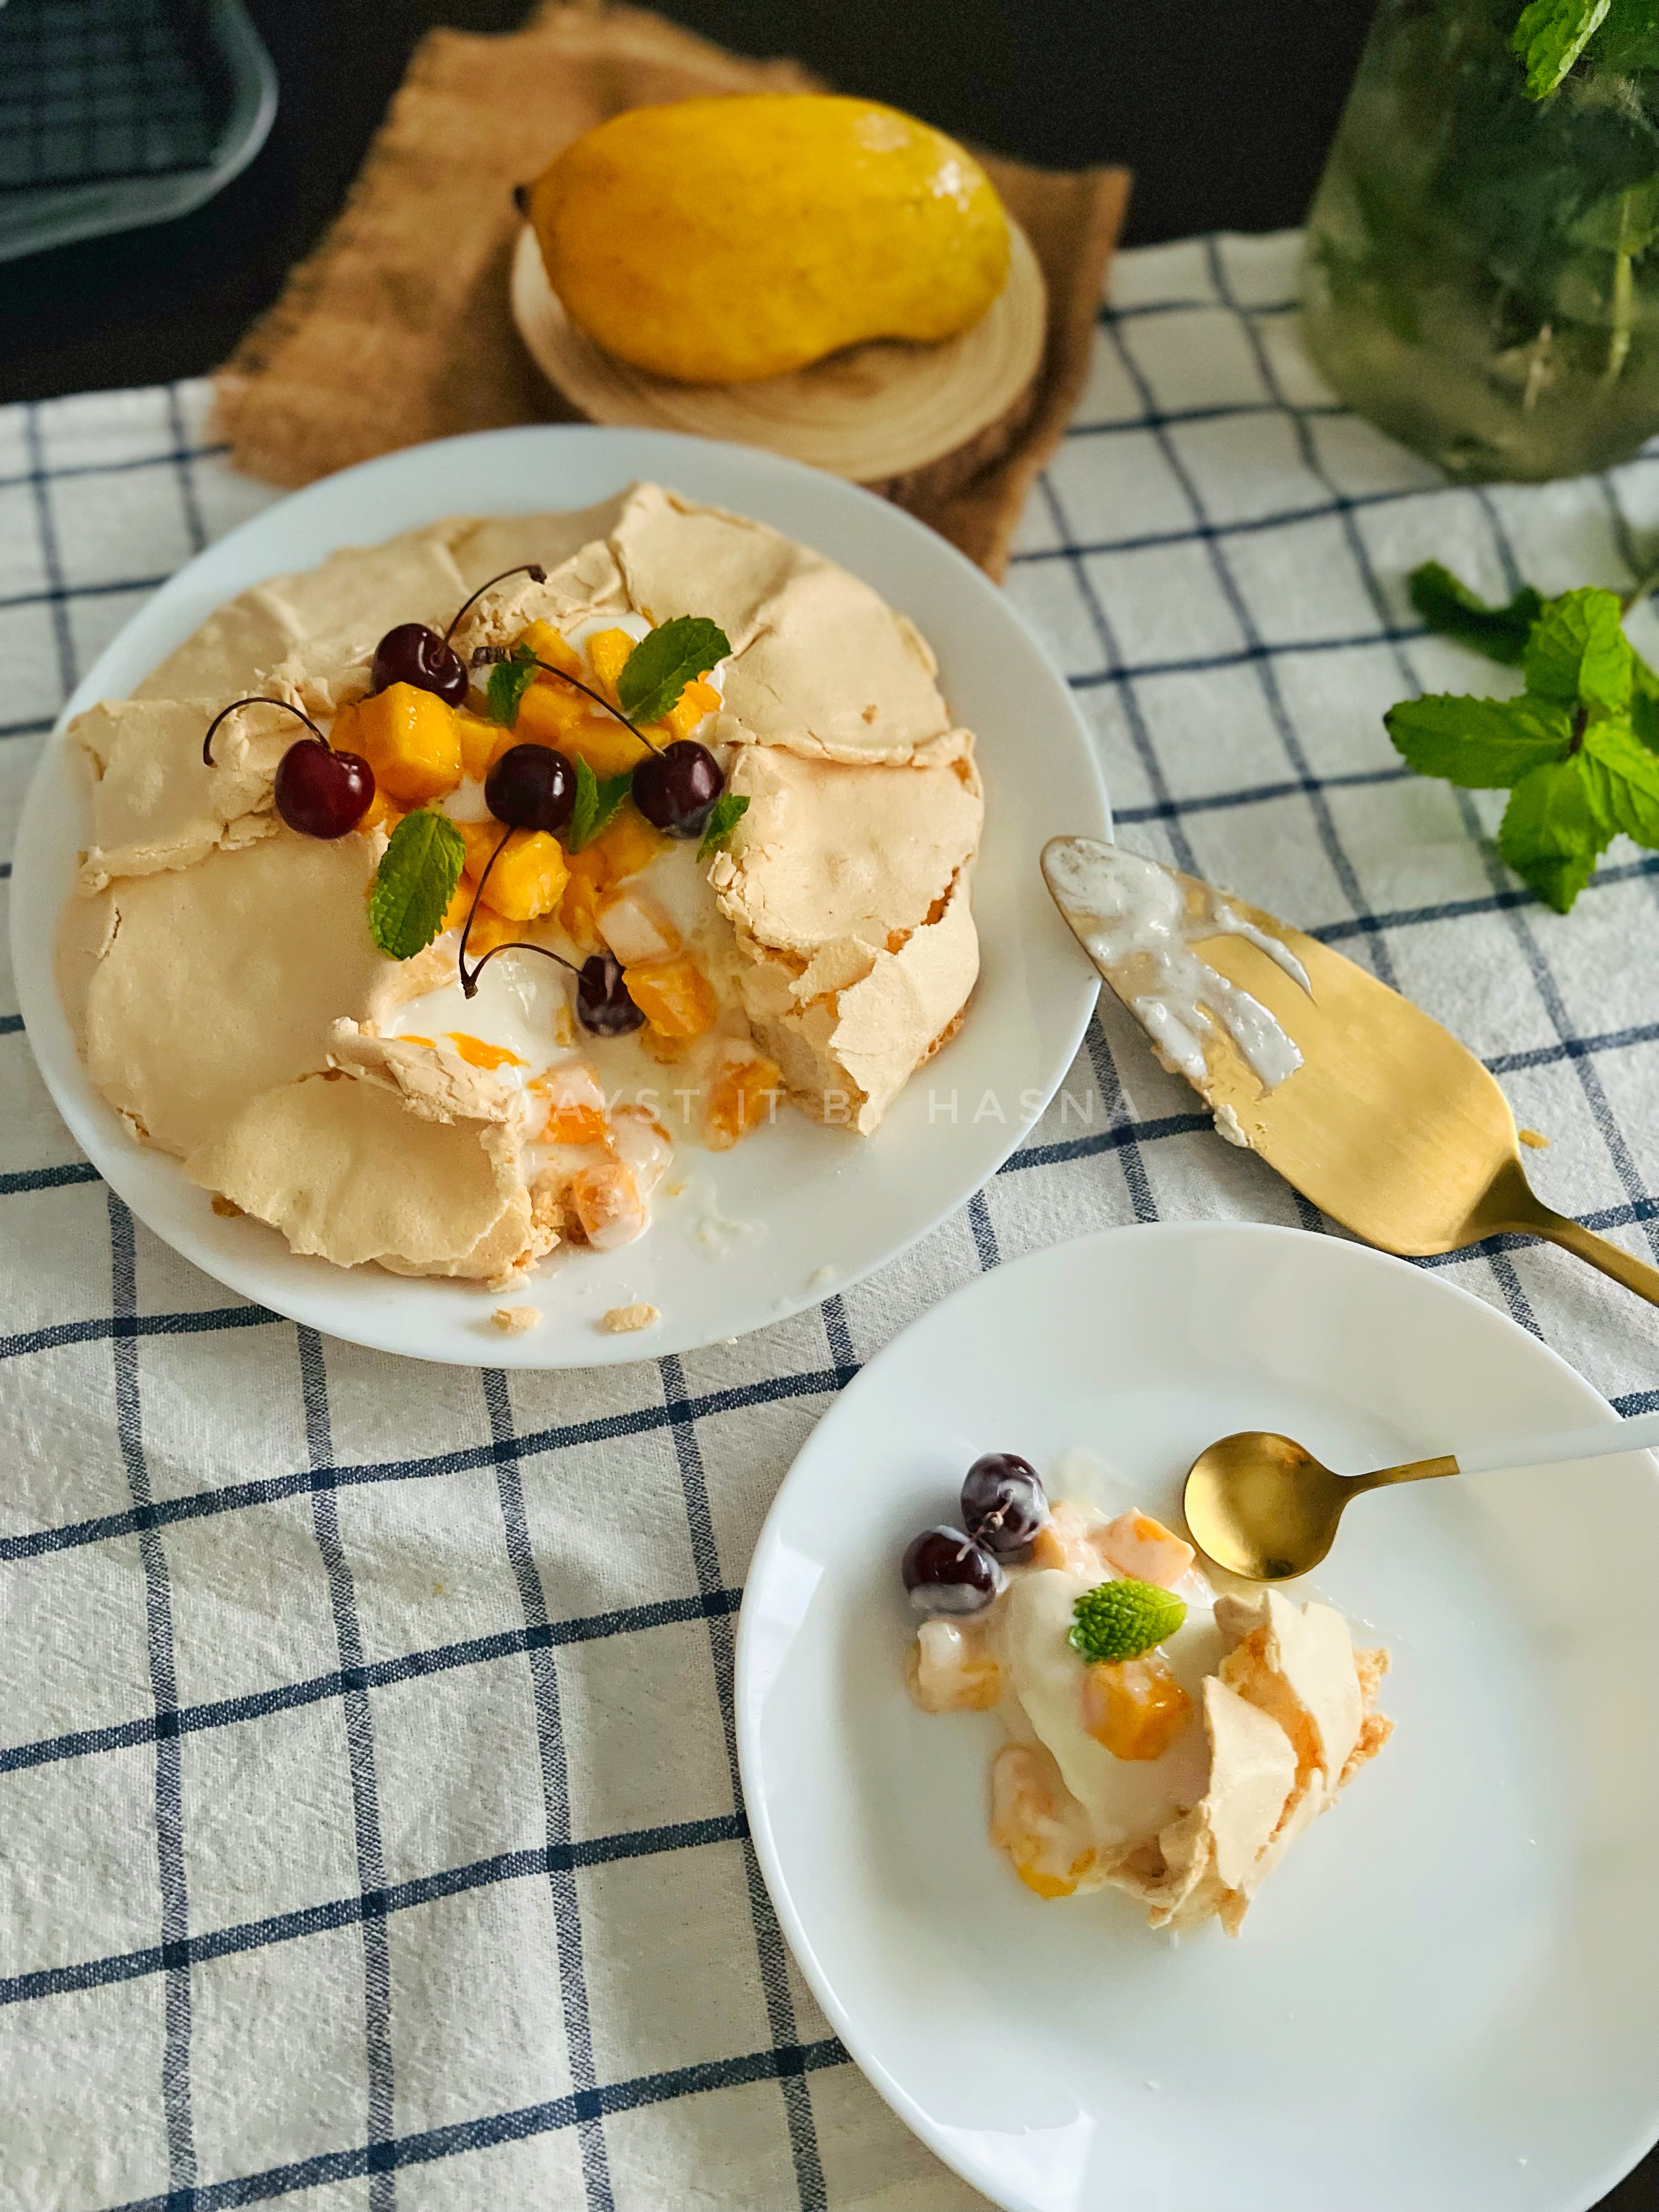
Search This Blog

Taystit by Hasna

Food, Recipes, and Beyond

  • Home
  • About Me
  • Recipes
    • Main Course
    • Snacks
    • Desserts
  • Uncategorized
    • Chicken
    • Meat
    • Vegetarian
    • Rice
    • Malabar Food
    • Baking
    • Breakfasts
    • Snacks
    • Fish
    • Pasta
    • Drinks
    • Soups
    • Desserts
  • Contact Me

Mango Basbousa


Mango season has just begun and I loooove Mangoes in any form, be it fresh or as a dessert! We are all in search of different mango recipes to try when all we can see are mangoes around us and this recipe was a trial but was a super hit at home. The crusty semolina adds texture and mingles well with the flavors from the mango cream and the biscuit layer. 

Unlike the usual Basbousa recipes where the first layer is that of the Basbousa batter, here I am using a biscuit layer to make it much more easier and delicious!! 

The filling consists of mango purée, condensed milk and cream. Once the Basbousa is baked, allow it to cool to give you precision to cut, or you will end up with a liquidy mess, (if you have no patience like me, haha) 

Ingredients: Serves 4 people 

Layer 1:

  • 100 gms Milkbikis Biscuits (can use digestive biscuits too)
  • 50 gms Butter, melted

Layer 2:

  • 160 gms Cream 
  • 1 Ripened Sweet Mango (preferably fiber less ones), puréed 
  • 3 tbsp Condensed Milk

Layer 3:

  • 1/4 cup Semolina
  • 2 tbsp Sugar
  • 3 tbsp Milk powder
  • 1 tsp Baking powder
  • 2 tbsp Vegetable Oil
  • 3 tbsp Water
  • 1/2 tsp Vanilla extract 

Sugar Syrup :

  • 1/2 cup Sugar 
  • 1/2 cup Water 
  • A squeeze of lemon 

Instructions: 

  1. Mix biscuit powder with melted butter and press and level it in a baking dish.
  2. Combine the cream, mango purée and condensed milk and spread evenly on the biscuit layer.
  3. Mix every ingredient under the layer 3 list and pour gently over the cream layer.
  4. Bake at 180 deg C for around 15 minutes. Bake on the top rack for 10 minutes and the rest 5 minutes on the bottom rack. 
  5. Prepare the sugar syrup by boiling water, sugar and lemon juice. Once combined and starts bubbling keep timer for around 8 minutes, allow to cool and pour over the Basbousa.
  6. Enjoy warm or cooled.


Do try this recipe and don't forget to share your experience/feedback with me here in the comments or feel free to send me a mail. Also, do tag me at #taystedit if you try out my recipes on Facebook, Instagram etc so that I can see when you make it. ♡♡♡♡

Dulce De Leche 


Unexpectedly it's the Eve of Eid and the end of the holy month of Ramadan. Days just flew by and I am kind of feeling a bit overwhelmed with sadness. I hope our Rabb accepts all our deeds and make us among the righteous until our last breath. 

Without further a do, let's get to our EID dessert and who doesn't love Dulce de Leche? ( Cooked condensed milk)
The dessert is a marriage between the flavors of tiramisu and Dulce de Leche without the addition of coffee.

Try to set the dessert in the refrigerator overnight for better results.

Ingredients:

  • 1 pack Italian Lady finger biscuits
  • 1/3 cup White Sugar
  • 2 tbsp Butter
  • 1/4 cup whole milk
  • 1 Can Condensed Milk
  • 1 cup Milk
  • 7-8 Kiri Cheese Cubes/ Cream Cheese
  • 1 1/4 cup whipping cream 
  • 1/2 tsp Vanilla essence 
  • Cocoa powder

Instructions:

  1. In a non stick pan, allow the sugar to caramelize. 
  2. Add the butter, one tbsp at a time and stir gently. 
  3. Finally pour milk, little at a time and mix well. 
  4. Allow to simmer on low heat for 3-4 until slightly thick. Instant Dulce de Leche is ready!
  5. In a bowl, pour the milk and Dulce de Leche (or blend them). 
  6. Dip the lady finger biscuits in the milk and arrange on a tray.
  7. Beat the whipping cream and set aside 1/4 of the cream for piping as decoration.
  8. In a bowl, cream or mix the Kiri Cheese cubes along with sugar and vanilla essence and add the remaining Dulce de Leche and combine well.
  9. Finally, fold the whipped cream with the cream cheese mix and layer over the arranged biscuits and spread evenly.
  10. Dust with cocoa powder.
  11. Pipe the whipped cream into a crescent shape by making a guideline using the back of a spoon and pipe accordingly. 
  12. Finally pipe the Dulce de Leche for a pop of caramel color and set in the refrigerator overnight or at least 3-4 hours. (For better results keep overnight)

Ps: you may use store bought Dulce de Leche (cooked condensed milk) or you May cook the condensed milk in a pressure cooker submerged in water ( after removing the outer cover of the can ) for 3 whistles and allow to cool overnight.

Do try this recipe and don't forget to share your experience/feedback with me here in the comments or feel free to send me a mail. Also, do tag me at #taystedit if you try out my recipes on Facebook, Instagram etc so that I can see when you make it. ♡♡♡♡

 Mango Pavlova with Coconut Cream


Eid Al Adha is right around the corner, and what better way to present a show stopper on your Eid dessert table with this marshmallowy Pavlova with contrasting and tropical flavors from the coconut, mangoes and cherries. The tropical flavor from coconut, the sweetness from the mangoes and sourness from the cherries marries so well together. I am not a big fan of Mango desserts, as Mango in itself is so delicious, but this one has my heart. Just perfectly delicious.
 
Egg whites are whipped to stiff peaks with the addition of sugar, which is then folded in with some lemon juice, corn flour, and vanilla essence. Plop the meringue mix over a baking sheet with a circle marking and bake it at the lowest temperature possible (140-150 deg c). If you are planning to make the pavlova for a party, prepare the Pavlova a day ahead, so that the Pavlova easily snaps out of the baking sheet after it cools down. The main step is to allow the Pavlova to sit in the oven even after the baking is done, for at least an hour or so. So that the texture of the Pavlova is retained, with a crispy outer cover and marshmallowy insides. 

For the coconut cream, I used Coconut milk powder (as I only had the milk powder in my pantry). You may use canned coconut cream, store it in the refrigerator and use it the next day, so that it is thick. I suggest to prepare the cream ahead of time and store it in the refrigerator, so that the cream thickens before scooping it over the pavlova. There is something about fresh cream that brings the essence to a dessert. I prefer fresh cream over any other creams in desserts. 

This dessert is definetly a must try, as there is no hard rule to follow in making shapes with the meringue. Play along and enjoy making this beautiful and deliciously refreshing dessert for your dessert table.


Ingredients : 

For the Pavlova:

  • 1/2 cup/ 4 Egg whites (must not contain egg yolks)
  • 1/2 cup - Fine sugar
  • 1 tsp lemon juice  
  • 1 1/2 tsp Corn Flour
  • 1 tsp Vanilla Essence
  • A pinch of salt

For the Coconut Cream:

  • 1/4 Cup of Coconut milk powder/ store bought Coconut Cream
  • 1-2 tbsp warm water
  • 100 gms Fresh Cream
  • 2- 3 tbsp Sweetened Condensed Milk 
  • 1 tbsp Dessicated Coconut

For the topping:

  • Mango, cubed and scooped
  • Sour Cherries
  • Mint leaves, for garnishing

Instructions :

  1. Make sure to wipe the bowl clean with lemon so that no grease remains in your mixing bowl, (if grease remains, the egg whites will not get whipped with stiff peaks).
  2. Draw a cirle of 7-8 inches using a plate etc on a baking sheet and fip the baking sheet.
  3. Beat the egg whites using a whisk attachment and once it starts to look frothy, sprinkle the sugar 1 tbsp at a time and whip the egg whites to stiff peaks.


  4. Next, add in your lemon juice, corn flour, vanilla and salt and fold the ingredients gently.
  5. Transfer the prepared meringue to your baking sheet, using a spatula, carve the meringue with the cirl drawn earlier. Make a slight depression/ using the spatula, swipe the spatula upwards to make markings all over the sides to make it look like a crown.

  6. In a preheated oven, of 140 deg C, allow the Pavlova to bake for around 1 hour and 15 minutes and allow the Pavlova to sit and cool in the oven itself, for at least an hour or preferably overnight. The Pavlova will have a slight change in shade of color and the outer will feel dry and hard, while the insides remain soft.
 

To make the Coconut cream:

  1. Mix the coconut milk powder with little warm water and make a paste. 
  2. Add the fresh cream to the coconut milk paste and fold in the fresh cream.
  3. Pour the condensed milk and add the Dessicated coconut and combine.
  4. Place in refrigerator and allow to cool and thicken before filling the meringue.
  5. Fill the Pavlova wuth the coconut cream, right before serving and top with cubed mangoes and place cherries. 
  6. Garnish with mint leaves and Enjoy!

Notes:

  • I have made my coconut cream here, you may use whipped cream if you like.
  • Make sure not to peep inside the oven while the oven bakes your meringue/pavlova as the resultant temperature differences can cause the pavlova to crack and notattain the perfect texture.
  • The baked pavlova can stay in the oven preferably overnight, so that it cools down completely.
  • You may store the baked meringue in an airtight container for a few days if not using immediately. 
  • Once you add in your whipped cream you have to consume immediately. 
  • If you want to store in the fridge, you may do so, but the meringue will not remain crisp and crunchy.


Do try this recipe and don't forget to share your experience/feedback with me here in the comments or feel free to send me a mail. Also, do tag me at #taystedit if you try out my recipes on Facebook, Instagram etc so that I can see when you make it. ♡♡♡♡

Galaktoboureko - Milk Custard Pie


Assalamualaikum wa rahmathullahi wa barakathuh

With less than 10 days left for Ramadan, the anticipation is getting real. Can't wait for the months blessings and happiness from Allah to be bestowed on us and may Allah accept all our Ibadah and duaa.

Let's come to the point now, the question; what's for iftar? This year I have decided not to over indulge in oily food, rather prepare 1 or 2 healthy dishes everyday. Also since I have been asked to share more healthy recipes for iftar, I have been doing a lot of experimenting lately, which is WHY I haven't been sharing many recipes recently.

That being said, I do not say that I will not be sharing yummy delicious snacks here. I have shared a few recipes already and I will be making a new selection in the menu bar for Ramadan recipe. This will help my dearest readers to have easy access to iftar/suhoor recipes like Butter Chicken Parcel and Malabar mini Vella pola.

Let's begin the Iftar recipe series with something sweet, as the elders say, it's always best to begin something with anything sweet. After much thought process, I came up with a delicious snack/dessert, to my surprise, a similar dish is already on the internet on the name Gulaktoboreko, which is a Greek dessert. So I kept the name the same 😁 Thanks to the Greek name, it came to my rescue to create a new name for the dish😝

Galaktoboreko gala means milk in greek and boreko means pie. First you have to prepare the sugar syrup and then the custard filling is prepared. It is similar to baklava, the layers are made using Phyllo dough and ghee is drizzled over the layers, and a filling made from milk, Semolina, vanilla and lemon zest is made and covered using the overflowing extras of Phyllo sheets and tucked in, which is then scored using a knife, carefully without cutting all the way to the base. This helps the hot air to escape and keeps the Phyllo crisp. Once baked, pour in your Cinnamon sugar syrup* and enjoy! It is very difficult to convince my momma when it comes to sweet dishes, but one bite of this and her face made my day! ✨ This one is too good, I tell you! 🤤😍😍

Ingredients :

  • Phyllo dough sheets, thawed
  • 3 tbsp Unsalted Butter
  • 2 cups milk
  • Little more than 1/4 cup sugar 
  • 1/4 cup semolina/ rava
  • 1 whole egg 
  • 1 egg yolk
  • 1 tsp vanilla essence
  • Zest of lemon or orange
  • Salt, a pinch 

For Syrup:

  • 3/4 cup sugar
  • 1/4 cup honey 
  • 1/2 water
  • A Cinnamon stick
  • 2 tbsp lemon juice
  • 1 tsp vanilla essence

Instructions :

  1. In a sauce pan, combine sugar, water, lemon juice and Cinnamon stick. 
  2. Bring to a boil and allow to boil for around 30 seconds. 
  3. Remove from heat and pour your honey to the sugar syrup prepared and mix well and set aside to cool. 

To make the custard :

  1. Beat the egg, yolk, half the sugar, salt, Semolina and corn starch for around 3 minutes until thick and pale. 

  2. Next pour the milk in the saucepan and allow the milk to heat on low.
  3. Next add the egg mixture to the milk and slowly cook over low heat while stirring constantly until it thickens. 
  4. Remove from heat and add vanilla extract and lemon zest. Mix well and set aside. 
  5. Grease your 4" by 7" baking dish, with melted butter. 
  6. Preheat your oven to 180°C.
  7. Line the first layer of Phyllo sheet on your baking dish, keeping in mind to allow half the sheet to hang out of the baking dish and drizzle melted butter on each layer. 
  8. After your first set of about 4 layers are done, pour the custard layer in the middle and fold the Phyllo sheets hanging over the sides, while drizzling melted butter on each layer of Phyllo sheet as you go. **

  9.  Score the resultant pie into the desired number of squares, keeping in mind not to score too deep into the pie, all way to the bottom. 

  10. Use up all the remaining butter brushing the Phyllo on all sides.
  11. Bake for 40 minutes or more, depending on your oven until it turn deep golden in colour. 
  12. As soon as the pie is done, cut deep through the scored areas to the bottom, so that it's easier to take portions as required. 
  13. Pour the prepared and cooled sugar syrup over the pie. 
  14. Sprinkle silvered pistachios or powdered Cinnamon, allow to set for 30 minutes or according to your liking you may have it warm and oozing, or if you like it set, have it after 30 minutes and enjoy! 


Notes:

  • Be careful to only pour sugar syrup that has been cooled and pour over the baked galaktoboureko allow to soak.. And enjoy!
  • **You may use extra sheets and tuck in if necessary, I forgot to allow to hang the sheets a bit over the dish, so I had to place extra sheets on top. 


Do try this recipe and don't forget to share your experience/feedback with me here in the comments or feel free to send me a mail. Also, do tag me at #taystedit if you try out my recipes on Facebook, Instagram etc so that I can see when you make it. ♡♡♡♡

Old fashioned Fruit Salad


One of my favorite summer dessert is this delicious yet so simple Fruit Salad. Especially for the weekends when you have had a heavy meal like biryani, this chilled fruit Salad is all that you want. Childhood memories were that of weekends where the fruit salad wouldn't be spared - Mama's way of getting some fruits into our tummies. Yes! You read that right we were a bunch of kids who hated fruits. Lol. Thinking back I know we should have eaten them fruits. So weekends were incomplete without finding a bowl of fruit salad in the fridge, and that made us so happy after all the play time with friends. Recently I happened to eat this at my bhabhi's place which brought back all the memories. Sometimes the easiest recipes are the best! 


My mom basically used to use the custard powder that came in a tin to make these oh-so-sophisticated dessert, pun intended! I promise you it's super easy! So while this scorching heat made me crave this dessert, to my horror, the custard powder was over. I was so desperate and depressed that I remembered I had stacks of the vanilla dessert mix that I had bought on offer and was waiting to be used. So I immediately thought of using the dessert mix for the custard.

The dessert mix is more Jelly like and may not come to the desired consisI thought to myself. So I decided to add my magic to it. Lol, just kidding! The magic is done by corn flour. I added corn flour slurry mixed in milk to the vanilla dessert milk that was coming to a boil (done as per package instructions), some extra sweetened Condensed milk and a dash of vanilla Essence! Transfered to a bowl, waited to cool and placed a cling film so that the pudding mix does not create a thin layer when it sets. Voila! To my surprise it came out the exact way I wanted. I hand whisked it and added in my chopped fruits, dry fruits, and nuts. (be careful not to add citric and acidic fruits like orange, pineapple). You may instead use canned fruits too, which may include pineapple.

Ingredients :

  • 575 ml full fat fresh milk
  • 1 pack vanilla dessert mix (pic inserted) 
  • 4 tbsp Corn Flour + 3 tbsp milk
  • 1/4 cup Condensed milk
  • 1 cup cut fresh fruits **
  • 1/2 cup dry fruits, chopped (dry Fig, dates etc)
  • 1/4 cup nuts, chopped


Instructions :

  1. In a saucepan (not steel, heavy bottom) , pour milk and the contents of the sachet and mix well.
  2. Before the mix comes to a boil add in your corn flour slurry (corn flour mixed in milk) while stirring constantly.
  3. Now once the mix comes to a boil, switch off the flame and add in your Condensed milk. Stir well.
  4. Now transfer to a bowl and allow to cool.
  5. Once almost cool, place a cling wrap touching the upper layer of the custard, so that a thin layer doesn't form in the top. 
  6. Allow to refrigerate at least for 3 hours or more depending on the consistency of the custard after 3 hrs. *
  7. Once the custard is set, hand whisk the custard well until you see no more lumps and then add in your fruits, dry fruits and nuts. 
  8. Mix well. 
  9. To decorate your serving bowl/glass, pour some hersheys strawberry syrup in your serving bowl/glass and add your prepared fruit salad to your decorated bowl.


Notes:
*To fasten the process of setting, I placed the custard in the freezer for 1/2 an hour and then left in the fridge for around 2 hrs.
** Do jot add in citrus and acidic in nature fruits like fresh orange, pineapple etc. 


Do try this recipe and don't forget to share your experience/feedback with me here in the comments or feel free to send me a mail. Also, do tag me at #taystedit if you try out my recipes on Facebook, Instagram etc so that I can see when you make it. ♡♡♡♡


TIRAMISU Truffles


Truffles are something that I love to make because
A. Not only are they simple to prepare
B. Requires minimal ingredients
C. Looks appealing
D. Bite-sized
E. Loved by children and adults equally
F. And this one requires no heating element like the gas stove or the oven.

That's like a lot Iot of reasons to love truffles. I was invited for an Eid Preparation Collab and I was quite overwhelmed with ideas that popped in mind. Will share the recipes/ideas soon too.. So stay tuned for that! And I finally settled for these tiramisu truffles as I looked into my pantry and found these savoiardi biscuits (Italian lady finger biscuit) looking at me and waiting to be used up. Tiramisu is something everyone in the family lives but sadly there was no mascarpone cheese with and that is usually the star ingredient of tiramisu. So I wondered, not everyone will have it in their fridge and not everyone can find the mascarpone cheese. So I immediately thought of Kiri cream cheese cubes that we all love. Though I was not quite sure how it would turn out, I took a chance and tried using the cubes instead of mascarpone and oh boy you won't believe me, no one would even make out that there is jot mascarpone in it. Was a big hit! 😍

I felt the need for some chocolatey goodness, so I added a small dollop of Nutella before rolling them into truffles by flattening the prepared tiramisu Truffle balls, flattening, adding Nutella and rolling them again.

Though everyone here detests consuming cocoa powder just like that as I used it to coat the truffles, I still did coat them in cocoa powder to keep its authenticity. I went on to melt some milk chocolate in the microwave and drizzled it over the truffles. Not only it gave a dimension to the truffles, if was definitely appetizing too. So glad to think of it at the last moment.🤤

Without further a do let's prepare these delicious TIRAMISU TRUFFLES! 


Ingredients:

  • 1 pack Savoiardi Biscuits
  • 5 Kiri Cream Cheese Cubes*
  • 3 tbsp Icing sugar 
  • 200 ml hot water
  • 1 tsp instant coffee powder 
  • 1 tsp Vanilla Essence 
  • 1/4 cup Cocoa powder
  • 3 tbsp Nutella
  • 2 tbsp Milk Chocolate, melted 
  • 1 tbsp butter


Instructions:

  1. Blitz and make a powder of the biscuits, and set aside. 
  2. Now using a fork mix the room temperature cream cheese, gradually add in your Icing sugar and then prepare the black coffee by mixing hot water and instant coffee. 
  3. The powdered biscuits are added to the cream cheese and the hot black coffee is also poured in ( add slowly and check consistency, be careful not to make it loose) , mix all of it and combine well.
  4. Finally add your room temperature butter and make balls out of it and flatten to add nuttella (optional step), now slowly bring the sides together make truffles out of it and allow to refrigerate for 2 hours or 1/2 an hour in the freezer. 

  5. Now roll the truffles in cocoa powder and drizzle the melted milk chocolate over them. 


Notes:

*Opening the Kiri cream cheese cube wrappers and placing them in a bowl before bring the cheese to room temperature will make our job of peeling the wrapper easy. 


Do try this recipe and don't forget to share your experience/feedback with me here in the comments or feel free to send me a mail. Also, do tag me at #taystedit if you try out my recipes on Facebook, Instagram etc so that I can see when you make it. ♡♡♡♡

Baklava Mini Bundt Cake with Honey Glaze


Howdy Folks? Finally my LO gets her mid term break and this calls for celebration. Haha! Little pleasures of life.. I tell you! So I decided to celebrate doing what I love doing the most.. Experimenting! 

Last week I happened to have Baklava and currently the only thing that I crave for is baklava. Baklava is a sticky sweet made of filo pastry brushed with pure ghee or butter, filled with chopped nuts and drenched in sugar syrup w/wo honey. The crunchy texture of nuts and crispy from the buttery filo pastry and the citrus flavor from lemon which is added to the sugar syrup binds all the different flavors together into a delicious sweet which originates from the Ottomon Empire.

This Baklava mini Bundt cake is inspired from the Traditional Baklava. Though this recipe doesn't use Filo Pastry, we take the good stuff i.e., the nuts and the base that of ghee cake with a hint of cinnamon and drizzled with honey icing and topped with caramelized nuts and pistachios.

Baklava is a time consuming process, which is why I rarely prepare them at home. Now this innovation of mine is just so easy. Basically no efforts at all. I bet even little kids can make this yummy cake.
Though I have prepared the cake in mini bundts, you may use a loaf cake pan or a normal bundt cake pan. The mini one's are cute and bakes in no time. I am sure if you try this for a tea party, it is definitely going to be a show stopper. 


If you think you ain't great at baking, this recipe is for you. It is a no-fail recipe. If you plan to bake ghee cake, just double the quantity of ghee. And aah, your house will smell so good while the oven gets its job done. Once the mini cakes are done, allow it to cool on a cooling rack for 10 minutes and flip it. The 10 minute timing is perfect for the bundt cakes to fall off, to be on the safer side, don't forget to grease the inner nooks and corners well.


The flavors are sooo good. They honey icing is killer. I added a dash of cream, but if you prefer the lemony zest, add in a squeeze of lemon instead of the cream.* If you love ghee cakes and caramelized nuts, you are definitely in for a treat! 

Ingredients:

Cake Batter:

  • 1 Cup All Purpose Flour/ Patent Flour
  • 1/4 Cup Ghee
  • 1/2 Cup Full Fat Fresh Milk
  • 1/2 Cup Sugar
  • 1 Egg
  • 1 tsp Baking Powder
  • 1/4 tsp Baking Soda
  • 1 tsp Vanilla Essence
  • A pinch of Cinnamon Powder
  • A pinch of Salt


Honey Glaze:

  • 2 tbsp Room Temperature Butter
  • 1/4 cup Honey
  • 3/4 cup Powdered Sugar
  • 1 tsp lemon/ cream*

Topping:

  • 1/4 cup butter
  • 1/2 cup chopped nuts
  • 1 tbsp honey
  • A pinch of light brown sugar


Instructions:

Baklava Bundt Cake:

  1. To prepare the mini bundt cakes, preheat the oven to 180 Deg C. Prepare your pan by greasing all the corners of the bundt pan using any flavorless vegetable oil and/ ghee.
  2. Combine the dry ingredients like flour, baking soda and baking powder and set aside.
  3. Next in a deep bowl, cream your ghee and sugar.
  4. Add in your milk and vanilla essence; whisk until creamy.
  5. Crack in your egg and mix well to combine.
  6. Now add in your flour mixture and fold everything well to a cake batter.
  7. Now slowly using an ice cream scooper, a piping bag or a normal tablespoon, spoon in your batter into the cake pan.
  8. Place the pan in the preheated oven for around 15 minutes or until a tooth pick inserted comes out clean.
  9. Allow the pan to cool exactly for 10 minutes on a cooling rack.
  10. Invert the mini cakes from the pan and to cool completely while we prepare the topping and the icing.


Topping:

Into a small non stick pan, add in your butter, brown sugar, chopped nuts (almond, pistachios, walnuts) and honey and allow to thicken and switch off and drop onto a baking paper whilst still hot and allow to cool. While the nuts topping cools, lets prepare the honey glaze.

Honey Glaze:

  1. Combine honey, powdered sugar, butter and lemon juice/ cream and make sure it is not too thick nor too watery. Reduce your lemon juice/ cream accordingly.
  2. Drizzle over the top of the cooled mini bundt cakes and garnish with your prepared nuts topping or slivered pistachios. Serve Immediately or you may keep the cake for up to 3 days in room temperature.


Note:
Please do not use cream if you happen to use lemon, as this might cause the icing to curdle.


Do try this recipe and don't forget to share your experience/feedback with me here in the comments or feel free to send me a mail. Also, do tag me at #taystedit if you try out my recipes on Facebook, Instagram etc so that I can see when you make it. ♡♡♡♡

Iles Flotantes - Floating Island 


It's International Egg day and which better day to try out this dreamy Classic French dessert called Floating Island. Yup! You read that right! Isn't the name of the dessert in itself so fascinating. It is basically a cloudy-pillowy meringue balls/oval shaped baby cakes that are floating on a rich creamy thick custard. 

I have been wanting to try this since a long time now. Though I wanted to try and experiment with different flavors other than vanilla, I stuck to the classic one this time as I wanted to know what the real flavors felt like. The meringue balls are usually made using the help of two Spoons and rolling a spoon full of meringue between two tablespoons till you get them ival shaped. But since the lazy girl in me did not want to go through the struggle, I literally grabbed an ice cream scooper and voila! My little island were scooped and dropped into the hot milk in no time. The meringue requires around 9-10 minutes of cook time, in between which you have to flip them to cook completely. The meringue is cooked well when you close the lid and beware of boiling the milk, you don't want a hot mess in here!


The recipe calls for cornstarch that has to be added to the whisked meringue, but I completely forgot to add it. But there was no issues in holding its shapes Coming to the flavor, practically speaking we all have vanilla essence at our homes, but I'd rather go for the vanilla pod next time I try the dessert. But guys I was literally amazed by the technique of poaching the meringue in the hot milk. Aaaahh! The inventions people come up with, truly genius! The rich creme anglaise and the meringue is a match made in heaven. It's unreal how a few ingredients like literally 4 ingredients and you can make an easy and delicious dessert in a jiffy.

Creme anglaise is basically egg yolks that are cooked along with hot milk and vanilla briefly without boiling, or else you might end up with a creme anglaise that is grainy.


Just a few points to be kept in mind and your classic French dinner dessert called Iles Flotantes with sugar basket is ready to serve! 😍 

Let's get started! 

Ingredients :


  • 2 cups Full Fat milk (plus extra to add on later) 
  • 1 tsp Vanilla extract or 1/2 vanilla bean paste
  • 4 large eggs, yolks and whites separated
  • 1/3 cup sugar (for meringue) 
  • 1/4 cup sugar (for creme anglaise) 
  • 1 tsp cornstarch /corn flour (optional) 

Instructions:

  1. Pour the milk into a wide skillet (you will be poaching your meringues here) and pour in your vanilla extract. Allow to heat on low flame whilst we prepare the meringue. 
  2. Whip the egg whites using a electric hand beater or a stand mixer on a high speed while gradually adding your sugar and continue to whip until the egg whites have stiff peaks when the beaters are lifted or spoon the meringue and turn the spoon and if the meringue stays intact without falling, the meringues are ready for poaching. Fold in the cornstarch at this stage. 
  3. Once the milk has heated to a point where there are no bubbles of boiling visible, using two large Spoons shaped the meringues to oval shape (I used uce cream scoop) and drop them into the hot milk carefully leaving space between each meringue ball. 
  4. Poach the meringues for 5 minutes uncovered, then flip and cook covered for around 4 minutes. 
  5. Using a slotted spoon, scoop the cooked meringues and set aside to cool on a tray. 
  6. Once cooked, allow to chill. 
  7. Into a clean saucepan, strain the milk that was used to cook the meringues and add extra milk if required (requires 2 cups/500 ml milk). Bring the milk to a Sim. 
  8. Whilst at that, whisk the egg yolks in a large bowl with sugar. Slowly pour the hot milk into the yolk mixture while whisking. 
  9. Transfer the custard mix to the saucepan again and using a wooden spoon mix well until the mix thickens lightly and coats the back of your wooden spoon (you can check this by wiping the back of your spoon with a finger and if it separates, then it is cooked and you may switch off the flame).
  10. Slowly strain the custard into a clean bowl and cover with a cling wrap directly covering the surface of the custard. Allow the custard to come to a room temperature and chill well before serving. 

  11. Finally, make caramel to garnish. (by bringing sugar to a boil and stiring occasionally until melted) 
  12. To serve, pour ladle fulls of the prepared and chilled creme anglaise into a flat serving dessert bowl and gently place the cooked and cooled meringue. Finally, drizzle the prepared caramelized sugar over the meringue, serve immediately and enjoy! 😍 


Do try this recipe and don't forget to share your experience/feedback with me here in the comments or feel free to send me a mail. Also, do tag me at #taystedit if you try out my recipes on Facebook, Instagram etc so that I can see when you make it. ♡♡♡♡

Gajar Ka Halwa Lotus Trifle


Gajar Ka Halwa is one of my favorite Indian desserts.. (after Gulab jamun🙈). This is a dessert that I have been preparing since a very young age, whenever I felt like having desserts. So experimenting a dessert with my favorite gajar ka Halwa toh Banta hai! 😝

Well, lotus spread and their biscuit are now my biggest obsession.. I try adding them in everything knowingly and unknowingly.. If I say that I am going to make some dessert the hubster keeps pestering me asking if I weren't adding lotus biscuits in it! Haha
So now you know! How much I love them. Contradictory to my liking of these yum lotus biscoff, I do not like to have them plain. I specifically like to have them in dessert. Not even with tea or coffee.

Now coming back to the invention of the trifle, like I said I had been craving carrot halwa since a while, so I made it and it's been quite a while now that this recipe has been sitting in my drafts! It was high time I put to some use for our Eid dessert ideas. I am that person who lovesss cooking and experimenting, but if you ask me what are you making for Eid or any other special occasion I just go blank as if I haven't cooked my entire life. Is it just me? Or is some one able to relate? Let me know in the comments below.
So, coming back to the recipe, I wanted my dessert to be nutty (meaning with nuts and tastes like it). For that I added 1/2 tsp of Almond extract, you may add vanilla extract or completely omit the step.

This trifle is basically layers of rich carrot halwa and luscious Lotus biscoff cream piped in and the chopped almonds in the carrot halwa plays with the textures making it even more scrumptious. This recipe is so easy and so versatile. Well, one thing I can assure you is that gajar ka Halwa and biscoff flavors go hand in hand.


Basically this is a dessert that I prepared when cravinga were at its highest. And that feeling of satisfaction is heavenly. This is dedicated to all lotus biscoff lovers. Advance Eid Mubarak wishes to everyone who is reading this. May Allah accept all our Qiyaam, Siyaam, our duaas and all our good deeds. May Allah make us amongst those who witness the next holy month of Ramadan. Taqqabal Allahu minna wa minkum. 🌹🎀🌹

Ingredients :

Gajar Ka Halwa 
  • 500 gms Indian Young carrots*, grated
  • 2 tbsp pure ghee
  • 2 cups milk (or 1 cup milk and 1/2 cup condensed milk)
  • 1/2 cup sugar
  • 1 tsp cardamom powder
  • 4 tbsp chopped almonds
  • 1 tbsp ghee (optional)

Lotus Cream:
  • 1 Sachet dream whip (whipped according to package instructions)
  • 1/2 tsp vanilla/ almond extract (optional)
  • 3 tbsp lotus biscoff spread
  • 3 tbsp thick cream or fresh cream

Instructions:

  1. In a heavy bottom pan bring the milk to a boil. Keep stirring in between, be careful not to burn it.
  2. In a large skillet add 2 tbsp ghee and sautee the carrots until the color changes and water is evaporated .
  3. Next pour half the milk and cook slowly, mixing in between and add rest and aloow to combine while mixing.
  4. Now add 1/2 cup sugar and mix well and add condensed milk if adding.*
  5. Finally when little moisture is left, add your cardamom powder and garnish with chopped almonds and your gajar ka halwa is ready. 
  6. If your halwa doesn't come off your pan or you want that extra richness finish off by adding 1 tbsp ghee.
  7. Now to prepare the lotus biscoff layer, whip the dream whip sachet according to package instructions and vanilla or almond essence (optional)
  8. Add to it add melted and cooled lotus biscoff spread and add in your thick/fresh cream.
  9. Fold everything gently.
  10. Your lotus biscoff cream layer is ready!
  11. Now time to aseemble. Add a few spoons of carrot halwa at the bottom of the desset glass/jar.
  12. Next pipe the prepared lotus cream. Repeat the process until done.
  13. Garnish with almonds and/ leftover gajar ka Halwa. 
Notes: *
  • I could not get Indian carrots, but using Indian carrots is the best.
  • You may use 2 cups whole fat milk or 1 cup milk and 1/2 cup condensed milk.
  • You may sautee your almonds in ghee and add.
  • If you do not like whipped cream, you may use 200 ml thick cream/fresh cream and add 3 tbsp powdered sugar and fold in the melted lotus spread. 


Do try this recipe and don't forget to share your experience/feedback with me here in the comments or feel free to send me a mail. Also, do tag me at #taystedit if you try out my recipes on Facebook, Instagram etc so that I can see when you make it. ♡♡♡♡

Rose Kunafa Cream Pudding


Eid is just around the corner and we are all going to witness for the first time in our lives, the most different eid. Who would have even thought that we wouldn't be going to the mosques on the morning of eid this year? That feeling of happiness after the eid prayer is simply bliss. Now after the eid prayers we often visit our relatives which is so much fun! I know we never expected this to happen, but Qadr Allahumaa sha faa'la (It is the decree of Allah and He does as He wills). But this does remind us to not take things for granted and to stay home and be safe.


What better way to cheer up our folks with some delightful dessert/ pudding experience?! On the eid day it is mandatory to have some sweet/ dessert after the 'mega eid lunch'.. and of course the star is always the mutta maala (traditional thread-like dessert made of eggs also called egg necklace). Mutta maala is customary to be made on eid. Now being a foodie, I like to serve a dessert too that is mostly indulged after a nap session, haha. (Come on! How much food can our tummies take in right after fasting for a month, teehee) So I thought to share a dessert recipe with you guys! I mean come on! How many of us do not like desserts? especially on Eid? 


Well, I am here to share the perfect show stopper for your eid spread! I couldn't wait to develop this recipe that has been in my mind. Now to put what is in your mind to action, is not easy! I looooove kunafa, I mean, who doesn't? Lately, I have been seeing a lot of rose dalgona which inspired me to try this! Thanks to @tableforfive for that! Also another inspiration was the popular mesh umm ali from @cleobuttera that made me try kunafa dough this way. They never cease to blow your mind with their food pictures! Now, coming back to the pudding, as I said I love kunafa, and rose dalgona in trending during ramadan too! So I wanted a bit of both; something crunchy at the same time creamy and with a hint of rose. So I immediately began working on the idea.
Basically, this was an experiment and alhamdulilah it tastes soooo good! Exaclty like I wanted it! Playing with textures is my thing. But the kunafa layer came out perfect and I forgot a huge step, to butter my baking dish, so the kunafa wouldn't budge! My initial plan was to make a rose cream and allow to set and place the sweetened kunafa as the second layer. Now since that the kunafa layer wouldn't budge, I had to pour the rose cream as the second layer. Tasted great! But I would prefer to keep the kunafa layer as the top layer, the next time I make these!
Now if you dont have kunafa you may do the same recipe, by frying the bread in some ghee+oil.
Without further a do, let's prepare this yumm Rose Kunafa Cream Pudding 🍨


Ingredients:

For baking Kunafa :
  • 1/2 package or less kunafa dough (as much as you can fit in one layer of your baking dish) 
  • 4 tbsp Pure ghee
  • 1/4 - 1/2 cup condensed milk
  • 1/4 cup Whipping cream

For the rose cream:
  • 1 cup Whipping cream
  • 2 tbsp rose syrup
  • 1/4 cup condensed milk

For Garnishing 

  • Slivered Pistachios
  • Dried Rose Petals

Instructions:

  1. Preheat your oven to 200°C and butter your baking dish, I used 9 by 7 inch baking dish. 
  2. Place the kunafa dough lengthwise and fill in as tightly as possible. 
  3. Apply ghee evenly over all areas using a brush. 
  4. Bake in a preheated oven 200°C for 20 minutes until golden and crisp. 
  5. Next, pour the condensed milk and heavy cream /Whipping cream over the baked Kunafa and bake again for 5 minutes until the kunafa becomes crisp again. 
  6. Now in a large bowl, whip the cream until medium stiff peaks and add the rose syrup and condensed milk and fold gently. 
  7. Pour this rose cream over the baked Kunafa layer and place it in the refrigerator for 2-3 hours until set or place in the freezer for 1/2 an hour. * (check notes) 
  8. Garnish with slivered pistachios and dried Rose Petals. 
Notes: 
  • I would recommend to set the whipped rose cream in a similar pudding dish and place the baked sweet Kunafa for better crunch and texture. I forgot to apply butter hence I had to pour the rose cream over the kunafa layer.
  • Once the rose cream is set, place the kunafa layer just before serving so that the crunchiness is retained.
  • If you want to use the rose cream as the top layer you may use sliced bread that is fried in ghee+oil for the base, also a great substitute for kunafa.
  • I used a glass baking dish to show the layers as this was an experiment. Use a ceramic baking dish if you have one. 
  • Line the dish with baking paper for easier handling of the sweet Kunafa. 
  • Be careful not to over pour Whipping cream while baking Kunafa, just a tad bit will do. 
  • You may alternatively crush the baked Kunafa slightly with clean and dry hands and layer in mini dessert bowls with slightly crushed Kunafa layer being the first then the cream and again the Kunafa layer. 
  • If you do not have rose syrup, you may use a dash of rose water and red food color, but I wouldn't recommend it coz the pudding would turn runny and also wouldn't taste as good. (had to put down since it's a FAQ)
  • Different ovens have different temperature, keep in mind not to bake for too long after you add Condensed milk to your baked Kunafa, this will result in a hard layer. 

Do try this recipe and don't forget to share your experience/feedback with me here in the comments or feel free to send me a mail. Also, do tag me at #taystedit if you try out my recipes on Facebook, Instagram etc so that I can see when you make it. ♡♡♡♡
Older Posts

Search This Blog

My name is Hasna Haneef, a mommy to a toddler, hailing from Thalassery, Kerala. Welcome to my humble abode on the Internet; wherein I share all my recipes and experiments. I am glad to have you on board!

TRENDING POSTS

  • Kerala Style Squid Roast
  • Chicken Steak with Creamy Mushroom Sauce
  • Emirati Chebab
  • Regag - Emirati Flat bread
  • Copy Cat Caesars Mini Pizza
  • Kerala Beef Fry/ Nadan beef dry fry

About Me

May peace be with you!

Welcome to my blog.

I am delighted to have you on board. My name is Hasna Haneef, a mommy to a toddler, hailing from Thalassery, Kerala. My homeplace being Dubai, as I am born and brought up here and I am very influenced by the lifestyle and the variety of authentic cuisines I get to try from here, which has made me try anything that comes across me
, click here →

Stay Connected!

Join Our Madness!

Join with Thousands Of Subscribers ! Get Our Latest Recipes Delivered to Your email Inbox!

Powered by follow.it
  • Home
  • About Me
  • Recipes

    • Main Course
    • Desserts
    • Snacks

    Uncategorized

    • Chicken
    • Meat
    • Vegetarian
    • Rice
    • Malabar Food
    • Baking
    • Breakfasts
    • Snacks
    • Drinks
    • Pasta
    • Fish
    • Soups
    • Desserts
  • Contact Me

Featured Post

Triple Chocolate Hazelnut Skillet Cookie

Blog Archive

  • ▼  2025 (4)
    • ▼  April (2)
      • 1 minute Chocolate Mug Cake
      • Grilled Cheese California Burrito
    • ►  March (1)
    • ►  February (1)
  • ►  2024 (36)
    • ►  October (4)
    • ►  September (5)
    • ►  July (1)
    • ►  June (2)
    • ►  May (4)
    • ►  April (3)
    • ►  March (10)
    • ►  January (7)
  • ►  2023 (47)
    • ►  December (3)
    • ►  September (2)
    • ►  August (6)
    • ►  July (6)
    • ►  June (9)
    • ►  May (4)
    • ►  April (5)
    • ►  March (6)
    • ►  February (3)
    • ►  January (3)
  • ►  2022 (69)
    • ►  November (4)
    • ►  October (6)
    • ►  September (7)
    • ►  August (9)
    • ►  July (12)
    • ►  June (5)
    • ►  May (5)
    • ►  April (12)
    • ►  March (4)
    • ►  February (2)
    • ►  January (3)
  • ►  2021 (24)
    • ►  November (1)
    • ►  October (2)
    • ►  July (1)
    • ►  June (4)
    • ►  May (6)
    • ►  April (4)
    • ►  February (4)
    • ►  January (2)
  • ►  2020 (82)
    • ►  December (5)
    • ►  November (6)
    • ►  October (4)
    • ►  September (2)
    • ►  August (5)
    • ►  July (10)
    • ►  June (10)
    • ►  May (13)
    • ►  April (12)
    • ►  March (8)
    • ►  February (4)
    • ►  January (3)
  • ►  2019 (22)
    • ►  December (1)
    • ►  November (2)
    • ►  October (6)
    • ►  September (1)
    • ►  August (1)
    • ►  February (3)
    • ►  January (8)
  • ►  2018 (15)
    • ►  December (4)
    • ►  November (6)
    • ►  October (3)
    • ►  September (2)

Subscribe Us

Labels

Bake Biscuits Breakfast Brown rice Burger Cheese Chocolate Dal Egg Emirati Fish Iftar Indonesian Japanese Jeerakashala rice Kerala Keto Kuwait food Lunch Milk Mutton Thai food UAE food afghan cuisine arabic beef biryani bread burnt cheesecake cake chicken cream dessert dinner greek healthy indo chinese lamb malabar prawns pudding puffs quick dinner ideas recipe refreshing drink rice salad sandwich stir fry vegetables vegetarian veggies yemeni

Contact Form


POPULAR POSTS AND PAGES

Kerala Style Squid Roast

Kerala Style Squid Roast

June 18, 2020
Chicken Steak with Creamy Mushroom Sauce

Chicken Steak with Creamy Mushroom Sauce

November 05, 2018
Emirati Chebab

Emirati Chebab

June 01, 2023
Regag - Emirati Flat bread

Regag - Emirati Flat bread

December 02, 2020
Copy Cat Caesars Mini Pizza

Copy Cat Caesars Mini Pizza

March 12, 2024

Pages

  • Home
  • About Me
  • Privacy Policy
  • Contact Me

Copywrite © 2023 TermsFeed®. All rights reserved.

Created By Sora Templates | Distributed By Gooyaabi Templates

Back to top