Search This Blog

Taystit by Hasna

Food, Recipes, and Beyond

  • Home
  • About Me
  • Recipes
    • Main Course
    • Snacks
    • Desserts
  • Uncategorized
    • Chicken
    • Meat
    • Vegetarian
    • Rice
    • Malabar Food
    • Baking
    • Breakfasts
    • Snacks
    • Fish
    • Pasta
    • Drinks
    • Soups
    • Desserts
  • Contact Me

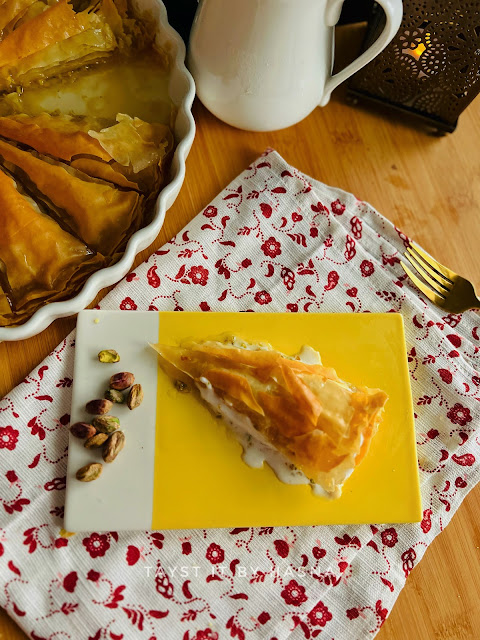
 Carrot Slice Baklava with Ice cream 


This Turkish delight is so drool worthy that no one can deny a piece of carrot Slice baklava. Baklava being one of my favorite sweets is something I would love to indulge any day! The smell of the clarified butter/ ghee smeared phyllo sheets baking is just too much aroma to handle.
 
I  have always been fascinated when this dish is served in restaurants. The art of serving carrot Slice Baklava with a slice of ice cream is definitely an art. I tried replicating it, but like I said it's an art, you need practice to nail it. :D
 
The first time I had this baklawa was for global village. I knew what all went into the sweet in the first bite itself. Also, it was pretty expensive for a slice, they served for 35 aed (if I am not wrong) and for a huge family like us, it was unfeasible. I tried replication it at home, was it worth it? Like hell it was! With very limited ingredients and suvh easy steps any one could easily replicate it at home! We all love it here, especially after a spicy meal, this sweet is heaven in your mouth!!

And the ice cream adds on to a creamy and cool texture. Let's see how it's done! 


Ingredients :

  • 20-25 sheets of Phyllo sheets
  • 200 gms Clarified Butter/ Ghee
  • 200 gms Pistachio, shelled and skin peeled (by soaking in warm water)
 

For the Sugar Syrup:

  • 2 cups Sugar
  • 1 1/2 cups water
  •  A slice of lemon

Instructions:

  1. Peel the skin of the pistachios by soaking them in warm water.
  2. In a sauce pan, make sugar syrup by combining sugar and water, stirring occasionally , make sure the sugar melts completely and slowly increase the flame, add the slice of lemon and bring to a boil.
  3. Now simmer the sugar syrup for around 15-17 minutes. (do not forget to add the slice of lemon, as it helps the sugar syrup from crystalizing.)
  4. In a large round tray, smear the ghee using a brush and place a phyllo sheet and smear the sheet with ghee again and repeat the process for around 10 phyllo sheets.

  5. Now blitz the skin peeled (optional) Pistachios and place the crushed pistachios over the 10th layer, a bit away from the edges.

  6. Now place a phyllo sheet and continue layering as mentioned and trim off/ tuck in the edges of the phyllo sheets using a wooden knife etc.
  7. Preheat oven to 170 deg C. 
  8. Using a sharp knife, score the baklawa into 16 equal slices, by cutting into quarters.

  9. After cutting, to give the baklawa an extra dimension, pinch the edges of each carrot baklawa and puff up.

  10. Brush all the remaining ghee over the prepared baklawa and place in oven and bake for 35- 40 minutes until golden.

  11. Take out from oven and pour the warm sugar syrup (not hot not cold) over the hot baklawa, and allow to sit at least for 1 hour at room temperature so that the baklawa soaks up all the syrup.

  12. Once cooled, place a slice of baklawa on a plate and remove the upmost baklawa layer until the pistachios in one go and place a slice of ice cream and place upmost layers back on the ice cream and enjoy! Afiyet Olsun!


Do try this recipe and don't forget to share your experience/feedback with me here in the comments or feel free to send me a mail. Also, do tag me at #taystedit if you try out my recipes on Facebook, Instagram etc so that I can see when you make it. ♡♡♡♡


 

Marble Cake Pudding


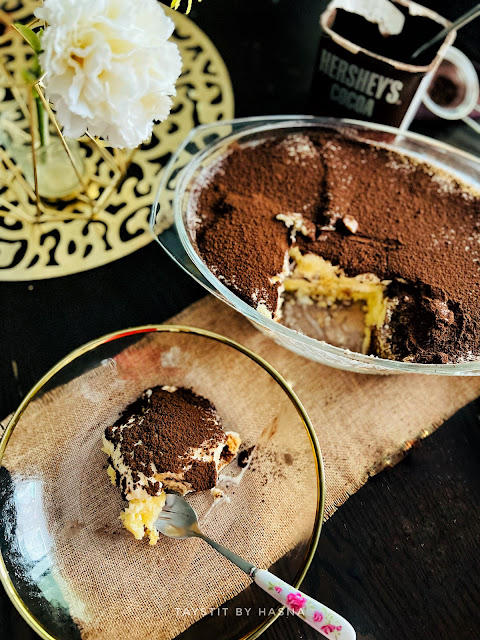
One of the most nostalgic pudding/ dessert from my childhood is this delicious marble cake pudding. It is my mom's most popular dessert, and undoubtedly the best. It's so simple to make. The marble cake is store bought , you may use home made cake, but I usually make this pudding as a last moment dessert,so that it doesn't get complicated and saves time.

Similar to tiramisu, the marble cake pudding tastes better the more it sits in the fridge. The cake soaks up all the cream and the cocoa powder that is dusted gives it that chocolatey taste. This marble cake pudding is like the OG milk cake of my childhood. The marble cake is tightly layered over which a custard cream is prepared poured and make a couple of layers which is set overnight. The pudding can be topped up with fresh fruits, funfetti, chocolate sprinkles etc.
Whenever mama makes this dessert for a party at home, the dessert dish is always wiped clean.
 
This was a dessert that mama prepared from what a friend of hers was saying in their usual conversation, about a dessert she had at a party. In an Era when there was no google/ YouTube for her to check and try recipes. Basically she was not told the entire ingredients, she made out and made it on her own, voila ! The perfect dessert for parties. I need to try out more recipes from her recipe book, since it's in malayalam, I find it very difficult to read them, yet my sheer curiosity in cooking has helped me learn reading malayalam by reading her recipes. LOL .


Ingredients :

  • 400 gms Marble Cake, store bought
  • 2 Crème Caramel Sachet (prepare as per package instructions )
  • 500 ml + 500 ml milk (for the crème caramel)
  • 120 ml Milk (for the dream whip)
  • 1 Sachet Dream Whip (prepare according to package instructions)
  • 1 tsp Vanilla Essence
  • 1/2 can Sweetened Condensed Milk
  • 1/4 cup Thick Cream
  • Cocoa powder, for dusting 


Instructions:

  1. Slice the marble cake and layer the cake slices tightly without any gap.
  2. Next, prepare the Creme Caramel according to package instructions and allow to cool, set aside.
  3. Next prepare the cream mixture by beating the dream whip powder mix in some milk, according to package instructions, beat until thickens.
  4. Next add in your condensed milk and thick cream, mix well. 
  5. Finally add the cooled custard prepared earlier and combine well.
  6. Pour the prepared custard cream over the marble cake and make another layer with the same method.
  7. Seal and wrap well using a cling film and allow to set in the refrigerator overnight.*
  8. Finally, right before serving dust some cocoa powder and enjoy!

* Tastes best the more it sits in the fridge.
** The brand I used for the marble cake is Modern Bakery. It comes as 730 gms, you will only require around half of the cake.
  

Do try this recipe and don't forget to share your experience/feedback with me here in the comments or feel free to send me a mail. Also, do tag me at #taystedit if you try out my recipes on Facebook, Instagram etc so that I can see when you make it. ♡♡♡♡

Iles Flotantes - Floating Island 


It's International Egg day and which better day to try out this dreamy Classic French dessert called Floating Island. Yup! You read that right! Isn't the name of the dessert in itself so fascinating. It is basically a cloudy-pillowy meringue balls/oval shaped baby cakes that are floating on a rich creamy thick custard. 

I have been wanting to try this since a long time now. Though I wanted to try and experiment with different flavors other than vanilla, I stuck to the classic one this time as I wanted to know what the real flavors felt like. The meringue balls are usually made using the help of two Spoons and rolling a spoon full of meringue between two tablespoons till you get them ival shaped. But since the lazy girl in me did not want to go through the struggle, I literally grabbed an ice cream scooper and voila! My little island were scooped and dropped into the hot milk in no time. The meringue requires around 9-10 minutes of cook time, in between which you have to flip them to cook completely. The meringue is cooked well when you close the lid and beware of boiling the milk, you don't want a hot mess in here!


The recipe calls for cornstarch that has to be added to the whisked meringue, but I completely forgot to add it. But there was no issues in holding its shapes Coming to the flavor, practically speaking we all have vanilla essence at our homes, but I'd rather go for the vanilla pod next time I try the dessert. But guys I was literally amazed by the technique of poaching the meringue in the hot milk. Aaaahh! The inventions people come up with, truly genius! The rich creme anglaise and the meringue is a match made in heaven. It's unreal how a few ingredients like literally 4 ingredients and you can make an easy and delicious dessert in a jiffy.

Creme anglaise is basically egg yolks that are cooked along with hot milk and vanilla briefly without boiling, or else you might end up with a creme anglaise that is grainy.


Just a few points to be kept in mind and your classic French dinner dessert called Iles Flotantes with sugar basket is ready to serve! 😍 

Let's get started! 

Ingredients :


  • 2 cups Full Fat milk (plus extra to add on later) 
  • 1 tsp Vanilla extract or 1/2 vanilla bean paste
  • 4 large eggs, yolks and whites separated
  • 1/3 cup sugar (for meringue) 
  • 1/4 cup sugar (for creme anglaise) 
  • 1 tsp cornstarch /corn flour (optional) 

Instructions:

  1. Pour the milk into a wide skillet (you will be poaching your meringues here) and pour in your vanilla extract. Allow to heat on low flame whilst we prepare the meringue. 
  2. Whip the egg whites using a electric hand beater or a stand mixer on a high speed while gradually adding your sugar and continue to whip until the egg whites have stiff peaks when the beaters are lifted or spoon the meringue and turn the spoon and if the meringue stays intact without falling, the meringues are ready for poaching. Fold in the cornstarch at this stage. 
  3. Once the milk has heated to a point where there are no bubbles of boiling visible, using two large Spoons shaped the meringues to oval shape (I used uce cream scoop) and drop them into the hot milk carefully leaving space between each meringue ball. 
  4. Poach the meringues for 5 minutes uncovered, then flip and cook covered for around 4 minutes. 
  5. Using a slotted spoon, scoop the cooked meringues and set aside to cool on a tray. 
  6. Once cooked, allow to chill. 
  7. Into a clean saucepan, strain the milk that was used to cook the meringues and add extra milk if required (requires 2 cups/500 ml milk). Bring the milk to a Sim. 
  8. Whilst at that, whisk the egg yolks in a large bowl with sugar. Slowly pour the hot milk into the yolk mixture while whisking. 
  9. Transfer the custard mix to the saucepan again and using a wooden spoon mix well until the mix thickens lightly and coats the back of your wooden spoon (you can check this by wiping the back of your spoon with a finger and if it separates, then it is cooked and you may switch off the flame).
  10. Slowly strain the custard into a clean bowl and cover with a cling wrap directly covering the surface of the custard. Allow the custard to come to a room temperature and chill well before serving. 

  11. Finally, make caramel to garnish. (by bringing sugar to a boil and stiring occasionally until melted) 
  12. To serve, pour ladle fulls of the prepared and chilled creme anglaise into a flat serving dessert bowl and gently place the cooked and cooled meringue. Finally, drizzle the prepared caramelized sugar over the meringue, serve immediately and enjoy! 😍 


Do try this recipe and don't forget to share your experience/feedback with me here in the comments or feel free to send me a mail. Also, do tag me at #taystedit if you try out my recipes on Facebook, Instagram etc so that I can see when you make it. ♡♡♡♡

Rose Kunafa Cream Pudding


Eid is just around the corner and we are all going to witness for the first time in our lives, the most different eid. Who would have even thought that we wouldn't be going to the mosques on the morning of eid this year? That feeling of happiness after the eid prayer is simply bliss. Now after the eid prayers we often visit our relatives which is so much fun! I know we never expected this to happen, but Qadr Allahumaa sha faa'la (It is the decree of Allah and He does as He wills). But this does remind us to not take things for granted and to stay home and be safe.


What better way to cheer up our folks with some delightful dessert/ pudding experience?! On the eid day it is mandatory to have some sweet/ dessert after the 'mega eid lunch'.. and of course the star is always the mutta maala (traditional thread-like dessert made of eggs also called egg necklace). Mutta maala is customary to be made on eid. Now being a foodie, I like to serve a dessert too that is mostly indulged after a nap session, haha. (Come on! How much food can our tummies take in right after fasting for a month, teehee) So I thought to share a dessert recipe with you guys! I mean come on! How many of us do not like desserts? especially on Eid? 


Well, I am here to share the perfect show stopper for your eid spread! I couldn't wait to develop this recipe that has been in my mind. Now to put what is in your mind to action, is not easy! I looooove kunafa, I mean, who doesn't? Lately, I have been seeing a lot of rose dalgona which inspired me to try this! Thanks to @tableforfive for that! Also another inspiration was the popular mesh umm ali from @cleobuttera that made me try kunafa dough this way. They never cease to blow your mind with their food pictures! Now, coming back to the pudding, as I said I love kunafa, and rose dalgona in trending during ramadan too! So I wanted a bit of both; something crunchy at the same time creamy and with a hint of rose. So I immediately began working on the idea.
Basically, this was an experiment and alhamdulilah it tastes soooo good! Exaclty like I wanted it! Playing with textures is my thing. But the kunafa layer came out perfect and I forgot a huge step, to butter my baking dish, so the kunafa wouldn't budge! My initial plan was to make a rose cream and allow to set and place the sweetened kunafa as the second layer. Now since that the kunafa layer wouldn't budge, I had to pour the rose cream as the second layer. Tasted great! But I would prefer to keep the kunafa layer as the top layer, the next time I make these!
Now if you dont have kunafa you may do the same recipe, by frying the bread in some ghee+oil.
Without further a do, let's prepare this yumm Rose Kunafa Cream Pudding 🍨


Ingredients:

For baking Kunafa :
  • 1/2 package or less kunafa dough (as much as you can fit in one layer of your baking dish) 
  • 4 tbsp Pure ghee
  • 1/4 - 1/2 cup condensed milk
  • 1/4 cup Whipping cream

For the rose cream:
  • 1 cup Whipping cream
  • 2 tbsp rose syrup
  • 1/4 cup condensed milk

For Garnishing 

  • Slivered Pistachios
  • Dried Rose Petals

Instructions:

  1. Preheat your oven to 200°C and butter your baking dish, I used 9 by 7 inch baking dish. 
  2. Place the kunafa dough lengthwise and fill in as tightly as possible. 
  3. Apply ghee evenly over all areas using a brush. 
  4. Bake in a preheated oven 200°C for 20 minutes until golden and crisp. 
  5. Next, pour the condensed milk and heavy cream /Whipping cream over the baked Kunafa and bake again for 5 minutes until the kunafa becomes crisp again. 
  6. Now in a large bowl, whip the cream until medium stiff peaks and add the rose syrup and condensed milk and fold gently. 
  7. Pour this rose cream over the baked Kunafa layer and place it in the refrigerator for 2-3 hours until set or place in the freezer for 1/2 an hour. * (check notes) 
  8. Garnish with slivered pistachios and dried Rose Petals. 
Notes: 
  • I would recommend to set the whipped rose cream in a similar pudding dish and place the baked sweet Kunafa for better crunch and texture. I forgot to apply butter hence I had to pour the rose cream over the kunafa layer.
  • Once the rose cream is set, place the kunafa layer just before serving so that the crunchiness is retained.
  • If you want to use the rose cream as the top layer you may use sliced bread that is fried in ghee+oil for the base, also a great substitute for kunafa.
  • I used a glass baking dish to show the layers as this was an experiment. Use a ceramic baking dish if you have one. 
  • Line the dish with baking paper for easier handling of the sweet Kunafa. 
  • Be careful not to over pour Whipping cream while baking Kunafa, just a tad bit will do. 
  • You may alternatively crush the baked Kunafa slightly with clean and dry hands and layer in mini dessert bowls with slightly crushed Kunafa layer being the first then the cream and again the Kunafa layer. 
  • If you do not have rose syrup, you may use a dash of rose water and red food color, but I wouldn't recommend it coz the pudding would turn runny and also wouldn't taste as good. (had to put down since it's a FAQ)
  • Different ovens have different temperature, keep in mind not to bake for too long after you add Condensed milk to your baked Kunafa, this will result in a hard layer. 

Do try this recipe and don't forget to share your experience/feedback with me here in the comments or feel free to send me a mail. Also, do tag me at #taystedit if you try out my recipes on Facebook, Instagram etc so that I can see when you make it. ♡♡♡♡
Classic Royal Falooda


Subhan Allah! The holy month of Ramadan is surely flying away. Its already the 22nd Ramadan, this is beyond belief. Trying to stay away from social media and other activities as much as I can. 

Increase your time in Ibadah, and do the maximum for the hereafter. If you are a busy mother and you don't have the time to do Ibadah like reciting the Mushaf and standing in prayer other than the obligatory ones, remember Allah is merciful and He rewards you for all that you do, be it household chores, or any other responsibilities as a mother, wife, daughter or sister. Moisten your tongue with dhikr and make duaa for the current situation to cease. Do include me and my fam in your duaa too.

Now coming back to star recipe of the day! The well known Royal Falooda is a dessert drink that is enjoyed amongst us especially during summer. Well, it is believed that the falooda was evolved from Persia. Persians had strong trade relations with India during the Mughal Era along with which food cultures were also adopted. It is said that Falooda was once served to the upper class, which is now enjoyed in every household too. This drink is prepared in various flavors, but I stilll prefer the classic rose flavored ones. I initially thought of making mango falooda, but my heart didn't feel like it.

Basically, Royal Falooda consists of rose syrup flavored ice milk, falooda sev or vermicelli, khas-khas or basil seeds, dry fruits, fresh fruits, and Ice cream. Falooda, as far as I remember was my favorite part of visiting India. We could never hold back our ecxitement to visit our favorite ice-cream shop 'Íceberg' or the then only ice cream cafe in Thalassery. If anyone would say they were going to Iceberg everyone would just jump to the car and join the clan. Ah! Those fine days were the best, even though we have many such cafe's and coolbars now in Thalassery, the memories and nostalgia attached to our visits to Iceberg are special. Fond memories of visits to Iceberg include this particular dessert drink that would quench our thirst, refresh us and fill our tummies, and Falooda was usually the most popular order given. The one faint memory if I hated falooda was that they added tutti fruitti which I totally dislike.
So I prepared it with all ingredients that I love. One spoonfull of this dessert drink and it felt like it took me back in memory lane and it was bliss!

You may add any fresh fruits of your choice or nuts preferably non-tropical fruits, I have added chopped apple, banana and pome aril seeds (anar seeds) in my demostration. You may add other fruits like sliced grapes etc. 

For iftar, we open our fasts with dates, juice and an array of fruits, why not try Royal Falooda since it is all in one and definitely a tummy pleaser.


Ingredients (makes 2 tall glasses of Falooda):
  • 5 tbsp rose syrup
  • 1 cup chilled milk
  • 1 cup cold milk
  • 4 - 5 tbsp sugar
  • 2 tbsp basil seeds (soaked in 2 tbsp water for 10-15 minutes)
  • 3- 4 tbsp cooked falooda sev or vermicelli
  • 6 tbsp cherry or strawberry jelly (prepared according to package instructions)
  • 4 scoops vanilla or pista ice cream
  • 6 tbsp chopped apple and banana
  • 2 tbsp dried fig and almonds chopped
  • 1 tbsp pome aril seeds
  • 1 tbsp slivered pistachio, for garnish
  • 1 strawberry, for garnish
Instructions:
  1. In a tall glass, add you bloomed basil seeds.
  2. Next, add your falooda sev or vermicelli and pour 1 tbsp rose syrup around the edges of the glass.
  3. Now in a blender, pour 1 cup cold milk, add 2 tbsp rose syrup and sugar. Blend well and add the chilled ice milk to the blender and pulse for a second or two.
  4. Add 3 tbsp jelly to the glass and pour in your prepared rose milk.
  5. Next add a scoop of vanilla ice cream and add your fresh cut fruits.
  6. Next add your dry fruits and almond and some pome aril seeds (anar seeds).
  7. Scoop in a couple of tbsp of jelly and finally finish off with a scoop of ice cream. Garnished with slivered pistachio and pome aril seeds.
                   
Notes:
  • Use Pistachio Ice cream for added nuts effect, I only had vanilla ice cream so used it.
  • My mom suggests to add sago seeds instead of Chia seeds or along with it. 


Do try this recipe and don't forget to share your experience/feedback with me here in the comments or feel free to send me a mail. Also, do tag me at #taystedit if you try out my recipes on Facebook, Instagram etc so that I can see when you make it. ♡♡♡♡

Cream Cheese Kunafa Rolls


Peace greetings to all of you! I am so excited to share this recipe that I can't wait to share with you guys! Basically these are cream cheese cubes that are wrapped with Kunafa dough and relished with a simple sugar syrup. Sounds too simple yea? But the flavors are intricate, I guarantee! 

I am so glad that I could come up with such a lovely sweet recipe for Ramadan. This is exactly how I want Kunafa. To be frank this is better than Kunafa! Not exaggerating or bragging but I couldn't believe how well this turned out. This is one recipe I really hope anyone who loves cooking with my recipes should try! It is worth it 😍 Takes only little bit of your time and requires very few ingredients. I can't stress enough how good these are. Drooling already while typing about it. 


I can proudly say this is better than Kunafa because, these are bite sized with a perfect crunch (which means no more fighting for a spoon to attack a Kunafa). And wayyy delicious with the Kiri cream cheese cubes. You can be sure that this cheese doesn't melt, by safely wrapping it with the Kunafa dough! The flavor of the ghee smeared Kunafa dough with that cream cheese filling with a drizzle of the simple sugar syrup is so humble yet fulfilling, and these rolls, ups the Kunafa game.

Haters might say that it is a copy from the famous Kunafa Queen Cleobuttera. But once I had sketched the recipe plan in my mind and I simply searched on Google ( just to make sure no one else had attempted this so that people wouldn't say I copied the recipe, to my surprise I see the exact same picture that I had in my mind, but of course her pictures are more drool worthy than anyone and so much of perfection.) She had posted the recipe with ricotta cheese, also she used fresh Kunafa dough, but I couldn't get my hands on them. Looked super delish and when I saw the video I got the idea to roll the Kunafa rolls. Forever grateful to her for the rolling method.


Now back to my Kunafa rolls.. I was telling my mom and brother that I wanted to try with Mozzarella the next time for the perfect cheese pull. But they were both of the opinion that this tasted so good simply because I used cream cheese here. And I couldn't agree more.

Also I only made a few of these rolls as I wasn't quite sure how much of a success would this be. But to my surprise it was too good. Everyone was fighting over it. And I couldn't be happier to see what a success it was. Just imagine my happiness amidst my siblings fighting for the last piece 😂 It was hilarious! My brother who is a big time foodie and the biggest critic in my fam was all praises, he couldn't stop saying how good these were. So now you know how much you need these rolls in your life 😍

Please don't mind the bad picture quality, it was almost time for the magrib azaan and I couldn't capture like how I wanted. Anywhooo please do give this recipe a try, I am that excited for you guys, that I don't want to delay until I get a chance to click again! Might update the pic later though! ❤️ 

So without further a-do let's get started! 

Ingredients :


For the kunafa rolls:

  • Kunafa dough, frozen (preferably fresh) 
  • 3 Kiri cream cheese cubes, cut lengthwise into 3 portions 
  • 4 tbsp pure Ghee
  • Water, to seal

Sugar syrup : (double the quantity if you want more) 

  • 1 cup Sugar 
  • 1/2 cup water 
  • A squeeze of lemon

Instructions :

To make the simple sugar syrup :
  1. In a deep sauce pan add the ingredients and allow to boil, once it comes to a rolling boil, allow to boil in Sim for exactly 10 minutes, and then switch off the flame. 
  2. Do not stir, you may swirl the pan or give a light mix if the sugar doesn't dissolve at all.

To make the kunafa rolls:
  1. Preheat the oven to 220°C.
  2. Onto a thin strand of kunafa dough place the 1 long piece of cream cheese cubes and fold from the sides so that the sides are sealed properly.
  3. Next place this Kunafa wrapped cream cheese onto the sheet of kunafa dough and roll and trim, once a layer of rolling is done. Now seal the edges of the strand using water and gently squeeze inside your palms. (Check my YouTube video for the exact tutorial) 
  4. Now onto a Parchment lined baking tray, dip or smear the ghee generously onto the rolls and place them Seam side down.

  5. Now allow to bake for 30-35 or until golden and crisps. Turning the roll occasionally once or twice so that they brown evenly.
  6. Once cooled down for 5 minutes, dip the ends of the rolls in sugar syrup and coat them in ground pistachio.
  7. Drizzle the simple sugar syrup and enjoy! 


Do try this recipe and don't forget to share your experience/feedback with me here in the comments or feel free to send me a mail. Also, do tag me at #taystedit if you try out my recipes on Facebook, Instagram etc so that I can see when you make it. ♡♡♡♡

Nutella Oreo Mousse Shots


Desserts that require fewer ingredients and minimal time for setting are the best! Isn't it? Also when the dessert calls for basic ingredients like Nutella which is basic and common in most of our homes, then making desserts are the best. These are so good that you can whip these up in less than 15 minutes and requires only half an hour of setting. It is that simple.

Also for iftar when you may crave for some dessert, this is something that is so easy to prepare that it doesn't take up some much of your time and who doesn't love desserts for iftar? I usually make the same mousse with dark chocolate instead of Nutella. But who doesn't like some change? Also since almost everyone stores Nutella in every house for instant chocolate cravings, it is definitely the best substitute for chocolate in desserts. Basically, this is a 2 ingredient dessert, but I have included a layer of crushed Oreos that are mixed with butter for extra richness and better texture so that there is a base to the mousse, you may simply use Nutella and whipped cream. Also, I love how this tastes, as it is something in between ice cream and cake. Cannot express exactly how delicious these are because who would believe its a 2 ingredient dessert. Woop Woop!

This was one of the most requested recipes when I once posted a picture of a party hosted for hubsters friends. I had got many compliments saying that those shots looked no less than what you can find in 5-star buffets. I was overwhelmed with happiness because only I knew it took me just 15 minutes to whip these up. Finally, I am sharing the recipe with you guys, I am sure you will be praised too! And if you have kids I bet they will be the happiest.

I love this mousse recipe because you don't have to worry about raw eggs in your mousse and you get to enjoy every spoon with pure joy! If you want to satisfy your sweet tooth instantly, this is the recipe for you! Now go make these and relish these yummy nutella oreo mousse shots.

Ingredients:


  • 2 pack of 4 Oreo biscuits
  • 2 tbsp butter
  • 1 cup heavy cream
  • 3 heapful tbsp of nutella
  • Melted dark chocolate for garnishing/ designing

Instructions:


  1. Crush your oreo biscuits with butter and add them to your serving shots equally. Press them down gently using a spoon. Allow it to set for 5 minutes in the freezer.
  2. In a micrwavable bowl, melt 3 heapfull tbsp of Nutella for 30 seconds.
  3. And in a separate bowl whip 1 cup of whipping cream until soft peaks and slowly fold the melted nutella into the whipped cream until combined, dont forget to fold in slow strokes.
  4. Now pipe or pour the mousse mixture onto the oreo base that has been set in the fridge.
  5. Allow to set for at least 30 minutes and decorate using melted dark chocolate and place half of the oreo biscuits as a topping.
  6. Enjoy!


Do try this recipe and don't forget to share your experience/feedback with me here in the comments or feel free to send me a mail. Also, do tag me at #taystedit if you try out my recipes on Facebook, Instagram etc so that I can see when you make it. ♡♡♡♡
Dalgona Milk Pudding


Dalgona Coffee has been something that has been viral for a couple of weeks now. It is a mixture of instant coffee powder, sugar and warm water that is blended well using a hand blender or whisk to form a fluff like coffee. 

Since it is available at almost every house, I wondered if it could be transformed to a tiramisu-like pudding. I have been planning to do this since the past 2-3 days. Finally I put my imagination to effect. Alhamdulilah it turned out so good. If you love coffee or loved the dalgona coffee experimence please do try this! 😍 


I made this with basic ingredients available at home, you may use cream cheese in the whipped cream-thick cream layer and substitute with whatever ingredients you have at home. As we all are going through this lock down phase, it is difficult to find ingredients. I made this with whatever I found in my pantry. 

After the Friday biryani session I always love to indulge in something sweet and this is one of the outcomes. This definitely is a cheat tiramisu dessert. So yumm and delicious. I have used Lady finger biscuits for my pudding, you may use any unflavored biscuits or even bread is doable. But if you are using biscuits like Marie, I would suggest to make the milk mixture lukewarm and pour over the Marie biscuits so that the biscuits are soaked well. For bread and lady finger biscuits cold milk mixture will do. Next is a layer of vanilla Flavored cream using whipped cream and thick cream, here you may add cream cheese if you have. And then again a layer of milk soaked biscuits. Finally spread or pipe the whipped coffee (dalgona) with some folded fresh cream (to dilute the bitterness) and top up with whatever your heart desires. 
This is definitely a quick fix tiramisu or like I love to call it - Cheat Tiramisu 😅
If you love tiramisu you are gonna love this one! Also a simple dessert, next time you have guests over you don't have to fret! Dalgona Milk Pudding to your rescue. Let's indulge in some Dalgona Milk Pudding. 😀


Ingredients :

  • Lady finger biscuits or any unflavored biscuits
  • Coffee powder 1 tsp for soaking milk and 2 tsp coffee powder for dalgona coffee (whisked coffee) 
  • 2 tbsp warm water 
  • 2 tbsp sugar
  • 3-4 tbsp fresh cream/ thick cream
  • 1 tsp Vanilla Essence 
  • 1 cup Whipped cream
  • 200 ml Fresh cream/ thick cream/Nestlé cream
  • 3 tbsp Condensed milk
  • 2-3 tbsp Icing Sugar
  • 1 cup Milk/uht milk/Evaporated milk 

Soaking milk mixture
Milk, condensed milk, coffee powder

Cream layer
Fold whipped cream, thick cream, vanilla essence and icing sugar

Dalgona coffee 
Blend 2 tbsp coffee powder, 2 tbsp sugar and 2 tbsp warm water for a minute using a hand blender until fluffy. 

Instructions:

  1. Place lady finger biscuits in a tray aligned and pour the milk mixture (set some aside for second layer), spread the cream layer, now align another layer of biscuits and pour the milk mixture and now spread the dalgona folded with thick cream mixture and spread it well. 
  2. Now make lines by piping melted dark chocolate, using a toothpick go up and down on the lines to form a beautiful design. Or use anything to style the pudding. 
  3. Refrigerate at least for 2-4 hours. And indulge! 😍

Notes:
  • I made this pudding in a small tray as it was an experiment , you may increase the quantity of the soaking milk and whipped cream like wise. 
  • I have used lady finger biscuits here, you may use any unflavored biscuits that are available to you. 
  • Biscuits like Marie might need more layering, also pour in lukewarm milk mixture for the biscuits to soak. 
  • Bread (sides trimmed) can also be used and prepared in cold milk mixture. 
  • If you do not have Whipping cream, you may use drem whip sachets too. 
  • You may also substitute for cream cheese instead of thick cream 
  • Remember to fold your dalgona coffee and cream and not whisk. Whisking allows more bubbles and makes the mixture liquid. 
  • You may pipe the Dalgona cream mixture for the final presentation too
  • The recipe makes 8 large slices, you may adjust the measurements accordingly, if you plan to make for more people😀
  • If Icing Sugar/castor sugar isn't available you may improvise by grinding normal granulated sugar. 

Do try this recipe and don't forget to share your experience/feedback with me here in the comments or feel free to send me a mail. Also, do tag me at #taystedit if you try out my recipes on Facebook, Instagram etc so that I can see when you make it. ♡♡♡♡

Biscoff Brownies


If you love chocolate, Brownies are your best friend. I cannot stress how much my family loves it when I make brownies. It just escapes into thin air as soon as it is served.
Imagine giving it a lotus biscoff makeover. The lotus spread gives it a nutty taste to the ever-awesome fudgy brownies. If you don't like fudgy brownies or haven't tried one yet, you are missing out so much in life. It is the best cheat indulgence you could ever have!

Well ever since I got my hands on the popular lotus biscoff spread, I have wanted to experiment with it in many ways. I have won hearts making lotus biscoff pudding, which I shall share with you guys soon. I have had many recipe requests using lotus biscoff spread. So this is one of them that is definitely a hit here.

However, if you aren't a lotus biscoff lover you may simply make a super delish fudgy brownie excluding the lotus biscoff part. The recipe stays the same.


I cannot stress enough on how fudgy these are. They aren't just exquisite, these are super delicious too. Quite often I make a batch and keep, to satisfy my sudden sweet tooth cravings. These stay fresh in airtight containers up to 3-4 days. These are super easy to make. Gets done in no time and in fact I love Brownies more than indulging in chocolate because there is more texture to it and of course tastes even better.
I am a brownie person, this is something anyone who knows me well, will acknowledge.
When I can't think of something to gift someone, it's these brownies that always come to my rescue. And I guarantee you, these are the best call you could ever have. Without further ado let's get baking!


Ingredients -


  • 200 gms Dark chocolate (good quality)
  • 100 gms Unsalted butter
  • 3 tbsp any Vegetable Oil
  • 4 Medium or 3 Large eggs
  • 1 cup Sugar
  • 3/4 cup All purpose flour/ Cake flour
  • 1/4 cup cocoa powder
  • 1/4 cup semi sweet chocolate chips (optional)
  • 1 tsp Vanilla Essence/Extract
  • Salt, a pinch
  • 7-8 Lotus Biscoff Biscuits
  • 1/2 cup Lotus Biscoff Spread

Instructions:


  1. Preheat your oven to 180°C and line your 9*9 inches baking pan with baking paper.
  2. In a microwave-safe bowl melt the chopped/broken dark chocolate and butter and microwave in 30 seconds bursts. Allow to melt and mix until smooth.
  3. While it cools, prepare the egg batter by whisking eggs and sugar using a hand blender/ electric mixer/ fork for no more than 3 minutes. It becomes like a mousse, Thick, and Creamy.
  4. Now add in the vanilla extract/essence and vegetable oil.
  5. Next pour in the chocolate-butter mixture and fold carefully. Do not over mix.
  6. After a few folds add in your flour, and cocoa powder. Carefully fold your batter using a spatula until almost combined.
  7. Do not deflate the whisked eggs by mixing vigorously. Now slowly pour the brownie batter to your prepared baking pan.
  8. Now break up the biscoff biscuits using your hands and sprinkle them onto the batter and using a fork mix up the batter lightly.
  9. Using two teaspoons scoop dollops of biscoff spread onto the brownie batter in rows, about 15 or more dollops and using a matchstick make swirls of the spread to make the Brownies look extra appealing and so that the biscoff spread seeps a little inside the batter.


  10. Bake the Brownies for 25-30 minutes and insert a Toothpick and if the crumbs are sticking onto the Toothpick the Brownies are probably done as these are fudgy Brownies.
  11. Allow the brownies to cool at least for 15 minutes before removing from pan and slicing.
  12. Your brownies are ready to indulge!


Notes:

  • Do not keep the Brownies in the oven for too long, keep checking every 5-10 minutes after the 30 minutes timer.
  • If you aren't a fan of lotus biscoff you may completely avoid that and it still makes an awesome fudgy brownie.
  • Allow the brownies to cool in the pan itself for at least 15 minutes.
  • The more it cools the better and easier to cut the Brownies into perfect squares.
  • These stay fresh for 4-5 days in an airtight container (only if you have something left 😅)

Do try this recipe and don't forget to share your experience/feedback with me here in the comments or feel free to send me a mail. Also, do tag me at #taystedit if you try out my recipes on Facebook, Instagram etc so that I can see when you make it. ♡♡♡♡
Older Posts

Search This Blog

My name is Hasna Haneef, a mommy to a toddler, hailing from Thalassery, Kerala. Welcome to my humble abode on the Internet; wherein I share all my recipes and experiments. I am glad to have you on board!

TRENDING POSTS

  • Kerala Style Squid Roast
  • Chicken Steak with Creamy Mushroom Sauce
  • Emirati Chebab
  • Regag - Emirati Flat bread
  • Copy Cat Caesars Mini Pizza
  • Kerala Beef Fry/ Nadan beef dry fry

About Me

May peace be with you!

Welcome to my blog.

I am delighted to have you on board. My name is Hasna Haneef, a mommy to a toddler, hailing from Thalassery, Kerala. My homeplace being Dubai, as I am born and brought up here and I am very influenced by the lifestyle and the variety of authentic cuisines I get to try from here, which has made me try anything that comes across me
, click here →

Stay Connected!

Join Our Madness!

Join with Thousands Of Subscribers ! Get Our Latest Recipes Delivered to Your email Inbox!

Powered by follow.it
  • Home
  • About Me
  • Recipes

    • Main Course
    • Desserts
    • Snacks

    Uncategorized

    • Chicken
    • Meat
    • Vegetarian
    • Rice
    • Malabar Food
    • Baking
    • Breakfasts
    • Snacks
    • Drinks
    • Pasta
    • Fish
    • Soups
    • Desserts
  • Contact Me

Featured Post

Triple Chocolate Hazelnut Skillet Cookie

Blog Archive

  • ▼  2025 (4)
    • ▼  April (2)
      • 1 minute Chocolate Mug Cake
      • Grilled Cheese California Burrito
    • ►  March (1)
    • ►  February (1)
  • ►  2024 (36)
    • ►  October (4)
    • ►  September (5)
    • ►  July (1)
    • ►  June (2)
    • ►  May (4)
    • ►  April (3)
    • ►  March (10)
    • ►  January (7)
  • ►  2023 (47)
    • ►  December (3)
    • ►  September (2)
    • ►  August (6)
    • ►  July (6)
    • ►  June (9)
    • ►  May (4)
    • ►  April (5)
    • ►  March (6)
    • ►  February (3)
    • ►  January (3)
  • ►  2022 (69)
    • ►  November (4)
    • ►  October (6)
    • ►  September (7)
    • ►  August (9)
    • ►  July (12)
    • ►  June (5)
    • ►  May (5)
    • ►  April (12)
    • ►  March (4)
    • ►  February (2)
    • ►  January (3)
  • ►  2021 (24)
    • ►  November (1)
    • ►  October (2)
    • ►  July (1)
    • ►  June (4)
    • ►  May (6)
    • ►  April (4)
    • ►  February (4)
    • ►  January (2)
  • ►  2020 (82)
    • ►  December (5)
    • ►  November (6)
    • ►  October (4)
    • ►  September (2)
    • ►  August (5)
    • ►  July (10)
    • ►  June (10)
    • ►  May (13)
    • ►  April (12)
    • ►  March (8)
    • ►  February (4)
    • ►  January (3)
  • ►  2019 (22)
    • ►  December (1)
    • ►  November (2)
    • ►  October (6)
    • ►  September (1)
    • ►  August (1)
    • ►  February (3)
    • ►  January (8)
  • ►  2018 (15)
    • ►  December (4)
    • ►  November (6)
    • ►  October (3)
    • ►  September (2)

Subscribe Us

Labels

Bake Biscuits Breakfast Brown rice Burger Cheese Chocolate Dal Egg Emirati Fish Iftar Indonesian Japanese Jeerakashala rice Kerala Keto Kuwait food Lunch Milk Mutton Thai food UAE food afghan cuisine arabic beef biryani bread burnt cheesecake cake chicken cream dessert dinner greek healthy indo chinese lamb malabar prawns pudding puffs quick dinner ideas recipe refreshing drink rice salad sandwich stir fry vegetables vegetarian veggies yemeni

Contact Form


POPULAR POSTS AND PAGES

Kerala Style Squid Roast

Kerala Style Squid Roast

June 18, 2020
Chicken Steak with Creamy Mushroom Sauce

Chicken Steak with Creamy Mushroom Sauce

November 05, 2018
Emirati Chebab

Emirati Chebab

June 01, 2023
Regag - Emirati Flat bread

Regag - Emirati Flat bread

December 02, 2020
Copy Cat Caesars Mini Pizza

Copy Cat Caesars Mini Pizza

March 12, 2024

Pages

  • Home
  • About Me
  • Privacy Policy
  • Contact Me

Copywrite © 2023 TermsFeed®. All rights reserved.

Created By Sora Templates | Distributed By Gooyaabi Templates

Back to top