Search This Blog

Taystit by Hasna

Food, Recipes, and Beyond

  • Home
  • About Me
  • Recipes
    • Main Course
    • Snacks
    • Desserts
  • Uncategorized
    • Chicken
    • Meat
    • Vegetarian
    • Rice
    • Malabar Food
    • Baking
    • Breakfasts
    • Snacks
    • Fish
    • Pasta
    • Drinks
    • Soups
    • Desserts
  • Contact Me

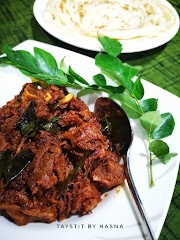
Naadan Crab Roast


Crab is one among my favorite seafood, well only after my favorite Kallumakaya (Mussels) of course! The flavor that comes from crab is just super delicious! This roast is one of my favorites that my mom used to make, and I used to wipe it clean. 

I just love how easy it is to prepare this crab roast and it almost goes well with all rotis and rice. My nostalgic memory is my mom making this roast and neer dosa (moodi pathil) rice crepe that is made with rice, coconut and cooked rice. These are really thin crepes and a liberal amount of ghee is applied which is then served with any delicious sides like this naadan crab roast.

I am sure most of you all make crab roast the same way, I thought of sharing it here so that it may be helpful for beginners in cooking. :) Also note that crab cooking time is around 7-8 minutes. Since we are making a roast here, I would say, to cook the crab separately in salt, turmeric and chilli powder with a litle water. As for roasting you need the ingredients to sauté for a long time on the stove to get a perfect reduced consistency.

Make sure you never store crabs directly into the freezer, as the flesh melts when it becomes ice. If you are in no mood to cook it immediately, you could cook them as said above and once cooled, can be stored in the refrigerator up to 2 days. 

Ingredients:


  • 1/2 kg Blue Crab, cleaned and precooked (with 1/2 glass water, 2 tsp Kashmiri Chilli powder, 1/4 tsp Turmeric powder and salt for 7-8 minutes, lid on)
  • 1 medium onion, sliced 
  • 1 large Tomato, chopped
  • 2 cloves Garlic, pounded
  • 1 small piece Ginger, pounded 
  • Green chilli (optional)
  • 2-3 tbsp Coconut oil
  • Curry leaves
  • 1 tsp Kashmiri Chilli powder 
  • 1 tsp Coriander powder
  • 1/4 tsp Garam Masala powder 
  • Coriander leaves, chopped
  • 1 tbsp Raw Coconut oil


Instructions:

  1. In a pot, cook the crab as mentioned above and set aside.
  2. In a frypan, pour coconut oil, add the sliced onion, salt, curry leaves and sauté until translucent, add the pounded ginger garlic, sauté until raw aroma disappears. 
  3. Next add the chopped tomatoes, sauté and cover with the lid and allow to get mushy.
  4. Keep the flame on low and add the spice powder and sauté. 
  5. Now add in the crab stock water and allow the gravy to reduce a little, add salt if required.
  6. Add in the crab and mix and cook covered for 2-3 minutes. Switch off the flame.
  7. Finally pour some raw coconut oil and garnish with freshly chopped coriander leaves. 


Do try this recipe and don't forget to share your experience/feedback with me here in the comments or feel free to send me a mail. Also, do tag me at #taystedit if you try out my recipes on Facebook, Instagram etc so that I can see when you make it. ♡♡♡♡

Unniyappam - A Traditional Kerala Snack


Good evening folks!

Unniyappam is one Kerala snack that I have faint memories of. The chewy outer layer and soft spongy like insides which gave in small pieces of ghee roasted coconut to munch on is something incredibly good. Though I used to dislike it as a child, I remember having my classmates and seniors bringing them to school when I did my schooling in Kerala; in these little steel dabbas that they would open and close with the utmost care and give you one if you are good friends with them. Aaaah memories! I used to always pass it on to the next person sitting near me as I hated wasting food and I didn't want to hurt by saying a no.

So one fine day, I finally happened to try it from one of my seniors and my bus mate. This particular unniyappam looked extremely appealing that I had to try it! Maaan, it would owe it her and her mom or whoever made that unniyappam.. big time! The unniyappam that she shared was undeniably so good, the color, the texture, yet the crunch from the ghee roasted coconut pieces made me fall for it. Neethu.. I hope you read this. :) 

Alas.. if you happen to have had an aversion to a particular food once and you somehow think of them all to be the same. Been there. Lesson learned. Never said a no after that lol, unless the food is stale or disgusting. Well, at our place, we don't make unniyappam much. Most often it has been a delicacy only relished from bakeries etc. Always disliked theirs too as theirs seemed to be hard and not spongy. If you nail the technique and get it right.. I am sure it will stay soft in an airtight container well for at least 2-3 days. My hubster, who happens to dislike unniyappam too, he never bothered to try it. My daughter who usually has food aversion, kept grabbing one from the kitchen counter top. The Mister who got curious, tried himself and stuffed his face without a word. Haha. Not boasting but it really was yumm coz I like mine chewy, spongy and crunchy at the same time.

Recently I have been on an experimenting and inventing mode off, as I love to explore traditional food too.These are made using pachari (white rice), jaggery, small Kerala bananas*(4-5), ghee roasted coconut pieces, black sesame seeds and a pinch of cardamom. The ingredients sounds simple yea? Well, it gets done in no time too. One of the easiest evening snack you can make. Jutst prepare the batter in the morning and allow to ferment for a good 8 hours, or you may also grind and allow it to ferment right before you go to sleep (if waiting is not in your dictionary). For me, since it is winter here it took around 8 + hours, but if you are in a hot and humid country, your batter may get fermented even earlier. So, let's hop on to the ingredients. Shall we?


Ingredients: 

  • Coconut oil*
  • 1 cup Pachari/ White Rice (soaked for 4-5 hours)
  • 2 Robust Ripe Bananas
  • 2 tsp Ghee
  • 1/2 cup melted jaggery 
  • 1/4 - 1/2 cup small coconut pieces 
  • 3 large cardamom pods
  • 1/4 - 1/2 cup of water
  • 1 tsp black sesame seeds
  • Baking powder, a pinch
  • Salt, as required

Instructions:

  1. Roast your coconut pieces in ghee and set them aside.
  2. Wash and grind your rice with water (be careful not to make too loose nor too tight)
  3. Next add in your bananas, cardamom pods and grind well and transfer to a large bowl.
  4. Now add in your melted Jaggery and your roasted coconut pieces, and salt and mix well.
  5. Allow to ferment for 8-9 hours.
  6. Now add in your baking powder, and black sesame seeds and mix well.
  7. Into an Appa Chatti with cavities, pour in your coconut oil.
  8. Once the oil is hot, pour in tablespoonfuls of the batter and allow to fry on medium flame and turn 
  9. the unniyappams using a stick.
  10. Allow to cook well on both sides and transfer to a steel oil strainer.
  11. Allow to drain. Your favorite evening snack is now ready to devour.


Notes:

  • Using Coconut oil gives you the best results and taste, nevertheless you may use any flavorless vegetable oil too.
  • Usually, the small bananas are used for this recipe, if using the small Kerala bananas, you may use 5 of them. I had only robust bananas with me.


Do try this recipe and don't forget to share your experience/feedback with me here in the comments or feel free to send me a mail. Also, do tag me at #taystedit if you try out my recipes on Facebook, Instagram etc so that I can see when you make it. ♡♡♡♡

Malabar Mini Vella pola


I am finally posting this here, it is the 26th of Ramadan. Vella pola is a dish that immediately brings in childhood memories of Ramadan. Vella pola is an epitome of Malabar food especially during Ramadan. 

This brings in a lot of comfort and warmth when you have it, feels like your ancestors are sitting and smiling at you and giving you a hug while you relish them. These are super soft and spongy fermented rice cakes or buns. Traditionally this requires 2-3 days of preparation of the dish in which the batter is poured to ferment. It is a long process. So I always stopped myself from trying to make these. 

My grandmother and great grandmothers used to prepare the vessel to help the fermentation process by soaking Pappadam (Pappad) in coconut water for 2-3 days (not exactly able to recall the process) . This is the traditional method and if at all someone I know who makes really tasty traditional food is my mom's uncle's wife. I just love her food that whenever I visit my native she always prepares these traditional dishes for me and either brings them home or sends them over. I can't stress enough, the amount of love she puts in her food. I know you might now think is love even an ingredient. My answer - yes! You NEED to put in a lot of love when you prepare something for someone and it surely shows when you taste it. When I have any doubts regarding traditional food, she is my go-to person. The last time I went to visit her she gave me these fluffy polas that I couldn't get enough of! I had to ask her the recipe and as my memory is always super weak I asked her daughter, Rishooty, my mom's cousin, to send me the recipe through Whatsapp. After hearing the process I have been ever so lazy to make these. Of course we have no patience like the women of the previous generations have had 🙈😅

Recently my mom told me to try it with yeast and voila I couldn't believe it, it was exactly the same but so effortless. I couldn't believe the results. It was the same or even better 😍

The person who came up with this idea is a genius! Now we all can make this at home.. Alhamdulilah. This for suhoor is so soothing. I love to have it for suhoor. Vella pola are normally prepared and steamed in steel plates or any mould that you have. My mom made these in Idli moulds a few days back and everyone wanted to know the recipe, and it looked super cute. I love anything in small portion sizes, unlike the normal Vella polas are cut into squares or triangle.

These vella polas are poured with cardamom flavored coconut milk, small kerala bananas and sugar. Smash the whole thing with your hands and have it with your hands. Specifically, no spoon🙈 I can't tell you how divine it is, until you try it! 😍

My miss fussy eater also loved it, she kept asking for more! Vella pola is like a malabar essential for Ramadan so let's not waste any time and make this right away!

Ingredients:

  • 1 glass Pachari/ white rice
  • 1/2 glass boiled rice 
  • 1 glass water
  • 1 tsp yeast
  • 2 tsp sugar
  • 2 Pappadam (Pappad) /2 tsp Uzhun  (soaked along with rice) 
  • Salt

For the banana curry

  • 2 small bananas, chopped
  • 1 cup freshly squeezed coconut milk
  • 5 - 6 tbsp sugar
  • A pinch of salt
  • 1/2 tsp cardamom powder

Instructions 

  1. Wash and soak rice for at least 5 hours or overnight. 
  2. Grind the soaked rice, boiled rice, pappadam/Uzhunn, yeast, and sugar and add water. 


  3. Transfer to a large bowl (the batter will rise), cover the batter with a lid and allow to ferment for at least 3-4 hours.
     
  4. Add salt before steaming. 
  5. Apply oil in Idli moulds or any steel plate, pour the batter to the moulds and steam.
  6. In Idli moulds you need no more than 12- 15 minutes.
  7. Allow to rest and cool for 5 minutes and combine the ingredients of the banana curry.
  8. Pour over the Vella pola, smash and have them with your hands. It's amazingly soft. 👌👌


  • Notes : If you do not have white rice (Pachari) you may use Jeerakashala rice instead. 
  • I made 12 small polas with this measurement. 
  • If you do not have pappadam (pappad) you may use Urad dal ( I believe this is because pappad is made from Urad dal and this acts as a substitute for Pappadam) 

Do try this recipe and don't forget to share your experience/feedback with me here in the comments or feel free to send me a mail. Also, do tag me at #taystedit if you try out my recipes on Facebook, Instagram etc so that I can see when you make it. ♡♡♡

SIMPLE SAMBAR RECIPE


Good evening folks!


I have always felt Sambar making is a big headache, but that is only if you want it to be a long and authentic one. Normally Sambar is prepared by stir-frying or sautéing grated coconut with other spices like powders, garlic, etc are Sautéed till it browns and the coconut mixture is ground to a paste and added to the dal-veg curry prepared earlier and lastly, for tempering - mustard seeds, dried red chilies, and curry leaves are used. A long process isn't it? Well, that is the authentic one. 🤷‍♀️
I am here to share with you the Simple Sambar recipe which is the best when you have time constraints. I somehow don't like the 'varutharacha sambar' (Sautéed and ground Coconut mixture Sambar) and it is super time-consuming.
Storytime- Once back in the good old days when I was in high school we used to have a carpenter who used to single-handedly do neat furniture for us. One fine day it was declared hartal and the very famous 'national hotel' was not opened that day. So I had to cook food for him too as mama was here in Dubai and I had already started my work for Sambar. I was quite hesitant to agree to cook for him as he is a local from our place and I am sure he would die laughing asking if this really was Sambar. I was new to my kitchen then, if at all I never tried Sambar much, there was a lot of pressure on me. I felt it like a mission. I did whatever I could to my understanding and prepared the Sambar. Voila and mission accomplished! My heart went *dhuck dhuck dhuck* in a fast rate. And I was indeed surprised when he said that this was the best Sambar he ever had! I was astonished 😲 I quite didn't know what to say as I didn't see this coming. So I thought to myself maybe he was just trying to make me happy as I was a little girl. Then he kept asking things like did someone help you in the kitchen and what all did you add in etc. I was overwhelmed and when he finally said to my dad that the guy who marries your daughter is the luckiest guy, I was blushing. @haseeb.hsb you lucky man😝
Not writing to brag about it here but isn't this one of the best critics a girl in her teens can get. Alhamdulilah since then I felt like I wanted to cook more. And try more. Always remember your motivation, encouragement and your kind words can always have a big impact on the lives of our children.
Anyhow, I never liked Sambar much and don't make it that often. Also, I hate making the varutharacha style, so will be sharing the "Simple Sambar" recipe on my blog. No videos or aesthetic pics as I never thought of putting this up here. But due to many requests for the recipe of easy Sambar came in, I thought I would share this beautiful story with you guys too! ❤️
Let's hop on and make this Simple Sambar!

Ps: Will update with pictures and videos the next time I make it. In Sha Allah ❤️

Serves: 4

Ingredients :

For sambar:


  • 1/2 glass Toor dal
  • 2 green chillies
  • 1 small onion slices
  • 1/2 tomato
  • 1 sprig curry leaves
  • 1 tsp Ginger garlic paste
  • 1/4 tsp Turmeric powder
  • 1/2 tsp chilli powder
  • A pinch of asafoetida/hung (optional)
  • Salt as required
  • 1 potato, chopped
  • 1 carrot, chopped
  • 2 drumsticks/ beans/ ladies finger etc. *

For tempering:


  • 2 tbsp coconut oil
  • 1/4 tsp Mustard seeds
  • 2 sprig curry leaves
  • 2 dried red chillies
  • 2 tsp Sambar powder*
  • Other ingredients :
  • About 2 tbsp tamarind pulp*
  • 1 tsp Jaggery (optional)


Instructions :


  1. Pressure cook everything in the list under 'for Sambar' except for the vegetables in about 1 and half cup to 2 cup water for 3 whistles.
  2. Once the pressure is released on its own, let the cut vegetables cook in the dal curry mixture for about 15 minutes or until knife passes through the vegetables easily.
  3. Temper the ingredients under the list 'for tempering' in coconut oil and add the Sambar powder and mix until raw smell of powders dissappear, (be careful not to burn) and toss it into the Curry and let it all boil well. Lastly add the tamarind pulp and Jaggery. Adjust salt and your Sambar is ready! 😋
Note: *If using ladies finger sautee them in coconut oil separately for 2-3 minutes and add to the Sambar
* Sambar powder quantity depends on the brand used, some are strong some aren't.
*tamarind pulp is prepared by adding hot water and set aside and strain the liquid and use the liquid in the Curry. 

Do try this recipe and don't forget to share your experience/feedback with me here in the comments or feel free to send me a mail. Also, do tag me at #taystedit if you try out my recipes on Facebook, Instagram etc so that I can see when you make it. ♡♡♡♡

Payyoli Chicken Fry (Calicut Paragon inspired) 


Haven't you tried the combination of Chicken with grated coconut yet? Sounds strange? Whether your answer is a yes or a no, this is one insane combination that defines Kerala cuisine. Payyoli Chicken is very commonly known among the mallu hommies as it is a popular dish of the well-known restaurant Calicut Paragon. It simply is scrumptious. Though the recipe is super simple, the touch of spicy fried coconut takes the chicken fry to a next level.

This is the perfect recipe if you are on the lookout to try some mallu style chicken fry. It was indeed a triumph when I made this for the first time and from then on has been a family favorite. Whenever I have guests over for dinner or lunch I make this chicken fry as it is super easy and delicious 😋.

Payyoli chicken can be served with any Kerala style curry, and chappati or simply as a starter. The chicken is preferably marinated twice for the marination to get absorbed well, where the rice powder is skipped and added right before you fry the chicken so that the chicken remains crispy from the outside and juicy from the inside. The chicken is first marinated in spicy marination and fried, which is then topped up with grated spicy coconut that is roasted in an iron Kadai (wok) which gives immense flavor dimension to the chicken fry. 

You have to be very careful when roasting the coconut, watch over very closely, the coconut may look like it's still not done, but all of a sudden it may change color and burn. The whole point is that the shredded coconut has to be crispy, fiery and not burnt with a beautiful dark reddish color. 

We begin the recipe by soaking the dried red chilies in hot water for 15 minutes, preferably Kashmir dried red whole chilies. Since I did not have the Kashmiri variety I used the normal dried red chillies. Also if you do not have any type of dried chilies at home you may use chili powder but the zing comes from the ground dried red chilies paste. Let's fry the chicken and top it with the crunchy roasted coconut. Let's get started!


Ingredients :

For the chicken marinade:

  • 700 gms bone-in chicken (small cut pieces)
  • 8 dried red chillies soaked in hot water for 15 minutes and made into paste
  • 2 tsp gg paste
  • 1 tsp meat masala/chicken Masala powder
  • 1/4 tsp Turmeric powder
  • 1 tsp Kashmiri Red chilli powder
  • 1 tbsp lemon juice
  • 1/2 tsp red chilli flakes (optional)
  • 2 tbsp cornflour
  • 1 tbsp maida/ all-purpose flour
  • Salt as required
  • 3/4 tbsp rice flour


For roasting coconut:


  • Coconut oil
  • Salt as required
  • 4-5 tbsp grated coconut
  • 3-4 green chillies (slit)
  • Curry leaves
  • 1-2 tsp of red chilli paste prepared earlier


Instructions :

  1. Grind the soaked red chilies to a paste.
  2. Marinate the cleaned, bone-in chicken pieces with the items under 'for the chicken marinade' title for at least half an hour to 2 hours.

  3. Reserve a couple of teaspoons of the chili paste for the coconut roast. The rest of the paste may be added to the chicken marinade.
  4. Right before you fry the chicken, mix in the rice flour and fry or med-high heat.
  5. Fry for 4 minutes each side for a total of 15-18 minutes or until well done and slightly crispy on the outside.
    Drain the chicken on a tissue paper.
  6. Grind the coconut with the reserved chilli paste and salt and set aside.
  7. Set aside some of the fried oil and fry the green chillies, and curry leaves in the same Kadai or pan.
  8. Next, fry the coconut chilli paste until crispy roasted. Be careful not to burn it.


  9. Scoop the fried coconut from the oil and transfer it onto a tissue paper.
  10. Serve your spicy chicken topped with your crispy roasted coconut, green chillies and curry leaves.


Notes:

  • Keep a close watch when roasting the coconut, thus one step goes wrong and the whole dish isn't worth it.
  • Use coconut oil for frying the chicken for bringing out its 'naadan' flavors.
  • Always remember while frying chicken do not overcrowd the Kadai or pan, it makes the chicken soggy and the chicken might not get done from the inside.
  • Another tip for the coating to stay in place is to let the chicken cook at least for 3-4 minutes and flip so that the coating cooks and does not stick to the Kadai or pan. 
Do try this recipe and don't forget to share your experience/feedback with me here in the comments or feel free to send me a mail. Also, do tag me at #taystedit if you try out my recipes on Facebook, Instagram etc so that I can see when you make it. ♡♡♡♡

Kerala Beef Dry Fry


Kerala Beef fry and Malabar Porotta is the national dish of Kerala. Unlike other foods that are enjoyed all over the different parts of the state, Kerala Beef fry is relished all over the state. Like often said, it is not just food for us, it is an emotion. 🤩

I love those beef fry that you find on the streets; road side vendors take them to a next level and serve them with kappa (tapioca). This with a glass of hot tea is all you need.

I have heard that Kerala beef fry and pazham porichat (plantains batter fried) is a sensation at Kerala. Made gag just giving a thought about the combination but it every one seems to love it. That's my next mission, to try this fusion.😁

Kerala style beef is normally slow cooked with a medley of aromatic spices. But since we are always short in time I made this in a cooker. Easy job! Quite frankly, I was nowhere near the cooker when the beef got cooked. Got some time to chill. Thank god for pressure cookers. Always to the rescue.🤩

My cooker is the no-whistle type, now if you ask me the number of whistles I cannot assure you but it has to get done in about 7-8 whistles.

I pressure cooked my beef for about 20 minutes which was timed after my cooker starting giving the screeching sound (might be helpful if you have the same cooker as mine). I will insert a picture of my cooker too. After 20 minutes done, cook on simmer for another 5 minutes. Turn off the heat and wait for the pressure to depart on its own.


Apart from how it is traditionally made, with coconut bits (thenga kothu), this recipe has my own special touch to it. It is super easy, well the ingredients are nothing! When it comes to the cooking of beef you might think you need a lot of spices. But this dish is really a simple one. Before we start, remeber that the more you add curry leaves the better. 
Let's get cooking.! 😍


Ingredients:


  • 700 gm beef (small cuts)
  • 2 big garlic cloves, paste
  • 1-inch ginger, paste
  • 1/4 tsp Turmeric powder
  • 4 tsp Chilli powder
  • 1 tsp meat masala
  • 1 1/4 tsp garam masala
  • Salt as required
  • 1 cup of water
  • 1 garlic clove, minced/paste
  • 5-6  twigs of curry leaves
  • Tomato paste 4-5 tbsp (Optional)
  • 4-5 tbsp pure coconut oil


Instructions :


  • Mix the beef with all the spices, until salt from the ingredients list. Add 1 cup of water or until the beef is immersed in water.


  • Now pressure cook for about 7-8 whistles and let the pressure depart on its own.


  • Take an iron pan or kadai and add the coconut oil. Once the oil is just about hot, decrease the flame and add the garlic paste and curry leaves, fry the Curry leaves well.
  • Add the tomato paste and sauté well.
  • Now add the beef stock water from the pressure cooked beef and let it reduce well.


  • Next, add the cooked beef and fry the beef well until its about dry. Not completely dry.  Your naadan beef dry fry is ready to have with flakey Malabar Porotta! 😍😋


  • Fry curry leaves in coconut oil and add to the dish as a garnish for extra elegance.
Please check notes for tips and tricks.


Notes:


  1. Fry in an iron pan or kadhai for better flavor on medium-high heat tossing every other minute till it reaches your desired consistency.
  2. I used Pakistani beef here, I normally use Indian beef. But it still did turn out good. Alhamdulilah.
  3. I have used both the cuts of beef, boneless and with bone. The beef with bone is more flavorful with all the juices from the bone marrow makes it super delish.
  4. I added the tomato paste for that rich dry gravy texture also for a light tanginess. You may totally omit that. It's up to you.
  5. I had to add about 2 tsp of salt and a little extra in total in the end.
  6. Pressure cook for about 7-8 whistles, each cooker is different, so is the meat so check and cook more if required. Do not cook too long because you don't want it to be so tender that when you dry fry, all the beef gets squashed.
  7. Enjoy! 


Do try this recipe and don't forget to share your experience/feedback with me here in the comments or feel free to send me an mail. Also, do tag me at #taystedit if you try out my recipes on Facebook, Instagram etc so that I can see when you make it. ♡♡♡♡
Older Posts

Search This Blog

My name is Hasna Haneef, a mommy to a toddler, hailing from Thalassery, Kerala. Welcome to my humble abode on the Internet; wherein I share all my recipes and experiments. I am glad to have you on board!

TRENDING POSTS

  • Kerala Style Squid Roast
  • Emirati Chebab
  • Chicken Steak with Creamy Mushroom Sauce
  • Kethel's Chicken
  • Kerala Beef Fry/ Nadan beef dry fry
  • Yemeni Mutton Haneeth

About Me

May peace be with you!

Welcome to my blog.

I am delighted to have you on board. My name is Hasna Haneef, a mommy to a toddler, hailing from Thalassery, Kerala. My homeplace being Dubai, as I am born and brought up here and I am very influenced by the lifestyle and the variety of authentic cuisines I get to try from here, which has made me try anything that comes across me
, click here →

Stay Connected!

Join Our Madness!

Join with Thousands Of Subscribers ! Get Our Latest Recipes Delivered to Your email Inbox!

Powered by follow.it
  • Home
  • About Me
  • Recipes

    • Main Course
    • Desserts
    • Snacks

    Uncategorized

    • Chicken
    • Meat
    • Vegetarian
    • Rice
    • Malabar Food
    • Baking
    • Breakfasts
    • Snacks
    • Drinks
    • Pasta
    • Fish
    • Soups
    • Desserts
  • Contact Me

Featured Post

Triple Chocolate Hazelnut Skillet Cookie

Blog Archive

  • ▼  2026 (2)
    • ▼  May (1)
      • Breakfast Waffles
    • ►  April (1)
  • ►  2025 (4)
    • ►  April (2)
    • ►  March (1)
    • ►  February (1)
  • ►  2024 (36)
    • ►  October (4)
    • ►  September (5)
    • ►  July (1)
    • ►  June (2)
    • ►  May (4)
    • ►  April (3)
    • ►  March (10)
    • ►  January (7)
  • ►  2023 (47)
    • ►  December (3)
    • ►  September (2)
    • ►  August (6)
    • ►  July (6)
    • ►  June (9)
    • ►  May (4)
    • ►  April (5)
    • ►  March (6)
    • ►  February (3)
    • ►  January (3)
  • ►  2022 (69)
    • ►  November (4)
    • ►  October (6)
    • ►  September (7)
    • ►  August (9)
    • ►  July (12)
    • ►  June (5)
    • ►  May (5)
    • ►  April (12)
    • ►  March (4)
    • ►  February (2)
    • ►  January (3)
  • ►  2021 (24)
    • ►  November (1)
    • ►  October (2)
    • ►  July (1)
    • ►  June (4)
    • ►  May (6)
    • ►  April (4)
    • ►  February (4)
    • ►  January (2)
  • ►  2020 (82)
    • ►  December (5)
    • ►  November (6)
    • ►  October (4)
    • ►  September (2)
    • ►  August (5)
    • ►  July (10)
    • ►  June (10)
    • ►  May (13)
    • ►  April (12)
    • ►  March (8)
    • ►  February (4)
    • ►  January (3)
  • ►  2019 (22)
    • ►  December (1)
    • ►  November (2)
    • ►  October (6)
    • ►  September (1)
    • ►  August (1)
    • ►  February (3)
    • ►  January (8)
  • ►  2018 (15)
    • ►  December (4)
    • ►  November (6)
    • ►  October (3)
    • ►  September (2)

Subscribe Us

Labels

Bake Biscuits Breakfast Brown rice Burger Cheese Chocolate Dal Egg Emirati Fish Iftar Indonesian Japanese Jeerakashala rice Kerala Keto Kuwait food Lunch Milk Mutton Thai food UAE food afghan cuisine arabic beef biryani bread burnt cheesecake cake chicken cream dessert dinner greek healthy indo chinese lamb malabar prawns pudding puffs quick dinner ideas recipe refreshing drink rice salad sandwich stir fry vegetables vegetarian veggies yemeni

Contact Form


POPULAR POSTS AND PAGES

Emirati Chebab

Emirati Chebab

June 01, 2023
Kerala Style Squid Roast

Kerala Style Squid Roast

June 18, 2020
Chicken Steak with Creamy Mushroom Sauce

Chicken Steak with Creamy Mushroom Sauce

November 05, 2018
Butter Chicken Parcels

Butter Chicken Parcels

April 29, 2020
Kerala Beef Fry/ Nadan beef dry fry

Kerala Beef Fry/ Nadan beef dry fry

October 08, 2019

Pages

  • Home
  • About Me
  • Privacy Policy
  • Contact Me

Copywrite © 2023 TermsFeed®. All rights reserved.

Created By Sora Templates | Distributed By Gooyaabi Templates

Back to top