Search This Blog

Taystit by Hasna

Food, Recipes, and Beyond

  • Home
  • About Me
  • Recipes
    • Main Course
    • Snacks
    • Desserts
  • Uncategorized
    • Chicken
    • Meat
    • Vegetarian
    • Rice
    • Malabar Food
    • Baking
    • Breakfasts
    • Snacks
    • Fish
    • Pasta
    • Drinks
    • Soups
    • Desserts
  • Contact Me

 Carrot Slice Baklava with Ice cream 


This Turkish delight is so drool worthy that no one can deny a piece of carrot Slice baklava. Baklava being one of my favorite sweets is something I would love to indulge any day! The smell of the clarified butter/ ghee smeared phyllo sheets baking is just too much aroma to handle.
 
I  have always been fascinated when this dish is served in restaurants. The art of serving carrot Slice Baklava with a slice of ice cream is definitely an art. I tried replicating it, but like I said it's an art, you need practice to nail it. :D
 
The first time I had this baklawa was for global village. I knew what all went into the sweet in the first bite itself. Also, it was pretty expensive for a slice, they served for 35 aed (if I am not wrong) and for a huge family like us, it was unfeasible. I tried replication it at home, was it worth it? Like hell it was! With very limited ingredients and suvh easy steps any one could easily replicate it at home! We all love it here, especially after a spicy meal, this sweet is heaven in your mouth!!

And the ice cream adds on to a creamy and cool texture. Let's see how it's done! 


Ingredients :

  • 20-25 sheets of Phyllo sheets
  • 200 gms Clarified Butter/ Ghee
  • 200 gms Pistachio, shelled and skin peeled (by soaking in warm water)
 

For the Sugar Syrup:

  • 2 cups Sugar
  • 1 1/2 cups water
  •  A slice of lemon

Instructions:

  1. Peel the skin of the pistachios by soaking them in warm water.
  2. In a sauce pan, make sugar syrup by combining sugar and water, stirring occasionally , make sure the sugar melts completely and slowly increase the flame, add the slice of lemon and bring to a boil.
  3. Now simmer the sugar syrup for around 15-17 minutes. (do not forget to add the slice of lemon, as it helps the sugar syrup from crystalizing.)
  4. In a large round tray, smear the ghee using a brush and place a phyllo sheet and smear the sheet with ghee again and repeat the process for around 10 phyllo sheets.

  5. Now blitz the skin peeled (optional) Pistachios and place the crushed pistachios over the 10th layer, a bit away from the edges.

  6. Now place a phyllo sheet and continue layering as mentioned and trim off/ tuck in the edges of the phyllo sheets using a wooden knife etc.
  7. Preheat oven to 170 deg C. 
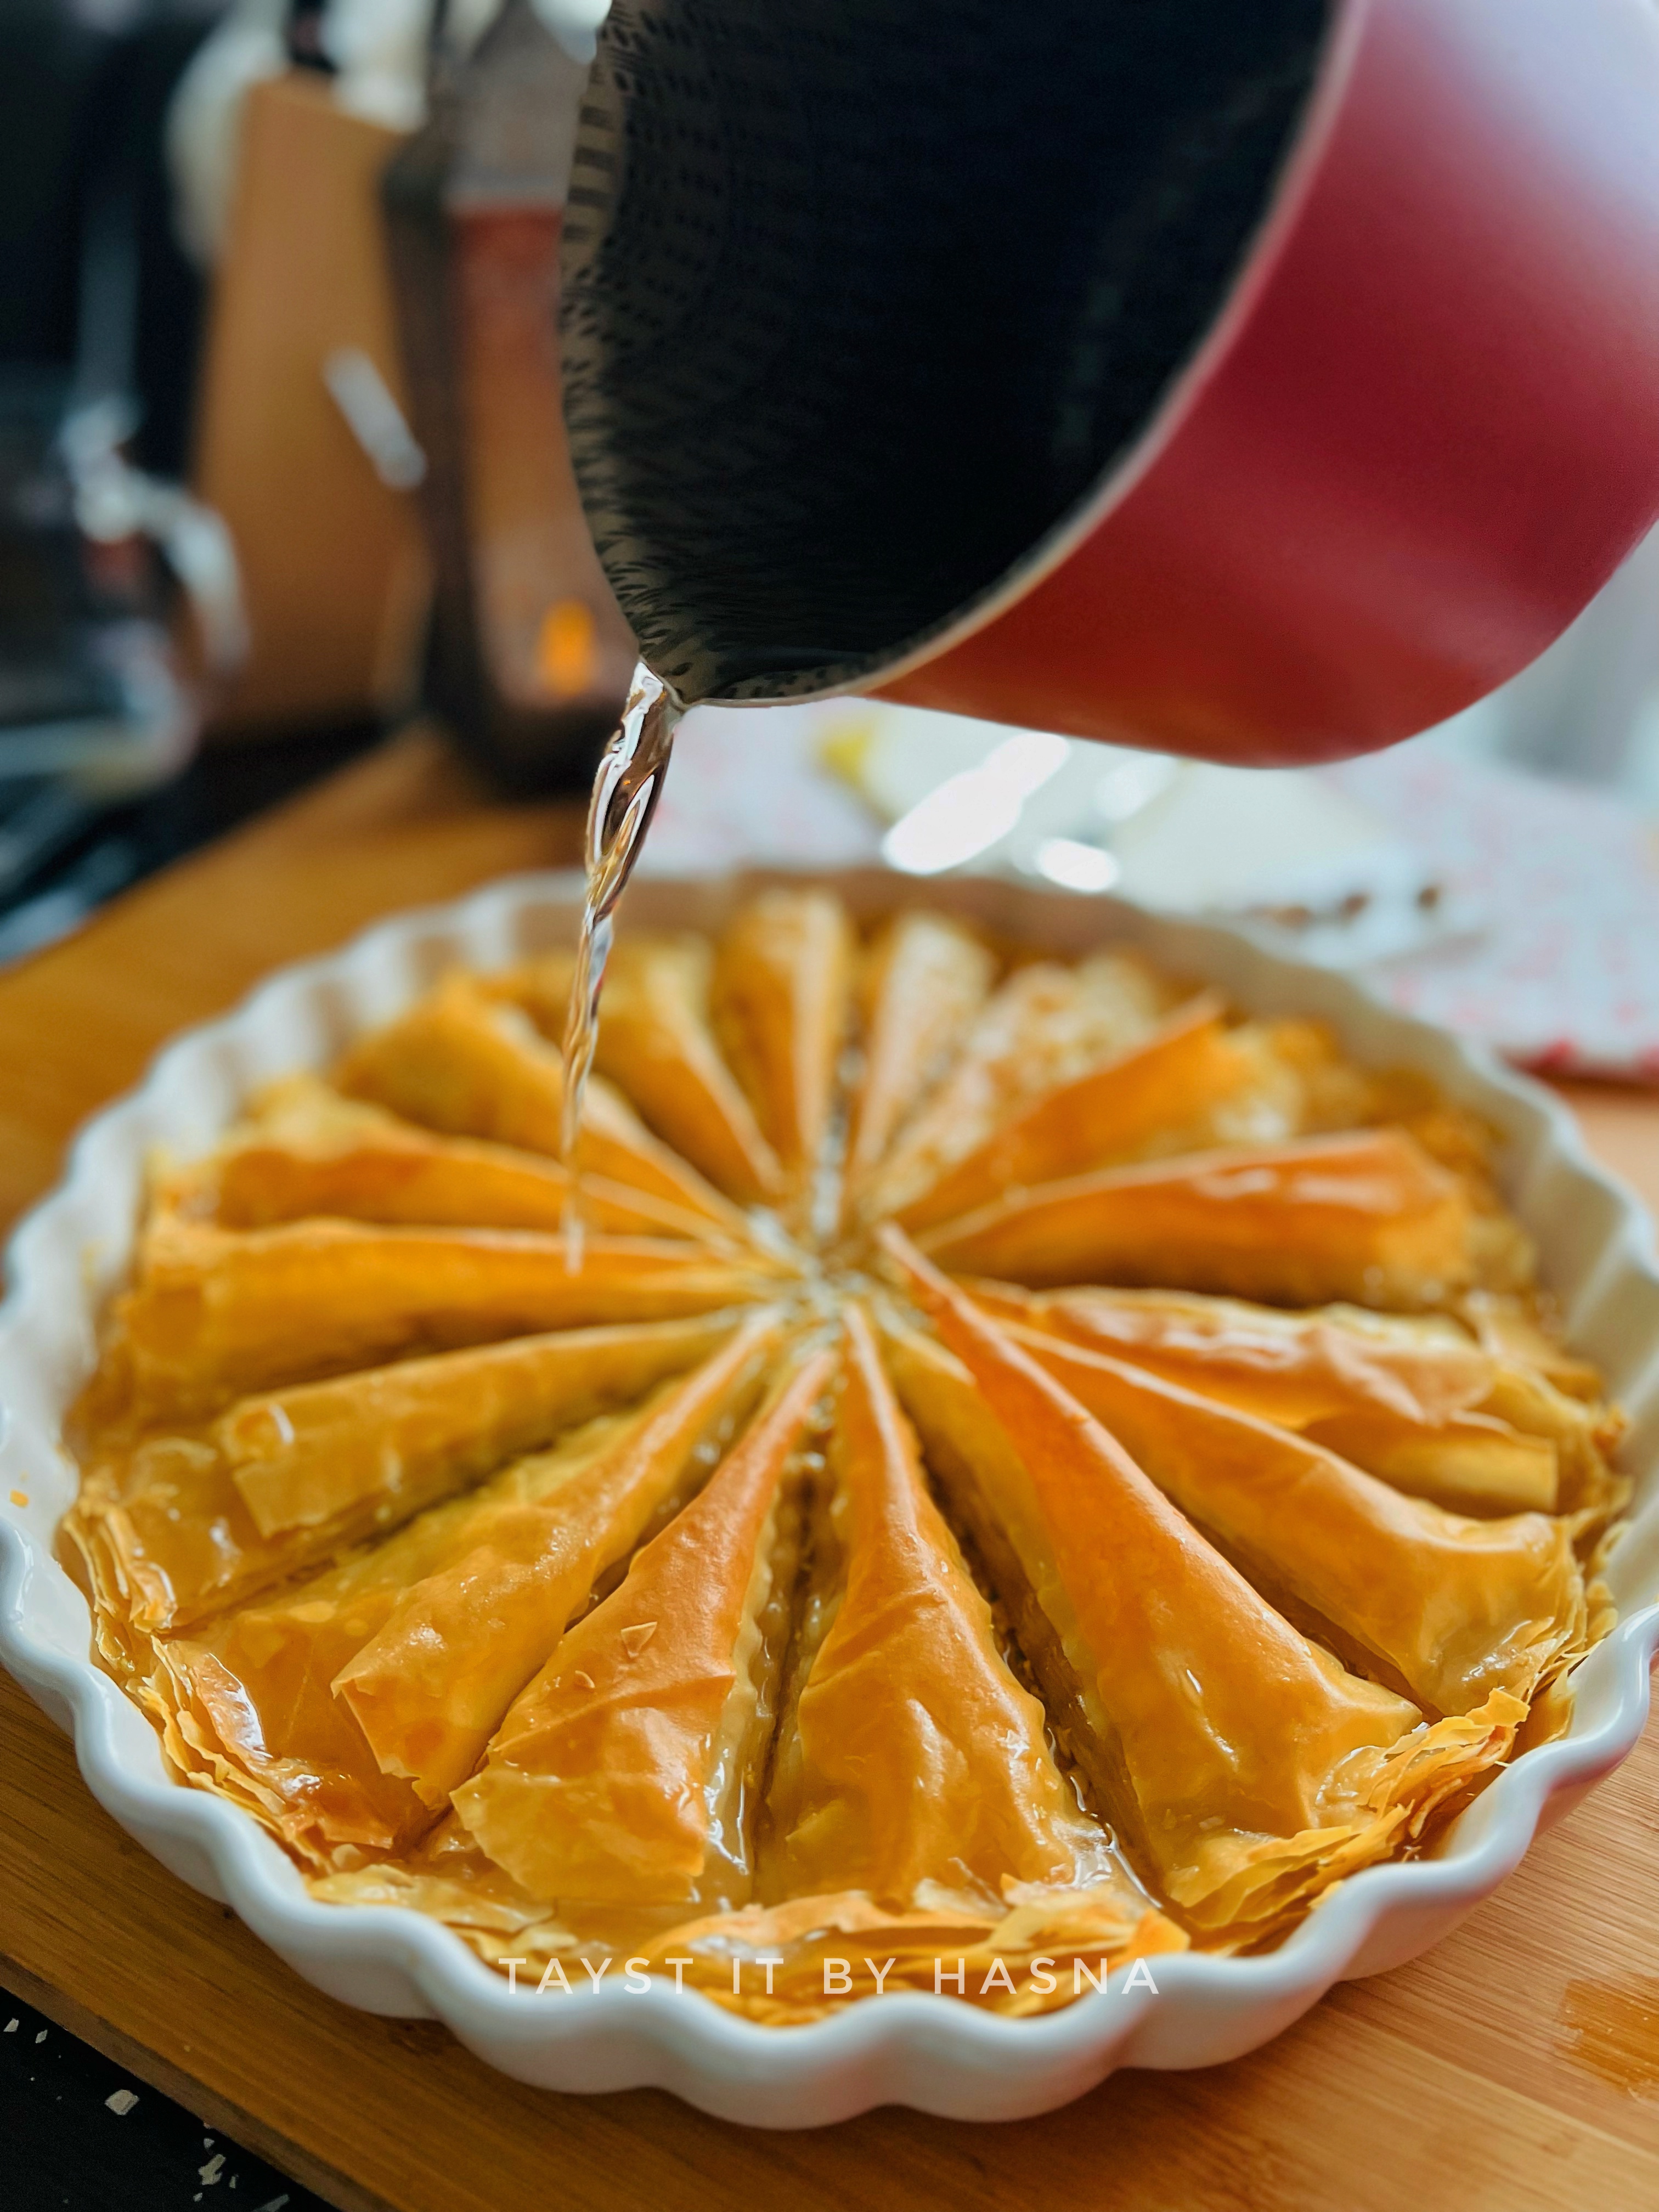
  8. Using a sharp knife, score the baklawa into 16 equal slices, by cutting into quarters.

  9. After cutting, to give the baklawa an extra dimension, pinch the edges of each carrot baklawa and puff up.

  10. Brush all the remaining ghee over the prepared baklawa and place in oven and bake for 35- 40 minutes until golden.

  11. Take out from oven and pour the warm sugar syrup (not hot not cold) over the hot baklawa, and allow to sit at least for 1 hour at room temperature so that the baklawa soaks up all the syrup.

  12. Once cooled, place a slice of baklawa on a plate and remove the upmost baklawa layer until the pistachios in one go and place a slice of ice cream and place upmost layers back on the ice cream and enjoy! Afiyet Olsun!


Do try this recipe and don't forget to share your experience/feedback with me here in the comments or feel free to send me a mail. Also, do tag me at #taystedit if you try out my recipes on Facebook, Instagram etc so that I can see when you make it. ♡♡♡♡


Instant Saffron and Pistachio Milk Peda


Happy Independence Day! I love loveee Milk Peda, what better day to make these Tri Color Peda on India's Independence Day?! These sweets are the easiest to make, and is simply the best. Milk Peda are sweets or more like a milk fudge that is traditionally made using Khoya. 

The mixture of milk, ghee and milk powder is allow to boil and reduce to a thick consistency. To the almost cooled Peda dough, powdered sugar and flavorants like cardamom, saffron etc are added for added flavor. These Pedas stay fresh for a day on room temperature, and for a week in the refrigerator. 

There are some points to keep in mind, while making pedas. The Peda mixture must never be over cooked as this will results in chewy pedas, while undercooking will result in sticky dough and will be difficult to shape them. Make sure to remove from the pan, as soon as the mixture feels non sticky to the fingers touch. (be careful while you do so)

As it's INDEPENDENCE DAY, I gave the peda, agreen hue with Pistachio paste and orange hue with saffron soaked milk.

Let's make these delicious treats!

Ingredients :

  • 1 tbsp Ghee/ Clarified butter
  • 1 cup Milk Powder
  • 1/2 cup Fresh Milk
  • 4-5 tbsp Powdered Sugar  
  • Saffron , a pinch
  • 2 tbsp pistachios (made to a paste with 1 tbsp hot water)

Instructions :

  1. In a pan, add 1/2 tbsp ghee and 1/2 cup milk, when the milk turns warm, remove the pan from flame, and add the milk powder and mix well.
  2. Once the milk powder and milk combines well, place on medium heat and continously mix well.
  3. Allow to thicken a little, add the 1/2 tbsp of ghee and continue mixing till the mixture starts to thicken and starts coming off the sides of the pan, continue mixing till the mixture forms a firm dough, not too loose, nor too dried up.
  4. Transfer the milk dough to a clean bowl and allow to cool.
  5. When almost cooled, grease your palms and add 3-4 tbsp powdered sugar and do a taste st and check if more is required.

  6. To the milk dough mixture, separate to 3 balls and add the Pistachio paste to the middle of a ball and knead well to spread the Pistachio green evenly, similarly do the same with another ball with saffron strands and milk.
  7. Make tiny balls and make pedas out of it. (By rolling and flattening lightly)


Notes:

  • Do not over cook or undercook the milk mixture.
  • Do not add the powdered sugar, if the milk mixture is still warm.
  • Try to use heavy botton pan, as the milk would cook up way too much.

Do try this recipe and don't forget to share your experience/feedback with me here in the comments or feel free to send me a mail. Also, do tag me at #taystedit if you try out my recipes on Facebook, Instagram etc so that I can see when you make it. ♡♡♡♡

Crispy Rose Jalebi


Jalebi is a sweet that is popular all around India. I love Jalebi when they are warm, crunchy and juicy. A batter made of all purpose flour, corn flour, curd and in this case, rose syrup. The fried little chakras or Jalebis are soaked into warm sugar syrup, which soaks up the sugar syrup leaving the Jalebis crispy on the outside and juicy inside.

A squeeze of lemon juice is added to the sugar syrup, so that the sugar syrup does not crystalize. And this keeps the Jalebis juicy. In my hometown, it is one the most popular dessert that is served at weddings. Me being someone who likes being innovative, made the Jalebi a little out of the box. The actual Jalebi are orange in colour, with a cardamom flavor to it, this recipe has a rose flavor and tint of rose color to the Jalebi.
 
The Pistachio that is used to garnish the Jalebi is what pops the flavor of the ROSE JALEBI with an extra crunch and adds to the flavor of the rose. I used Rose syrup in the recipe, you may use rose water with a few drops of red food coloring. Next time you have guests over, try making this Jalebi for dessert or as sweet and they are going to be super impressed! Don't forget to mention where you found the recipe.  ;)


Ingredients: (makes around 25 jelebis)

For Jalebi:

  • 1 cup All Purpose Flour
  • 4 tbsp Corn Flour
  • 4 tbsp Yogurt
  • 2 tbsp Rose Syrup / Rose water
  • 2 drops of red food coloring
  • 1/4 Baking Soda
  • Salt, a pinch
  • 1 cup/ 200 ml water
  •  Vegetable Oil
  • Pistachios, to garnish

 For Sugar Syrup:

  • 2 cups Sugar
  • 1 cup Water
  • 4-5 whole Cardamom 
  • 2 tsp Lemon Juice
  • 3-4 tbsp Rose Syrup 
  • 2-3 drop red food coloring 

Instructions :

  1. To make the Jalebi batter, in a bowl, add your all purpose flour, corn flour, baking soda, and salt and give a stir using a whisk.
  2. Next add yogurt/curd, rose syrup, red food coloring and add water little at a time and mix well, and make a batter without lumps. (The batter should not be too thin, or too thick).

  3. Cover with a lid, and set aside until we prepare the sugar syrup. 
  4. To make the sugar syrup, In a deep pot, melt sugar with water, cardamom and lemon juice.
  5. Allow to come to a boil, in around 5 minutes, when the sugar syrup achieves one string consistency, immediately remove from flame.
  6. Add rose syrup and red food coloring and mix well and set aside on a cooling rack.
  7. Transfer the batter to a squeeze bottle using a funnel, or you may use a piping bag too.  
  8. In a wide and large frying pan, pour the vegetable oil and allow the oil to come to high temperature, now on medium high flame, squeeze the batter into spiral shapes and bring the end of the spiral to the middle while releasing pressure on the squeeze bottle, this way, the layers of spiral stay attached while frying.
  9. Fry until the sides start to brown a little, immediately drain and drop the Jalebi to the warm sugar syrup. Allow the Jalebi to soak the sugar syrup, and let it stay in the sugar syrup until you make the next batch of jalebis.
  10. Using thongs, remove the Jalebi from sugar syrup and serve. Garnish with crushed pistachios.
  11. Serve as it is (warm/ cold, preferably warm) or enjoy with rabri or any milk dessert of your choice. 

Note:

  • The Jalebi might turn a little on a browner shade while frying, it is quite natural, and a fully rose color when fried is not possible to achieve.
  • The sugar syrup has to be warm, not too hot or too cold, as hot syrup will make the Jalebi soft and cold syrup will not allow the jalebi to soak up the sugar syrup.
  • The process might look a bit tedoius, but it is very therapeutic if you follow the instructions.

Do try this recipe and don't forget to share your experience/feedback with me here in the comments or feel free to send me a mail. Also, do tag me at #taystedit if you try out my recipes on Facebook, Instagram etc so that I can see when you make it. ♡♡♡♡


Baklava Mini Bundt Cake with Honey Glaze


Howdy Folks? Finally my LO gets her mid term break and this calls for celebration. Haha! Little pleasures of life.. I tell you! So I decided to celebrate doing what I love doing the most.. Experimenting! 

Last week I happened to have Baklava and currently the only thing that I crave for is baklava. Baklava is a sticky sweet made of filo pastry brushed with pure ghee or butter, filled with chopped nuts and drenched in sugar syrup w/wo honey. The crunchy texture of nuts and crispy from the buttery filo pastry and the citrus flavor from lemon which is added to the sugar syrup binds all the different flavors together into a delicious sweet which originates from the Ottomon Empire.

This Baklava mini Bundt cake is inspired from the Traditional Baklava. Though this recipe doesn't use Filo Pastry, we take the good stuff i.e., the nuts and the base that of ghee cake with a hint of cinnamon and drizzled with honey icing and topped with caramelized nuts and pistachios.

Baklava is a time consuming process, which is why I rarely prepare them at home. Now this innovation of mine is just so easy. Basically no efforts at all. I bet even little kids can make this yummy cake.
Though I have prepared the cake in mini bundts, you may use a loaf cake pan or a normal bundt cake pan. The mini one's are cute and bakes in no time. I am sure if you try this for a tea party, it is definitely going to be a show stopper. 


If you think you ain't great at baking, this recipe is for you. It is a no-fail recipe. If you plan to bake ghee cake, just double the quantity of ghee. And aah, your house will smell so good while the oven gets its job done. Once the mini cakes are done, allow it to cool on a cooling rack for 10 minutes and flip it. The 10 minute timing is perfect for the bundt cakes to fall off, to be on the safer side, don't forget to grease the inner nooks and corners well.


The flavors are sooo good. They honey icing is killer. I added a dash of cream, but if you prefer the lemony zest, add in a squeeze of lemon instead of the cream.* If you love ghee cakes and caramelized nuts, you are definitely in for a treat! 

Ingredients:

Cake Batter:

  • 1 Cup All Purpose Flour/ Patent Flour
  • 1/4 Cup Ghee
  • 1/2 Cup Full Fat Fresh Milk
  • 1/2 Cup Sugar
  • 1 Egg
  • 1 tsp Baking Powder
  • 1/4 tsp Baking Soda
  • 1 tsp Vanilla Essence
  • A pinch of Cinnamon Powder
  • A pinch of Salt


Honey Glaze:

  • 2 tbsp Room Temperature Butter
  • 1/4 cup Honey
  • 3/4 cup Powdered Sugar
  • 1 tsp lemon/ cream*

Topping:

  • 1/4 cup butter
  • 1/2 cup chopped nuts
  • 1 tbsp honey
  • A pinch of light brown sugar


Instructions:

Baklava Bundt Cake:

  1. To prepare the mini bundt cakes, preheat the oven to 180 Deg C. Prepare your pan by greasing all the corners of the bundt pan using any flavorless vegetable oil and/ ghee.
  2. Combine the dry ingredients like flour, baking soda and baking powder and set aside.
  3. Next in a deep bowl, cream your ghee and sugar.
  4. Add in your milk and vanilla essence; whisk until creamy.
  5. Crack in your egg and mix well to combine.
  6. Now add in your flour mixture and fold everything well to a cake batter.
  7. Now slowly using an ice cream scooper, a piping bag or a normal tablespoon, spoon in your batter into the cake pan.
  8. Place the pan in the preheated oven for around 15 minutes or until a tooth pick inserted comes out clean.
  9. Allow the pan to cool exactly for 10 minutes on a cooling rack.
  10. Invert the mini cakes from the pan and to cool completely while we prepare the topping and the icing.


Topping:

Into a small non stick pan, add in your butter, brown sugar, chopped nuts (almond, pistachios, walnuts) and honey and allow to thicken and switch off and drop onto a baking paper whilst still hot and allow to cool. While the nuts topping cools, lets prepare the honey glaze.

Honey Glaze:

  1. Combine honey, powdered sugar, butter and lemon juice/ cream and make sure it is not too thick nor too watery. Reduce your lemon juice/ cream accordingly.
  2. Drizzle over the top of the cooled mini bundt cakes and garnish with your prepared nuts topping or slivered pistachios. Serve Immediately or you may keep the cake for up to 3 days in room temperature.


Note:
Please do not use cream if you happen to use lemon, as this might cause the icing to curdle.


Do try this recipe and don't forget to share your experience/feedback with me here in the comments or feel free to send me a mail. Also, do tag me at #taystedit if you try out my recipes on Facebook, Instagram etc so that I can see when you make it. ♡♡♡♡
Older Posts

Search This Blog

My name is Hasna Haneef, a mommy to a toddler, hailing from Thalassery, Kerala. Welcome to my humble abode on the Internet; wherein I share all my recipes and experiments. I am glad to have you on board!

TRENDING POSTS

  • Kerala Style Squid Roast
  • Chicken Steak with Creamy Mushroom Sauce
  • Emirati Chebab
  • Regag - Emirati Flat bread
  • Copy Cat Caesars Mini Pizza
  • Kerala Beef Fry/ Nadan beef dry fry

About Me

May peace be with you!

Welcome to my blog.

I am delighted to have you on board. My name is Hasna Haneef, a mommy to a toddler, hailing from Thalassery, Kerala. My homeplace being Dubai, as I am born and brought up here and I am very influenced by the lifestyle and the variety of authentic cuisines I get to try from here, which has made me try anything that comes across me
, click here →

Stay Connected!

Join Our Madness!

Join with Thousands Of Subscribers ! Get Our Latest Recipes Delivered to Your email Inbox!

Powered by follow.it
  • Home
  • About Me
  • Recipes

    • Main Course
    • Desserts
    • Snacks

    Uncategorized

    • Chicken
    • Meat
    • Vegetarian
    • Rice
    • Malabar Food
    • Baking
    • Breakfasts
    • Snacks
    • Drinks
    • Pasta
    • Fish
    • Soups
    • Desserts
  • Contact Me

Featured Post

Triple Chocolate Hazelnut Skillet Cookie

Blog Archive

  • ▼  2025 (4)
    • ▼  April (2)
      • 1 minute Chocolate Mug Cake
      • Grilled Cheese California Burrito
    • ►  March (1)
    • ►  February (1)
  • ►  2024 (36)
    • ►  October (4)
    • ►  September (5)
    • ►  July (1)
    • ►  June (2)
    • ►  May (4)
    • ►  April (3)
    • ►  March (10)
    • ►  January (7)
  • ►  2023 (47)
    • ►  December (3)
    • ►  September (2)
    • ►  August (6)
    • ►  July (6)
    • ►  June (9)
    • ►  May (4)
    • ►  April (5)
    • ►  March (6)
    • ►  February (3)
    • ►  January (3)
  • ►  2022 (69)
    • ►  November (4)
    • ►  October (6)
    • ►  September (7)
    • ►  August (9)
    • ►  July (12)
    • ►  June (5)
    • ►  May (5)
    • ►  April (12)
    • ►  March (4)
    • ►  February (2)
    • ►  January (3)
  • ►  2021 (24)
    • ►  November (1)
    • ►  October (2)
    • ►  July (1)
    • ►  June (4)
    • ►  May (6)
    • ►  April (4)
    • ►  February (4)
    • ►  January (2)
  • ►  2020 (82)
    • ►  December (5)
    • ►  November (6)
    • ►  October (4)
    • ►  September (2)
    • ►  August (5)
    • ►  July (10)
    • ►  June (10)
    • ►  May (13)
    • ►  April (12)
    • ►  March (8)
    • ►  February (4)
    • ►  January (3)
  • ►  2019 (22)
    • ►  December (1)
    • ►  November (2)
    • ►  October (6)
    • ►  September (1)
    • ►  August (1)
    • ►  February (3)
    • ►  January (8)
  • ►  2018 (15)
    • ►  December (4)
    • ►  November (6)
    • ►  October (3)
    • ►  September (2)

Subscribe Us

Labels

Bake Biscuits Breakfast Brown rice Burger Cheese Chocolate Dal Egg Emirati Fish Iftar Indonesian Japanese Jeerakashala rice Kerala Keto Kuwait food Lunch Milk Mutton Thai food UAE food afghan cuisine arabic beef biryani bread burnt cheesecake cake chicken cream dessert dinner greek healthy indo chinese lamb malabar prawns pudding puffs quick dinner ideas recipe refreshing drink rice salad sandwich stir fry vegetables vegetarian veggies yemeni

Contact Form


POPULAR POSTS AND PAGES

Kerala Style Squid Roast

Kerala Style Squid Roast

June 18, 2020
Chicken Steak with Creamy Mushroom Sauce

Chicken Steak with Creamy Mushroom Sauce

November 05, 2018
Emirati Chebab

Emirati Chebab

June 01, 2023
Regag - Emirati Flat bread

Regag - Emirati Flat bread

December 02, 2020
Copy Cat Caesars Mini Pizza

Copy Cat Caesars Mini Pizza

March 12, 2024

Pages

  • Home
  • About Me
  • Privacy Policy
  • Contact Me

Copywrite © 2023 TermsFeed®. All rights reserved.

Created By Sora Templates | Distributed By Gooyaabi Templates

Back to top