Search This Blog

Taystit by Hasna

Food, Recipes, and Beyond

  • Home
  • About Me
  • Recipes
    • Main Course
    • Snacks
    • Desserts
  • Uncategorized
    • Chicken
    • Meat
    • Vegetarian
    • Rice
    • Malabar Food
    • Baking
    • Breakfasts
    • Snacks
    • Fish
    • Pasta
    • Drinks
    • Soups
    • Desserts
  • Contact Me

 Mango Swiss roll


One of my favorites and successful bakes in the recent times! I must say this one was "next level", like the husband exclaimed. While editing the video/reel of the recipe, my little one comes to me saying, my tummy says that it wants the cake you made yesterday again! You know what such compliments mean, It was craaazy good! Mango Swiss roll right out of a cafe/ bakers shop! I mean it!

This mango Swiss roll shouts summer like no OTHER! I mean, I wanted to play around with flavors, but this one was as good as it was being plain in itself. I would try to add tropical favors like coconut the nect time, for added texture, but otherwise, we loved the Swiss roll with a generous spread of Mango coulis, and chantilly cream (comprises of whipped cream, vanilla and icing sugar).


I happened to buy this R2e2 Mango from Carrefour, it's a huge sized variety of mango family. I had so many ideas to try using this mango, finally I settled for this swissroll that I have been procrastinating since a long time now. Next time I make this Mango Swiss roll, I would probably use a smaller mago for the decoration, as the weight of the Mango slices weighs down the Swiss roll, this R2e2 Mango of Australian origin was delicious otherwise! The best part is that, since the cake is made completely using vegetable oil, the cake stays soft and moist even when taken right out of the refrigerator, and also most ingredients are easily available at home. I am definitely making this for the next party at home, I mean it is such a show stopper that just melts in the mouth. If you haven't tried making Swiss rolls yet, give this Mango Swiss roll a try, everyone is going to be all praises. You can thank me later! <3


Recipe adapted from Mattadlard

Ingredients:

For the Sponge :

4 Large Eggs (yolks and whites separated)
  • 1/4 Cup Sugar, for the yolk
  • 1/4 Cup Sugar, for the white
  • 1/4+1 tsp Cup Plain Flour
  • 1/4 Cup Corn Flour
  • 1/4 tsp Baking powder 
  • 1/4 Cup +1 tsp Whole milk
  • 1/4 Cup Vegetable Oil
  • 1 tsp Vanilla
  • 1/4 tsp Lemon Zest
 

Chantilly Cream:

  • 1 Cup Whipping Cream
  • 2 tbsp Sugar
  • 1/2 tsp Vanilla 
  • 1/2 cup Mascarpone (optional)

Mango Coulis:

  • 1 Mango, peeled abd chopped 
  • 3 tsp Sugar
  • 2 tsp Lemon juice

Mango slices and Strawberries for topping

Instructions:

  1. Separate the Egg yolks from the egg whites, and whip the egg yolks, lemon zest with sugar and in another bowl, whip the egg whites and sugar until stiff peaks, now fold the egg whites into the egg yolks.
  2. Using a strainer, sift the plain flour, corn flour and baking powder and very gently fold the dry ingredients.
  3. Now add in the milk and vegetable oil, and make sure you go well under there and scoop and fold the wet ingredients wellaas they tend to stay at the bottom.        
  4. Preheat the oevn at 170 deg C, line a 33*33 cm baking tray with baking paper and pour the cake batter and evel using a off set spatula.
  5. Bake for 25 minutes and broil for the last 5 minutes for that perfect baked tops.

  6. Prepare the coulis by cooking Mango pieces with sugar and lemon juice on simmer for around 10 minutes and once cooled make a paste using an emulsion blender.
  7. Next prepare the Chantilly cream, whip the cream with sugar and vanilla and fold in the beaten Mascarpone if you have it! Whip everything well till you have medium peaks.
  8. Once the sponge cake has baked, drop the baked top facing on a new baking paper and remove the baking paper used for baking, trim off the edges using a knife and smear the cake generously with the Mango coulis, this is where the flavor comes from!

  9. Spread the chantilly cream, be careful not to over do it, as it will be difficult to roll otherwise!
  10. Roll it up real tight, as shown in the video on my Instagram reel, and allow to chill for 30 minutes, covered.

  11. Spread the remaining chantilly over the Swiss roll and decorate as per your liking. 


  12. Enjoy chilled!


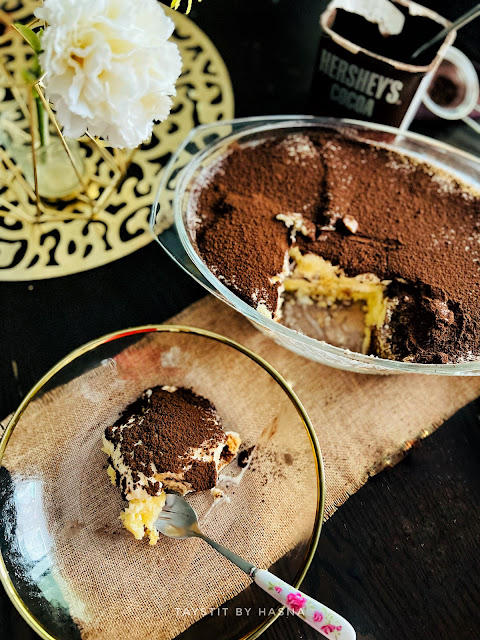
Marble Cake Pudding


One of the most nostalgic pudding/ dessert from my childhood is this delicious marble cake pudding. It is my mom's most popular dessert, and undoubtedly the best. It's so simple to make. The marble cake is store bought , you may use home made cake, but I usually make this pudding as a last moment dessert,so that it doesn't get complicated and saves time.

Similar to tiramisu, the marble cake pudding tastes better the more it sits in the fridge. The cake soaks up all the cream and the cocoa powder that is dusted gives it that chocolatey taste. This marble cake pudding is like the OG milk cake of my childhood. The marble cake is tightly layered over which a custard cream is prepared poured and make a couple of layers which is set overnight. The pudding can be topped up with fresh fruits, funfetti, chocolate sprinkles etc.
Whenever mama makes this dessert for a party at home, the dessert dish is always wiped clean.
 
This was a dessert that mama prepared from what a friend of hers was saying in their usual conversation, about a dessert she had at a party. In an Era when there was no google/ YouTube for her to check and try recipes. Basically she was not told the entire ingredients, she made out and made it on her own, voila ! The perfect dessert for parties. I need to try out more recipes from her recipe book, since it's in malayalam, I find it very difficult to read them, yet my sheer curiosity in cooking has helped me learn reading malayalam by reading her recipes. LOL .


Ingredients :

  • 400 gms Marble Cake, store bought
  • 2 Crème Caramel Sachet (prepare as per package instructions )
  • 500 ml + 500 ml milk (for the crème caramel)
  • 120 ml Milk (for the dream whip)
  • 1 Sachet Dream Whip (prepare according to package instructions)
  • 1 tsp Vanilla Essence
  • 1/2 can Sweetened Condensed Milk
  • 1/4 cup Thick Cream
  • Cocoa powder, for dusting 


Instructions:

  1. Slice the marble cake and layer the cake slices tightly without any gap.
  2. Next, prepare the Creme Caramel according to package instructions and allow to cool, set aside.
  3. Next prepare the cream mixture by beating the dream whip powder mix in some milk, according to package instructions, beat until thickens.
  4. Next add in your condensed milk and thick cream, mix well. 
  5. Finally add the cooled custard prepared earlier and combine well.
  6. Pour the prepared custard cream over the marble cake and make another layer with the same method.
  7. Seal and wrap well using a cling film and allow to set in the refrigerator overnight.*
  8. Finally, right before serving dust some cocoa powder and enjoy!

* Tastes best the more it sits in the fridge.
** The brand I used for the marble cake is Modern Bakery. It comes as 730 gms, you will only require around half of the cake.
  

Do try this recipe and don't forget to share your experience/feedback with me here in the comments or feel free to send me a mail. Also, do tag me at #taystedit if you try out my recipes on Facebook, Instagram etc so that I can see when you make it. ♡♡♡♡

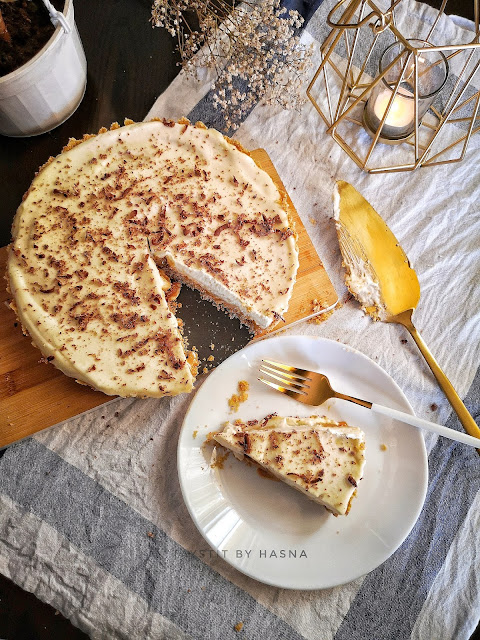
Classic Bannoffee Pie


I made this yummilicious dessert last week to celebrate my win for a dessert competition where I attained 2nd prize from among 2000 entries and 30 contestants. Bannoffee pie is a dessert I like to make when I have some good just ripped bananas in my fruit basket. 

I always undermine the flavor of fresh banana fruit in dessert, somehow I cannot stand it. But this dessert and Magnolia Bakery's Banana Pudding are my favorites when it comes to bananas. 


The ingredients are basic and the method is simple that even kids can prepare this no Bake pie! The Toffee in Bannoffee is what gives the dessert the special flavor. The first layer consists of a crushed biscuits layer with melted butter, then a layer of dulce de Leche (cooked Condensed milk) is spread, after which sliced bananas are placed in a sequence and a layer of whipped cream is smothered, and finally garnished with grated chocolate or dusted with cocoa powder. 

This pie is done in no time as it doesn't require any cooking. My lil one and siblings always wipe the pie dish clean whenever I prepare Bannoffee pie. The more the banooffe pie sits in the fridge, the more delicious it becomes (but I never get a chance to do that). 


I am always a fan of light desserts and Bannoffee pie is one such dessert. It's a treat for everyone, even if you dislike bananas, definitely give this dessert a try, I am sure you will love it! 


Let's get started! 


Ingredients ;

1 can Condensed milk (cooked) *
2 bananas
10-12 Mcvities Digestive Biscuits, crushed
2 tbsp Butter, melted
200 ml whipped cream, unsweetened 
1 tsp Vanilla Essence/ extract
4 tbsp Icing sugar 
Chocolate, grated

Instructions:

Dulce de leche:

  1. Remove the label of the sweetened Condensed milk and place it in a pressure cooker with water that fills half the pressure cooker. Cook for 1 whistle and allow to simmer on low at least for 20 minutes. 
  2. Allow the cooker to release its pressure on its own and allow the pressure cooker and its contents to cool down at leat for 4 hours. **

Bannoffee Pie:

  1. In a food processor, crush the biscuits with melted butter or in a zip lock bag pound the biscuits using a rolling pin. 
  2. Now transfer the contents to a loose bottom pie dish and level using the back of a measuring cup. 
  3. Allow to refrigerate for at least 10 minutes. 
  4. Now whip the cream in a stand mixer or a hand held mixer, add in your vanilla essence and gradually add in your Icing sugar 1 tbsp at a time. 
  5. Allow to whip well. Do not over beat. 
  6. Now beat the dulce de Leche/Toffee in a bowl using a fork and spread the Toffee over the crushed biscuit layer. 
  7. Now layer the sliced bananas in a sequence (like in the image). 

  8. Spread the whipped cream, and level it using a spatula.

  9. Finally grate the chocolate as garnish or dust some cocoa powder. 
  10. Place in the refrigerator, allow to set. 


Notes :

  • *The steps to prepare dulce de Leche has been explained above. 
  • ** I like to prepare the dulce de Leche the night before 
  • I used a loose bottom pie pan, you may use a cheesecake pan too. 


Do try this recipe and don't forget to share your experience/feedback with me here in the comments or feel free to send me a mail. Also, do tag me at #taystedit if you try out my recipes on Facebook, Instagram etc so that I can see when you make it. ♡♡♡♡

Creamy Coconut Delight


Well well, Eid is right around the corner and this Holy month is coming to an end. May Allah SWT keep our faith intact and help us continue doing good deeds until the end. It is very saddening to think that this beautiful month just got over in a blink of an eye.

I wonder who doesn't like coconut? And it's very tropical flavor. I just love coconut in any form, it simply makes any dish rich and decadent. For the base I have used here lotus biscoff biscuits, not everyone likes its flavor, feel free to use any biscuits of your choice as the base, preferably that is less or non flavored ones. This pudding is just so easy that you do not require the use of any heating equipments, and gets done in 10 minutes. I love lotus biscoff and love love coconut flavor, so this pudding is basically a combination of my favorites! 😁

Super easy desserts are my favorite, especially when you have sudden plans for parties etc the lotus biscuits act as a base for the pudding, then the next layer is goodness of creams - dream whip is whipped in milk and coconut milk (preferably fresh coconut milk, I have used the tin ones, but nothing can beat freshly squeezed coconut milk) and to make it even more delicious and rich, Condensed milk, and thick cream /heavy cream is added. And finally dessicated coconut / toasted coconut is sprinkled for that final touch and texture.

Without further a do, let's get started.


Ingredients : ( Just use half the ingredients if you are 2-3 ppl) 

  • 2 Sachets Dream Whip
  • 1/2 cup cold milk 
  • 1/2 cup cold coconut milk (tin/fresh) + reserve 1/4 cup for biscuits 
  • 200 gm thick cream/ heavy cream
  • 4 tbsp Condensed milk
  • 20-22 Lotus Biscoff biscuits/ any of your choiche
  • 2-3 tbsp Lotus Biscoff spread 
  • Toasted coconut/ dessicated coconut for garnish.


Instructions :

  1. Whip up your dream whip sachets with milk and coconut milk.
  2. And fold in your thick cream and Condensed milk.
  3. Now to a flat bottom dish place your biscuits aligned and pour some of your reserved warm coconut milk*. 
  4. Now drop in your prepared coconut cream and spread out evenly using a spatula. And refrigerate for at least half an hour. 
  5. Finally garnish with some lotus biscoff spread or Sprinkle toasted coconut and/ dessicated coconut. 
  6. Refrigerate and enjoy! 😍 


Do try this recipe and don't forget to share your experience/feedback with me here in the comments or feel free to send me a mail. Also, do tag me at #taystedit if you try out my recipes on Facebook, Instagram etc so that I can see when you make it. ♡♡♡♡

Rose Kunafa Cream Pudding


Eid is just around the corner and we are all going to witness for the first time in our lives, the most different eid. Who would have even thought that we wouldn't be going to the mosques on the morning of eid this year? That feeling of happiness after the eid prayer is simply bliss. Now after the eid prayers we often visit our relatives which is so much fun! I know we never expected this to happen, but Qadr Allahumaa sha faa'la (It is the decree of Allah and He does as He wills). But this does remind us to not take things for granted and to stay home and be safe.


What better way to cheer up our folks with some delightful dessert/ pudding experience?! On the eid day it is mandatory to have some sweet/ dessert after the 'mega eid lunch'.. and of course the star is always the mutta maala (traditional thread-like dessert made of eggs also called egg necklace). Mutta maala is customary to be made on eid. Now being a foodie, I like to serve a dessert too that is mostly indulged after a nap session, haha. (Come on! How much food can our tummies take in right after fasting for a month, teehee) So I thought to share a dessert recipe with you guys! I mean come on! How many of us do not like desserts? especially on Eid? 


Well, I am here to share the perfect show stopper for your eid spread! I couldn't wait to develop this recipe that has been in my mind. Now to put what is in your mind to action, is not easy! I looooove kunafa, I mean, who doesn't? Lately, I have been seeing a lot of rose dalgona which inspired me to try this! Thanks to @tableforfive for that! Also another inspiration was the popular mesh umm ali from @cleobuttera that made me try kunafa dough this way. They never cease to blow your mind with their food pictures! Now, coming back to the pudding, as I said I love kunafa, and rose dalgona in trending during ramadan too! So I wanted a bit of both; something crunchy at the same time creamy and with a hint of rose. So I immediately began working on the idea.
Basically, this was an experiment and alhamdulilah it tastes soooo good! Exaclty like I wanted it! Playing with textures is my thing. But the kunafa layer came out perfect and I forgot a huge step, to butter my baking dish, so the kunafa wouldn't budge! My initial plan was to make a rose cream and allow to set and place the sweetened kunafa as the second layer. Now since that the kunafa layer wouldn't budge, I had to pour the rose cream as the second layer. Tasted great! But I would prefer to keep the kunafa layer as the top layer, the next time I make these!
Now if you dont have kunafa you may do the same recipe, by frying the bread in some ghee+oil.
Without further a do, let's prepare this yumm Rose Kunafa Cream Pudding 🍨


Ingredients:

For baking Kunafa :
  • 1/2 package or less kunafa dough (as much as you can fit in one layer of your baking dish) 
  • 4 tbsp Pure ghee
  • 1/4 - 1/2 cup condensed milk
  • 1/4 cup Whipping cream

For the rose cream:
  • 1 cup Whipping cream
  • 2 tbsp rose syrup
  • 1/4 cup condensed milk

For Garnishing 

  • Slivered Pistachios
  • Dried Rose Petals

Instructions:

  1. Preheat your oven to 200°C and butter your baking dish, I used 9 by 7 inch baking dish. 
  2. Place the kunafa dough lengthwise and fill in as tightly as possible. 
  3. Apply ghee evenly over all areas using a brush. 
  4. Bake in a preheated oven 200°C for 20 minutes until golden and crisp. 
  5. Next, pour the condensed milk and heavy cream /Whipping cream over the baked Kunafa and bake again for 5 minutes until the kunafa becomes crisp again. 
  6. Now in a large bowl, whip the cream until medium stiff peaks and add the rose syrup and condensed milk and fold gently. 
  7. Pour this rose cream over the baked Kunafa layer and place it in the refrigerator for 2-3 hours until set or place in the freezer for 1/2 an hour. * (check notes) 
  8. Garnish with slivered pistachios and dried Rose Petals. 
Notes: 
  • I would recommend to set the whipped rose cream in a similar pudding dish and place the baked sweet Kunafa for better crunch and texture. I forgot to apply butter hence I had to pour the rose cream over the kunafa layer.
  • Once the rose cream is set, place the kunafa layer just before serving so that the crunchiness is retained.
  • If you want to use the rose cream as the top layer you may use sliced bread that is fried in ghee+oil for the base, also a great substitute for kunafa.
  • I used a glass baking dish to show the layers as this was an experiment. Use a ceramic baking dish if you have one. 
  • Line the dish with baking paper for easier handling of the sweet Kunafa. 
  • Be careful not to over pour Whipping cream while baking Kunafa, just a tad bit will do. 
  • You may alternatively crush the baked Kunafa slightly with clean and dry hands and layer in mini dessert bowls with slightly crushed Kunafa layer being the first then the cream and again the Kunafa layer. 
  • If you do not have rose syrup, you may use a dash of rose water and red food color, but I wouldn't recommend it coz the pudding would turn runny and also wouldn't taste as good. (had to put down since it's a FAQ)
  • Different ovens have different temperature, keep in mind not to bake for too long after you add Condensed milk to your baked Kunafa, this will result in a hard layer. 

Do try this recipe and don't forget to share your experience/feedback with me here in the comments or feel free to send me a mail. Also, do tag me at #taystedit if you try out my recipes on Facebook, Instagram etc so that I can see when you make it. ♡♡♡♡
Meringue Roulade with Fresh Raspberries and Rose Petals󠀫⁣


Craving to satisfy your sweet tooth? This dessert/pudding is simply slurping just as it looks stunning on a dinner table or if you have guests over for lunch. It is definitely a show stopper. You are going to be amazed by the flavors that melt in your mouth from the gooey /crunchy meringue to the softly whipped cream as a filling. Roulade is a French word for something that is rolled and can refer to a sweet dessert made with sponge cake and filled with whipped cream, pastry cream, ganache and sometimes fruit. The meringue is a sweet mixture of egg whites and sugar, and it is really sweet.. so you don't want to mess up the cream by adding too much sugar to the cream. The cream should be light and not very sweet, this makes the roulade special. The crunchiness from the slivered green pistachios, the fruitful goodness of the fresh raspberries and the rose petals is a surprise with a twist. You won't believe how the flavors compliment each other, that is until you give it a try. 😄


The combination of raspberry, rose and pistachios create a delicate floral flavor profile to complement the lightness of the texture. Each bite of this roulade will remind you of a breeze wafting over your face, refreshing and delightfully favorable. My husband and my whole fam were very impressed and they kept asking for it after every meal.

So what are you waiting for? Let's move on to the ingredients and bake some remarkable roulade...


INGREDIENTS

  1. Meringue:
    • 4 large egg whites
    • 1 cup/ 215 g superfine sugar
    • 1 teaspoon vanilla extract
    • 1 teaspoon white wine vinegar
    • 1 teaspoon cornstarch
  2. Cream:
    • 3 1/2 ounces/100 g mascarpone
    • 1 tablespoon confectioners' sugar
    • 1 1/2 tablespoons rose water
    • 1 3/4 cups/400 ml heavy cream
    • 1 1/4 cups/150 g fresh raspberries
    • 2 tablespoons dried rose petals
    • 1 teaspoon slivered pistachios (or regular, if unavailable, crushed)
    • Confectioner's sugar, for dusting


  1. instructions

  2. To make the meringue:

  1. Preheat the oven to 325°F/160°C.
  2. Line the base and sides of a 13 by 9-inch/33 by 23-cm jelly roll pan with parchment paper. Allow the paper to rise about 3/8 inch/1 cm above the sides of the pan.
  3. In a large bowl, beat the egg whites with an electric mixer until they begin to firm up. Add the superfine sugar to the whites in spoonfuls or tip into the bowl in a slow stream. Continue beating until a firm, glossy meringue form. 
  4. Using a large metal spoon, gently fold in the vanilla, vinegar, and cornstarch. Spread the mixture inside the prepared pan and level with an offset spatula.
  5. Bake for 30 minutes, until a crust forms and the meringue is cooked through (it will still feel soft to the touch). Remove from the oven and allow to cool in the pan. Unmold the cooled meringue onto a fresh piece of parchment paper. Carefully peel off the lining paper.


TO MAKE THE CREAM:
  1. Place the mascarpone, confectioners' sugar, and rose water in a large bowl and whisk by hand until smooth. Add the cream and whisk for about 4 minutes, until the cream just holds its shape. (You can do this in an electric mixer but keep a close eye on it as it's easy to overmix).  
  2. Spread most of the mascarpone cream over the original underside of the meringue, reserving a few tablespoons. Leave a small border around the edge of the meringue. Scatter most of the raspberries and 1 1/2 tablespoons of rose petals evenly over the cream.
  3. Using the paper to assist you and starting from a long edge, roll up the meringue into a perfect log shape. Carefully transfer the log onto a serving dish. Use the remaining cream to create a rough wavy strip along the top of the log (see photo). Chill for at least 30 minutes.
  4. When ready to serve, dust the log with confectioners' sugar, dot with the remaining raspberries, and scatter the remaining rose petals and pistachios evenly over the top.


Recipe Courtesy: Adapted from Epicurious.

Notes: 
  • Do not overbeat the egg whites, add the sugar and check for a glossy consistency. 
  • Never over bake the meringue. It will not come together as desired.

    1. Do comment below and share the happiness. If you try out this recipe, please do tag me at #taystedit, so that I can find all your lovely creations. Lots more great recipes coming up. Stay tuned!

Older Posts

Search This Blog

My name is Hasna Haneef, a mommy to a toddler, hailing from Thalassery, Kerala. Welcome to my humble abode on the Internet; wherein I share all my recipes and experiments. I am glad to have you on board!

TRENDING POSTS

  • Kerala Style Squid Roast
  • Chicken Steak with Creamy Mushroom Sauce
  • Emirati Chebab
  • Regag - Emirati Flat bread
  • Copy Cat Caesars Mini Pizza
  • Kerala Beef Fry/ Nadan beef dry fry

About Me

May peace be with you!

Welcome to my blog.

I am delighted to have you on board. My name is Hasna Haneef, a mommy to a toddler, hailing from Thalassery, Kerala. My homeplace being Dubai, as I am born and brought up here and I am very influenced by the lifestyle and the variety of authentic cuisines I get to try from here, which has made me try anything that comes across me
, click here →

Stay Connected!

Join Our Madness!

Join with Thousands Of Subscribers ! Get Our Latest Recipes Delivered to Your email Inbox!

Powered by follow.it
  • Home
  • About Me
  • Recipes

    • Main Course
    • Desserts
    • Snacks

    Uncategorized

    • Chicken
    • Meat
    • Vegetarian
    • Rice
    • Malabar Food
    • Baking
    • Breakfasts
    • Snacks
    • Drinks
    • Pasta
    • Fish
    • Soups
    • Desserts
  • Contact Me

Featured Post

Triple Chocolate Hazelnut Skillet Cookie

Blog Archive

  • ▼  2025 (4)
    • ▼  April (2)
      • 1 minute Chocolate Mug Cake
      • Grilled Cheese California Burrito
    • ►  March (1)
    • ►  February (1)
  • ►  2024 (36)
    • ►  October (4)
    • ►  September (5)
    • ►  July (1)
    • ►  June (2)
    • ►  May (4)
    • ►  April (3)
    • ►  March (10)
    • ►  January (7)
  • ►  2023 (47)
    • ►  December (3)
    • ►  September (2)
    • ►  August (6)
    • ►  July (6)
    • ►  June (9)
    • ►  May (4)
    • ►  April (5)
    • ►  March (6)
    • ►  February (3)
    • ►  January (3)
  • ►  2022 (69)
    • ►  November (4)
    • ►  October (6)
    • ►  September (7)
    • ►  August (9)
    • ►  July (12)
    • ►  June (5)
    • ►  May (5)
    • ►  April (12)
    • ►  March (4)
    • ►  February (2)
    • ►  January (3)
  • ►  2021 (24)
    • ►  November (1)
    • ►  October (2)
    • ►  July (1)
    • ►  June (4)
    • ►  May (6)
    • ►  April (4)
    • ►  February (4)
    • ►  January (2)
  • ►  2020 (82)
    • ►  December (5)
    • ►  November (6)
    • ►  October (4)
    • ►  September (2)
    • ►  August (5)
    • ►  July (10)
    • ►  June (10)
    • ►  May (13)
    • ►  April (12)
    • ►  March (8)
    • ►  February (4)
    • ►  January (3)
  • ►  2019 (22)
    • ►  December (1)
    • ►  November (2)
    • ►  October (6)
    • ►  September (1)
    • ►  August (1)
    • ►  February (3)
    • ►  January (8)
  • ►  2018 (15)
    • ►  December (4)
    • ►  November (6)
    • ►  October (3)
    • ►  September (2)

Subscribe Us

Labels

Bake Biscuits Breakfast Brown rice Burger Cheese Chocolate Dal Egg Emirati Fish Iftar Indonesian Japanese Jeerakashala rice Kerala Keto Kuwait food Lunch Milk Mutton Thai food UAE food afghan cuisine arabic beef biryani bread burnt cheesecake cake chicken cream dessert dinner greek healthy indo chinese lamb malabar prawns pudding puffs quick dinner ideas recipe refreshing drink rice salad sandwich stir fry vegetables vegetarian veggies yemeni

Contact Form


POPULAR POSTS AND PAGES

Kerala Style Squid Roast

Kerala Style Squid Roast

June 18, 2020
Chicken Steak with Creamy Mushroom Sauce

Chicken Steak with Creamy Mushroom Sauce

November 05, 2018
Emirati Chebab

Emirati Chebab

June 01, 2023
Regag - Emirati Flat bread

Regag - Emirati Flat bread

December 02, 2020
Copy Cat Caesars Mini Pizza

Copy Cat Caesars Mini Pizza

March 12, 2024

Pages

  • Home
  • About Me
  • Privacy Policy
  • Contact Me

Copywrite © 2023 TermsFeed®. All rights reserved.

Created By Sora Templates | Distributed By Gooyaabi Templates

Back to top