Search This Blog

Taystit by Hasna

Food, Recipes, and Beyond

  • Home
  • About Me
  • Recipes
    • Main Course
    • Snacks
    • Desserts
  • Uncategorized
    • Chicken
    • Meat
    • Vegetarian
    • Rice
    • Malabar Food
    • Baking
    • Breakfasts
    • Snacks
    • Fish
    • Pasta
    • Drinks
    • Soups
    • Desserts
  • Contact Me

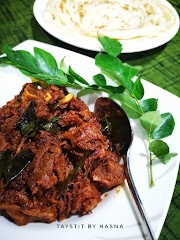
Kerala Beef Dry Fry


Kerala Beef fry and Malabar Porotta is the national dish of Kerala. Unlike other foods that are enjoyed all over the different parts of the state, Kerala Beef fry is relished all over the state. Like often said, it is not just food for us, it is an emotion. 🤩

I love those beef fry that you find on the streets; road side vendors take them to a next level and serve them with kappa (tapioca). This with a glass of hot tea is all you need.

I have heard that Kerala beef fry and pazham porichat (plantains batter fried) is a sensation at Kerala. Made gag just giving a thought about the combination but it every one seems to love it. That's my next mission, to try this fusion.😁

Kerala style beef is normally slow cooked with a medley of aromatic spices. But since we are always short in time I made this in a cooker. Easy job! Quite frankly, I was nowhere near the cooker when the beef got cooked. Got some time to chill. Thank god for pressure cookers. Always to the rescue.🤩

My cooker is the no-whistle type, now if you ask me the number of whistles I cannot assure you but it has to get done in about 7-8 whistles.

I pressure cooked my beef for about 20 minutes which was timed after my cooker starting giving the screeching sound (might be helpful if you have the same cooker as mine). I will insert a picture of my cooker too. After 20 minutes done, cook on simmer for another 5 minutes. Turn off the heat and wait for the pressure to depart on its own.


Apart from how it is traditionally made, with coconut bits (thenga kothu), this recipe has my own special touch to it. It is super easy, well the ingredients are nothing! When it comes to the cooking of beef you might think you need a lot of spices. But this dish is really a simple one. Before we start, remeber that the more you add curry leaves the better. 
Let's get cooking.! 😍


Ingredients:


  • 700 gm beef (small cuts)
  • 2 big garlic cloves, paste
  • 1-inch ginger, paste
  • 1/4 tsp Turmeric powder
  • 4 tsp Chilli powder
  • 1 tsp meat masala
  • 1 1/4 tsp garam masala
  • Salt as required
  • 1 cup of water
  • 1 garlic clove, minced/paste
  • 5-6  twigs of curry leaves
  • Tomato paste 4-5 tbsp (Optional)
  • 4-5 tbsp pure coconut oil


Instructions :


  • Mix the beef with all the spices, until salt from the ingredients list. Add 1 cup of water or until the beef is immersed in water.


  • Now pressure cook for about 7-8 whistles and let the pressure depart on its own.


  • Take an iron pan or kadai and add the coconut oil. Once the oil is just about hot, decrease the flame and add the garlic paste and curry leaves, fry the Curry leaves well.
  • Add the tomato paste and sauté well.
  • Now add the beef stock water from the pressure cooked beef and let it reduce well.


  • Next, add the cooked beef and fry the beef well until its about dry. Not completely dry.  Your naadan beef dry fry is ready to have with flakey Malabar Porotta! 😍😋


  • Fry curry leaves in coconut oil and add to the dish as a garnish for extra elegance.
Please check notes for tips and tricks.


Notes:


  1. Fry in an iron pan or kadhai for better flavor on medium-high heat tossing every other minute till it reaches your desired consistency.
  2. I used Pakistani beef here, I normally use Indian beef. But it still did turn out good. Alhamdulilah.
  3. I have used both the cuts of beef, boneless and with bone. The beef with bone is more flavorful with all the juices from the bone marrow makes it super delish.
  4. I added the tomato paste for that rich dry gravy texture also for a light tanginess. You may totally omit that. It's up to you.
  5. I had to add about 2 tsp of salt and a little extra in total in the end.
  6. Pressure cook for about 7-8 whistles, each cooker is different, so is the meat so check and cook more if required. Do not cook too long because you don't want it to be so tender that when you dry fry, all the beef gets squashed.
  7. Enjoy! 


Do try this recipe and don't forget to share your experience/feedback with me here in the comments or feel free to send me an mail. Also, do tag me at #taystedit if you try out my recipes on Facebook, Instagram etc so that I can see when you make it. ♡♡♡♡

Beetroot Chicken Curry


Good evening Folks! Howdy?

Welcome to my Kitchen!

This time it's something that everyone can definitely try, I have had loads of requests to share recipes that are for beginners. I would say this curry is really good if you are a beginner. It seems complicated but it is simple to cook yet delicious!

Beetroot is very versatile but to think it to go with chicken is pretty insane yeah? 👀

Fun fact: I was a beetroot baby, as in, my mom used to crave for beetroot when I was in her womb, crazy isn't it to crave for beetroot. I had a great laugh when I was told this, Tbh I still like beetroot but not so much that I love to have it every other day. My sister always argued, apparently, that's how I got my fair skin tone. 😅

I love how beetroot stains anything so well, as in when it comes to cooking. Anything you add to it becomes red.

Want some instant natural lipstick? Apply a slice of beetroot onto your lips and there you go! I love the hue it gives. Teenage beauty ideas. *hi5* if you have done this too! 😉

Beetroot also is known as beets are packed with nutrients, contains sources of fiber, iron, vitamin C, etc. 
Now, what's your excuse to not include them in your diet? 

I was astounded when I first heard about this dish. I wondered how a Veggie like a beet would go along with chicken. Anyhow, I was pretty sure the curry would bring in an impressive color without the addition of artificial food coloring. Color does play an important role here, imagine the color of beets being yellow. 🤢

I used to prepare this curry quite often, then I totally forgot about this curry, but when I had some lonely beets in my fridge lying there without any purpose, I thought to prepare this dish. I had no clue how the recipe goes, totally fail to remember the recipe, but with my instinct I prepared it and Alhamdulilah became a success. 😃

Now back to the recipe. This curry is especially great for kids who hate veggies, specifically beetroot. They won't even know these nutrients are breaking into their tummies. What else is good news to mommies? 😁

This curry is super easy to cook, this is one of those dishes that I make when I have little to no time. Takes about half an hour to 45 minutes from start to finish. 
I love such simple, nutritious and yummy dishes. If you're on a lookout for the same who have bumped at the right place. Without further a-do let's move on to the recipe.

Ingredients :


  • 800 gms Chicken
  • Salt
  • 2 tsp Kashmiri Chilli powder
  • ¼ tsp Turmeric powder
  • 1 tsp Ginger garlic paste for marination
  • 1 large beetroot, peeled and grated
  • 2 medium tomatoes, roughly chopped
  • 1 small onion, chopped
  • A handful of curry leaves
  • 3 green chilies slit
  • ½ tsp garam masala powder
  • 1 tsp Kashmiri Chilli powder
  • 3 - 4 tbsp Coconut oil
  • Vegetable oil for frying
  • 2 tsp Ginger Garlic paste
  • 2 tbsp tomato ketchup
  • Salt as required


Instructions :

Semi deep fry the marinated chicken for 5 mins each side on medium-high heat in 2 or 3 batches, do not overcrowd the pan/Kadai.

Meanwhile, grate the beetroot and grind the grated beetroot with the tomatoes and grind to a paste in a mixy or grinder.

Drain the chicken pieces well.

Take a Kadai or pan and add in 3-4 tbsp of oil used for frying or for better flavor add coconut oil.

Sautee the chopped onions on medium-low heat.


Add curry leaves and ginger garlic paste. Sautee and once the raw smell of gg paste is gone and fragrant add in the green chillies.

Now add the spices like chili powder and garam masala powder. Sautee on lowest heat till the rawness of the spices has vanished.

Now add the tomato-beetroot mixture to the pan and add 1/2 cup water, and salt, let it cook well for about 5 minutes.

Add in the chicken pieces, mix well to coat all the spices and masala to the chicken and let it cook for 5 minutes on medium-low heat.

Relish this amazing gravy with chappati, roti, battoora, puri, etc. Enjoy!


Notes :


  • Marinate with gg paste, salt, Turmeric, and Kashmiri Chilli powder for at least ½ an hr. The more time kept, the better.
  • Chicken with bones cut in small pieces is best for this recipe. It makes the dish even more succulent.
  • Dont worry about the less frying time, small pieces of chicken with bones get cooked fast. Also, the chicken will get cooked in the gravy for another 5 - 10 minutes.
  • Chicken with bones in gravies needs no more than 20 minutes of total cooking time.
  • Though beetroot is a sweet vegetable, to balance the sourness and spiciness and other flavors, I add the tomato ketchup at the end.
  • You may add more water according to your preference depending on how thick you want the gravy. But be careful with the water, if the consistency changes, the gravy will look watery and will taste bland.


Do try this recipe and don't forget to share your experience/feedback with me here in the comments or feel free to send me a mail. Also, do tag me at #taystedit if you try out my recipes on Facebook, Instagram etc so that I can see when you make it. ♡♡♡♡

Sparkling Passion Fruit Mojito 


Beat the heat with this PASSION FRUIT MOJITO.🍹

Passion Fruit? You might ask if you are a Dubai kid. I haven't had heard of this fruit until recently, probably after my marriage. From all these years of shopping, 🛒 I haven't seen them here in Dubai (guys let me know if you know where to get it from) 🥰
#problemsofadubaikid

It has been my HD's and mom's fav fruit and they have had fond memories of adding in spoonfuls of sugar and mixing and having them within the fruit itself. They grew in the courtyard of their houses.  

*sigh* 

I wish I knew about this in the days gone by. My hubsy kept mentioning about this fruit and I wondered what it was. 🤔

Finally, when we were on a trip to Coorg he showed me the fruit on an estate tour, the fruit, tree and how it should be eaten, lol, like I mentioned above! The authentic way; you get it? and oh boy! Was I fascinated 😍

And when back in Dubai we have been ordering anything and everything passion fruit ever since. 😅

And that gives me the kick to try passion Fruit Mojito at home. But whenever I wanted to make something innovative with it I never got my hands on one. 
One fine day, my hubby gets a couple of them from one of his friends and was I craving them. I was so happy to make them at home finally! It was a shame that I could not take a good picture of it, as I didn't want the fizz to cease. Also, my hub and Lil peanut was gazing at it like an eagle would eye it prey😄
And there weren't any more passion fruits to make more😭😭

You definitely got to try this. It was soooo refreshing. Take my word for it. 🍋🍈

The recipe to celebrate the last days of summer is down below 👇 😋

Ingredients :


  • 2 Passion Fruit 
  • 10-12 mint leaves
  • 1/2 cup cold simple syrup *check tips
  • Juice from 1 medium lemon
  • Flaxseed (optional) *
  • Ice cubes
  • 2 cans of Club Soda 

Instructions :

1.  In a  medium glass muddle mint leaves and lime juice. 
2. Squeeze the juice of 1 whole lemon and scoop the insides of the Passion fruits to the glass, add the simple syrup and ice cubes.
3. Now pour this into the prepared glass jar (check notes) * and pour in the soda when you are ready to guzzle it down so that the fizziness is preserved and the drink revives you. Enjoy! 🍹 ❤️

Tips:

*Simple syrup is a mixture of equal quantities of sugar and water boiled and cooled to form a syrup. 

*You may use sugar and cold water instead of simple syrup, but my personal preference would be simple syrup.

*I have had it in a version of  MOJITO I had from a restaurant, haven't tried it that way since I had no flaxseeds ATM.

*On the edges of the glass jar simply apply the lemon and dunk the mouth of the jar onto a bowl or dish containing sugar for that dramatic icy effect.


Do try this recipe and don't forget to share your experience/feedback with me here in the comments or feel free to send me a mail. Also, do tag me at #taystedit if you try out my recipes on Facebook, Instagram etc so that I can see when you make it. ♡♡♡♡

Glazed Upside Down Banana Loaf


Having ripe bananas at home and you have no idea what to do with them? Worry not! Upside down Banana Loaf Cake is simply delicious, the best accompaniment for tea time, also a wonderful snack if you have kids at home. This utterly butterly delicious banana cake is definitely going to be everyone's favorite snack. 


My husband happened to see a video on facebook of a banana bread ice cream cake, and he wanted me to bake it for him. Since I had no ice cream in the freezer, I thought of giving it a try with my own ideas. I always loved the caramel dripping effect, so I took my take on the upside-down caramel banana loaf. When I was experimenting with my recipe, I had my cousins come over unexpectedly. They loved the loaf, more than them their kids kept munching on them and came asking for more. Everyone wanted the recipe. It was an adapted version of the one I saw on facebook and it came out so good.

The smell that came from the oven while I had them bake made me go bonkers, I just couldn't wait to try them. I loved how the caramel glaze came out on the top. Feel free to add a little whipped cream, when making the sauce (it will spill all over initially, be careful) if you like more of caramel than the glaze effect. Mind that the glaze one is very sweet, I would definitely try the caramel version the next time.

Let's hop on to the recipe. If you make it, do share your feedback, would love to hear from you!💝

INGREDIENTS


  • 2 overripe bananas
  • 3 tbsp Brown sugar
  • 1/4 cup + 1/4 cup melted butter
  • 1/4 cup sugar
  • 1 tsp cinnamon powder (optional)
  • 2 eggs
  • 1 tsp vanilla 
  • 1 1/2 Flour
  • 1 tsp baking soda
  • Salt a pinch
  • 1 tbsp raisins/ blueberry
  • 2 tbsp yogurt/curd

INSTRUCTION

  1. Preheat the oven to 180℃. 
  2. In a small saucepan, melt the butter and add in the brown sugar and let it get to a boil on medium-low flame. Pour the glaze into the loaf pan.


  1. Slice the banana and place them carefully, lined in a pattern on the sauce poured.


  2. Now smash the other banana with the help of a fork in a separate bowl. Add in the butter, egg, sugar, vanilla essence, yogurt, blueberries/raisins and combine them using a spatula.


  3. Now add in the rest of the ingredients; the flour, baking soda, and salt. Mix till well combined.
  4. Pour the mixture to a loaf pan.

  5. Now bake the loaf for around 50 mins till a toothpick inserted in the middle comes out clean.
  6. After the loaf almost cools, about 20 mins later, go around the sides of the loaf using a blunt knife and level the bulge layer and make it a flat surface, as it is an upside-down loaf.
  7. Now place the loaf upside down on your serving plate and tap the loaf pan a few times for the loaf to loosen and drop on the plate or serving platter. Get ready to be mesmerized! 😋

Note:

  •  To make home-made cinnamon powder, you need not buy one, you may grind it to fine powder by adding a tsp of sugar when grinding the cinnamon, it helps the powder to be finer.
  • I have only shown 1 egg in the picture, this is because I was experimenting and using my instincts and felt 2 eggs would be required which only dawned on me while I mixed the batter.
Do try this recipe and don't forget to share your experience/feedback with me here in the comments or feel free to send me a mail. Also, do tag me at #taystedit if you try out my recipes on Facebook, Instagram etc so that I can see when you make it. ♡♡♡♡

Koshari/ Kosheri - An Egyptian Delight


Being bought up in Dubai, I know a long list of dishes from different cuisines which I am yet to try. I always like to experiment once I try the authentic homemade ones so that I can figure out the real taste, which is not always practical for all the dishes I try. I have always seen this dish where ever I go in Dubai, a place where you have access to all sorts of cuisines. Alhamdulilah. We were neighbors to Egyptians a decade ago, they used to serve us their delicacy; stuffed grapevine leaves. But I never got to taste Kosheri, yet their whole house smells of this dish. When I cooked this I felt nostalgic of the childhood memories, when they used to open their door this smell used to gush into our noses. I was not too much into food when I was a child, always a picky eater. Don't ask when I developed a fondness towards food. 😄

So recently when I went for a gathering where all sorts of nationalities were assembled, a dear friend introduced me to Koshari. Was I delighted to try the authentic, homemade Koshari? I loved it! Couldn't wait to try it at home already. My dear friends helped me with the type of rice to look for in stores. I bought it the same day and tried it for Friday lunch. It was awesome indeed. I made a salmon side dish to go along with it.

Now lets come back to Koshari. Koshari is not only fun to say, but it is also definitely fun to cook too, with basic pantry ingredients, this dish defines how basic ingredients can form into a delicious and scrumptious meal. This humble bowl of comfort food might not seem very TASTY to the sight but the flavors that come from combining the tomato gravy and fried onions that has a vinegar hint to it (which I am usually not fond of) is out-of-the-world good.


Like I said, was I veracious when I said I wanted to try authentic Kosheri, I definitely said that because it-is-a-big-deal! Story ahead... Last week when I was roaming around Carrefour and I was dead hungry I came across Koshari and I bought it expecting it to be okayish. But when I tasted I felt so bad since the taste was not even up to the mark to say an okay. It was bitter. So next time you try from such stalls etc don't expect you can get the authentic taste. Here I have tried my take to replicate the one I tried from the gathering and I must say, it is very light on the tummy and addictive. 👌👌😋 Try my version and let me know what you think of it in the comments below.


Ps: My hubsy cannot have anything vegetarian on its own, hence the salmon with coriander-butter sauce happened to show up🤣

Ingredients:

For the Rice:
1 Tablespoon Vegetable Oil
2 Cups Calrose Rice
2 cup Dark Brown Lentil
1/2 cup angel hair pasta
1 small onion diced
1/4 cup oil
3 cup water 
1 chicken/veg stock cube
Salt

For the sauce:
2 cups crushed tomatoes
1 cup water
1 tbsp Oil
1 tsp Cumin Powder
1 tsp Coriander Powder
2 garlic cloves minced
1/2 cup diced tomatoes
1 tsp sugar
Salt as required

For the dressing :
1 cup water
1/4 cup vinegar
1 tsp Cumin Powder
1 tsp Coriander Powder
1 tsp paprika
1/2 tsp red chilli flakes
Salt as required
2 minced garlic

Assembling Ingredients:
2 cups small elbow pasta cooked
1 cup chickpeas cooked
1/2 kg Onions sliced
Salt
1-2 tbsp white vinegar

Instructions:


  • Immerse the 1/2 kg sliced onions in white vinegar. Cover and set aside for 1 hour.
  • Now in the 2 cups crushed tomatoes add the ingredients mentioned under *for the sauce*. Mix, cover and put them on a medium flame till it boils and once boiled, put them on simmer for 10 mins.

  • To make the dressing, in a different bowl, mix the ingredients under the sub *for the dressing*. Give a good mix and set aside.
  • Rinse the onions soaking in vinegar in cold water and drain off excess water. Now fry them in a deep pan with oil, check if the oil is hot enough and fry until the onion becomes a little more than golden brown but not dark brown.

  • While the onions are frying, in a deep bottom vessel boil the dark brown lentil with some salt. 
  • Next, boil the elbow pasta and check the tomato sauce in between and give a stir.
  • In another vessel, let's boil the water with salt and Chicken/Veg stock (Optional) which will be used for boiling the rice and angel hair pasta.
  • Next, sautee the diced onions in little oil and some salt, and once translucent add the angel hair pasta and stir fry for about a minute and add the calrose Egyptian rice and stir fry for a couple of minutes. Now add the boiling stock water to it. Once the water is bubbling, put the flame on simmer and let it get cooked covered for about 10-12 minutes.

  • It's now time to plate! The most interesting part. First onto a serving plate put the rice and angel hair pasta mix first, top it with the boil dark brown lentils. Unto that add the cooked chickpeas and pour in the yummy tangy sauce and sprinkle the crispy fried onions on top.
  • When serving, drizzle the dressing over the Kosheri and you are ready to feast on!😋

PS: The recipe might seem a bit complicated, rather a lot of dishes to do but all that effort was well worth in the end. My family approved! 😃


Do try this recipe and don't forget to share your experience/feedback with me here in the comments or feel free to send me a mail. Also, do tag me at #taystedit if you try out my recipes on Facebook, Instagram etc so that I can see when you make it. ♡♡♡♡

Newer Posts
Older Posts

Search This Blog

My name is Hasna Haneef, a mommy to a toddler, hailing from Thalassery, Kerala. Welcome to my humble abode on the Internet; wherein I share all my recipes and experiments. I am glad to have you on board!

TRENDING POSTS

  • Kerala Style Squid Roast
  • Emirati Chebab
  • Chicken Steak with Creamy Mushroom Sauce
  • Kethel's Chicken
  • Kerala Beef Fry/ Nadan beef dry fry
  • Yemeni Mutton Haneeth

About Me

May peace be with you!

Welcome to my blog.

I am delighted to have you on board. My name is Hasna Haneef, a mommy to a toddler, hailing from Thalassery, Kerala. My homeplace being Dubai, as I am born and brought up here and I am very influenced by the lifestyle and the variety of authentic cuisines I get to try from here, which has made me try anything that comes across me
, click here →

Stay Connected!

Join Our Madness!

Join with Thousands Of Subscribers ! Get Our Latest Recipes Delivered to Your email Inbox!

Powered by follow.it
  • Home
  • About Me
  • Recipes

    • Main Course
    • Desserts
    • Snacks

    Uncategorized

    • Chicken
    • Meat
    • Vegetarian
    • Rice
    • Malabar Food
    • Baking
    • Breakfasts
    • Snacks
    • Drinks
    • Pasta
    • Fish
    • Soups
    • Desserts
  • Contact Me

Featured Post

Triple Chocolate Hazelnut Skillet Cookie

Blog Archive

  • ▼  2026 (2)
    • ▼  May (1)
      • Breakfast Waffles
    • ►  April (1)
  • ►  2025 (4)
    • ►  April (2)
    • ►  March (1)
    • ►  February (1)
  • ►  2024 (36)
    • ►  October (4)
    • ►  September (5)
    • ►  July (1)
    • ►  June (2)
    • ►  May (4)
    • ►  April (3)
    • ►  March (10)
    • ►  January (7)
  • ►  2023 (47)
    • ►  December (3)
    • ►  September (2)
    • ►  August (6)
    • ►  July (6)
    • ►  June (9)
    • ►  May (4)
    • ►  April (5)
    • ►  March (6)
    • ►  February (3)
    • ►  January (3)
  • ►  2022 (69)
    • ►  November (4)
    • ►  October (6)
    • ►  September (7)
    • ►  August (9)
    • ►  July (12)
    • ►  June (5)
    • ►  May (5)
    • ►  April (12)
    • ►  March (4)
    • ►  February (2)
    • ►  January (3)
  • ►  2021 (24)
    • ►  November (1)
    • ►  October (2)
    • ►  July (1)
    • ►  June (4)
    • ►  May (6)
    • ►  April (4)
    • ►  February (4)
    • ►  January (2)
  • ►  2020 (82)
    • ►  December (5)
    • ►  November (6)
    • ►  October (4)
    • ►  September (2)
    • ►  August (5)
    • ►  July (10)
    • ►  June (10)
    • ►  May (13)
    • ►  April (12)
    • ►  March (8)
    • ►  February (4)
    • ►  January (3)
  • ►  2019 (22)
    • ►  December (1)
    • ►  November (2)
    • ►  October (6)
    • ►  September (1)
    • ►  August (1)
    • ►  February (3)
    • ►  January (8)
  • ►  2018 (15)
    • ►  December (4)
    • ►  November (6)
    • ►  October (3)
    • ►  September (2)

Subscribe Us

Labels

Bake Biscuits Breakfast Brown rice Burger Cheese Chocolate Dal Egg Emirati Fish Iftar Indonesian Japanese Jeerakashala rice Kerala Keto Kuwait food Lunch Milk Mutton Thai food UAE food afghan cuisine arabic beef biryani bread burnt cheesecake cake chicken cream dessert dinner greek healthy indo chinese lamb malabar prawns pudding puffs quick dinner ideas recipe refreshing drink rice salad sandwich stir fry vegetables vegetarian veggies yemeni

Contact Form


POPULAR POSTS AND PAGES

Emirati Chebab

Emirati Chebab

June 01, 2023
Kerala Style Squid Roast

Kerala Style Squid Roast

June 18, 2020
Chicken Steak with Creamy Mushroom Sauce

Chicken Steak with Creamy Mushroom Sauce

November 05, 2018
Butter Chicken Parcels

Butter Chicken Parcels

April 29, 2020
Kerala Beef Fry/ Nadan beef dry fry

Kerala Beef Fry/ Nadan beef dry fry

October 08, 2019

Pages

  • Home
  • About Me
  • Privacy Policy
  • Contact Me

Copywrite © 2023 TermsFeed®. All rights reserved.

Created By Sora Templates | Distributed By Gooyaabi Templates

Back to top