Search This Blog

Taystit by Hasna

Food, Recipes, and Beyond

  • Home
  • About Me
  • Recipes
    • Main Course
    • Snacks
    • Desserts
  • Uncategorized
    • Chicken
    • Meat
    • Vegetarian
    • Rice
    • Malabar Food
    • Baking
    • Breakfasts
    • Snacks
    • Fish
    • Pasta
    • Drinks
    • Soups
    • Desserts
  • Contact Me

Savoury Cream Cheese Bread Toast 


A very delicious and super easy snack that is perfect to serve sudden guests or as a snack for kids in tiffin box. My girl loves this, I am sure your kids will love it too!! 

The first time I had it was at my husband’s cousins place. She made this easy bread toast for us in a jiffy and it tasted super delicious. We had to immediately ask her for the recipe and it is such a keeper!! Thank you Safeenatha for this easy peesy recipe that is an always a favorite here! 

The ingredients are very staple and that makes this recipe a go-to. We all always have a dabba (container) of cream cheese at the back of the fridge, waiting to be used and the cream cheese in this recipe just brings out the flavors like no other! Make sure you use ghee generously.. that’s where the flavors spark! 

Without further a do, let’s get started!! 


Ingredients: makes for 2


  • 4 Slices of White Bread
  • 2 Eggs 
  • 1/2 of an Onion
  • 1/2 tsp Oregano 
  • 1/4 Red Chilli flakes 
  • 2 tbsp Cream Cheese (preferably salted) 
  • Salt, as required 
  • Ghee/ clarified butter

Instructions: 

  1. In a small blender, crack in the eggs, add in the roughly chopped onion, Oregano, cream cheese and blend by pulsing around 4-5 times.

  2. Transfer the contents to a wide bowl, and add in the red chilli flakes and mix well.

  3. In a hit pan, add in a couple of tbsps of ghee.
  4. Now, dip the bread in egg mixture and toast the bread slices in ghee and your savory bread toast is ready!! 


Do try this recipe and don't forget to share your experience/feedback with me here in the comments or feel free to send me a mail. Also, do tag me at #taystedit if you try out my recipes on Facebook, Instagram etc so that I can see when you make it. ♡♡♡♡

 Freezer-Friendly Cheesy Chicken Cutlet Fingers


During Ramadan, it's almost unavoidable to have fried snacks. The smell of fried snacks always hits different when you are fasting. I plan to share iftar recipes, where there is a moderation between fried and non-fried snacks. These Freezer friendly cheesy chicken Cutlet Fingers are super easy to make, and that you don't waste time shaping the cutlets is such a time saver hack!

I had some leftover basic chicken filling, that's when I tried out this hack, that dawned on me and oh boy, I so love this hack! I love cutlets but shaping them takes up so much time. I will share the chicken filling recipe below. Also Cheesey snacks tend to break and ooze out when made immediately, the zip lock-freezing hack comes so handy as, the cheese will not burst out that easily. You may use a baking paper to make a block of the chicken potato mix that are sandwiched between Mozzarella cheese. And they kept in the freezer to become a solid square for 3-4 hours or overnight. Then thaw for half an hour and cut into equal strips and cut into halves. And coat them in egg mixture and coat them in bread crumbs.

Do definitely give the recipe a try, in Sha Allah!


Chicken filling:

Sauté onion, green chillies, coriander leaves and chicken cooked in water with salt and turmeric. Add the shredded chicken to the onion mix.

Ingredients :

  • 2-3 Potatoes, boiled with salt and mashed
  • Chicken filling
  • Mozzarella Cheese
  • 2 Eggs
  • Bread Crumbs
  • Zip lock bag/ Baking Paper
  • Vegetable Oil 

Instructions :

  1. Into the boiled and Mashed potatoes add the chicken filling and mix well. 

  2. Add the chicken -potato mix into a zip lock bag and flatten leaving a gap in the lock and flatten using a roller. You may also use a baking paper, flatten using oiled hands into a medium flat square shape on the baking paper.

  3. Next add in a layer of Mozzarella cheese and repeat the process of adding the chicken potato mix and roll flat. If using baking, cover using the baking paper and place in the freezer. Allow to freeze to solid for 3-4 hours or overnight, so that the cheese becomes solid. 
  4. Next, thaw for half an hour so that you may easily cut into equal strips and and half them. 

  5. Into a bowl, crack 2 eggs and whisk using a fork. Now to the egg mix, dip your Cutlet finger and coat in bread crumbs. 

  6. Fry in hot oil and make sure to fry in hot oil.
  7. Enjoy with ketchup.


Do try this recipe and don't forget to share your experience/feedback with me here in the comments or feel free to send me a mail. Also, do tag me at #taystedit if you try out my recipes on Facebook, Instagram etc so that I can see when you make it. ♡♡♡♡

 Mumbai Street Food Style Chicken Frankie


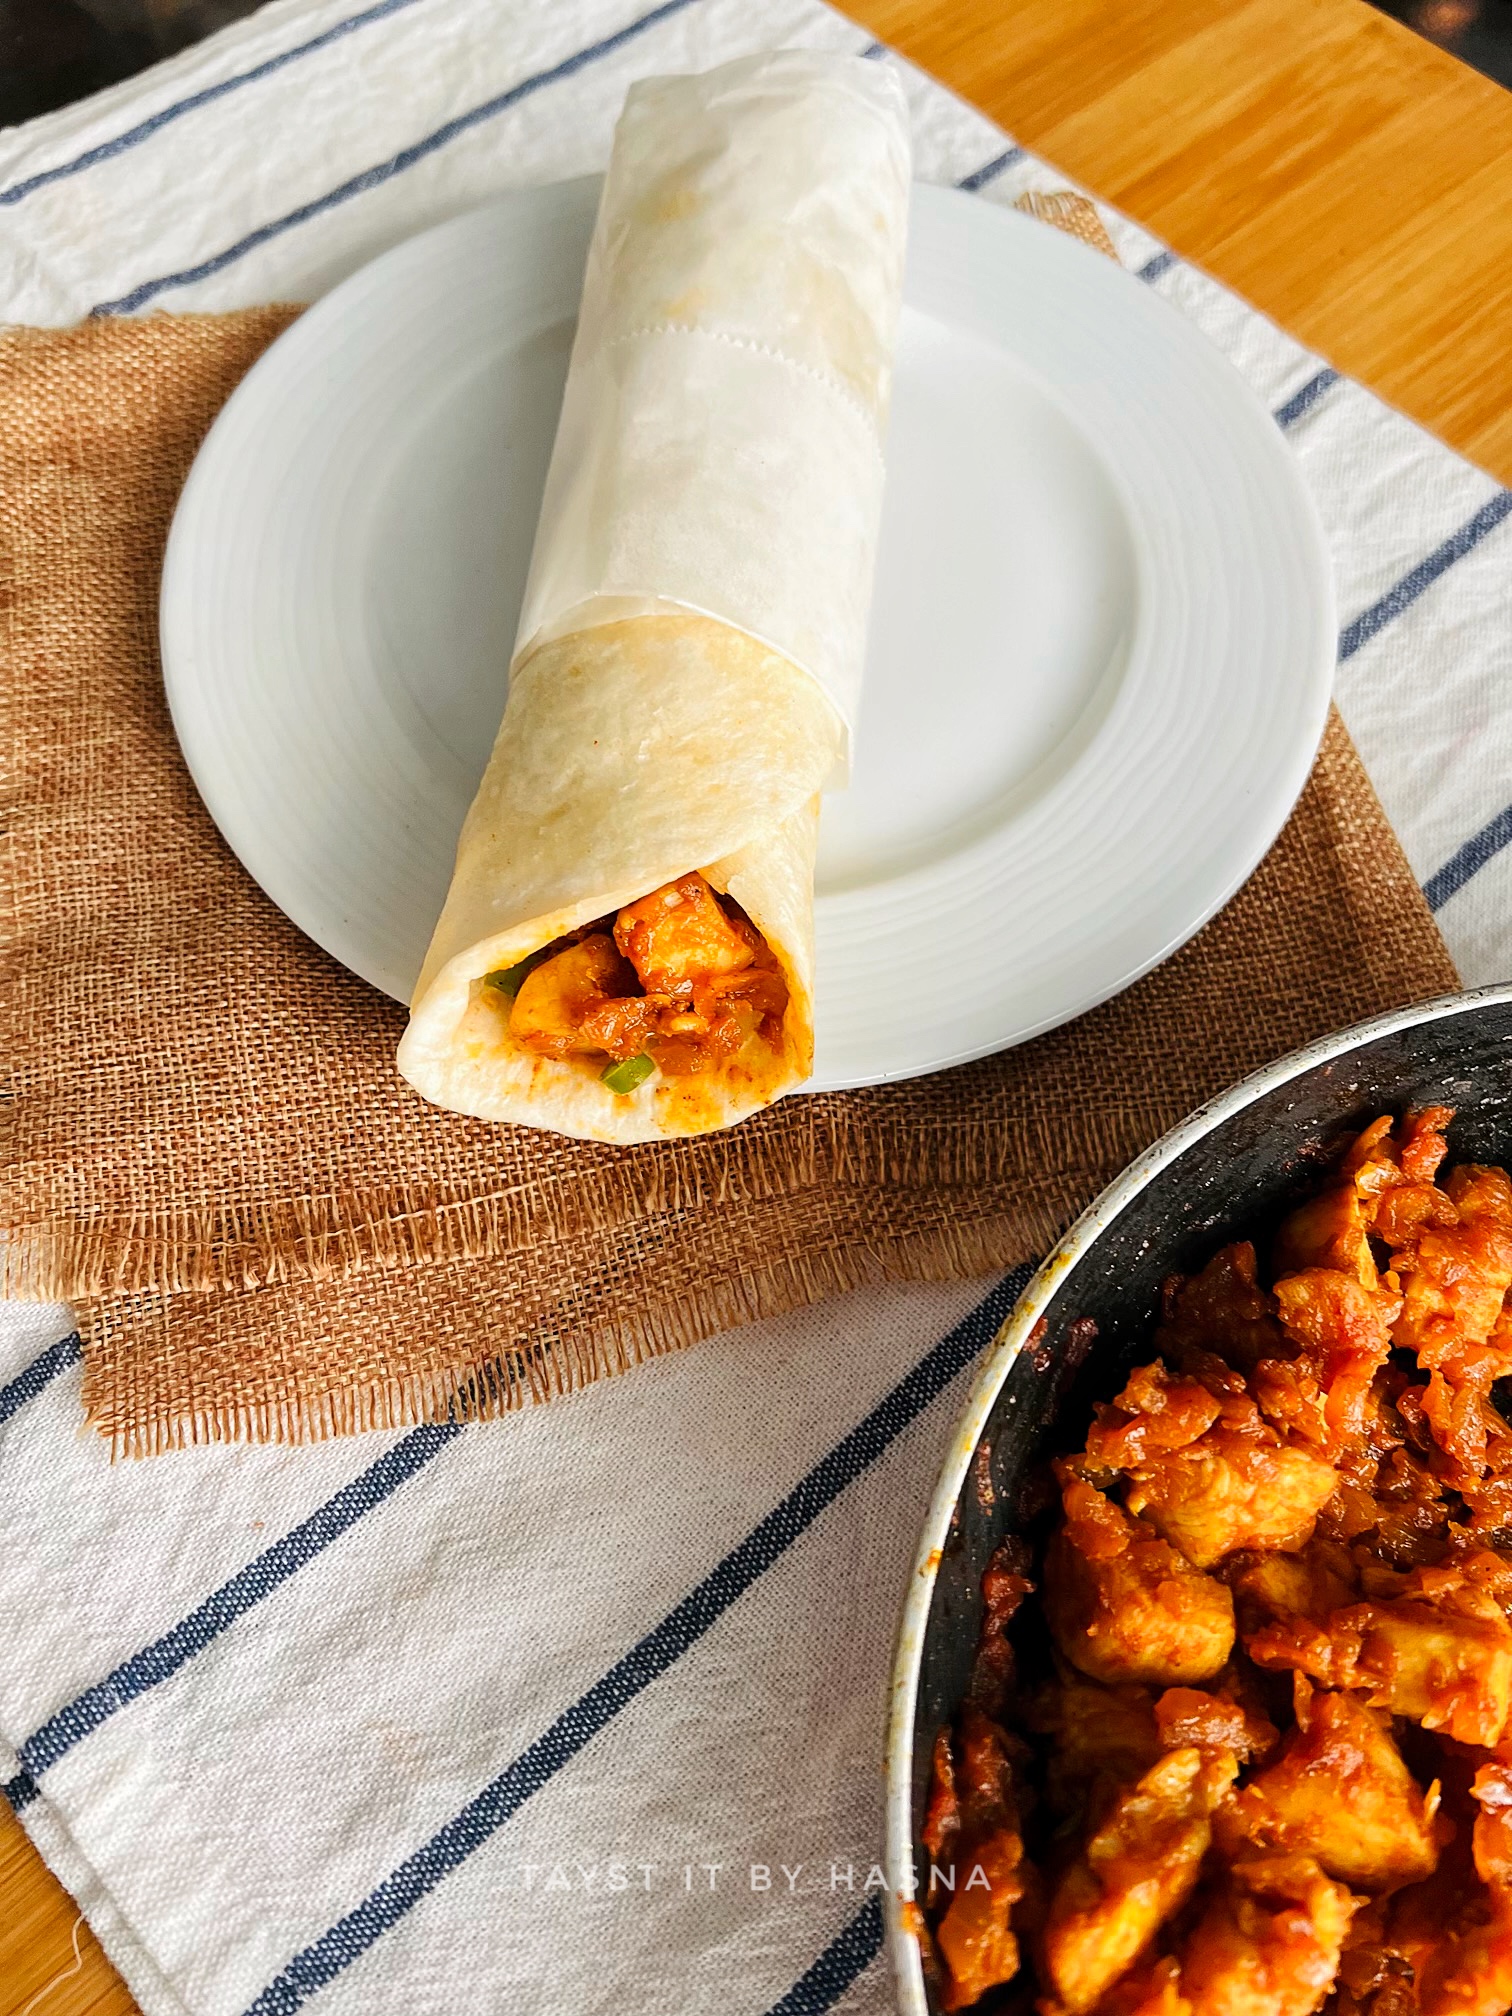
Chicken Frankie is a wrap that consists of an omlette like layer inside the wrap, with a chicken filling inside which is finished off with a dash of pickled onion and green chilli and a sprinkle of Frankie masala powder, unlike other wraps, this one is chatpatta which means it is spicy and tangy.

Frankie is usually made with a roti made from maida dough, I have used here tortilla wraps as it was more accessible to me. I have used tender chicken breasts, you may use boneless chicken thighs, as there is no risk of over cooking chicken thighs. On the other hand, if you overcook breast pieces, it may result in a dry texture, if overcooked.

Preferably prepare the filling a day ahead, as it helps in the flavors of the masala to steep in the chicken pieces and store in the refrigerator overnight. Chicken frankie is very filling and with the omlette inside, makes it a complete meal. So you may have it as a snack or as a meal. I am sure you will fall in love with the flavors.

Ingredients: (makes 3)

  • 4 tbsp White Vinegar
  • 1/2 an Onion, thinly sliced 
  • 2 Green  Chillies
  • Salt, as required
  • 250 gms Boneless chicken, cubed
  • 2 tbsp Vegetable Oil
  • 2 medium Onions, chopped finely
  • Salt, as required
  • 1 tsp Garlic paste
  • 1 tsp Ginger paste 
  • 1/4 Turmeric powder
  • 2 tsp Kashmir Red Chilli powder
  • 1 tsp Coriander powder
  • 1 tsp Cumin Powder
  • 2-3 tbsp Tomato Paste
  • 1/4 cup Water  
  • 2-3 Large Eggs
  • Ready made/ Homemade roti or paratha
  • 2 tbsp Butter 
  • 2 tbsp Frankie masala powder **
  • Butter paper for wrapping the frankie

Instructions:

  1. In a small bowl, add in the sliced onions, chopped green chillies, white vinegar and salt. Mix and set aside.
  2. In a large pan/wok, pour vegetable oil and add in the chopped onions, add salt as required and allow the onions to become translucent.
  3. Next add in the ginger and garlic paste, Sautee until raw aroma disappears.
  4. Next add in the spices and mix well. Add the tomato paste and the chicken cubes,our in a splash of water and allow the chicken to cook well. After 7 minutes, switch off the flame.

  5. In another small bowl, beat an egg with some salt and in a pan, pour vegetable oil, allow to come to a heat, then pour the beaten egg in the pan, once half cooked place in your prepared roti before the egg cooks completely, as the uncooked egg helps to stick onto the paratha/ roti.
  6. Smear the roti with butter, flip and allow to cook. Immediately transfer to a board or a plate and stack the earlier prepared chicken filling to a side of the omlette-roti and add in the pickled onion and green chillies over the chicken filling and sprinkle the frankie masala powder as required. Now slowly roll the frankie from the side and halfway through, roll one of the long ends inward and roll the frankie wrap, now using a butter paper wrap the chicken frankie. 


  7. Serve hot and enjoy with pickled veggies.


**Homemade Frankie Masala powder:
  • 2 tbsp Red Chilli Powder
  • 1 tbsp Coriander Powder
  • 2 tbsp Dry mango powder
  • 1 tbsp Cumin powder
  • 1 tsp Garam Masala powder
  • 1/2 tsp Turmeric powder
  • 1 tbsp Black Salt/ Normal Salt
Mix all spices and store in an air tight container.


Do try this recipe and don't forget to share your experience/feedback with me here in the comments or feel free to send me a mail. Also, do tag me at #taystedit if you try out my recipes on Facebook, Instagram etc so that I can see when you make it. ♡♡♡♡

 Crispy Fried Calamari


One of the easiest appetizers to make are these Crispy Fried Calamari. If you have cleaned squid, this snack/ appetizer takes only a minute to fry. Not kidding, calamari takes only a minute to cook, well, if you fry it anywhere around 5 minutes or more, the texture then turns rubbery. 

Calamari are simply a type of squid that are smaller in size. Squid does not have too much cooking time, but if you plan to cook it really well, you might use the pressure cooker, as the pressure cooker method makes the squid less rubbery. To know the exact cooking time for squids, there is no cooking time that is 'in between'. It is either cooked for a minute on high flame or cooked for a long time, preferably in pressure cookers.

I wanted to be innovative with this recipe, but for some recipes, the simplicity is what brings out the flavors of the calamari. The recipe is super easy with very few ingredients and does not use egg too, it's that easy and mess free!

Ingredients :

  • 500 gms Squid, skin peeled and cleaned 
  • Salt, as required
  • 1/2 tsp Black Pepper, crushed
  • 1/2 cup All Purpose Flour
  • 1/4 cup Corn Flour
  • 1 tsp dried Parsley, optional
  • Vegetable Oil

Mayo Sauce:

  • 1 tiny Garlic Clove
  • 3 tbsp Mayo

Instructions :

  1. Cut the cleaned squid into thin rings and add salt and pepper to it. Mix well and set aside.


  2. In a bowl, add all purpose flour, corn flour and the dried parsley, mix well using a whisk.
  3. Now drop the marinated squid rings to the flour mix and coat well.
  4. In a deep pan, pour vegetable oil and allow to heat well, once heated, add in the squid rings one at a time, on medium high flame.

  5. Fry for 30 seconds, and flip and fry for another 30 seconds and you are done!
  6. Mix the minced garlic and mayo and enjoy the fried crispy calamari as it is or with the dip!
 

Do try this recipe and don't forget to share your experience/feedback with me here in the comments or feel free to send me a mail. Also, do tag me at #taystedit if you try out my recipes on Facebook, Instagram etc so that I can see when you make it. ♡♡♡♡

 Easy Homemade Chicken Nuggets


We are all in search of the best recipes when it comes to pack lunch for kids. I completely detest the frozen chicken Nuggets that come in the supermarkets, as we do not know what all goes into it. So I try and make these ahead of time, super easy to make too. I made the chicken Nuggets with hormone free boneless chicken cubes.
 
The addition of mayonnaise helps the chicken to tenderize and makes the Nuggets even more delicious. Make these Nuggets ahead of time (during the weekend) and your kids are going to love their lunch time. And for us mommies, we can feel guilt free too. I served the Nuggets on lettuce, you may place them inside bread slices as a sandwich or however you desire. 
 
Chicken Nuggets are loved by kids worldwide. So I am sure your kids will love them! It is always a hit here. To bring in the right coating texture I used 3 different ingredients to bring out the texture, I used plain cornflakes, rolled oats and a little amount of bread crumbs. Do try and let me know how your kids liked them!
 

Ingredients : (makes 12 Nuggets)

  • 250 gms Boneless chicken
  • 1 tbsp Mayonnaise 
  • 1 tsp Garlic powder
  • 1/2 tsp Paprika Powder
  • 1 tsp White Pepper Powder
  • 1/4 tsp Parsley (dried, optional)
  • Salt, as required
  • 1-2 tbsp Bread Crumbs, if required

For coating:

  • 2 Eggs 
  • 1/2 cup Maida/ All Purpose Flour 
  • 1/2 cup Cornflakes
  • 1/4 cup Rolled Oats
  • 1/4 cup Bread Crumbs

Instructions:

  1. In a food processor, pulse boneless chicken cubes with mayonnaise , garlic powder, paprika powder, white pepper powder, and dried parsley. Pulse and check the consistency, if required add a couple of tablespoons of bread crumbs and pulse once again. (make sure not make a paste)
  2. Onto a parchment paper/ baking paper add the chicken mixture and with the help of oiled hands flatten using using your fingers and shape the nugget mixture to a neat square, cover using the overlying baking paper from all sides and store in the freezer for around 20-30 minutes, this step will help you slice the chicken nugget block into perfect sized Nuggets.
  3. Remove the nugget block from the freezer and using a sharp and oiled knife, cut the chicken nugget block into equal sized nuggets.

  4. In a dry grinder, pulse cornflakes, rolled oats and bread or bread crumbs.

  5. Now dip the nugget into beaten eggs and then dip in the flour and repeat the process, now dip in egg again and coat in the cornflake mix. 


  6. In a freezer safe container place the prepared Nuggets using a baking paper before placing another layer of nuggets, or immediately fry for 3-4 minutes each side on medium flame.


  7. Serve with ketchup or any of your favorite dips.

Do try this recipe and don't forget to share your experience/feedback with me here in the comments or feel free to send me a mail. Also, do tag me at #taystedit if you try out my recipes on Facebook, Instagram etc so that I can see when you make it. ♡♡♡♡

 Breakfast Cheddar Biscuits


Since it's the vacation season, kids are always at home, and this makes a great garb and go breakfast idea when you have made plans with your family. These biscuits when paired with some veggies and fresh juice, makes a great breakfast meal. These buscuits comes together very easily, no effort at all, I guarantee. 

The aroma that sits in the house is just, aaaah, sooo good. Well, of course, you have butter as the star ingredient. You can make them ahead and store it in the frezeer, so that you have something ready for your kids snack time. These are much similar to buttermilk biscuits that are my favorite, Popeyes biscuits. The crisp from the scallions are just so good. If you can get hold of some shredded cheddar cheese, do try this recipe. If you have made ahead, and frozen them, thaw the biscuits in the refrigerator overnight and bake them for 15 minutes and have it warm, and enjoy. 😋

Ingredients:

  • 1 1/2 cup All purpose flour
  • 1 tsp baking powder 
  • 1/2 tsp baking soda
  • Black pepper, crushed
  • Salt, as required 
  • 1/2 cup cold butter, cubed
  • 1 tbsp butter, melted
  • 1/4 cup Scallions, chopped
  • 1/2 cup shredded cheddar cheese
  • 3/4 cup buttermilk

Instructions:

In a large bowl add flour, baking powder, baking soda, black pepper and salt.
Work the cold butter into the flour, using fork/finger until crumbly in texture.
Add in the chopped scallions and cheddar cheese, mix well.
Now pour the buttermilk, little at a time and bring to a dough until not too sticky or too crumbly.

Transfer the dough to a lightly floured counter top and kneed well, just until the dough comes together.
Flatten into a rectangle shape and fold the short sides overlapping each other and press down and flatten and repeat the process again.

Now flatten a little and using a dough scrapper/knife , cut the dough into 6 equal squares.

On a baking paper lined sheet, place a little cheddar cheese just before placing each biscuit. The cheese comes underneath each biscuit.
Brush the biscuits with melted butter and bake the biscuits in a preheated oven at 210 deg C for 15 minutes until golden brown.
Enjoy with semi boiled eggs and fresh fruits and juice for breakfast! 😋😍


Do try this recipe and don't forget to share your experience/feedback with me here in the comments or feel free to send me a mail. Also, do tag me at #taystedit if you try out my recipes on Facebook, Instagram etc so that I can see when you make it. ♡♡♡♡


 Plantain Sushi Rolls with Caramel Sauce


This is one recipe that was developed while I went to bed to sleep, sometimes the best recipes comes to my mind when I switch off myself for the day. I sometimes feel like preparing it and devouring it right away and note down the recipe in my book then and there. Let me tell you, this is one snack/dessert that is definitely a treat to your taste buds.
 
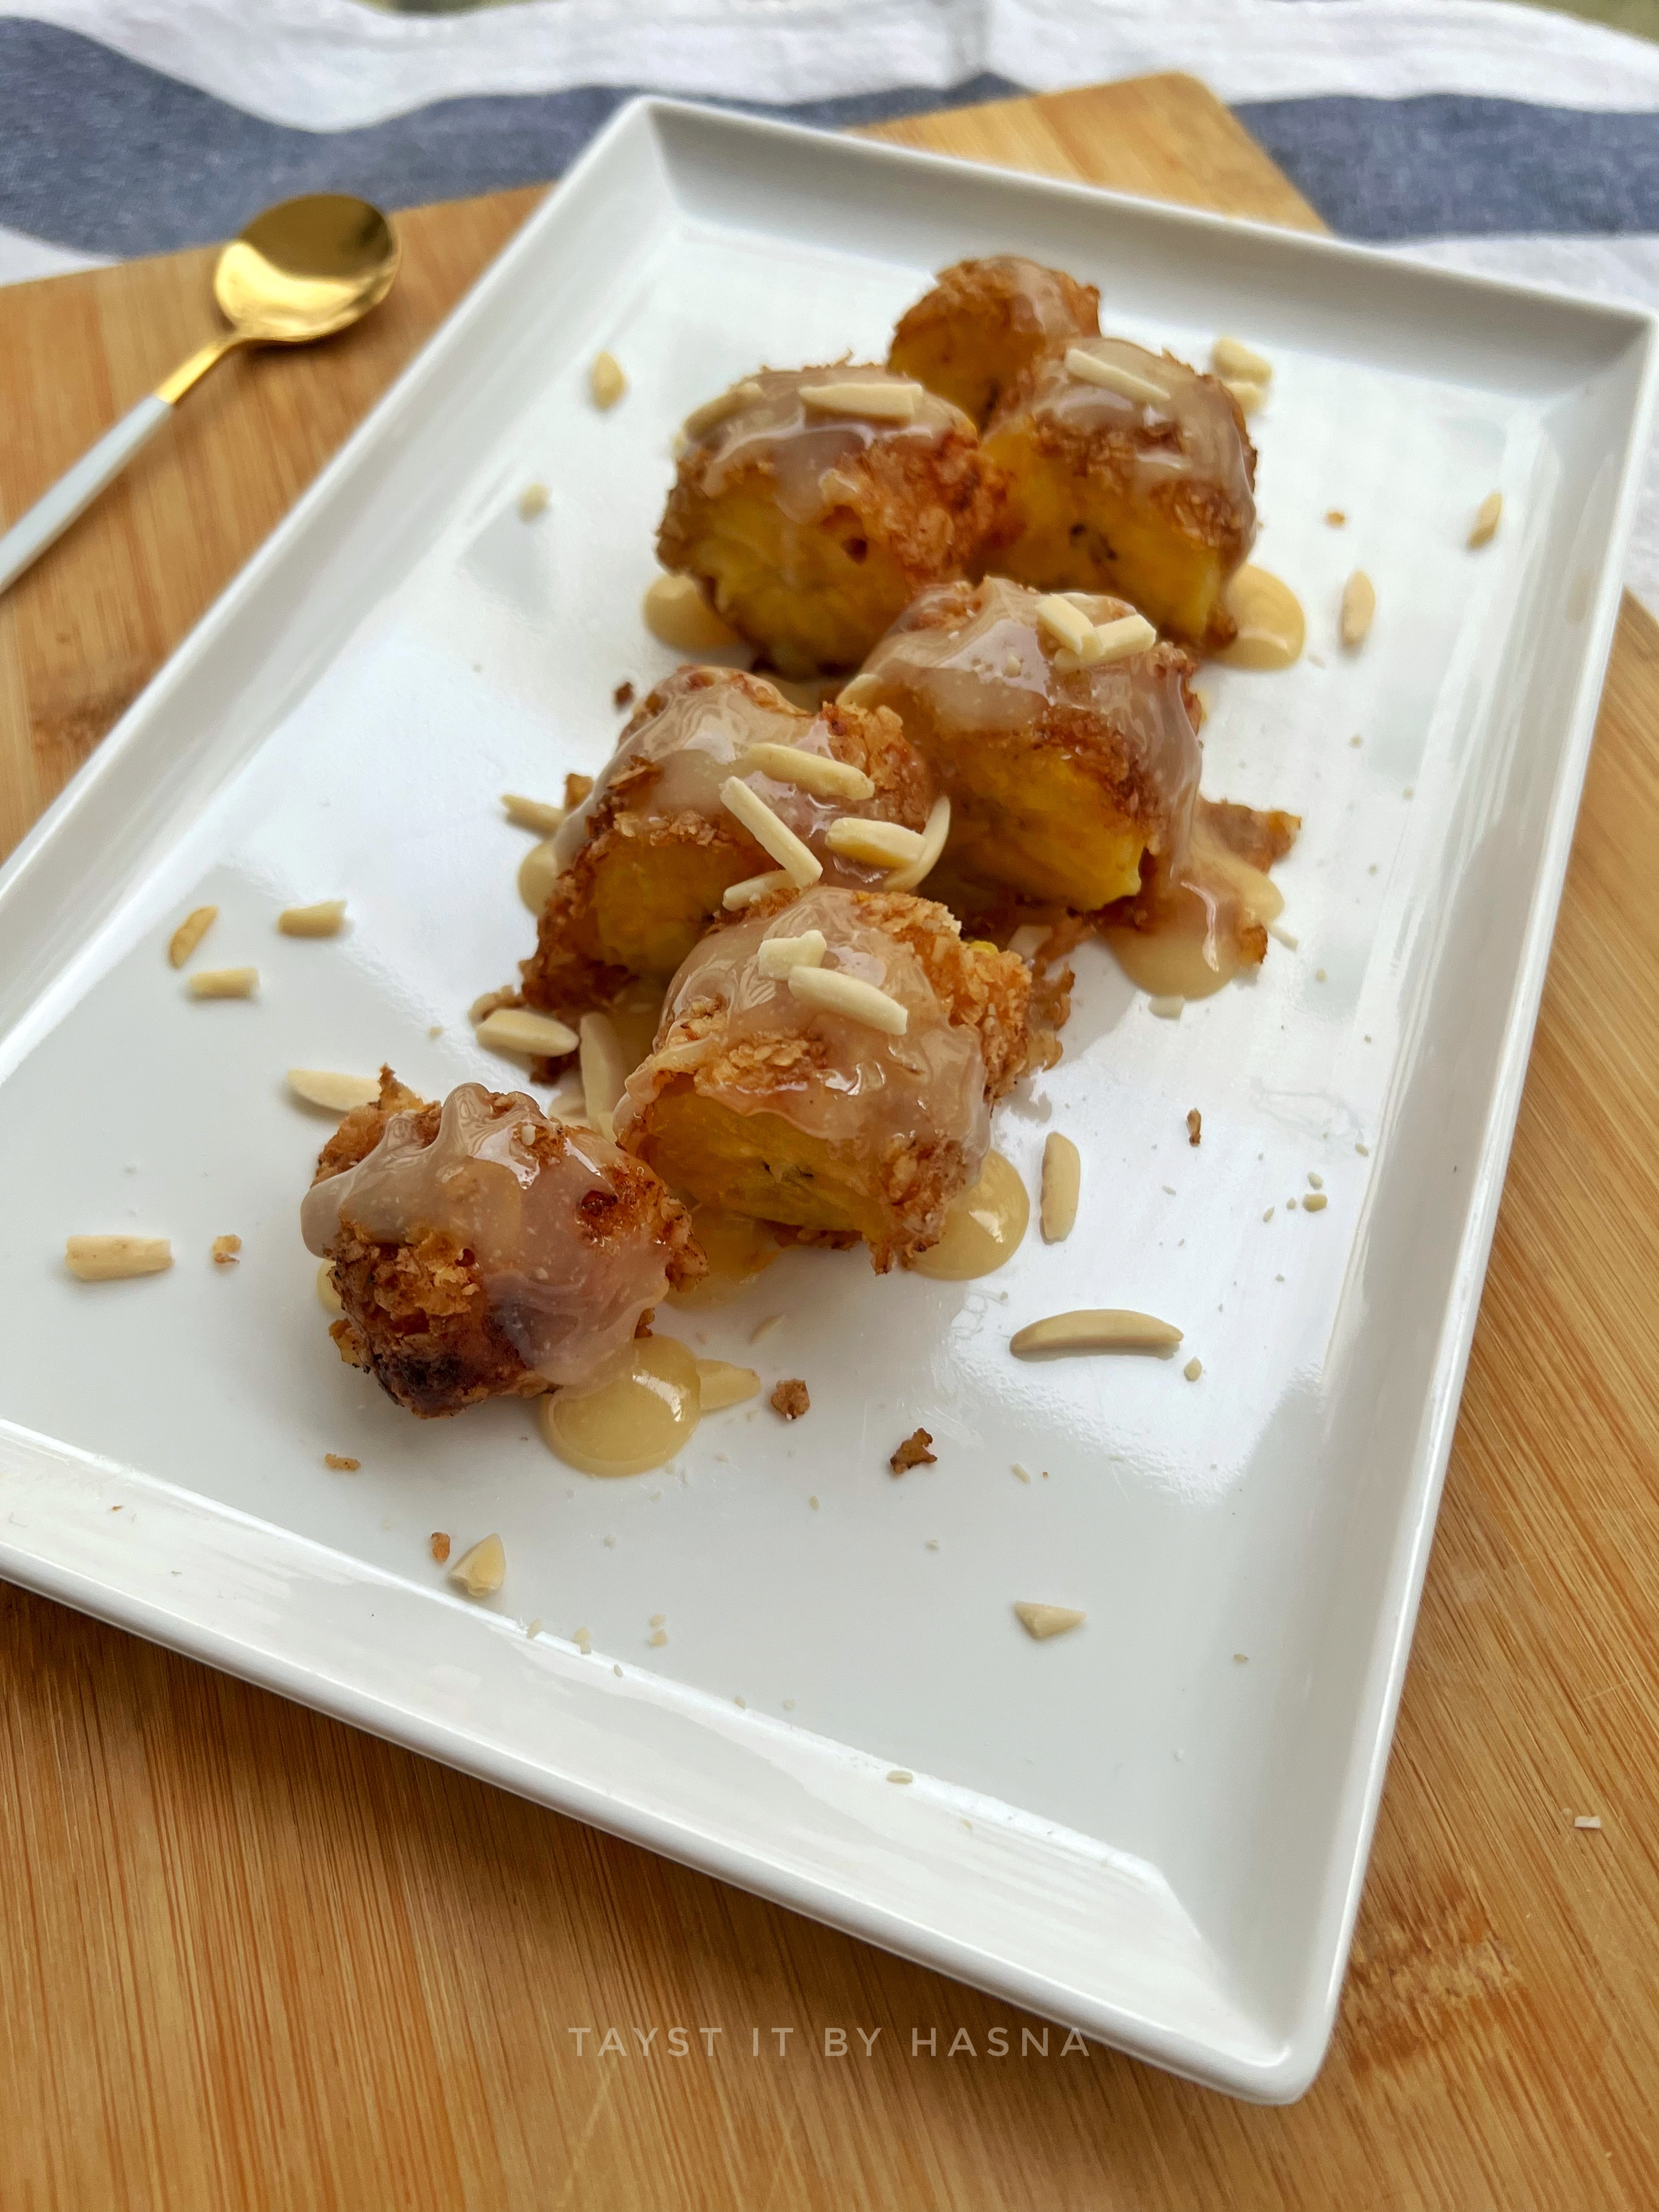
Make this to impress your guests and they are gonna love it! This is preferably made using ripe plantains. Once you start frying the oats coated plantains, your house is going to smell like baskin robbins to top that, the aroma of the caramel sauce is like the cherry to your cake.
 
This is probably a fusion recipe, as it involves frying of plantains aka nendra pazham/ Kerala bananas, which is then smothered/ drizzled with Caramel sauce with a final touch of blanched and chopped almonds.
 
Since I invented the recipe, I was going about to put a name for this dish, finally settled for sushi rolls, teehee, forgive my quirkiness :) 

This is such an easy recipe, I urge you to try it. After all it is hubby approved and my girl loves it! 


Ingredients :


  • 3 Ripe Plantains
  • 1/2 cup All Purpose Flour
  • Salt, as required
  • 1/2 cup water
  • 1 cup Quick Oats
  • Oil, for frying

Caramel Sauce

  • 1/2 cup White granulated Sugar
  • 2 tbsp Butter, room temperature
  • 1/4 cup heavy cream/ thick cream, room temperature 
  • 1/4 tsp Salt
  • 1/2 tsp Vanilla Essence, optional
  • Blanched and Chopped Almonds, for garnish 

Instructions:

  1. To prepare the Caramel Sauce, in a heavy duty sauce pan, heat sugar, stirring comstantly. Sugar will start to melt and once it reaches an amber color, reduce heat as you don't want to burn it.
  2. Ps: Please be precautions when you make caramel sauce, as it bubbles rapidly and can cause burns if distance is not maintained.
  3. Next, add your room temperature butter and stir in until melted and combined.
  4. Allow to cook for half a minute, slowly pour the heavy cream, little at a time and stir it in.
  5. Remove from heat and add salt and vanilla essence if desired.
  6. Allow to cool slightly before using the sauce.
  7. To prepare the plantain sushi rolls, dip the plantains in the all purpose flour slurry (made using flour+water+salt) and then coat in the oats well.
  8. Shallow fry/ deep fry until golden and crisp.
  9. Serve immediately with the caramel sauce prepared earlier and top with blanched and chopped almonds.


Notes:

  • Make sure to use room temperature butter and whipping cream / thick cream for better results.
  • The sugar might look like it’s crumbling when it’s starts to melt, it’s quite normal, it will melt completely after a while.
  • My caramel sauce looks a bit pale as I was in a hurry and did not wait the sugar to turn amber in color. 
  • You may also add a scoop of vanilla ice cream for added deliciousness.


Do try this recipe and don't forget to share your experience/feedback with me here in the comments or feel free to send me a mail. Also, do tag me at #taystedit if you try out my recipes on Facebook, Instagram etc so that I can see when you make it. ♡♡♡♡


Chicken Pakora


Good evening folks!

So a couple of days back I had posted a chicken pakora making scenes and I have been meaning to share the recipe ever since. This one is super simple to prepare and I am sure all the ingredients are readily available in your pantry.

Onion pakoras are my mom's favorite. So one day when she had leftover chicken breasts, we made it like this and chicken pakora happened. And if you have a food processor, I bet nothing can be easier that making these chicken pakoras especially when you have sudden guests. Great with a hot cup of Chai. 

I usually prepare with the below mentioned spices, but last day I prepared with a Frankie masala powder which had similar ingredients and was good just as well. Though I haven't clicked pictures of the process, will update the pictures in the near future.

Without further a do, lets make this crispy yummy snack.

Ingredients:

  • 2 large onions, thinly sliced
  • 350 grams chicken breast, cubed or sliced
  • 1/2 tsp Ginger-garlic paste
  • 1 tsp lemon juice 
  • 1/4 Turmeric powder
  • 1 + 1/2 tsp Kashmiri Red chilli powder
  • 2 green chillies, chopped
  • 3-4 sprigs of curry leaves, chopped
  • Chopped Coriander leaves 
  • 1/4 tsp pepper powder
  • 1/4 tsp cumin powder 
  • 1/4 Garam masala powder
  • 1 tsp Paprika and or Amchur powder (optional) 
  • 1 egg
  • 3 tbsp Corn flour
  • 3 tbsp Rice flour


Instructions :

  1. In a bowl, add in your cut pieces of chicken breast, add ginger garlic paste, salt, lemon juice, Turmeric powder and Chilli powder. **
  2. Now add in your sliced onions and your greens (green chilli, Coriander leaves, and curry leaves). 
  3. Now add in all your powders - cumin, pepper, Garam masala, paprika (optional), and Kashmiri Red Chilli powder and mix. Drop in an egg and mix well. 
  4. Finally add in your corn flour and rice flour and toss well to coat. 
  5. Scoop into medium hot oil and fry for 3 minutes each side and until golden brown and crisp. *


Notes:
**you may store the chicken at this stage.
*Be careful not to burn the onions, burnt onions taste awful so beware. 

Ps : The pic was taken in a hurry, as it was time for iftar, will be updating pictures. In Sha Allah. 

Do try this recipe and don't forget to share your experience/feedback with me here in the comments or feel free to send me a mail. Also, do tag me at #taystedit if you try out my recipes on Facebook, Instagram etc so that I can see when you make it. ♡♡♡♡

Mexican Pizza Bites with Guacamole 


When you are a person who gets this instant cravings of pizza and you are in a mood to spice things up, then here I am to introduce you to this super easy Mexican Pizza.

Here I have used bread slices as the base. You may use Tortilla too. The only problem with the recipe is that, you need to consume it as soon as possible as the color may change the more it stays out. So, it is best served as a starter or a snack. 

If I had a few sliced black olives, I would use it to top up the snack bites, but since I ran out of it, I couldn't not get the disired color contrast in the final product. This is one of my experimental inventions that happened to be a part of my Ramadan snack ideas, as innovative food is what I love to do. All this while, it remained in my drafts, was contemplating whether to share or not, as my hubb is not a fan of guacamole. But I tell you, it's the best bite sized pizzas ever. The rest of the fam was raving about it. And then a few blogger friends invited to do a collaboration on Instagram on the theme Fusion Food! That is when I realized the time has come to reveal these yummy bites. I loved it and is such an easy recipe to nail. I would suggest not prepare a large quantity of guacamole as discoloration might occur. This is one easy recipe that I make when the hubster is not at home and there are avos smiling at me. 😀

When I thought about Italian cuisine and Mexican cuisine, the first things that popped in my mind was the Italian Pizza and Mexican Guacamole, So I immediately started creating the recipe plan! Guacamole, a Mexican invention, is an avocado dip, or spread that is now found in American cuisine as a condiment too. Avocado pieces are mashed using a mortar and pestle and fresh ingredients like onion, tomato and cilantro (Coriander leaves) takes it to a next level. As avocado is quite bland, this method definetly brings out the flavors of the avocado and it is sooo good and the final squeeze of lemon brings out the freshness in the dip which is the Icing on the cake! 😋👌

And the magic that stands out from normal guacamole is the maggi cube crumbs, which is completely optional. 

Definitely do give it a try and let me know your thoughts too❤️

Lets get started!


Ingredients :

  • 250 gms tender Chicken Breast, sliced
  • 2-3 tbsp olive oil
  • 1 tsp Garlic paste
  • 1 tsp paprika powder
  • 1/4 tsp Turmeric powder
  • 3/4 tsp Kashmiri Red chilli powder
  • Salt as required

For the base:

  • 4 Slices White Bread
  • 2 tbsp Salted butter
  • 1/2 tsp Garlic paste
  • 1/2 tsp Oregano
  • 1/4 tsp Red Chilli Flakes

Guacamole:

  • 1/2 avocado, sliced into cubes
  • 1/2 tsp Garlic paste
  • 2 tsp Coriander leaves
  • 2 tbsp Onion, finely chopped
  • A good squeeze of lemon 
  • 2 tbsp Tomato, finely chopped
  • Crumbs of Maggi Chicken Cube

Instructions :

  1. Slice the tender chicken breasts and marinate using the spices mentioned. 
  2. Fry in a couple of tbsps of olive oil and set aside. 
  3. Prepare the guacamole by mixing all the ingredients mentioned under guacamole using a mortan and pestle if possible. This method helps to bring out its flavor better. 
  4. Don't forget to squeeze the lemon juice and consume the guacamole immediately. *
  5. Now make a spread that consists of butter, garlic paste, oregano and red chilli flakes. Spread on each bread slice and toast to golden perfection. 


Notes:

  • Use the guacamole as soon as possible, as the color of the avocado changed the more it sits out. Lemon juice helps to retain the color to an extent.
  • If you'd like, you may use ketchup too. But the guacamole has enough strong flavors😊


Do try this recipe and don't forget to share your experience/feedback with me here in the comments or feel free to send me a mail. Also, do tag me at #taystedit if you try out my recipes on Facebook, Instagram etc so that I can see when you make it. ♡♡♡♡
Older Posts

Search This Blog

My name is Hasna Haneef, a mommy to a toddler, hailing from Thalassery, Kerala. Welcome to my humble abode on the Internet; wherein I share all my recipes and experiments. I am glad to have you on board!

TRENDING POSTS

  • Emirati Chebab
  • Kerala Style Squid Roast
  • Thalassery Style Kozhi kaal/ Koyikaal
  • Kethel's Chicken
  • Copy Cat Caesars Mini Pizza
  • Yemeni Mutton Haneeth

About Me

May peace be with you!

Welcome to my blog.

I am delighted to have you on board. My name is Hasna Haneef, a mommy to a toddler, hailing from Thalassery, Kerala. My homeplace being Dubai, as I am born and brought up here and I am very influenced by the lifestyle and the variety of authentic cuisines I get to try from here, which has made me try anything that comes across me
, click here →

Stay Connected!

Join Our Madness!

Join with Thousands Of Subscribers ! Get Our Latest Recipes Delivered to Your email Inbox!

Powered by follow.it
  • Home
  • About Me
  • Recipes

    • Main Course
    • Desserts
    • Snacks

    Uncategorized

    • Chicken
    • Meat
    • Vegetarian
    • Rice
    • Malabar Food
    • Baking
    • Breakfasts
    • Snacks
    • Drinks
    • Pasta
    • Fish
    • Soups
    • Desserts
  • Contact Me

Featured Post

Triple Chocolate Hazelnut Skillet Cookie

Blog Archive

  • ▼  2026 (3)
    • ▼  September (1)
      • Homemade Cerelac for Babies
    • ►  May (1)
    • ►  April (1)
  • ►  2025 (4)
    • ►  April (2)
    • ►  March (1)
    • ►  February (1)
  • ►  2024 (36)
    • ►  October (4)
    • ►  September (5)
    • ►  July (1)
    • ►  June (2)
    • ►  May (4)
    • ►  April (3)
    • ►  March (10)
    • ►  January (7)
  • ►  2023 (47)
    • ►  December (3)
    • ►  September (2)
    • ►  August (6)
    • ►  July (6)
    • ►  June (9)
    • ►  May (4)
    • ►  April (5)
    • ►  March (6)
    • ►  February (3)
    • ►  January (3)
  • ►  2022 (69)
    • ►  November (4)
    • ►  October (6)
    • ►  September (7)
    • ►  August (9)
    • ►  July (12)
    • ►  June (5)
    • ►  May (5)
    • ►  April (12)
    • ►  March (4)
    • ►  February (2)
    • ►  January (3)
  • ►  2021 (24)
    • ►  November (1)
    • ►  October (2)
    • ►  July (1)
    • ►  June (4)
    • ►  May (6)
    • ►  April (4)
    • ►  February (4)
    • ►  January (2)
  • ►  2020 (82)
    • ►  December (5)
    • ►  November (6)
    • ►  October (4)
    • ►  September (2)
    • ►  August (5)
    • ►  July (10)
    • ►  June (10)
    • ►  May (13)
    • ►  April (12)
    • ►  March (8)
    • ►  February (4)
    • ►  January (3)
  • ►  2019 (22)
    • ►  December (1)
    • ►  November (2)
    • ►  October (6)
    • ►  September (1)
    • ►  August (1)
    • ►  February (3)
    • ►  January (8)
  • ►  2018 (15)
    • ►  December (4)
    • ►  November (6)
    • ►  October (3)
    • ►  September (2)

Subscribe Us

Labels

Bake Biscuits Breakfast Brown rice Burger Cheese Chocolate Dal Egg Emirati Fish Iftar Indonesian Japanese Jeerakashala rice Kerala Keto Kuwait food Lunch Milk Mutton Thai food UAE food afghan cuisine arabic beef biryani bread burnt cheesecake cake chicken cream dessert dinner greek healthy indo chinese lamb malabar prawns pudding puffs quick dinner ideas recipe refreshing drink rice salad sandwich stir fry vegetables vegetarian veggies yemeni

Contact Form


POPULAR POSTS AND PAGES

Emirati Chebab

Emirati Chebab

June 01, 2023
Kerala Style Squid Roast

Kerala Style Squid Roast

June 18, 2020
Thalassery Style Kozhi kaal/ Koyikaal

Thalassery Style Kozhi kaal/ Koyikaal

June 08, 2020
Rose Kunafa Cream Pudding

Rose Kunafa Cream Pudding

May 20, 2020
Copy Cat Caesars Mini Pizza

Copy Cat Caesars Mini Pizza

March 12, 2024

Pages

  • Home
  • About Me
  • Privacy Policy
  • Contact Me

Copywrite © 2023 TermsFeed®. All rights reserved.

Created By Sora Templates | Distributed By Gooyaabi Templates

Back to top