Search This Blog

Taystit by Hasna

Food, Recipes, and Beyond

  • Home
  • About Me
  • Recipes
    • Main Course
    • Snacks
    • Desserts
  • Uncategorized
    • Chicken
    • Meat
    • Vegetarian
    • Rice
    • Malabar Food
    • Baking
    • Breakfasts
    • Snacks
    • Fish
    • Pasta
    • Drinks
    • Soups
    • Desserts
  • Contact Me

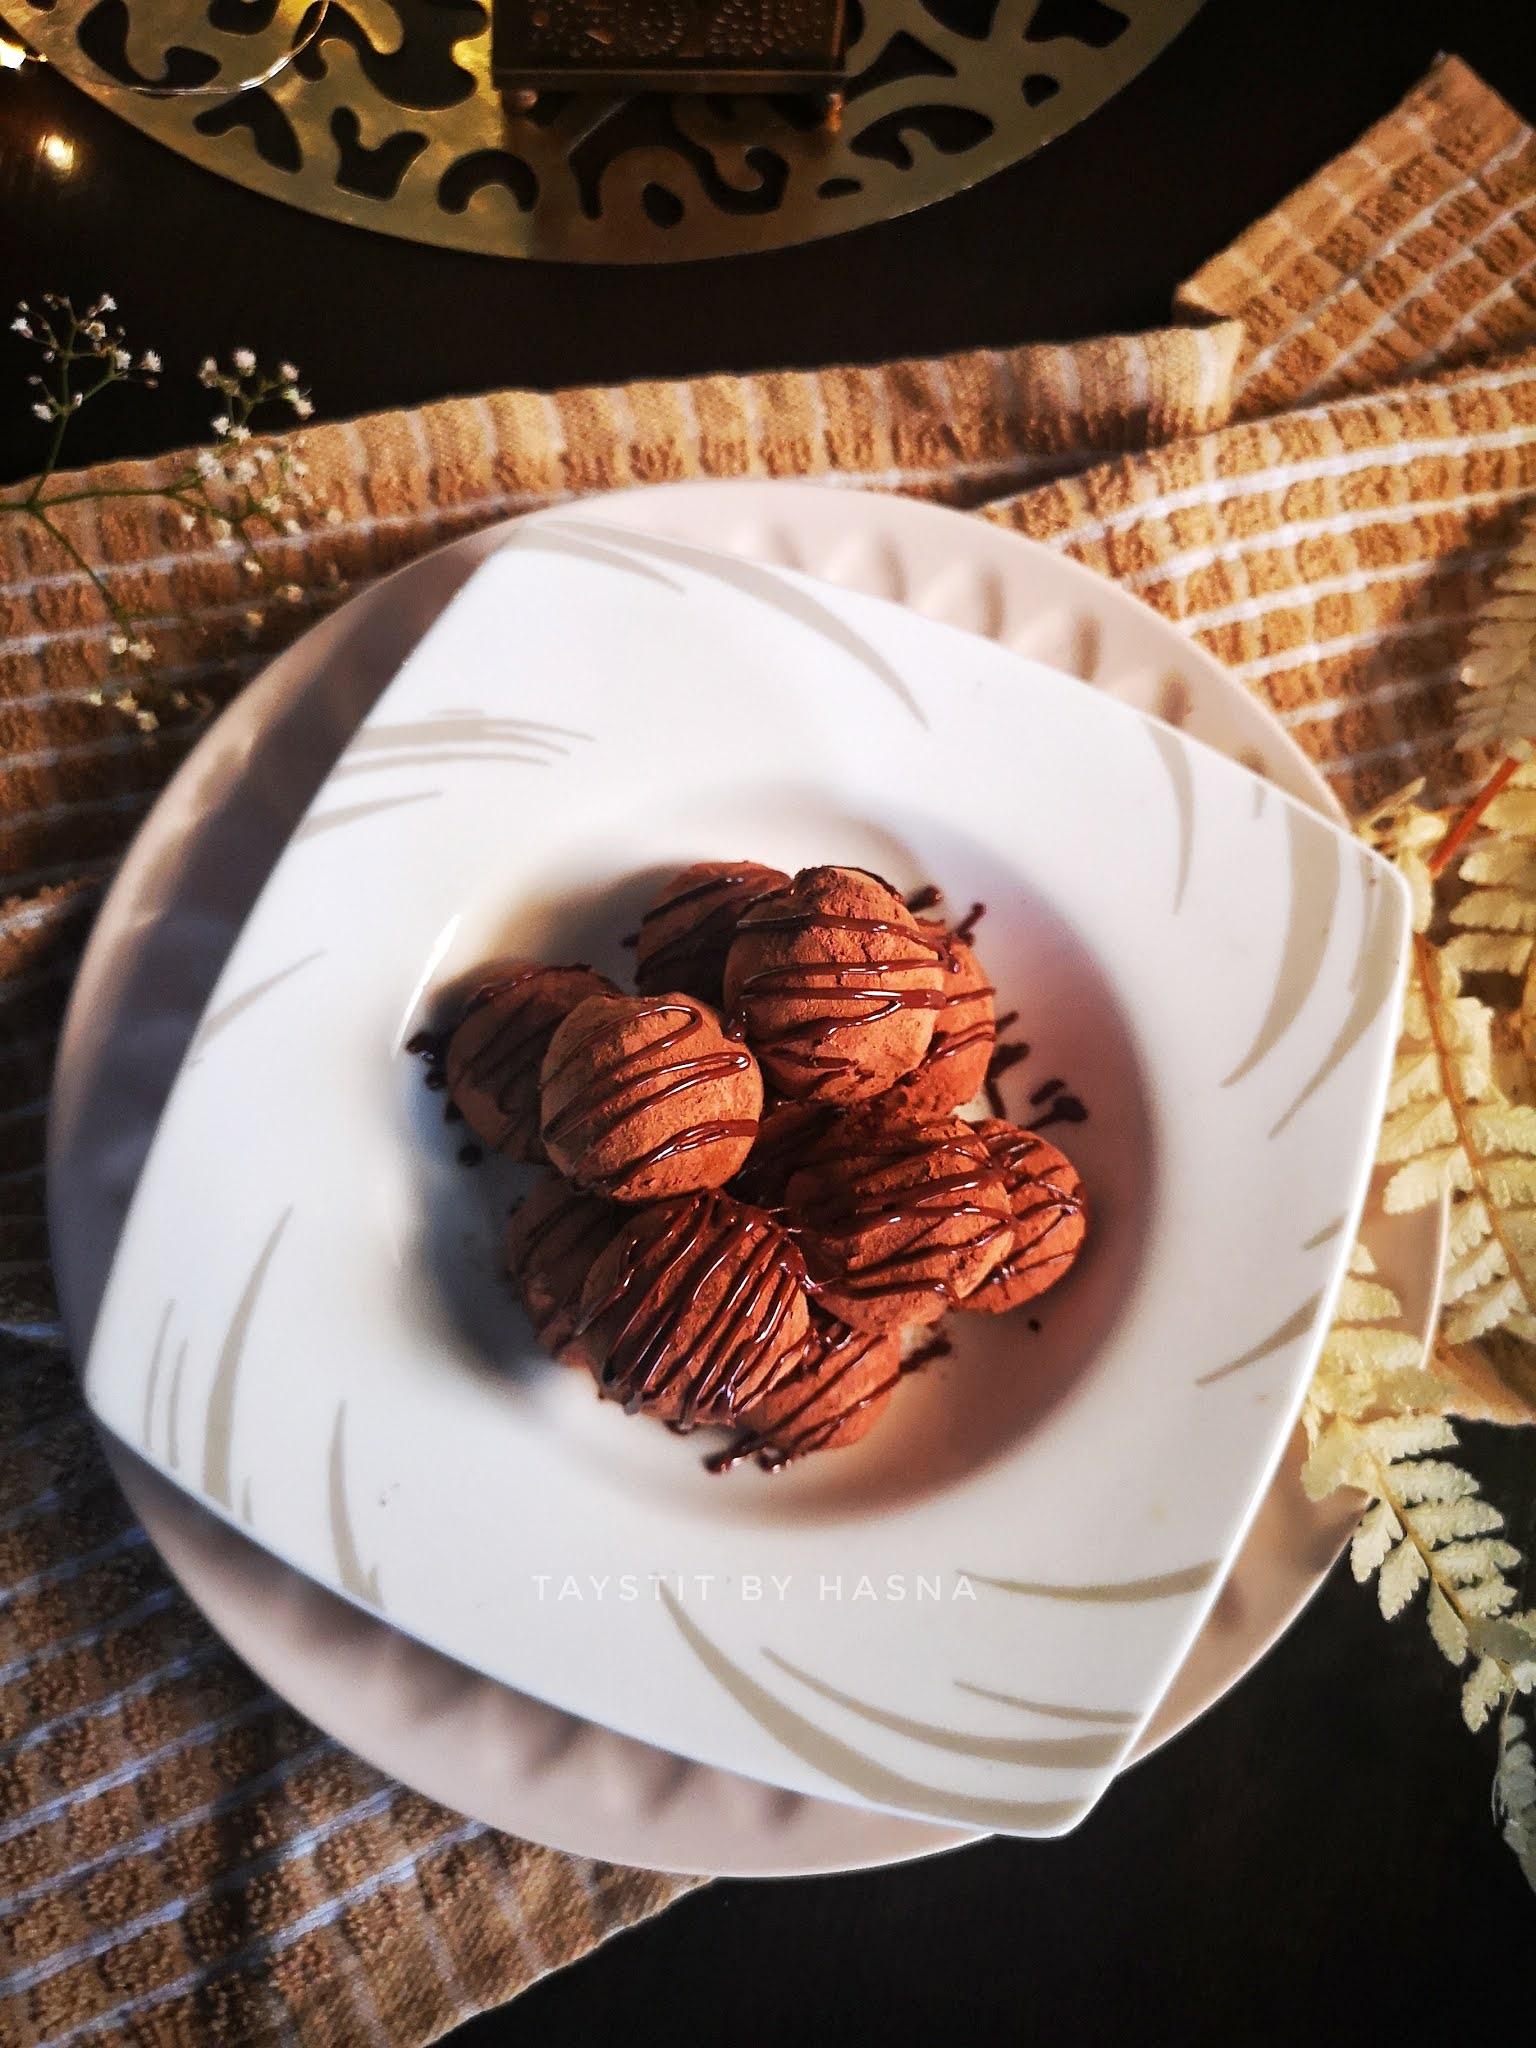
TIRAMISU Truffles


Truffles are something that I love to make because
A. Not only are they simple to prepare
B. Requires minimal ingredients
C. Looks appealing
D. Bite-sized
E. Loved by children and adults equally
F. And this one requires no heating element like the gas stove or the oven.

That's like a lot Iot of reasons to love truffles. I was invited for an Eid Preparation Collab and I was quite overwhelmed with ideas that popped in mind. Will share the recipes/ideas soon too.. So stay tuned for that! And I finally settled for these tiramisu truffles as I looked into my pantry and found these savoiardi biscuits (Italian lady finger biscuit) looking at me and waiting to be used up. Tiramisu is something everyone in the family lives but sadly there was no mascarpone cheese with and that is usually the star ingredient of tiramisu. So I wondered, not everyone will have it in their fridge and not everyone can find the mascarpone cheese. So I immediately thought of Kiri cream cheese cubes that we all love. Though I was not quite sure how it would turn out, I took a chance and tried using the cubes instead of mascarpone and oh boy you won't believe me, no one would even make out that there is jot mascarpone in it. Was a big hit! 😍

I felt the need for some chocolatey goodness, so I added a small dollop of Nutella before rolling them into truffles by flattening the prepared tiramisu Truffle balls, flattening, adding Nutella and rolling them again.

Though everyone here detests consuming cocoa powder just like that as I used it to coat the truffles, I still did coat them in cocoa powder to keep its authenticity. I went on to melt some milk chocolate in the microwave and drizzled it over the truffles. Not only it gave a dimension to the truffles, if was definitely appetizing too. So glad to think of it at the last moment.🤤

Without further a do let's prepare these delicious TIRAMISU TRUFFLES! 


Ingredients:

  • 1 pack Savoiardi Biscuits
  • 5 Kiri Cream Cheese Cubes*
  • 3 tbsp Icing sugar 
  • 200 ml hot water
  • 1 tsp instant coffee powder 
  • 1 tsp Vanilla Essence 
  • 1/4 cup Cocoa powder
  • 3 tbsp Nutella
  • 2 tbsp Milk Chocolate, melted 
  • 1 tbsp butter


Instructions:

  1. Blitz and make a powder of the biscuits, and set aside. 
  2. Now using a fork mix the room temperature cream cheese, gradually add in your Icing sugar and then prepare the black coffee by mixing hot water and instant coffee. 
  3. The powdered biscuits are added to the cream cheese and the hot black coffee is also poured in ( add slowly and check consistency, be careful not to make it loose) , mix all of it and combine well.
  4. Finally add your room temperature butter and make balls out of it and flatten to add nuttella (optional step), now slowly bring the sides together make truffles out of it and allow to refrigerate for 2 hours or 1/2 an hour in the freezer. 

  5. Now roll the truffles in cocoa powder and drizzle the melted milk chocolate over them. 


Notes:

*Opening the Kiri cream cheese cube wrappers and placing them in a bowl before bring the cheese to room temperature will make our job of peeling the wrapper easy. 


Do try this recipe and don't forget to share your experience/feedback with me here in the comments or feel free to send me a mail. Also, do tag me at #taystedit if you try out my recipes on Facebook, Instagram etc so that I can see when you make it. ♡♡♡♡

Creamy Coconut Delight


Well well, Eid is right around the corner and this Holy month is coming to an end. May Allah SWT keep our faith intact and help us continue doing good deeds until the end. It is very saddening to think that this beautiful month just got over in a blink of an eye.

I wonder who doesn't like coconut? And it's very tropical flavor. I just love coconut in any form, it simply makes any dish rich and decadent. For the base I have used here lotus biscoff biscuits, not everyone likes its flavor, feel free to use any biscuits of your choice as the base, preferably that is less or non flavored ones. This pudding is just so easy that you do not require the use of any heating equipments, and gets done in 10 minutes. I love lotus biscoff and love love coconut flavor, so this pudding is basically a combination of my favorites! 😁

Super easy desserts are my favorite, especially when you have sudden plans for parties etc the lotus biscuits act as a base for the pudding, then the next layer is goodness of creams - dream whip is whipped in milk and coconut milk (preferably fresh coconut milk, I have used the tin ones, but nothing can beat freshly squeezed coconut milk) and to make it even more delicious and rich, Condensed milk, and thick cream /heavy cream is added. And finally dessicated coconut / toasted coconut is sprinkled for that final touch and texture.

Without further a do, let's get started.


Ingredients : ( Just use half the ingredients if you are 2-3 ppl) 

  • 2 Sachets Dream Whip
  • 1/2 cup cold milk 
  • 1/2 cup cold coconut milk (tin/fresh) + reserve 1/4 cup for biscuits 
  • 200 gm thick cream/ heavy cream
  • 4 tbsp Condensed milk
  • 20-22 Lotus Biscoff biscuits/ any of your choiche
  • 2-3 tbsp Lotus Biscoff spread 
  • Toasted coconut/ dessicated coconut for garnish.


Instructions :

  1. Whip up your dream whip sachets with milk and coconut milk.
  2. And fold in your thick cream and Condensed milk.
  3. Now to a flat bottom dish place your biscuits aligned and pour some of your reserved warm coconut milk*. 
  4. Now drop in your prepared coconut cream and spread out evenly using a spatula. And refrigerate for at least half an hour. 
  5. Finally garnish with some lotus biscoff spread or Sprinkle toasted coconut and/ dessicated coconut. 
  6. Refrigerate and enjoy! 😍 


Do try this recipe and don't forget to share your experience/feedback with me here in the comments or feel free to send me a mail. Also, do tag me at #taystedit if you try out my recipes on Facebook, Instagram etc so that I can see when you make it. ♡♡♡♡

Instant Chicken Tandoori Bows


Chicken Tandoori is definitely a dish most of us love. Well, this Ramadan I have tried to cut down on oil fried food/snacks. That's how I came up with this idea. It is the easiest dish you could prepare for iftar that is oil less, yet filling and delicious.

These bows that you see here aren't puff pastry sheets. Guess what! These are frozen Parathas that I transformed to a puff pastry kinda experience just by baking them. My little one being a puffs lover, this is a snack that had to be invented! 😅

If you are someone like me who stores frozen Parathas for quick access for immediate hunger pangs. Then this recipe is a good hack and delicious! 😋 👌


I prepared the chicken Tandoori Masala, and marinated it for a few minutes and pan fried  the chicken breast and allowed to cool, once cooked, you need to blitz the cooked chicken and make a sauce that comprises of yogurt and Mayo with a dash of chopped Coriander leaves for that hint of freshness.
As simple as that. And the tiny bows were baked to golden perfection by giving an egg wash prior to baking.

Let’s see the ingredients and get started:

Ingredients :

Chicken Marination:

  • 250 gms Chicken Breast
  • 1 tsp Garlic paste
  • 1/2 tsp ginger paste 
  • 2 tbsp yogurt
  • 3 tsp Kashmiri Red chilli powder
  • 1/4 tsp Turmeric powder
  • 1/2 tsp Garam masala powder
  • 1/2 tsp Black Pepper Powder
  • 1 tsp Coriander Powder
  • 1/2 tsp Dried Fenugreek leaves
  • Salt, as required
  • A squeeze of lemon
  • Frozen Parathas

For the sauce:

  • 2 tbsp Mayo
  • 1 tbsp Yogurt 
  • Coriander leaves, chopped 
 

Instructions:

  1. Marinate the chicken breasts, with the ingredients under chicken marination for at least 15 minutes. 

  2. Now in a pan, fry the chicken breast well on both sides 5 minutes on medium high and flip and cook 3 minutes on medium low heat. 
  3. Allow to cool, blitz in a food processor and set aside. 
  4. Now thaw the frozen Parathas one at a time, so that they do not stick to the plastic that comes along with the paratha. 
  5. Once thawed, peel off one layer of the plastic cover of the Paratha and cut a '+' sign, that is horizontal and vertical cut that gives 4 pieces.
  6. Now make a sauce by combining your yogurt, Mayo and Coriander leaves. 
  7. Onto the cut frozen Paratha, smear your prepared Mayo-yogurt sauce and place a tbsp of your blitzed chicken Tandoori on the  end if the triangle and roll them. 


  8. Once it reaches the end, press both the sides and pinch to middle to form a bow shape. 

  9. Now give them an egg wash. 
  10. And bake in a preheated oven at 200 Def C for 20 minutes or until golden and crisp. 


Notes: 

You may place a burning charcoal in an aluminum foil and pour a little oil in a sealed pot along the cooked chicken for that tandoori smokey effect, this step is optional. 

For detailed steps on the rolling process, check my YouTube video. 


Do try this recipe and don't forget to share your experience/feedback with me here in the comments or feel free to send me a mail. Also, do tag me at #taystedit if you try out my recipes on Facebook, Instagram etc so that I can see when you make it. ♡♡♡♡

Pull Apart Shawarma Sliders with no egg Garlic Sauce/ Thoum


Like I said, this year, I am actively trying not to consume fried snacks for iftar. That's when I decided to share this slider recipe. This is especially dedicated to all the shawarma lovers out there! Shawarma as sliders may sound weird but let me tell you, it's just sooo good! It's basically like a combination of middle eastern and western food piled up.. One bite and you will want more..

The best part of pull apart sliders is that you don't have to fill them individually and you all your sauces and fillings are done in one go. I love pull apart sliders for iftar because they are less tiresome and more yumminess..

The whole yumminess comes from the garlic sauce or 'toum' like the locals here like to call it. Unlike other garlic sauces, this one is not made using raw egg whites as such, instead it is made using a secret ingredient.. "Corn Flour".. I know right! Don't be surprised, the garlic sauce is really good or even better. For the sauces, I usually use garlic sauce only. When in the mood, I go in for a tad bit of Tahini and go a little crazy over Mayo too. This is completely an optional step.

The bun is super soft, and feels like baby's bum. As these are super soft sliders, I request you to not prepare it in the last moment, as the bun requires enough time to cool. Once cool, you need to cut the sliders in one go using a bread knife for precision. Adding jalapeños bought the sliders to a next level. You may add any other pickled veggies of your choice for that.

The shawarma spiced chicken is oven cooked here. You may fry instead if you do not have an oven. As complicated the pics may look, it is one of the easiest and yummy iftar snacks to prepare. Without any delay, let's get started!

Ingredients:


For Dough of slider:

  • 1 tsp Active dried yeast
  • 1 tsp sugar
  • 1/4 lukewarm watee
  • 2 cups all purpose flour
  • 1 1/2 tsp sugar 
  • Salt, as required
  • 1 cup lukewarm milk
  • 2 tbsp butter
  • White sesame seeds

For Chicken Shawarma:


  • 500 gms chicken breast
  •  2 tbsp yogurt
  • 1 tbsp olive oil 
  • 1 tbsp tomato ketchup
  • 1 tsp white vinegar
  • 4 tsp Kashmiri Red chilli powder 
  • 1/4 tsp cardamom powder
  • 1 tsp cumin powder
  • 1 tsp Coriander Powder 
  • 1 tsp Garlic Powder 
  • 1 tsp white pepper powder
  • 1 tsp Black pepper powder 
  • 1 tsp paprika 
  • A pinch of Oregano
  • Salt as required 

No Egg Garlic sauce (thoum) :

  • 1 1/4 cup water
  • 1/2 cup corn flour/ corn starch
  • 1 cup yogurt
  • 3 garlic pods
  • 1/2 cup oil 
  • 1 tsp lemon
  • Salt as required 

Adds ons:

  • Chopped Lettuce 
  • Tomatoes, sliced
  • Jalapeños 
  • Hot sauce (optional) 

Instructions :


  1. In a bowl, pour in the lukewarm water and add in your active dried yeast and sugar, mix gently and place a lid and set aside. 
  2. In a stand mixer place your dough hook, or use a mixing bowl and add in your flour, a pinch of sugar and salt as required. Mix gently to combine. 
  3. Now keeping the speed setting of your stand mixer on low, gradually add in your activated yeast and add in lukewarm milk until the dough turns soft and non sticky to touch. (make sure to make a very tight or lose dough) 
  4. Finally add in your room temperature butter to the dough and knead well. 
  5. Allow the dough to proof by placing the dough in a warm area for 1 hour. Once double the size, gently give the dough a slight knead and make medium sized balls and place them on your baking pan/tray lined with a baking paper, place the balls spaced out and allow to proof again. *
  6. Once proofed, apply milk and sprinkle white sesame seeds on top of the sliders, bake the sliders at 180 deg C for 20 minutes or until it bakes well and the top of the sliders brown slightly. 
  7. Allow the sliders to cool well before you slice the sliders horizontally using a bread knife. *


  8. To prepare your no egg garlic sauce/thoum, in a sauce pan, pour your water and add your corn flour, give it a mix and place on flame. 
  9. Once the mixture starts bubbling, set aside to cool. 
  10. Once cool, the mixture hardens, now in a blender/grinder, add your hardened corn flour, yogurt, garlic cloves, oil and salt as required. 
  11. To prepare the shawarma chicken, mix all the ingredients under chicken shawarma and spread well on the chicken, you may either roast* in the oven or fry in a fry pan.

  12. Apply your thoum/garlic sauce on both sides of the slider and place your chopped Lettuce, sliced tomatoes, and add in your jalapeños now place your cooked chicken and place the slider's top half smeared un garlic paste over it. 

  13. Pull apart your shawarma chicken sliders and enjoy! 


Notes :

*By spacing out the dough balls, you allow room for the balls to become bigger into tiny buns. 
*20-25 minutes roasting time, depending on your oven, time may vary. 
*If the sliders don't cool well before you slice, the sliders may fall apart.
*You may use hot sauce or tobasco sauce over the garlic sauce if you like it. 

Do try this recipe and don't forget to share your experience/feedback with me here in the comments or feel free to send me a mail. Also, do tag me at #taystedit if you try out my recipes on Facebook, Instagram etc so that I can see when you make it. ♡♡♡♡

CREAM CHEESE PUFFS with a CRISPY PISTACHIO TWIST 


With the second wave happening all over the world, especially in India, let's keep everyone in our prayers and stay safe you guys! Whoever you may be, if you are reading this, please ask your family and loved ones to stay indoors as much as possible as the symptoms aren't even detectable. We are in this together and we shall overcome this together with the help of Allah.
 
Days of Ramadan are flying by and it breaks my heart to think that it's already the 14th of Ramadan. Trying to find time for Ibadah amidst all the house chores being a home maker, or an employee or whatever you occupation might be, can make things difficult. The best you can do is to moisten your tongue with zikr. This is a reminder to myself first.


So this Ramadan I have been looking forward to share easy and less time consuming recipes that you guys could easily follow and enjoy! These Crispy cream cheese puffs were an overnight invention. I had no clue if this could be good or bad but had my hopes high coz you can never go wrong when you have sweetened Condensed milk in a recipe. Isn't it? 😁


I happened to see this on reel on the explore page of Instagram, where a lady was preparing these Puff pastries, last week at midnight. I just loved the idea of puffs, sweetened Condensed milk and pistachios. But I felt that it would be too sweet to my liking. So to bring in a balance I sliced and placed a Kiri cheese cube inside these puffs and oh boy! The family went all bonkers over it! I felt so content and happy to see all the smiling faces and especially when my LO comes to me saying, mama please make more of these again. What else does a mother want to hear? Alhamdulilah 🥰

I know it sounds divine! Let me warn you, these are going to vanish into thin air.. So what are we waiting for? 

Let's get to the recipe! 

Ingredients :

  • 5 Square Puff pastry sheets (will give 15-20 nos) 
  • 5 Kiri Cream Cheese Cubes
  • 1/2 ground pistachios
  • 1/2 cup broken thin vermicelli 
  • 1/2 +1/4 cup Condensed milk
  • 3 tbsp butter/ghee

Instructions :

  1. To make the filling, in a strong bottom pan, add in 2 tbsp butter and add in your broken vermicelli and Sautee it well in butter. 
  2. Next add in your ground pistachio. 

  3. Now switch off your flame and add in your Condensed milk and reserve the rest for pouring when serving. 
  4. Combine well and set aside. 
  5. Roll out a thawed square Puff sheet and scoop and place your filling in the Puff sheet and place your sliced Kiri cheese cubes horizontally and carefully wrap the filling. 
  6. Now using a sharp large knife cut the wrap vertically 3-4 cuts and bake them in a preheated oven at 220°C on a baking tray that has been lined with baking paper. 

  7. Now using a pastry brush, brush the outsides of the tiny puffs and allow to bake until golden for around 20 minutes. 
  8. Once the golden puffs are removed from the oven, drizzle in the sweetened Condensed milk and enjoy warm! 😍 


Do try this recipe and don't forget to share your experience/feedback with me here in the comments or feel free to send me a mail. Also, do tag me at #taystedit if you try out my recipes on Facebook, Instagram etc so that I can see when you make it. ♡♡♡♡

Cheesy Murtabak with Chilli Mayo dip


Day 7 of Ramadan already? Where did the first 6 go? Jokes apart, time is ticking away and we need to utilize our valuable time to the maximum for Ibadah etc. Keep your tongue moist with zikr and adhkars. Also doing your chores, cooking food and being of some help to the family are also considered Ibadah and rewarded in the holy month. Just don't be extreme. Moderation is the key.

I have been asked to share oil free iftar dishes and I have come up with Cheesy Murtabak in my style. It is also called Muthabaq. Oh boy is it yummm?! 

Murtabak or mutabbaq is a stuffed Paratha with your favorite fillings like spicy minced meat and for that extra cheesiness I have added a ton load of cheese 🤪 (you know you can never go wrong with cheese). The classic, Saudi style matabak consists of green onions and leeks. But I kept it very simple. Just eggs and cheese with the spicy minced meat. And instead of adding in chopped onion, I have simply substituted by adding in some onion powder. 


It is a street food specialty especially seen in Saudi, Kuwait, Malaysia etc. Mini pockets  of these non fried Paratha are the best snack for iftar, coz these use little to no oil.
Now I won't call it healthy but definitely a step towards healthy eating for iftar. These little pockets are so delicious and filling. The chilli Mayo dip adds on to its yumminess, and a karak chai! Aaaaah, definition of bliss... Sooo soooo good. I cannot stress enough!

Here I have used meat mince, you may use chicken Mince also if you like, but traditionally mince meat is used for Murtabak. 

Let's get on to the ingredients to prepare this easy and delicious iftar dish. 


Ingredients :

Dough:

  • 1 cup all purpose flour
  • 1 tsp oil
  • 1/2 cup water 
  • Salt, as required 

Filling :

  • 300 grams minced meat
  • 3 small green chillies, chopped
  • 1 tsp Onion powder
  • 1 tsp Garlic paste
  • 1/2 tsp red Chilli flakes
  • 1/2 tsp Black Pepper po]]] wder
  • 1 tsp Cumin powder
  • 2 tsp paprika powder*
  • 1/2 of a tomato* (chopped fine) 
  • 3 tbsp Cream cheese 
  • 1/2 cup Mozzarella
  • 2 eggs
  • Salt, as required 

Instructions :

  1. Mix all the ingredients under dough by adding water little at a time, the dough should not be sticky, yet soft. Pour some oil over the dough ball, cover with a plastic wrap and to set for around 1 hour. 
  2. In a cast iron pan or any heavy bottom pan, pour a dash of olive oil add in your minced meat with a pinch of salt and break the minced meat using a wooden spoon.
  3. Once the color of the minced meat changes from red to brown, add in your garlic paste.
  4. Allow to cook for a couple of minutes, at this stage it is normal to see a lot of water ooze out of the meat.
  5. Next add in your chopped green chillies and sauté.
  6. Now add in your spices like onion powder, paprika powder, red chilli flakes, pepper powder, and cumin powder.  


  7. Allow your filling to cool, whilst at that in a bowl Crack 2 eggs, Mozzarella cheese and the cream cheese. 


  8. Next dump in all the contents of the filling to the bowl with eggs and cheese. 


  9. Add a tad bit of salt if required. 
  10. Make lemon sized small balls out if the dough. 
  11. Pour some oil in your Countertop and press and spread using your fingers and a rolling pin until it is very thin and see through. 
  12. Add 2 tbsp of the prepared filling and fold overlapping inner sides and outer sides. 

  13. Place the murtabaq on a pan with med high heat pan, seam side down, flip and cook 2 minutes each side or  until a sizzle starts coming, this indicates that the murtabaq is done. Using thongs, cook the sides of the murtabaq too (which only takes seconds). 
  14. Serve with your choice of sauce/dip or serve it just like that right away! *


Note:

  • You may substitute paprika with Kashmiri Red Chilli powder if you cannot find paprika.
  • You may use more tomato if you like. Or you may also add it after the meat cooking process.
  • I made a chilli Mayo dip, prepared by mixing hot sauce, Mayo and garlic powder. 

Do try this recipe and don't forget to share your experience/feedback with me here in the comments or feel free to send me a mail. Also, do tag me at #taystedit if you try out my recipes on Facebook, Instagram etc so that I can see when you make it. ♡♡♡♡

Turkish Tulumba


And alhamdulilah the Holy month of Ramadan is here to spread joy, peace, tranquility to the mind and soul. May Allah accept our Ibadah and forgive our sins and shortcomings and make us the inhabitants of Jannah. 

Tulumba can be described as a distant cousin of Jelebi and Churros. What is distinct about this dessert/ sweet snack is that it is super crunchy on the outside yet soft and Juicy on the insides.


Tulumba is generally prepared by making a soft and semi liquid dough that is squeezed into *cold oil* using a piping bag with a star nozzle and each segment of Tulumba is cut off using oil greased scissors. Notice that I have stressed cold oil, because frying Tulumba in hot oil might not give the exact texture you are looking for.

It definitely looks eye catching, at the same time it is a delicious dessert too. If you have prepared sugar syrup ready in hand ( I make a batch of sugar syrup for Ramadan treats like this, Qatayef, Kunafa rolls etc.) this is the easiest sweet dish you could prepare for Ramadan.


Tulumba is called Bamiyeh in Iran and Egypt. It is a famous and everyone's favorite street food, which is also also served especially during Ramadan. 

To attain the glossy finish keep in mind to drop in your hot Tulumbas in room temperature or cold sugar syrup. I am sure these Tulumbas are going to be loved by everyone. Let's move on to the ingredients. 


Ingredients :

Sugar Syrup ;

  • 2 1/2 cups sugar
  • 1 1/2 cups water
  • 1 tbsp lemon juice

Dough:

  • 2 1/2 cup Flour
  • 2 cups water 
  • 1 tbsp butter/oil
  • 1 tbsp sugar
  • Pinch of Salt 
  • 4 eggs 

Instructions :

  1. In a large vessel, add your sugar, water and lemon syrup and allow to boil for 10 minutes and switch off the flame and allow to cool. 
  2. In a large vessel, pour in the water to prepare the dough. Salt, sugar and  flour are to be added. (explained in the next step) 
  3. Into the hot boiling water add in your flour and mix vigorously using a wooden spoon. 
  4. Once the dough has come together and cooled, using a stand mixer or wearing kitchen gloves add your eggs one at a time and combine well (using a kitchen mixer /stand mixer is best for combing). 
  5. Using a star nozzle for your piping bag, fill in your dough and for safety of your dough from plopping out while you squeeze the dough, use an extra piping bag and give a cut at the end of the piping bag again. 
  6. Now into a wide pan, pour your oil. Into your cold oil drop in your squeezed Tulumbas and cut off using a greased scissors. 
  7. Now switch on the flame on medium high and allow to fry until golden and crisp. 
  8. Now drop your hot Tulumbas to your cold sugar syrup and coat well. 
  9. Using a slotted spoon remove your Tulumbas from the sugar syrup to your serving dish.
  10. Garnish with a dash of ground pistachios. 

Enjoy! 

Notes :

  • Just like I mentioned, the oil has to be cold  and the dropped Tulumba are then placed in the stove for heating and frying them, the syrup has to be cooled before dropping in your hit Tulumbas.
  • The dough must cool before putting the eggs into the dough.
  • Add the eggs one at a time and combine well everytime you add it ( you may use kitchen gloves too)
  • When you squeeze the second batch of dough, make sure the oil has cooled.
  • For greasing your scissors, dip the tip of your scissors in the cold oil. 


Do try this recipe and don't forget to share your experience/feedback with me here in the comments or feel free to send me a mail. Also, do tag me at #taystedit if you try out my recipes on Facebook, Instagram etc so that I can see when you make it. ♡♡♡♡

Blueberry Dutch Baby Pancakes


May peace and blessings be upon you all.

Okay, I am back here after a month of vacay and it literally feels likes ages, my in laws were here with me and it was a month well spent, alhamdulilah ❤ . Ramadan is just a few days away and I cannot wait to share with you iftar recipes. But today I am presenting you guys with German origin custard-crusty pancakes called Dutch Baby Pancakes with a Blueberry twist. Weekend breakfast is always a thing! If you have such easy on-the-go recipes in hand to kickstart an awesome weekend, why worry?! 😀

My little one is having her spring break and I am more happy than her to get some relief from e-learning 😁😁 Now weekends are the only days I get to experiment on breakfasts and one fine day I made these delicious, super easy pancakes and my daughter wiped clean her plate. When a fussy eater like her, likes such easy breakfasts, the recipe definitely becomes a keeper!

So easy to prepare, yet it has its own speciality. I call it a simple yet effective breakfast because you just have to prepare the batter and pour out the contents to your butter greased cast iron pan and the oven does the job for you. As simple as that! So you can summarize Dutch babies as crepes in the form of pancakes. 

You may use any pan or casserole that is oven safe, the batter puffs up as heat hits the pan. I have added a few blueberries before baking, you may either use a Compote (if you dislike blueberry's natural sourness), add other berries like raspberry or blackberry or avoid all and keep it plain. Serve it right away by adding in fresh fruits, or a Sprinkle of Icing sugar or strawberry sauce, maple syrup, honey butter etc. I'd also recommend using room temperature ingredients for better texture. Use butter liberally so that the batter does not stick to the pan. Without further delay let's get our basic ingredients that everyone has in their pantries. And bake a huge giant pancake that is the easiest and mess free!  


Ingredients :

  • 3 large eggs
  • 1/2 cup patent flour/ all purpose flour
  • 1/2 cup full fat milk at room temperature  
  • 1 tbsp sugar
  • 3 tbsp butter
  • 1 tsp Vanilla extract 
  • A pinch of salt
  • 1/4 Blueberries or Blueberry Compote (any berries of your choice)


Instructions:

  1. Preheat the cast iron pan in a preheated oven at 200 °C for around 5 minutes. 
  2. In a bowl incorporate all the ingredients like eggs, flour, milk, sugar, salt, and vanilla and combine well using a whisk. 
  3. Now safely remove the cast iron pan from the oven using mittens and drop in 3 tbsp of butter and swirl the pan so that the bottom of the pan is covered in butter. 
  4. Pour in your batter to the hot and buttered pan and drop in your blueberries, preferably Compote and allow to bake for 15-18 minutes, until the Dutch baby pancake is puffed or the sides turn golden brown at the edges. 
  5. Carefully remove the pan from the hot oven using mittens and serve immediately with your favorite toppings and sauce. 


Notes:
  • Use cast iron for best results. However any type of Dutch oven or oven safe casserole dish would do. 
  • Dutch Baby Pancakes require a good amount of butter, which adds to its taste and also helps the pancake to come off the pan easily. 
  • The pancake can rise and have a shapeless outcome which is totally natural and has a divine beauty in itself. 
  • You may prepare these pancakes without any berries or you may use any berry sauce, fresh fruits or Icing sugar as a garnish. 


Do try this recipe and don't forget to share your experience/feedback with me here in the comments or feel free to send me a mail. Also, do tag me at #taystedit if you try out my recipes on Facebook, Instagram etc so that I can see when you make it. ♡♡♡♡
Newer Posts
Older Posts

Search This Blog

My name is Hasna Haneef, a mommy to a toddler, hailing from Thalassery, Kerala. Welcome to my humble abode on the Internet; wherein I share all my recipes and experiments. I am glad to have you on board!

TRENDING POSTS

  • Kerala Style Squid Roast
  • Emirati Chebab
  • Chicken Steak with Creamy Mushroom Sauce
  • Kethel's Chicken
  • Thalassery Style Kozhi kaal/ Koyikaal
  • Kerala Beef Fry/ Nadan beef dry fry

About Me

May peace be with you!

Welcome to my blog.

I am delighted to have you on board. My name is Hasna Haneef, a mommy to a toddler, hailing from Thalassery, Kerala. My homeplace being Dubai, as I am born and brought up here and I am very influenced by the lifestyle and the variety of authentic cuisines I get to try from here, which has made me try anything that comes across me
, click here →

Stay Connected!

Join Our Madness!

Join with Thousands Of Subscribers ! Get Our Latest Recipes Delivered to Your email Inbox!

Powered by follow.it
  • Home
  • About Me
  • Recipes

    • Main Course
    • Desserts
    • Snacks

    Uncategorized

    • Chicken
    • Meat
    • Vegetarian
    • Rice
    • Malabar Food
    • Baking
    • Breakfasts
    • Snacks
    • Drinks
    • Pasta
    • Fish
    • Soups
    • Desserts
  • Contact Me

Featured Post

Triple Chocolate Hazelnut Skillet Cookie

Blog Archive

  • ▼  2026 (2)
    • ▼  May (1)
      • Breakfast Waffles
    • ►  April (1)
  • ►  2025 (4)
    • ►  April (2)
    • ►  March (1)
    • ►  February (1)
  • ►  2024 (36)
    • ►  October (4)
    • ►  September (5)
    • ►  July (1)
    • ►  June (2)
    • ►  May (4)
    • ►  April (3)
    • ►  March (10)
    • ►  January (7)
  • ►  2023 (47)
    • ►  December (3)
    • ►  September (2)
    • ►  August (6)
    • ►  July (6)
    • ►  June (9)
    • ►  May (4)
    • ►  April (5)
    • ►  March (6)
    • ►  February (3)
    • ►  January (3)
  • ►  2022 (69)
    • ►  November (4)
    • ►  October (6)
    • ►  September (7)
    • ►  August (9)
    • ►  July (12)
    • ►  June (5)
    • ►  May (5)
    • ►  April (12)
    • ►  March (4)
    • ►  February (2)
    • ►  January (3)
  • ►  2021 (24)
    • ►  November (1)
    • ►  October (2)
    • ►  July (1)
    • ►  June (4)
    • ►  May (6)
    • ►  April (4)
    • ►  February (4)
    • ►  January (2)
  • ►  2020 (82)
    • ►  December (5)
    • ►  November (6)
    • ►  October (4)
    • ►  September (2)
    • ►  August (5)
    • ►  July (10)
    • ►  June (10)
    • ►  May (13)
    • ►  April (12)
    • ►  March (8)
    • ►  February (4)
    • ►  January (3)
  • ►  2019 (22)
    • ►  December (1)
    • ►  November (2)
    • ►  October (6)
    • ►  September (1)
    • ►  August (1)
    • ►  February (3)
    • ►  January (8)
  • ►  2018 (15)
    • ►  December (4)
    • ►  November (6)
    • ►  October (3)
    • ►  September (2)

Subscribe Us

Labels

Bake Biscuits Breakfast Brown rice Burger Cheese Chocolate Dal Egg Emirati Fish Iftar Indonesian Japanese Jeerakashala rice Kerala Keto Kuwait food Lunch Milk Mutton Thai food UAE food afghan cuisine arabic beef biryani bread burnt cheesecake cake chicken cream dessert dinner greek healthy indo chinese lamb malabar prawns pudding puffs quick dinner ideas recipe refreshing drink rice salad sandwich stir fry vegetables vegetarian veggies yemeni

Contact Form


POPULAR POSTS AND PAGES

Kerala Style Squid Roast

Kerala Style Squid Roast

June 18, 2020
Emirati Chebab

Emirati Chebab

June 01, 2023
Chicken Steak with Creamy Mushroom Sauce

Chicken Steak with Creamy Mushroom Sauce

November 05, 2018
Butter Chicken Parcels

Butter Chicken Parcels

April 29, 2020
Kerala Beef Fry/ Nadan beef dry fry

Kerala Beef Fry/ Nadan beef dry fry

October 08, 2019

Pages

  • Home
  • About Me
  • Privacy Policy
  • Contact Me

Copywrite © 2023 TermsFeed®. All rights reserved.

Created By Sora Templates | Distributed By Gooyaabi Templates

Back to top