Search This Blog

Taystit by Hasna

Food, Recipes, and Beyond

  • Home
  • About Me
  • Recipes
    • Main Course
    • Snacks
    • Desserts
  • Uncategorized
    • Chicken
    • Meat
    • Vegetarian
    • Rice
    • Malabar Food
    • Baking
    • Breakfasts
    • Snacks
    • Fish
    • Pasta
    • Drinks
    • Soups
    • Desserts
  • Contact Me

15 minute Microwave Chocolate Ganache Cake


Have you ever had sudden cravings for chocolate cake? You have all the ingredients to make the perfect chocolate cake at home, but no patience? Well, this is me, I have to get cake when I think of it. But you know all the time it takes to bake a proper chocolate cake. I don't have that kind of patience for a simple chocolate cake.

That's how this super easy and delicious cake was invented. I have been doing recipe trials of this one lately and everyone has been asking for me. This cake is simple yet deliciously good, no one will ever make out it's a microwave cake until you tell them. It's that simple! And the best part is that unlike any other basic chocolate cakes, this one isn't heavy and you can't just stop at one spoonfull. You just want to keep diving in all that chocolatey goodness with the chocolate ganache. The perfect recipe to satisfy all your sudden chocolate cake cravings!


I have always been in this situation, where whenever I make a mug cake, I can never eat one mug cake peacefully. Either I will have to share or will have to make couple more for everyone. Boohoo. So this recipe solves all such problems. This one is especially dedicated to all my friends who are in hostel and have always asked me for recipes that can be done in microwave especially for immediate cravings. I am not joking when I saw it only takes 15 minutes from start to finish.

The chocolate ganache makes the cake even more indulgent! Though the chocolate ganache isn't necessary, but I wouldn't trade mine for one with the ganache, teehee. The only issue with this cake is that you won't be able save some, or take a picture of it, it will be long gone.. At least that's what happened with me everytime I wanted to take a good picture of the cake. 😅
Lets see how to make this super easy Chocolate Ganache Cake which is ridiculously indulgent!

Ingredients:

Dry Ingredients:

  • 3/4 Cup All Purpose Flour
  • 1/2 Cup Sugar
  • 1/4 Cup Good Quality Cocoa Powder
  • 1 tsp Baking Powder
  • Salt, a pinch

Wet Ingredients :

  • 1/2 cup Vegetable Oil
  • 1 Egg
  • 1/2 cup Full Fat Milk
  • 1 tsp Vanilla Essence
  • 1 Cup warm water

Chocolate Ganache:

  • 1/2 cup Dark/ Milk Chocolate
  • 1/2 cup Heavy/ Cooking Cream

Instructions:

  1. First prepare your ganache by pouring warm heavy cream into a bowl that contains your chocolate. Mix well using a whisk. Cover the bow with a lid and allow to cool and set in the freezer.
  2. In a large bowl add all the ingredients and mix well.
  3. In another bowl, mix together all your wet ingredients except for warm water.
  4. Pour in your wet mix to the bowl with your dry ingredients and mix until combined.
  5. Now pour in your warm water and mix well to get a little runny cake batter.
  6. In a 7" microwave proof dish/pan lined with baking/parchment paper, pour in your batter and microwave for 5 minutes, checking every 30 seconds after 3 minutes 30 seconds, until skewer inserted comes out clean.*
  7. Allow the cake to cool completely before removing from pan. Use a blunt knife to slide around the pan for easy removal of the cake, if required.
  8. Once your cake has been transfered to your serving plate, pour your chocolate ganache (that has been sitting in the freezer) over your 15 minute cake and enjoy! 😋🤤


Notes:
The middle portion may look a little undone, but the skewer inserted should come out clean.
You can spread melted Nutella or any of your favorite spreads instead of the chocolate ganache.


Do try this recipe and don't forget to share your experience/feedback with me here in the comments or feel free to send me a mail. Also, do tag me at #taystedit if you try out my recipes on Facebook, Instagram etc so that I can see when you make it. ♡♡♡♡

Murabyan - A one pot Rice and Shrimp Dish


If you love one pot rice recipes, then this one is a must try! The aroma that lingered in the whole house when I made Murabyan was exceptional! Murabyan originates from Kuwait, where seafood is abundantly available. My friend from Jordan told me that Rubyan means shrimps and Murabyan means made with a lot of shrimps. 

The masala is prepared by making a tomato based gravy with a lot of spices, to which you add your rubyan (and shrimps), and then add in your rice and cook until the flavors marry each other. Murabyan is usually paired with Dakoos (a tomato based gravy). 

One fine day, I was going to make the normal Chemmeen Chor (Shrimp rice) that I usually prepare at home. I wanted to try preparing something out of the box like I always like to do! teehee.. What distinguishes Murabyan from the normal shrimp rice, is the use of Dill leaves. It has a very distinct smell and texture, yet very refreshing. I love to add it in my soups, potato stir fry, rice recipes, etc. This may not be the authentic Murabyan recipe, but it definitely is delicious.

Let's make this aromatic, and delicious one pot rice!


Ingredients: (makes for 5-6 people) 

  • 1 medium Onion, chopped
  • 1 tbsp Ghee + 1 tbsp to be added with shrimps
  • 2 tbsp Vegetable Oil
  • 1 tbsp Ginger Garlic Paste
  • 250 gms Med Sized Shrimps, cleaned and deviened
  • 2-3 tsp Tomato Paste
  • Handful of chopped Coriander leaves
  • Handful of chopped Dill leaves
  • 1 dry black lemon
  • Maggi Chicken cube (optional)
  • 3 cups Basmati Rice
  • 4 1/2 cups water (including the stock water) 

Spices:

  • 1/4 tsp Turmeric Powder
  • 1 tsp Black Pepper Powder
  • 1 tsp Red Chilli Powder
  • 1 tsp Coriander Powder
  • 1/4 Cardamom Powder
  • 1/2 tsp Cumin Powder
  • 1/4 tsp Sumac Powder (Optional)
  • 1 tsp Garam Masala/ All spice Powder

Instructions:

  1. In a large cooking pot, add in your ghee and vegetable oil.
  2. Wet your chopped onions in the ghee+oil. Keep sautéing until your onions are almost going to caramelize.
  3. Add in your cleaned shrimps, and add salt to taste.

  4. Pour in a dash of ghee to bring out the flavors of the shrimps.
  5. Next, add your spices (mentioned under Spices) to your prawns and Sautee well for a minute on low heat.

  6. Pour in half a glass of water to the spices and mix well to form a gravy kind of consistency.


  7. Next add in 2-3 tsp Tomato paste and a dry lemon
  8. Cook well until the gravy thickens.
  9. Now, add in your chopped coriander and dill leaves.


  10. Set aside some of your cooked Rabyan (shrimps).
  11. In the leftover shrimps that is in the pot, add water required for cooking the rice. Add salt if required. Check my tips on cooking basmati rice.

  12. Next add rice to the water and break the chicken cube to pieces and drop to the water (make sure the cube has dissolved).
  13. Cover and cook for around 25 minutes.

  14. Now top off with the reserved shrimps and masala and allow to dum by placing a foil on simmer for 15 minutes to 30 minutes.

  15. Garnish with chopped coriander leaves and you are ready to serve Murabyan with daqoos (a sauce made using tomato, garlic and other spices).

Daqoos Recipe:

Daqoos, A Kuwaiti Tomato based Sauce that is usually served with rice.
  • 2 Tomatoes, blended
  • 1 Green Chilli
  • 2 Garlic cloves, minced
  • 1/4 tsp black pepper, freshly ground
  • 2 tsp Tomato paste
  • 2 tbsp Olive oil/ Veg oil
  • Salt, as required
  • Sugar, a pinch 

Instructions:

  1. In a sauce pan, add in your oil. Nex add in your minced garlic, once the raw aroma disappears, add in your blended tomatoes, green chilli, and tomato paste, mix well for 2 minutes.
  2. Add salt, pepper and sugar. 
  3. Allow to cook for around 3 minutes, until thick.
  4. Your Daqoos, Tomato sauce is ready to be served with murabyan.


Do try this recipe and don't forget to share your experience/feedback with me here in the comments or feel free to send me a mail. Also, do tag me at #taystedit if you try out my  recipes on Facebook, Instagram etc so that I can see when you make it. ♡♡♡♡

Chocolate Pistachio Fettuccine Crepes


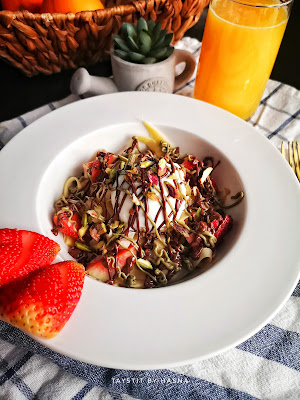
Doesn't my plate look like it's just Fettuccine pasta covered in chocolate and Pistachio cream? Well, they are crepes sliced into Fettuccine and drizzled with sauces, ice cream, and sliced pistachios for a crunch and fresh strawberries for a bite! Waking right in the morning for a Cafe kinda breakfast feel is what I crave some days of the week. Though it's easier that way, to go and simply place an order for your favorite delicacy, I'd rather like to enjoy them in my PJs, when I really want it my way and no café can provide me that. 😁


The Pistachio Chocolate Fettuccine Crepe is an idea, that came to me when when I tried the Fettuccine Crepe from ChocoMonarch. I felt that this could be easily be prepared at home, so why not give it a try at home. I usually make my own Pistachio cream, but I happened get my hands on my favorite Pistachio cream for under my apartment for a discounted price. Ever since, I have been longing to drizzle this delicious spread over my creations. Fettuccine Crepes are prepared by making vanilla crepes and slicing them using a pizza cutter into long stripes.

Crepes are the easiest to prepare for breakfast and to convert it to a Cafe like chocolatey goodness is all you need for a happy morning. I do have healthy breakfasts almost all the other days, and sometimes you need to indulge and this happens...for a good reason ! 😋

Let's see how easy they are to prepare.


Ingredients: (makes for 3)

  • 1 Cup All Purpose Flour
  • 2 Tbsp Butter, melted
  • 1 Tbsp Sugar
  • 3/4 Cup of Full Fat Milk or more if required
  • 1 tsp vanilla essence
  • Salt, as required
  • 1 Egg
  • Melted Chocolate/ Nutella
  • Pistachio Cream
  • Pistachios, sliced
  • Strawberries, chopped
  • Vanilla Ice Cream 

Instructions:

  1. Mix the dry ingredients in a bowl and wet ingredients in another and combine them well using a whisk, or a mixer and make into a smooth batter.
  2. On a Crepe pan, pour the batter and swirl the pan, or pour a ladleful and swirl the ladle over the batter to form Crepes or use a crepe spreading instrument to get a thin crepe,once cooked on one side, flip ad cook for a minute and keep aside under a kitchen towel and finish making all the crepes the same way.
  3. Place 2-3 crepes overlapping on a clean board and slice into thin stripes using a pizza cutter.
  4. Now pull apart all the stripes and place them on a plate like Fettuccine pasta.
  5. Next scoop in a dollop of vanilla ice cream and drizzle your chocolate and Pistachio sauces generously.
  6. Finally garnish with chopped Pistachio and chopped strawberries/ kiwi for that fresh twist.
  7. Bon appetit!


Do try this recipe and don't forget to share your experience/feedback with me here in the comments or feel free to send me a mail. Also, do tag me at #taystedit if you try out my recipes on Facebook, Instagram etc so that I can see when you make it. ♡♡♡♡

Kheema Pav Wreath


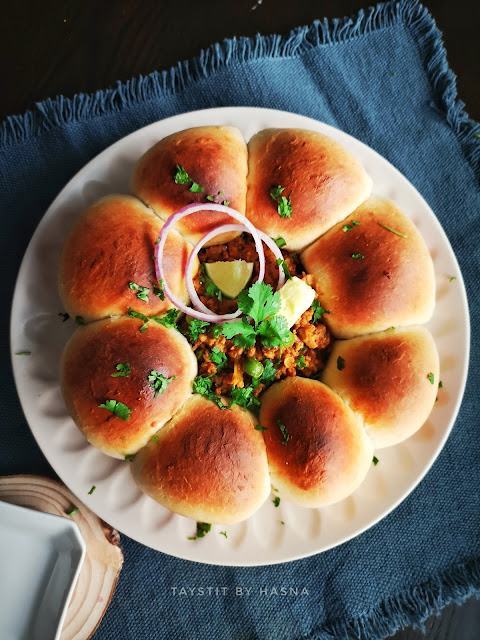
Howdy folks?! Like promised I am going to try and share more innovative recipes to you guys.. And this is one among my innovations.. How pretty does this look for a ladies Night or a game night.. What say eh?

When the westerners does their pull apart bread with cheese, bolognese sauce etc, I thought why not Indian food? And Mutton Kheema masala is what popped right in my head.

When basic ingredients that can found home can make a difference, I thought to myself, why not be the difference. The Mutton mince /kheema is cooked for 15- 20 minutes in Indian spices and Masalas that gives in its beautiful aroma. 


I have noticed that what I hate in Kheema is that when it's dry and the mince doesn't feel succulent in the mouth. Ever since, I have been adding a dash of milk or cream to my kheema that not only makes my kheema masala succulent and Juicy, but also makes it fit for a king! Psst psst.. Let me tell you, not only was it delicious, it is also very filling. I usually don't like mattar/ green Peas in my kheema. But I like the vibrancy from the green color that it gives to the dish. 

My initial plan was to fill the kheema inside the Pav. But I wanted the kheema to get kore exposure, that's when the wreath idea came into existence. I am sure this will be a hit for a party table too! 

Soft, buttery and pillowy Pav buns is what the wreath is made of. The combination is so rewarding to the palate. I have always been fond of bread baking and let this be a beginning to it.


Ingredients :

  • 800 gms/ 3 1/2 cups of bread flour/ all purpose flour
  • 4 tbsp milk powder
  • 2 tsp instant yeast
  • 2 tsp sugar
  • 1 1/2 - 2 cups water **
  • Salt, as required 

Kheema Masala:

  • 500 gms minced Mutton 
  • 3 tbsp oil
  • 1 tsp Gheem clarified butter
  • 2 medium onions, chopped
  • 3 green chillies, chopped
  • Salt, as required 
  • 1 tbsp ginger garlic paste 
  • 1/4 tsp Turmeric powder 
  • 1 tsp Chilli powder
  • 1 tsp Coriander Powder 
  • 1 tsp Garam Masala
  • 1/2 tsp Cumin powder 
  • 2 tomato, ground to paste
  • 1/4 frozen green peas
  • 1/2 cup milk + 3 tbsp for brushing

Instructions:


  1. In a bowl or on a clean counter top, add your flour and other dry ingredients like yeast, milk powder, sugar and salt. 
  2. Mix the dry ingredients with hand gently, now slowly add in your water gradually. 
  3. Allow the gluten to work so that you get a stretchy dough. *
  4. Allow to rise in a dry and warm place with a kitchen towel over the dough for at least 1/2 and to 1 hour. 
  5. To prepare the kheema masala, take a pan and add oil and ghee/clarified butter. 
  6. Add in your chopped onions, green chillies and Sautee well. 
  7. Next add in your ginger garlic paste and saute until the raw smell disappears. 
  8. Next add in your masala powders and saute for around 30 seconds. 
  9. Next add in your freshly ground tomato paste and mix until combined and allow to cook well for 5 minutes. 
  10. Now add in your minced meat and season with salt and mix well using a spatula or a wooden spoon. 
  11. Add in your green peas in the last 5 minutes of cooking meat. 
  12. Cook the minced meat with masalas for around 20 minutes until cooked well. 
  13. Finally drop in a piece of butter and set aside. 
  14. Now the dough would have doubled the size, using a bench scrapper cut the dough into 8 equal parts and tuck them into a ball shape, roll well and place them in a springfoam pan, placing a dessert ring in the middle, place the shaped balls around the ring in the shape of a wreath with an inch gap in between for the Pav hub's to rise while baking. 

  15. Brush milk over the buns and allow to bake for 30-35 minutes in a preheated oven at 180 degrees C. 
  16. Remove from oven and immediately brush butter oven the hot baked bread 😍
  17. Allow to cool for 5 minutes and remove the ring and fill the ring with the prepared Kheema masala and garnish with onion rings, lemon wedges and chopped Coriander leaves. 


Notes :

** water quantity depends on how sticky or dry your dough is. You need a dough that is sticky, stretchy and that does does break when you pull or stretch. When you touch the dough with a dry finger, the dough shouldnt stick to your finger. If your water content is less, chances are your dough will break. 

*If you plan to keep your baked Pav buns out, transfer to plate/bowl and cover with kitchen towel trapping the warmth inside and hence will keep your Pav buns soft and warm


Do try this recipe and don't forget to share your experience/feedback with me here in the comments or feel free to send me a mail. Also, do tag me at #taystedit if you try out my recipes on Facebook, Instagram etc so that I can see when you make it. ♡♡♡♡

Balaleet


Balaleet is one the most popular breakfasts of Emiratis. Bring born and bought up in the United Arab Emirates I have always had such so much love for the food and culture of this beautiful country.

This traditional dish is usually served with boiled garbanzo beans and served with other sides like Hummus, cheese and bread.
Balaleet has contrasting flavors. The noodle pasta/vermicelli is sweet and the eggs are savory.

The bedouins have always prepared eggs with sweet but the noodle pasta/vermicelli came into existence from the traders who introduced pasta to the middle east. This with some boiled beans and a cup of Karak is only you need for breakfast. I could not get hold of the garbanzo beans today. But I definitely recommend it for a complete meal.


Balaleet is a combination of cardamom and saffron flavored sweet vermicelli tht is served with savory eggs. It is also served for iftar during Ramadan. The first time I had it was from Arabian Tea House, a prominent restaurant in Dubai. I wanted to create it at home right away! The ingredients seemed accessible. But the first time I made, it was a big flop coz I made around 400 gms of vermicelli for 6 of us. While preparing balaleet, remember less is more. 😅 Also if you love sweet and savory in one dish, you will certainly love balaleet for breakfast. I feel the dish has an acquired taste, the situation at home was mixed reviews. So I think it is definitely an acquired taste. I loved it though! 😍 

I have been delaying to post the recipe of balaleet as I wanted to post for UAE National Day. But I wasn't able to do so. So I thought let me share it anyways 😄, it's never too late for anything.. It's the mind's game that keeps us from doing things sometimes. Anywhoo let's go check out how to prepare this easy Emirati  breakfast! 😍

Ingredients -

  • 200 gms vermicelli
  • 2 1/2 cups water or as required 
  • 1/2 cup sugar
  • 3 tbsp ghee
  • Saffron, a pinch
  • Powdered Cardamom, a pinch
  • 2 eggs
  • Salt, a pinch
  • Vegetable oil

Instructions :

  1. Roast the vermicelli in a pan until they turn golden brown, by stirring constantly so that the vermicelli does not burn.
  2. Next pour your water and bring to a boil and allow to cook for around 5 minutes. Drain water if necessary. 
  3. Now soak saffron in a tbsp of water. 

  4. Next in a large pan, add in your cooked vermicelli and ghee, mix well. 
  5. Next add in your sugar, soaked saffron and a pinch of cardamom powder, mix well and your sweet side of the dish is done. 
  6. Next prepare your eggs by pouring your beaten eggs with a pinch of salt and flip the Omlette once the underside is done and  the upside is dry. Once the eggs are cooked for around 2 minutes on medium low heat, set the omlette aside. 
  7. Now for the plating, place the omelet over the bed of cooked sweet vermicelli and your Emirati breakfast is ready to relish preferably with a glass of Karak chai! 😍 


Do try this recipe and don't forget to share your experience/feedback with me here in the comments or feel free to send me a mail. Also, do tag me at #taystedit if you try out my recipes on Facebook, Instagram etc so that I can see when you make it. ♡♡♡♡


Fiery Buffalo wings


I always fancy anything glazed. And these fiery Buffalo wings explode in the mouth with tanginess and all things spice. 

Chicken wings for starters are always the best I.e perfectly fried  and coated in the amazing tangy buttery sauce is just aahhhmaaayyzing! 

Ever since I heard the name Buffalo wings, I was always perplexed to think how can one associate a chicken wing and Buffalo. Later to my surprise, when researched., though the name does bemuse and makes one think that Buffalo has something to do with "Buffalo Wings", it is completely unrelated to the name. It's origin is from a place called Buffalo in NY. It was invented when a mother, Co owner of a bar, made a late night snack of Buffalo wings for her son and friends by deep frying chicken wings and then coating them in a butter based cayenne pepper sauce. 


The first time I tried Buffalo wings, I didn't quite like them as it was not quite as I expected it to be, as it was inauthentic. But later on when I tried the real deal, my thoughts on Buffalo wings changed, ever since! I have always wanted to replicate them at home, with available resources at home. I have used Sriracha sauce to make the sauce for coating the deep fried chicken wings. 

So, here I am! Demonstrating Buffalo wings for you guys.. An amazing appetizer, that I am sure everyone is going to ask for a second helping! 

So without further a do, let's get started! 

Ingredients :

  • 500 gms Chicken wings
  • 1/2 tsp crushed black pepper 
  • Salt, as required 
  • 1 tsp Paprika powder 
  • 3/4 cup All Purpose Flour 
  • 1 tbsp Butter
  • 200 ml Sriracha Sauce/ any favorite spicy sauce
  • 1 tsp sugar
  • 1/2 tsp pepper powder
  • 1 tsp Paprika
  • 1 garlic clove/ 1/2 tsp Garlic Powder 
  • 1 tbsp corn flour 
  • Oil for deep frying 

Instructions :

  1. Marinate the chicken wings using salt, pepper and paprika powder.

  2. Next coat the chicken wings in all purpose flour and deep fry until golden and crisp for around 6 minutes. 
  3. Now, to prepare the sauce, in a saucepan, drop a tablespoon of butter and then pour in your Sriracha Sauce. 
  4. Next add in your seasonings, paprika, black pepper powder, salt and sugar for balancing. 
  5. Finally add in freshly minced garlic clove or garlic powder. 
  6. Next, before the sauce starts to boil, add in your corn flour as slurry as thickening agent. Combine well. 
  7. Allow to boil for a minute on medium low flame and your Buffalo sauce is ready! 

  8. Finally, coat the fried chicken wings in your buffallo sauce and enjoy hot! 😋


Do try this recipe and don't forget to share your experience/feedback with me here in the comments or feel free to send me a mail. Also, do tag me at #taystedit if you try out my recipes on Facebook, Instagram etc so that I can see when you make it. ♡♡♡♡

Classic Bannoffee Pie


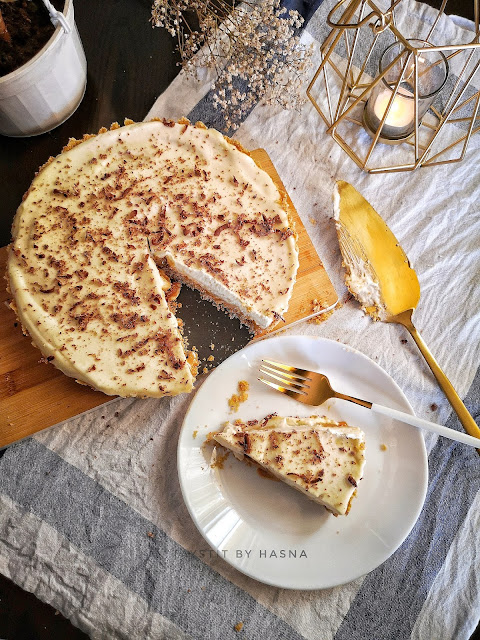
I made this yummilicious dessert last week to celebrate my win for a dessert competition where I attained 2nd prize from among 2000 entries and 30 contestants. Bannoffee pie is a dessert I like to make when I have some good just ripped bananas in my fruit basket. 

I always undermine the flavor of fresh banana fruit in dessert, somehow I cannot stand it. But this dessert and Magnolia Bakery's Banana Pudding are my favorites when it comes to bananas. 


The ingredients are basic and the method is simple that even kids can prepare this no Bake pie! The Toffee in Bannoffee is what gives the dessert the special flavor. The first layer consists of a crushed biscuits layer with melted butter, then a layer of dulce de Leche (cooked Condensed milk) is spread, after which sliced bananas are placed in a sequence and a layer of whipped cream is smothered, and finally garnished with grated chocolate or dusted with cocoa powder. 

This pie is done in no time as it doesn't require any cooking. My lil one and siblings always wipe the pie dish clean whenever I prepare Bannoffee pie. The more the banooffe pie sits in the fridge, the more delicious it becomes (but I never get a chance to do that). 


I am always a fan of light desserts and Bannoffee pie is one such dessert. It's a treat for everyone, even if you dislike bananas, definitely give this dessert a try, I am sure you will love it! 


Let's get started! 


Ingredients ;

1 can Condensed milk (cooked) *
2 bananas
10-12 Mcvities Digestive Biscuits, crushed
2 tbsp Butter, melted
200 ml whipped cream, unsweetened 
1 tsp Vanilla Essence/ extract
4 tbsp Icing sugar 
Chocolate, grated

Instructions:

Dulce de leche:

  1. Remove the label of the sweetened Condensed milk and place it in a pressure cooker with water that fills half the pressure cooker. Cook for 1 whistle and allow to simmer on low at least for 20 minutes. 
  2. Allow the cooker to release its pressure on its own and allow the pressure cooker and its contents to cool down at leat for 4 hours. **

Bannoffee Pie:

  1. In a food processor, crush the biscuits with melted butter or in a zip lock bag pound the biscuits using a rolling pin. 
  2. Now transfer the contents to a loose bottom pie dish and level using the back of a measuring cup. 
  3. Allow to refrigerate for at least 10 minutes. 
  4. Now whip the cream in a stand mixer or a hand held mixer, add in your vanilla essence and gradually add in your Icing sugar 1 tbsp at a time. 
  5. Allow to whip well. Do not over beat. 
  6. Now beat the dulce de Leche/Toffee in a bowl using a fork and spread the Toffee over the crushed biscuit layer. 
  7. Now layer the sliced bananas in a sequence (like in the image). 

  8. Spread the whipped cream, and level it using a spatula.

  9. Finally grate the chocolate as garnish or dust some cocoa powder. 
  10. Place in the refrigerator, allow to set. 


Notes :

  • *The steps to prepare dulce de Leche has been explained above. 
  • ** I like to prepare the dulce de Leche the night before 
  • I used a loose bottom pie pan, you may use a cheesecake pan too. 


Do try this recipe and don't forget to share your experience/feedback with me here in the comments or feel free to send me a mail. Also, do tag me at #taystedit if you try out my recipes on Facebook, Instagram etc so that I can see when you make it. ♡♡♡♡

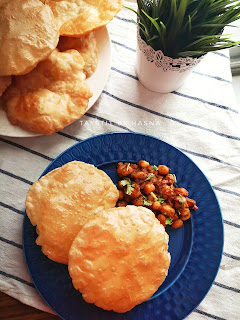
Chole Masale/ Chana Masala


Have you seen the movie 'Chef'? I don't watch much movies now days but the title of this one excited me! When Saif asks in it, do you know where you get the best Chole Bhature in the world? I literally imagine myself making it every morning...but the lazy me always forgets to soak the chickpeas. And oh boy! There is nothing like satisfying your cravings.😋 Alhamdulilah!

Everyone here, especially Pops was all praises.. He is a big time non veg fan.. And him taking a second serving assures that it's a win - win! 😍

I loveee the combination of Chole Bhature. Nothing shouts North Indian Breakkie like Piping hot puffy Bhature and Chole Masale.. The flavors reminds of Indian Street food😍 Also commonly served in restaurants on North West India. The sweetness from the tomato, the sour from the raw Mango powder and the roasted and ground raw spices is what brings out the flavors!

My version is an easy, no hassle recipe. Some finely chopped onions, tomato puree, gg paste, ground spices and cooked chick Peas and done! 

Ingredients :

  • 1 cup White Chickpeas soaked overnight 
  • 1 tbsp ghee
  • 1 tbsp vegetable oil 
  • 1 medium Onion finely chopped
  • 1 tsp Ginger Garlic paste 
  • 2 Green Chillies, slit
  • 2 medium Tomatoes, pureed
  • 1 tbsp Roasted and Ground Spices (for ingredients check under Raw Spices) 
  • 1 tsp Kashmiri Chilli powder 
  • 1/4 Turmeric powder
  • Amchur powder / Raw Mango powder (optional) 

Raw Spices:

  • 1 tbsp Coriander seeds
  • 1 tsp Cumin seeds
  • 1 tsp Shahi Jeera
  • 1 tsp Fennel Seeds
  • 1 Clove
  • 1 Small Cinnamon Stick
  • 2 tsp Whole Black Pepper
  • 2 Dry Red Chilli

Instructions :

  1. Wash the overnight soaked white chick Peas and cook them for 6 whistles in pressure cooker with some water (around 2 cups) and salt as required. 
  2. In a kadai, pour some oil and ghee, add in the ginger garlic paste and Sautee. 
  3. Now add in your finely chopped onion, and sauté until translucent and light golden. 
  4. Now add in the roasted and ground spices and  Turmeric, chilli powder and Amchur. Sauté for a minute. 
  5. Now add in your tomato puree, and mix well. Finally add your cooked chick Peas along with the chickpea broth. 
  6. Cook covered for around 10 minutes and uncovered if required, to evaporate excess water in the gravy. 
  7. Check seasoning, if required add a dash of sugar to balance the flavors. 
  8. Finally garnish with some chopped Coriander leaves. 


Do try this recipe and don't forget to share your experience/feedback with me here in the comments or feel free to send me a mail. Also, do tag me at #taystedit if you try out my recipes on Facebook, Instagram etc so that I can see when you make it. ♡♡♡♡

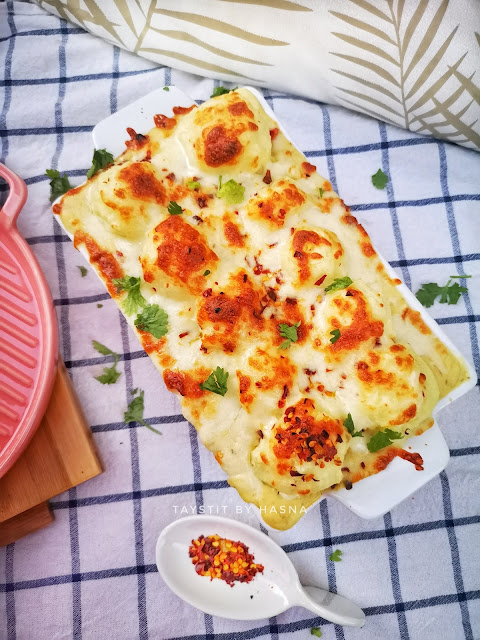
Cheesy Chicken Fajita Bake topped with Mashed Potato dumplings


I am BACK! The much needed break was very much essential for me to kickstart again ! 😀

Now that I am here, let's bake some Chicken Fajita topped with Mashed Potato dumplings. If you don't bake much, or don't have an oven.. It doesn't matter! Just prepare the same in a casserole dish with a heavy lid or place a sheet of aluminium foil over the casserole and place the lid for the bake effect and place on simmer. 

This Fajita Bake is soo good, coz it's prepared with less ingredients, done in no time, yet the flavors are amazing! 😍 During Ramadan, I happened to experiment and try this flavor combination and we loved it here! But you need to have this piping hot 🔥 😋

Basically the bake consists of a bed of chicken and veggies flavored with Fajita seasoning and then a creamy layer which consists of bechamel sauce with a touch of cream cheese and topped with Mashed Potato dumplings and Mozzarella cheese. True Mexican goodness! 😍 

The Fajita mix is homemade and made with a handful of ingredients. And if at all you have any leftovers, your kids lunch box is sorted too! 


Ingredients:

  • 3 medium potatoes (boiled and mashed, click here for the recipe) 
  • 250 gms Chicken Breast 
  • 2 tbsp Olive oil 
  • 1tsp garlic paste
  • Green, Red and Yellow Bell peppers/ Capsicum, sliced thinely
  • 1/2 med Onion, sliced
  • 3 tbsp Cream Cheese, salted or unsalted, optional 
  • 1 tsp Fajita Seasoning mix (recipe below) 
  • 1 tbsp butter
  • 1 tbsp all purpose flour
  • 1 cup full fat milk
  • Handful of Mozzarella Cheese
  • 1/2 tsp Red Chilli Flakes
  • Chopped Coriander leaves 

Homemade Fajita Seasoning:

  • 1 tsp Chilli Powder 
  • 1 tsp Paprika
  • 1 tsp Garlic Powder 
  • 1 tsp Cumin Powder 
  • 1/2 tsp Oregano powder
  • 1/4 tsp Black Pepper Powder 
  • 1/4 tsp white Pepper Powder 
  • 3/4 tsp salt

Instructions :

  1. Prepare the Fajita Seasoning mix and marinade the chicken breast. 
  2. Prepare Mashed potatoes and set aside (click here for the recipe). 
  3. In a pan, pour the olive oil, add in your garlic paste and shallow fry the chicken pieces for 3-4 minutes on med high flame. 
  4. Next, add in your slices onion and bell peppers. Sauté well, until lightly soft and it doesn't loose its crunch. Add salt as required. 
  5. Prepare Bechamel sauce, in a deep non stick pan, add 1 tbsp butter and 1 heapful tbsp of flour, sauté on low. Switch off flame and pour your milk gently and mix vigorously, now turn on the heat and allow to thickem while mixing the sauce gently and add your cream cheese and mix well. Check for seasoning. 
  6. Now layer your baking dish with the chicken Fajita layer, pour the prepared bechamel sauce. 
  7. Top with scoops of mashed potato balls and Sprinkle a generous layer of shredded Mozzarella cheese, bake until the cheese has melted and oozing. 
  8. Finally finish off with red chilli flakes. 
  9. Garnish with chopped Coriander leaves. Dig in warm! 

Notes: No Bake method has been explained above. 

Do try this recipe and don't forget to share your experience/feedback with me here in the comments or feel free to send me a mail. Also, do tag me at #taystedit if you try out my recipes on Facebook, Instagram etc so that I can see when you make it. ♡♡♡♡
Newer Posts
Older Posts

Search This Blog

My name is Hasna Haneef, a mommy to a toddler, hailing from Thalassery, Kerala. Welcome to my humble abode on the Internet; wherein I share all my recipes and experiments. I am glad to have you on board!

TRENDING POSTS

  • Kerala Style Squid Roast
  • Chicken Steak with Creamy Mushroom Sauce
  • Emirati Chebab
  • Regag - Emirati Flat bread
  • Kerala Beef Fry/ Nadan beef dry fry
  • Copy Cat Caesars Mini Pizza

About Me

May peace be with you!

Welcome to my blog.

I am delighted to have you on board. My name is Hasna Haneef, a mommy to a toddler, hailing from Thalassery, Kerala. My homeplace being Dubai, as I am born and brought up here and I am very influenced by the lifestyle and the variety of authentic cuisines I get to try from here, which has made me try anything that comes across me
, click here →

Stay Connected!

Join Our Madness!

Join with Thousands Of Subscribers ! Get Our Latest Recipes Delivered to Your email Inbox!

Powered by follow.it
  • Home
  • About Me
  • Recipes

    • Main Course
    • Desserts
    • Snacks

    Uncategorized

    • Chicken
    • Meat
    • Vegetarian
    • Rice
    • Malabar Food
    • Baking
    • Breakfasts
    • Snacks
    • Drinks
    • Pasta
    • Fish
    • Soups
    • Desserts
  • Contact Me

Featured Post

Triple Chocolate Hazelnut Skillet Cookie

Blog Archive

  • ▼  2025 (4)
    • ▼  April (2)
      • 1 minute Chocolate Mug Cake
      • Grilled Cheese California Burrito
    • ►  March (1)
    • ►  February (1)
  • ►  2024 (36)
    • ►  October (4)
    • ►  September (5)
    • ►  July (1)
    • ►  June (2)
    • ►  May (4)
    • ►  April (3)
    • ►  March (10)
    • ►  January (7)
  • ►  2023 (47)
    • ►  December (3)
    • ►  September (2)
    • ►  August (6)
    • ►  July (6)
    • ►  June (9)
    • ►  May (4)
    • ►  April (5)
    • ►  March (6)
    • ►  February (3)
    • ►  January (3)
  • ►  2022 (69)
    • ►  November (4)
    • ►  October (6)
    • ►  September (7)
    • ►  August (9)
    • ►  July (12)
    • ►  June (5)
    • ►  May (5)
    • ►  April (12)
    • ►  March (4)
    • ►  February (2)
    • ►  January (3)
  • ►  2021 (24)
    • ►  November (1)
    • ►  October (2)
    • ►  July (1)
    • ►  June (4)
    • ►  May (6)
    • ►  April (4)
    • ►  February (4)
    • ►  January (2)
  • ►  2020 (82)
    • ►  December (5)
    • ►  November (6)
    • ►  October (4)
    • ►  September (2)
    • ►  August (5)
    • ►  July (10)
    • ►  June (10)
    • ►  May (13)
    • ►  April (12)
    • ►  March (8)
    • ►  February (4)
    • ►  January (3)
  • ►  2019 (22)
    • ►  December (1)
    • ►  November (2)
    • ►  October (6)
    • ►  September (1)
    • ►  August (1)
    • ►  February (3)
    • ►  January (8)
  • ►  2018 (15)
    • ►  December (4)
    • ►  November (6)
    • ►  October (3)
    • ►  September (2)

Subscribe Us

Labels

Bake Biscuits Breakfast Brown rice Burger Cheese Chocolate Dal Egg Emirati Fish Iftar Indonesian Japanese Jeerakashala rice Kerala Keto Kuwait food Lunch Milk Mutton Thai food UAE food afghan cuisine arabic beef biryani bread burnt cheesecake cake chicken cream dessert dinner greek healthy indo chinese lamb malabar prawns pudding puffs quick dinner ideas recipe refreshing drink rice salad sandwich stir fry vegetables vegetarian veggies yemeni

Contact Form


POPULAR POSTS AND PAGES

Kerala Style Squid Roast

Kerala Style Squid Roast

June 18, 2020
Chicken Steak with Creamy Mushroom Sauce

Chicken Steak with Creamy Mushroom Sauce

November 05, 2018
Emirati Chebab

Emirati Chebab

June 01, 2023
Regag - Emirati Flat bread

Regag - Emirati Flat bread

December 02, 2020
1 minute Chocolate Mug Cake

1 minute Chocolate Mug Cake

April 09, 2025

Pages

  • Home
  • About Me
  • Privacy Policy
  • Contact Me

Copywrite © 2023 TermsFeed®. All rights reserved.

Created By Sora Templates | Distributed By Gooyaabi Templates

Back to top