Search This Blog

Taystit by Hasna

Food, Recipes, and Beyond

  • Home
  • About Me
  • Recipes
    • Main Course
    • Snacks
    • Desserts
  • Uncategorized
    • Chicken
    • Meat
    • Vegetarian
    • Rice
    • Malabar Food
    • Baking
    • Breakfasts
    • Snacks
    • Fish
    • Pasta
    • Drinks
    • Soups
    • Desserts
  • Contact Me

 GRWM FOR RAMADAN 2023


Ramadan is just in a few days and I am super excited! In Sha Allah.. I have always wanted to share a few tips and tricks with my readers, that will help in fully utilizing the month of Ramadan in doing acts of worship in Sha Allah. Utilize your freezer space during this time of the year. It is not easy for me, as I am a spontaneous cook, and I just can't seem to make ahead, but this time around, I have decided to plan my meals and make use of the time in Ramadan, in Sha Allah.

  • Plan your meals for the 30 days in advance
  • Prepare Snacks and Do meal prep in advance
  • Deep clean your house and Kitchen space
  • Make a small corner for all your Ramadan essentials 
  • Tips and Tricks to stay active and hydrated

Let's welcome Angels to our clean houses and make this Ramadan the most productive of all in Sha Allah.

Plan your meals in advance:

Planning your meals ahead of time can help you save time, and energy during the Holy month. Make a list of snacks, meals, drinks, soups, and suhoor in advance. The food can be repeated, just try to keep the meals nutritious. If you have kids, make sure to plan their meals too, this will help you to completely focus on your Ibaadah, in Sha Allah.

Planning and creating a list of Food that you will be preparing in Ramadan can help you decide and stock up on your groceries in advance, i.e, the non perishable groceries. Planning your meals can also help in over splurging on unnecessary and unhealthy food options, this in turn will help minimize wastage. I am sure, we will all feel relieved and spend more time doing our Ibaadah if we spend the time to make a meal plan before Ramadan.
 

Meal prep in advance and make Freezer Friendly snacks:

Doing meal preparation in advance definitely helps save lot of our time. You can do this by:
 

Making an Onion-Green Chilli-Coriander mix (sliced and chopped batches) :

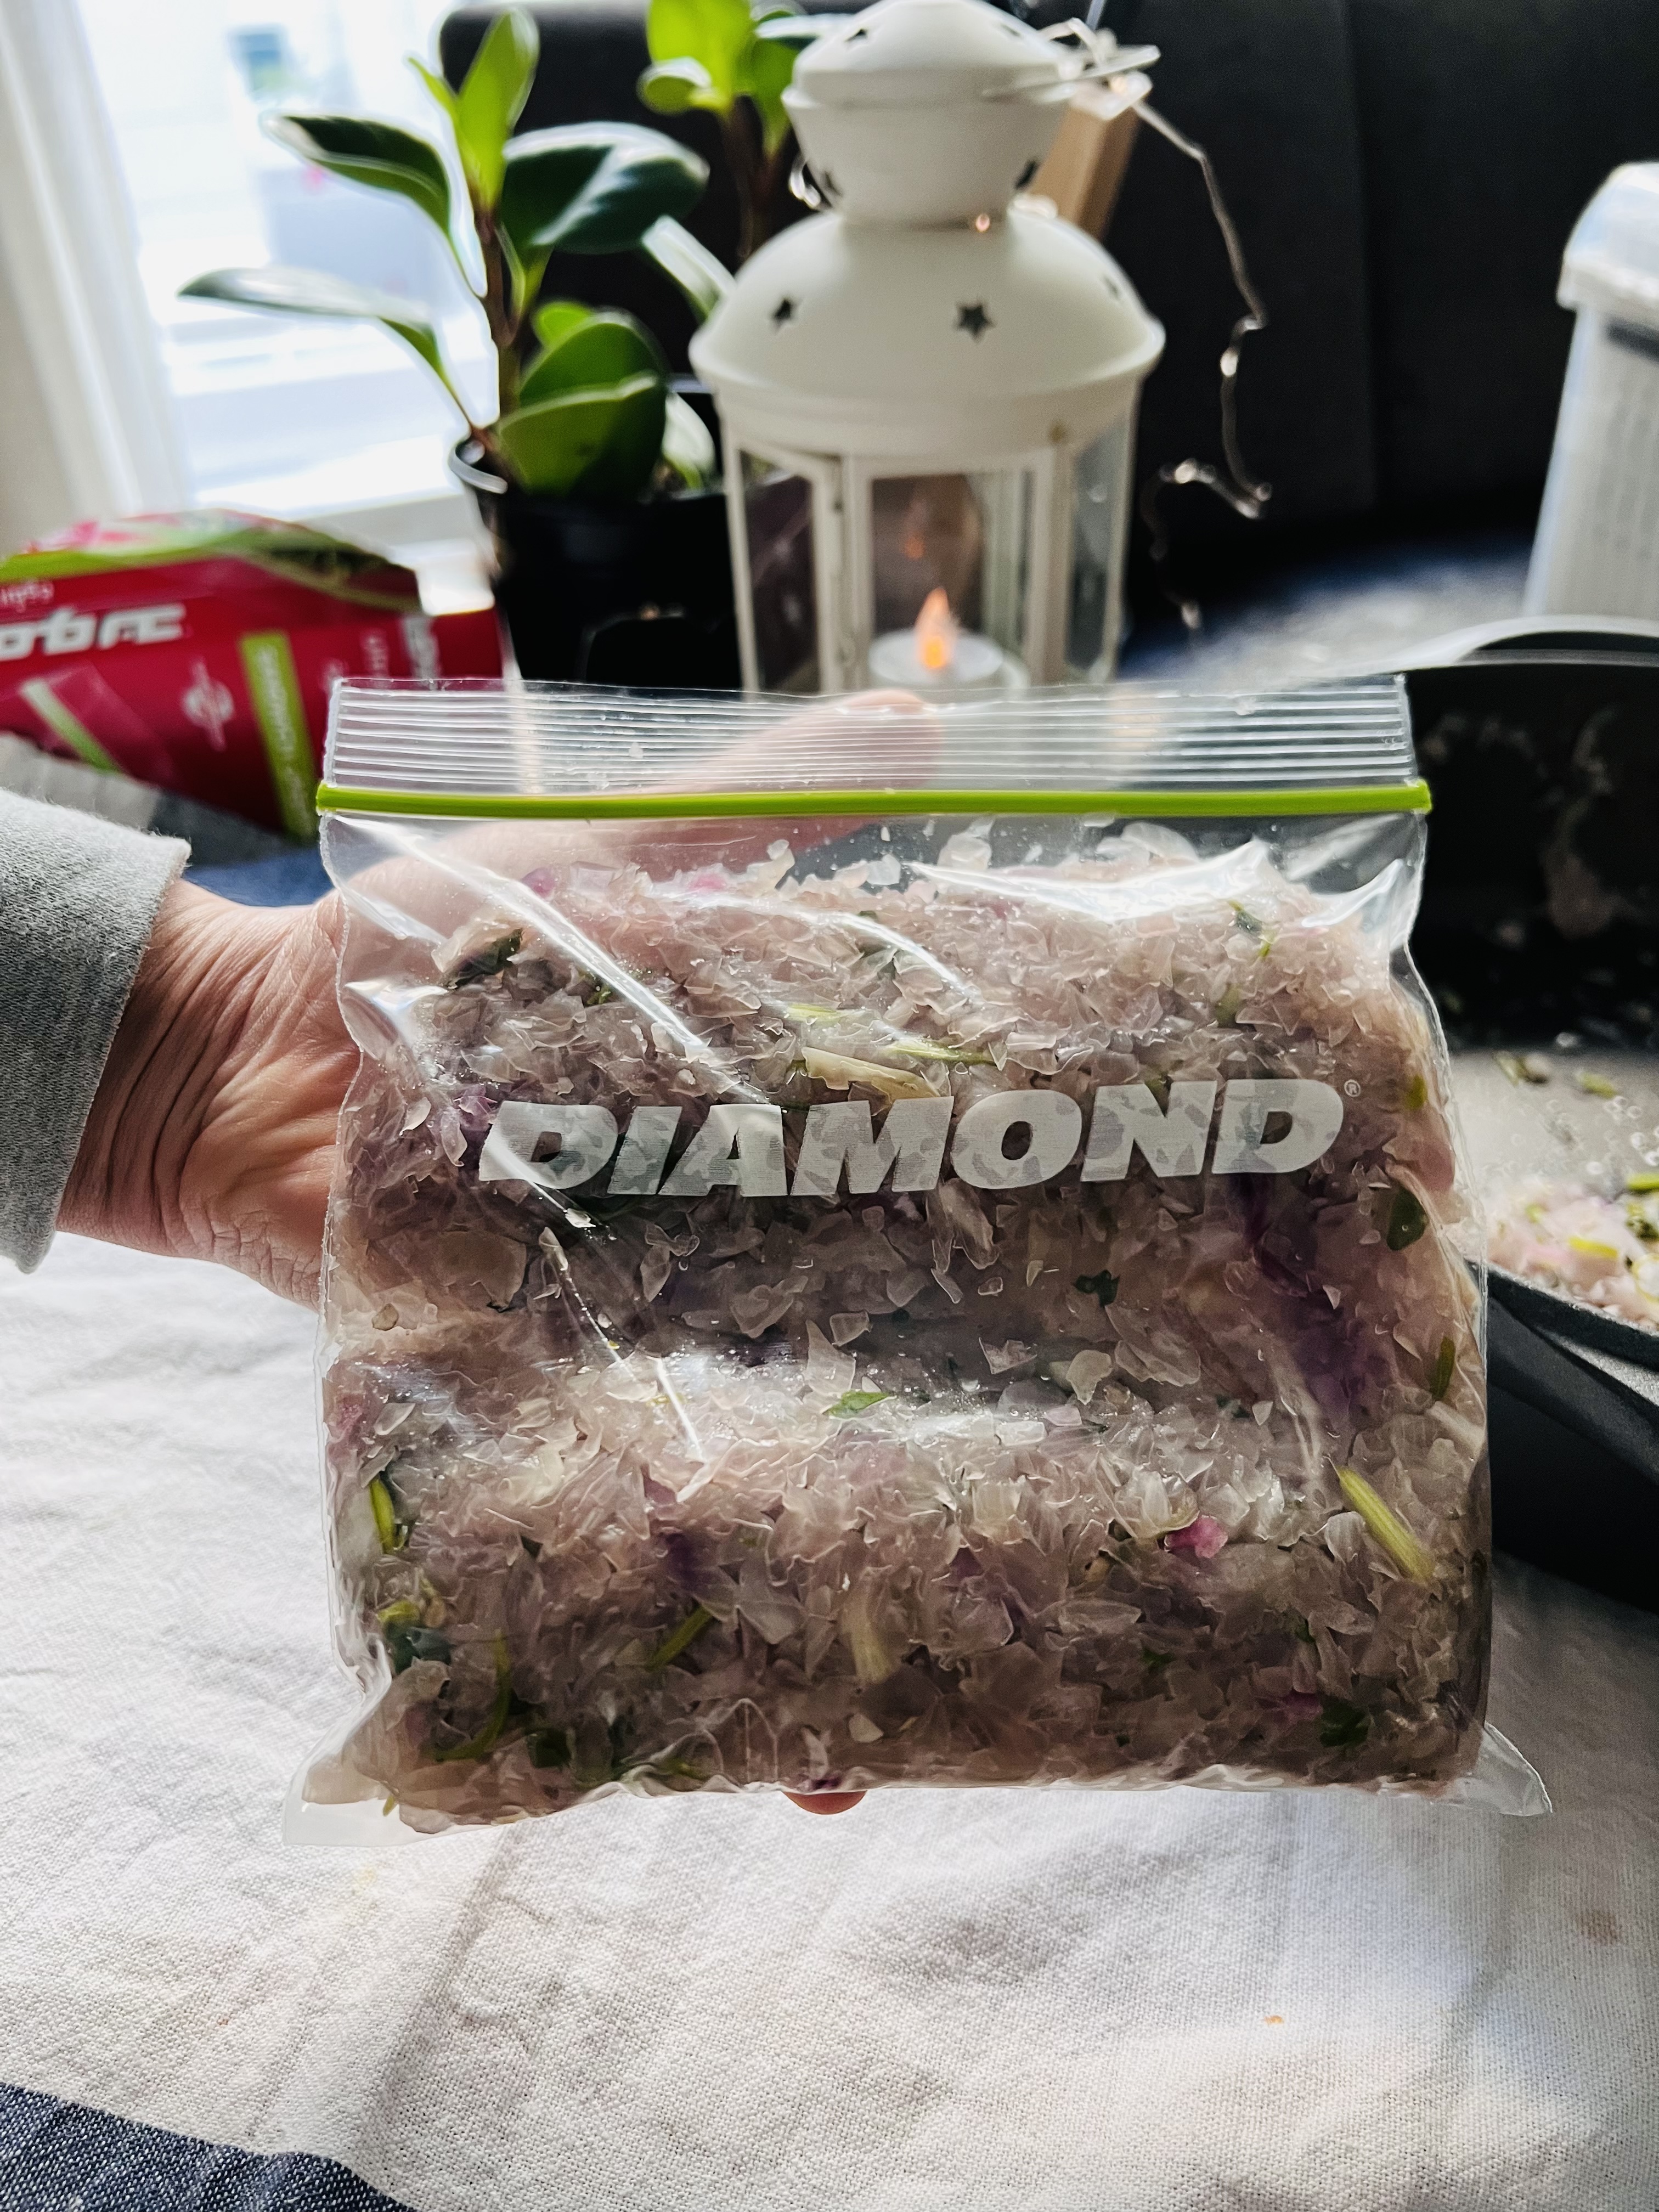
Make two batches of Sauteed onion (one sliced and one chopped) , green chillies and coriander leaves in some oil and ghee and set aside to cool. Once cool, pack the cooled onion mix into freezer friendly zip lock bags and make portions using your hand so that you can easily use that portion for cooking instead of thawing the whole pack or using many zip lock bags! Thanks to @tableforfivedubai for this amazing tip! <3

You can use the sliced Onion mix for preparing biryani, curries, egg puffs etc (which is why I haven't added spice powders, so that you can kee them versatile and use for any recipes as a matter of fact!). While the chopped onions mix can be used for almost every snack recipe.

Also make sure to add a good number of green Chillies, as you don’t want the sauteed onions to taste sweet.

Ps: I preferably like to do a ratio of 1:1 (1 Green Chilli for 1 large onion) and if it’s a big quantity, increase or decrease the quantity of green Chillies depending on how spicy you like your food. 


Prepare ginger garlic paste:

The most laborous part of Indian cooking is making the ginger garlic paste. Making them ahead of time and storing them in jars, definitely helps making cooking easier.

Ingredients :
 
Garlic paste:
250 gms/ 1 small bag Garlic bulbs (peeled)
1 tbsp Vegetable oil (any odorless oil like sunflower/ corn oil etc)
2 tsp Salt
 
Ginger paste:
Replace the Garlic in garlic paste and the same ingredients

Instructions:
In a blender, add your garlic, oil and salt and blend to your desired consistency. I like mine not pastey nor coarse.
Similarly do the same for ginger and store them in clean and dry jars and these ginger garlic lasts upto 2-3 weeks, if used carefully. Keep the jars back in the refrigerator immediately after use and use a dry spoon when scooping from the jars. 
*Slight color change is normal, unless you see mold or the smell hasn't changed, you may use the ginger garlic paste.
 

 Make a batch of Fried Onions:

Fried onions are a must for us Asians in our cooking, from biryani, haleem, aleesa what not! 
Slice onions thinly and fry them to golden brown and drain them well using paper towels. Now make sure to mix the fried onions every now and then so that they completely cool down and crispen. If you have an aluminum zip lock you may use them to store the fried onions. If you are like me, who only uses the zip lock bags, add the crispy Fried onions to the bag and remove any trapped air inside and store them in the freezer. The crispy onion stays crisp for more than a month.
 

Chop veggies ahead of time:

I know you get these frozen veggies, but I am not s big fan of them, as for making bulk food, it's not the best choice, also you do not know the sources of these veggies and how well they are washed before being chopped and frozen. So I like to chop the veggies myself, especially for soups, stews, filling for snacks,. Doing them gives you so much satisfaction and of course free time. Once frozen on a tray separately, transfer the veggies into ziplock bags and store in the freezer. Use as and when required.

Ps: You may use them directly for cooking, no need to thaw.
 
I  have some more tips, I may do a part 2 depending on the response for this article, or maybe update this space, so stay tuned and keep checking this space :) in Sha Allah!


Deep clean your house and Kitchen space:

This is that time of the year when the angels come to our houses, let's give them a warm welcome by tidying up every nook and corner of our houses like washing curtains, cleaning carpets, organizing cupboards (donating good ones and throwing away unnecessary ones) etc.You can bring home the spirit of Ramadan by involving kids in the cleaning process and doing small Ramadan decors, that will get them, excited too and look forward to the Holy Month.
 
Kitchen is the place that we all spend a lot of time yet we don't get that extra time to tidy up. if you haven't started your Ramadan preps , this is your cue to clean your kitchen and house now!
 
  • For starters, you can start with the fridge, this will help you decide what to add into your grocery shopping list. And you may throw away expired and give away unused food items that are in good condition. 
  • Wipe down the Kitchen cabinets and cupboards (check expiry dates and discard if not in use).
  • Clean the cooking range, oven, dishwasher (if any) and fridge. I like to use Smac for tough grease and stains and for cleaning the oven and fridge (I wiped down using lemon - vinegar water solution). Don't forget the stove hob and the kitchen hood, where all grease are accumulated.
  • Lastly, make sure to replace old brushes/ sponges/ cloths with new ones and if they aren’t that soiled, soak them in a solution of bubbling hot water with vinegar for around 30 minutes and you will feel so satisfied to see all that dirt that came from the kitchen cloth. Squeeze and rinse well with warm water. Allow to dry in sunlight.

Do not make yourself overwhelmed with all these tasks, do them one day at a time.

Make a small corner for all your Ramadan essentials:
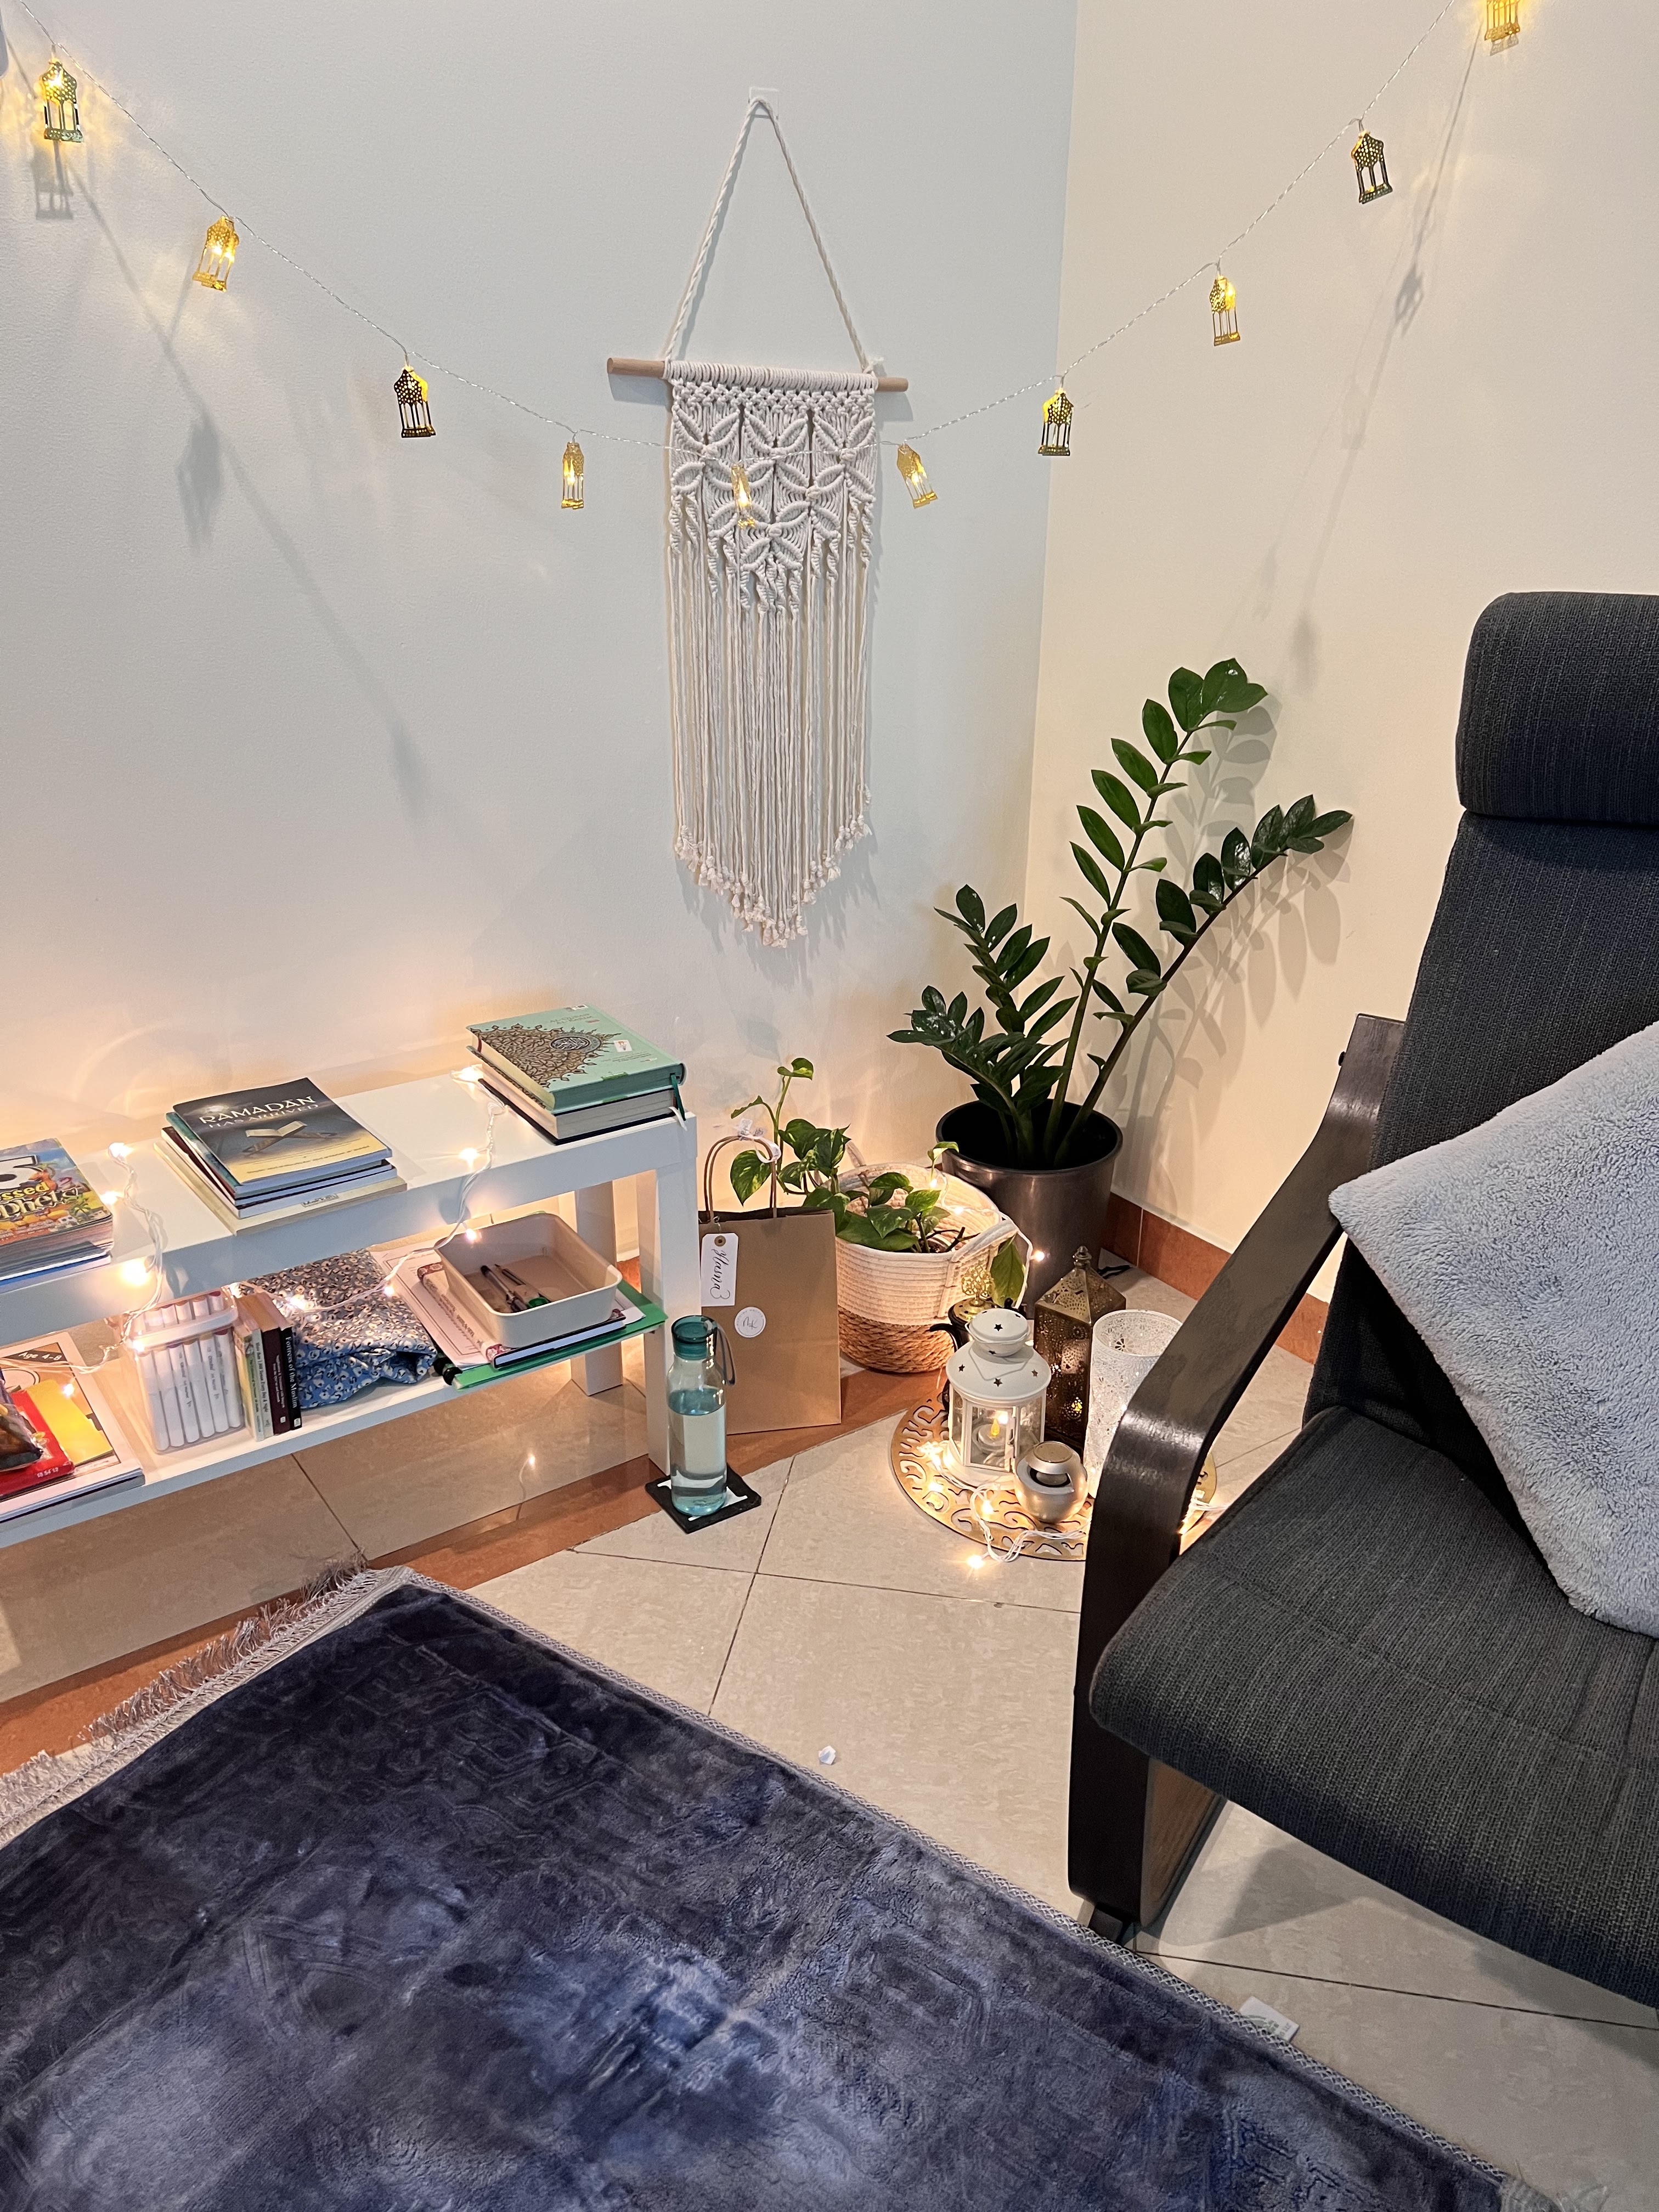


You can make a small corner in your house where you keep your Quran, Translation, Islamic books, Duaa books, Morning and evening adhkaar Duaa cards, Ramadan Planner if any, folding desk,Musalla (prayer mat), Prayer dress, maybe some candles, a bottle of water and maybe a couple of plants for that extra feel of serinity. (This is just my way of creating a calm and quiet atmosphere for better concentration and tranquility).

You can make a similar space for your kids, with their Musalla , prayer dress, Ramadan activity books, craft supplies like sketch pens, Quran (if they know how to recite), Quran reading pen, Prophet stories etc.

Strive to make this a practice/ habit/ lifestyle even after Ramadan in Sha Allah (involve kids in decorating the space too)

Tips and Tricks to stay active and hydrated:

  • Drink water in half an hour intervals, make sure you do this maybe by downloading such apps or be personal reminders for each other haha :)
  • Break your fast with soups, fruits, salad, juice etc instead of gobbling down all the snacks and feeling tired and bloated for prayers. once you are done with your Magrib prayers, have your snacks and a limited amount of tea/ coffee.
  • Reduce intake of caffeine however possible, as caffeine drains out water from our bodies and keep us tired and dehydrated. I know it's difficult for some of us to completely quit tea/ coffee etc, but you can always have them limited.
  • Try to avoid processed food. They always make sure to keep you constipated, that's the last thing you want during Ramadan, so keep yourself hydrated and have fiber rich food such as lentils, oats, fruits, veggies etc.
  • Try to make use of healthier options such as airfryer, oven, steamed food etc. And have oil fried snacks with intervals of at least 1-2 days.

Suhoor ideas:

Try to include nutrient rich, fibrous, and filling easy meals like:
Shakshouka
Oats Porridge 
Granola with yogurt/ milk
Banana Almond milkshake
Boiled eggs

At least have a banana or a couple of dates and a glass of milk if possible with loads of water, to help you keep hydrated throughout the day.

May we be able to make the most out of this Ramadan with these little tips and tricks, bi ithnillah. 

May Allah SWT forgive us and accept our Ibadaah. Aameen ya rabb🤲🏼

Do try this recipe and don't forget to share your experience/feedback with me here in the comments or feel free to send me a mail. Also, do tag me at #taystedit if you try out my recipes on Facebook, Instagram etc so that I can see when you make it. ♡♡♡♡

 Fusion Spaghetti with a secret ingredient


Ramadan is almost here, Alhamdulilah! I have planned a variety of recipes for you guys! Can't wait to share it with my lovely people here. May Allah help us reach Ramadan, in Sha Allah.

Before the Ramadan series begin, I thought of sharing this yum recipe of Spaghetti that my mom makes during my childhood. The recipe is a very basic one, but there is this one ingredient that brings in a lot of flavor and aroma. The recipe uses soy sauce and all the flavors of Chinese, but the addition of a generous amount of Indian clarified butter takes the flavor to the next level. 

Let's make this delicious Spaghetti:


Ingredients:

  • 1 pack Spaghetti  
  • 3-4 Gralic, finely chopped
  • 1/4 Cup Yellow Capsicum, sliced
  • 1/4 Cup Red Capsicum, sliced
  • 1/2 cup beans, sliced
  • 1/2 cup Carrot, sliced
  • 2 green Chillies, slit
  • 200 gms, Boneless Chicken strips
  • 3 Eggs
  • 2-3 tbsp Ghee/ clarified butter
  • Vegetable oil
  • Salt, as required
  • 1/2 tsp Black pepper powder
  • 1/2 tsp White pepper powder
  • 2-3 tbsp Soy sauce 
  • Homemade Chicken broth/ Maggi chicken cube*

Instructions:

  1. Cook the Spaghetti according to package instructions. Drain and set aside.
  2. Crack 3 eggs, add salt and pepper and whisk it and keep aside.

  3. In a pan, pour veg oil and pour the egg mixture completely, to form a thin layer.
  4. Once slightly cooked, immediately overlap each side of the Omlette and cut uniformly into thin strips using the flat laddle.
  5. Remove the egg from the pan immediately.
  6. In the same pan, add ghee and veg oil and Sautee the garlic and veggies on high heat for a couple of minutes, so that they are cooked yet retain crispiness.
  7. Now move the veggies to the side of the pan, and cook the chicken strips.


  8. Pour some oil, add the chicken, black pepper and salt, cook well and mix everything.
  9. Now add the cooked Spaghetti in two batches. Add the soy sauce, black pepper, white pepper, and chicken broth and toss everything well on high heat.
  10. Finish off with a generous amount of ghee. Enjoy warm!


Notes;
*If using the cube, mix the chicken cube in around 1/2 cup of hot water and pour the contents to the Spaghetti so that the Spaghetti doesn't dry out.


Do try this recipe and don't forget to share your experience/feedback with me here in the comments or feel free to send me a mail. Also, do tag me at #taystedit if you try out my recipes on Facebook, Instagram etc so that I can see when you make it. ♡♡♡♡

 Varutharacha Kallumakaya Curry


One seafood that I simply can't get enough are Mussels. This delicious seafood made in any way makes the most delicious food. This curry, which is a traditional curry was introduced to me by my ummama (grandmother ), when I went to visit India this year. The aroma from the roasted spices filled the air. I immediately went to have a glance to check how the curry is made.

The curry, though it may look complicated, the recipe is very simple and a delicious curry perfect for rice, chappathi or Ari orotti. The spice powders are dry roasted which is then added to the main curry. The main gravy consists of green Mango slices, you may use Tamrind water and/ tomatoes for sourness too. My grandmother said in olden times, tomatoes were not available much or it was a seasonal fruit/ vegetable that was very expensive and hence was not used much in our traditional cooking.

Let's see how thw curry is made,

Ingredients:


  • 500 gms Kallumakaya/ Mussels (cleaned*)
  • 3 tsp Coriander powder
  • 1 1/2 tsp Kashmiri Red Chilli powder 
  • I/2 of one small Green Mango, sliced/ 1/2 of a Tomato 
  • 5-6 Shallots
  • 1/2 cup Grated Coconut 
  • Water, as required for grinding 
  • Curry leaves
  • 1/4 tsp Turmeric
  • Salt, as required 

Tadka:

  • Coconut oil 
  • Mustard seeds
  • Curry leaves 
  • Dry Red Chilli 

Instructions:

  1. In a pan, dry roast coriander powder and red Chilli powder for around a minute or two and set aside.
  2. Make a paste of grated coconut, shallots, and water. Set aside.
  3. In a pot, add the cleaned mussels with the residual water that oozed from the mussels. 
  4. Add curry leaves, sliced green mango or tomato, roasted spices, turmeric and salt as required. 
  5. Allow to cook for 3-4 minutes. 
  6. Next add the coconut ground paste and allow to come to a boil. Switch off the flame.
  7. Now make a tadka/tempering of coconut oil, mustard seeds, curry leaves and dry red Chillies.
  8. Add the tadka to the prepared curry and enjoy hot with rice, chappati or Ari orotti.

Notes:

*Clean the Kallumakaya and the water that drains from the clean Kallumakaya is used in the curry to enhance the flavor.

 You may also make this recipe using prawns too 


Do try this recipe and don't forget to share your experience/feedback with me here in the comments or feel free to send me a mail. Also, do tag me at #taystedit if you try out my recipes on Facebook, Instagram etc so that I can see when you make it. ♡♡♡♡

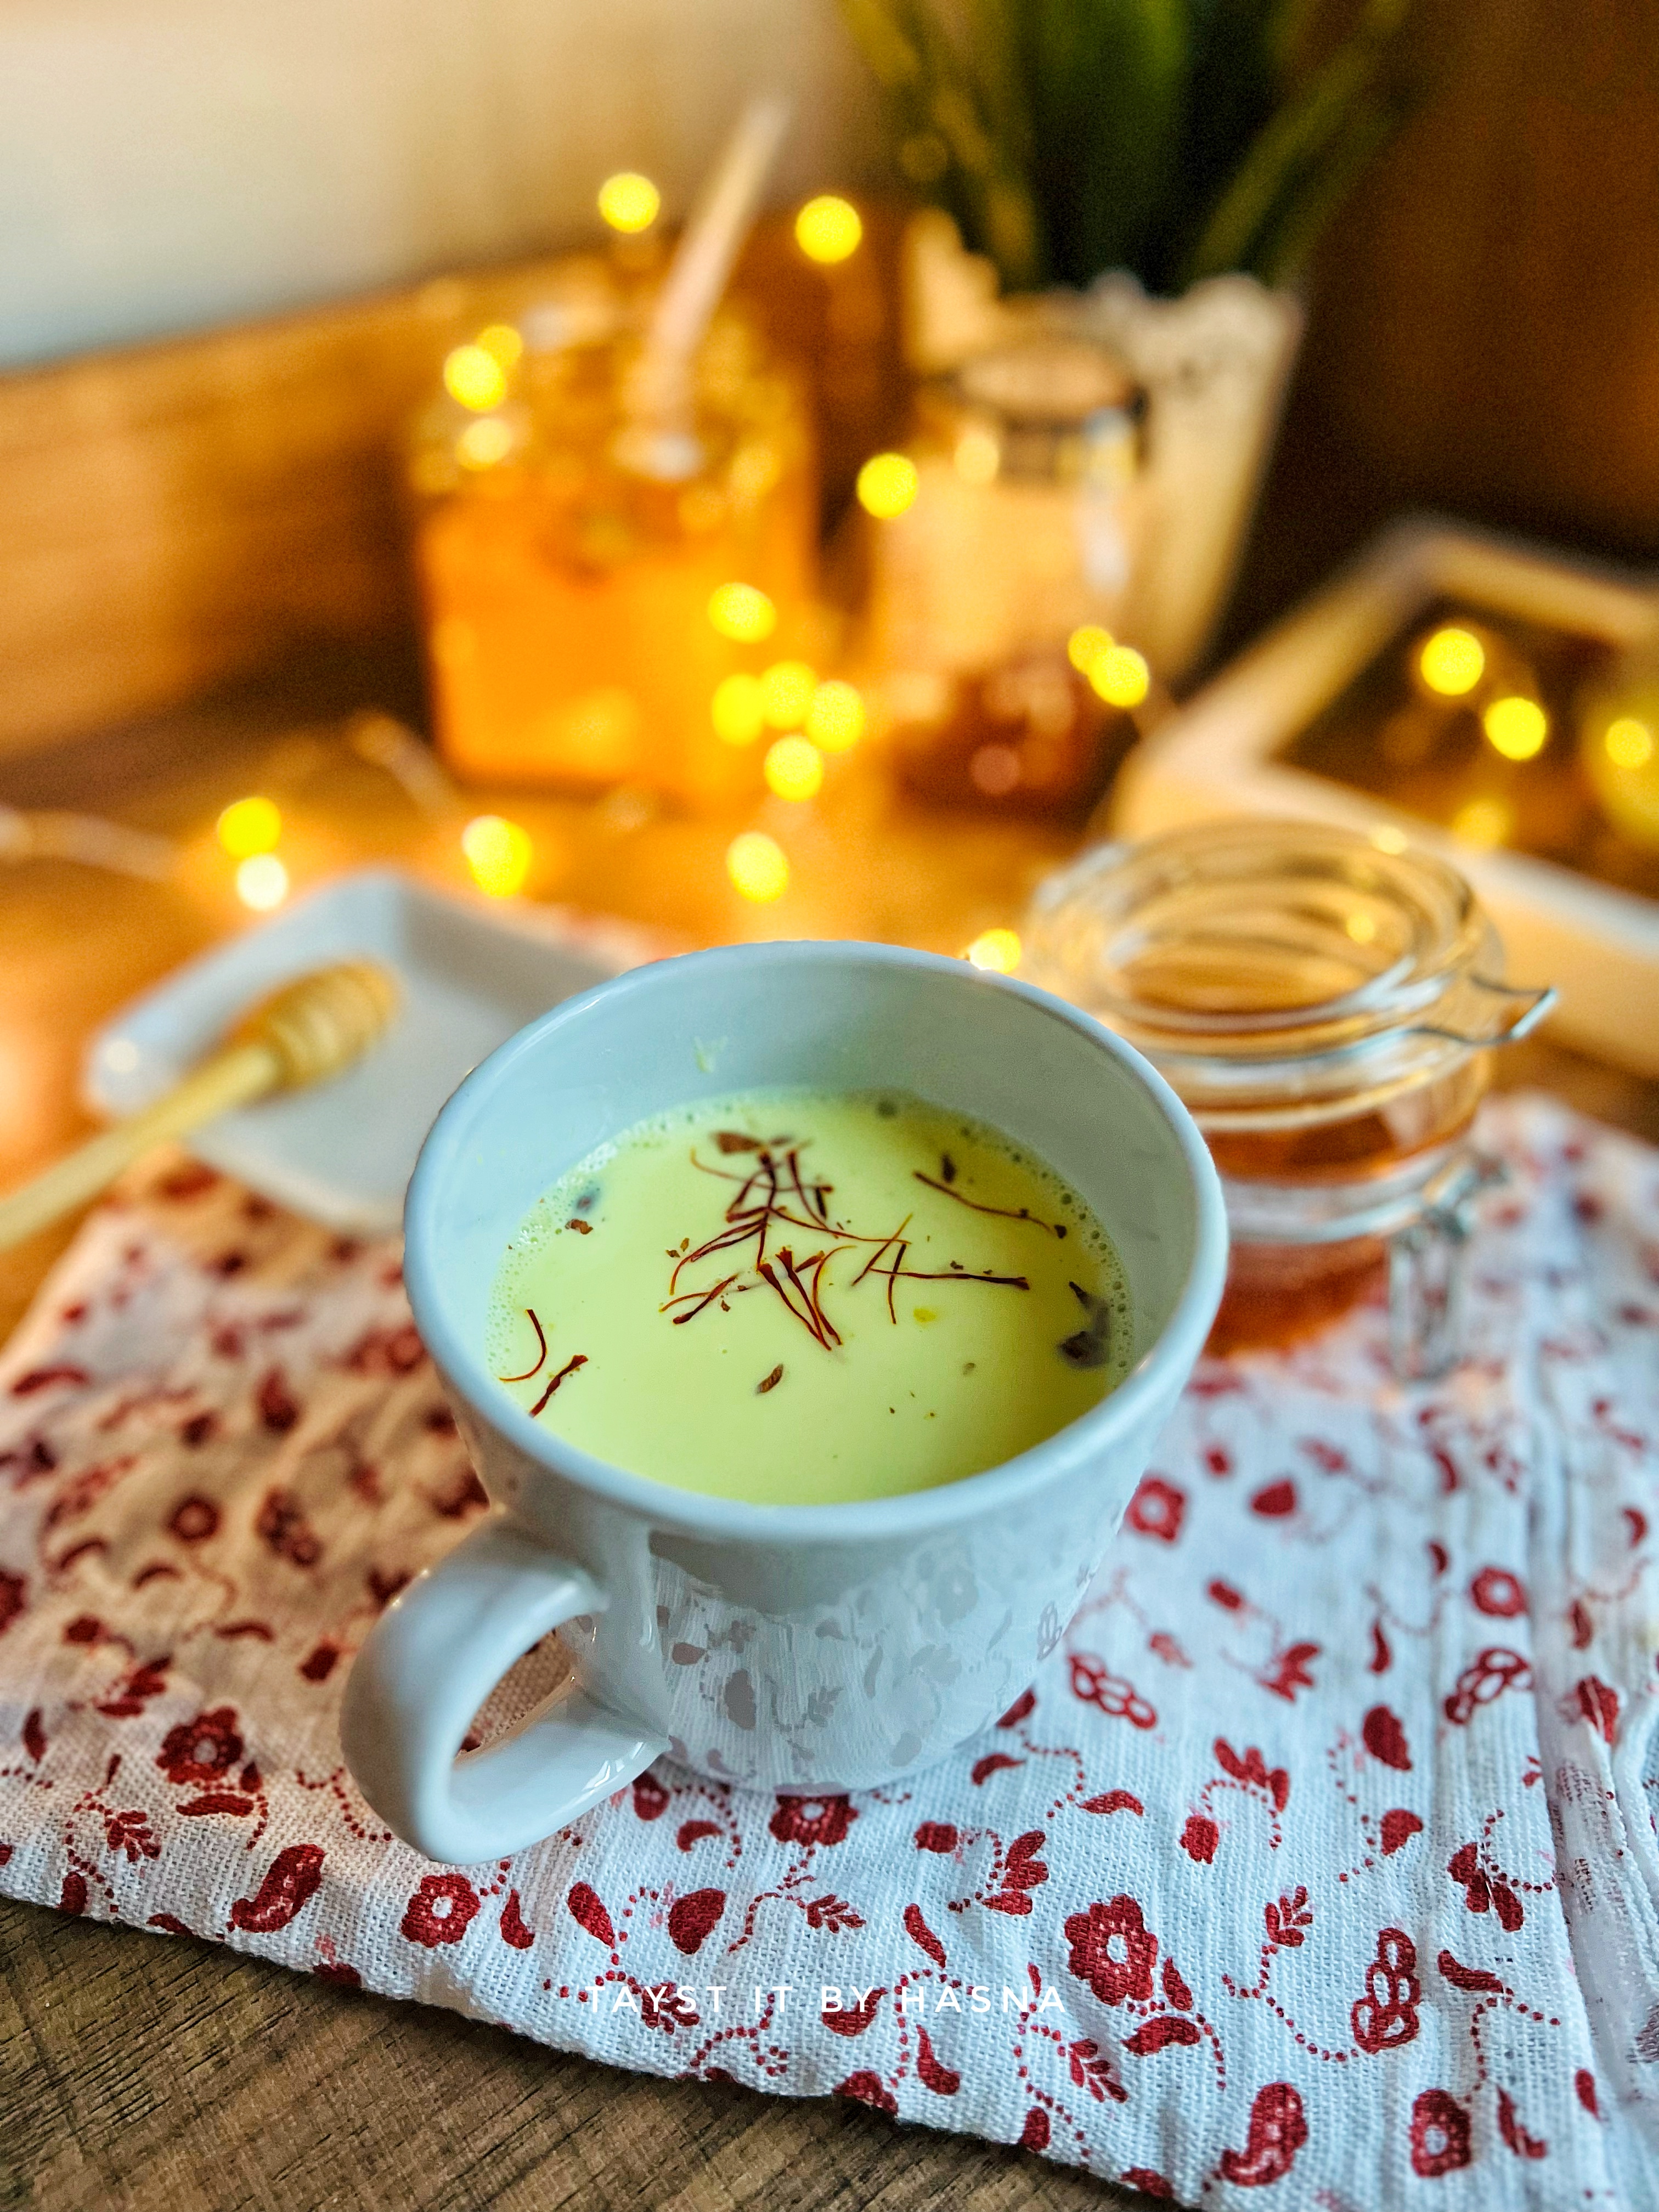
Saffron Golden Lattè 


The perfect soothing drink for winter evenings! This drink has so many health benefits and also helps lower stress level and helps improve sleep quality.
I love to have this drink if I have not cold already or have cough. Do not try this drink if you are already having symptoms of cold, as it may worsen your cold.

This drink helps in protecting against flu and I love to have this either in evenings or right before sleep. Make sure you add honey generously, it is a heart warming drink. Enjoy!

Ingredients: (makes for 1 person)


  • 1 cup Full Cream Milk
  • Turmeric, a pinch
  • 1/2 tsp Black pepper
  • 2 pieces Cinnamon
  • 1 Cardamom 
  • 1 Clove
  • 1 small piece ginger 
  • 2 tbsp Honey, generously
  • 1 tbsp Almonds, chopped
  • Saffron, a pinch

Instructions:

  1. In a tea pot, pour the milk, add a pinch of turmeric and mix it.
  2. Using a steel infuser ball or a small piece of clean cotton cloth or simply use a strainer once the ingredients have simmered well. Add the black pepper, cinnamon, clove, cardamom, and ginger and allow it to infuse in the milk.
  3. Once comes to a boil, simmer for 2 minutes and pour to your mug and honey generously, mix well.
  4. Add chopped almonds for a crunch and a pinch of Saffron and enjoy immediately!


Do try this recipe and don't forget to share your experience/feedback with me here in the comments or feel free to send me a mail. Also, do tag me at #taystedit if you try out my recipes on Facebook, Instagram etc so that I can see when you make it. ♡♡♡♡

Gai Tod - Thai Fried Chicken 


I am sure once you try this recipe, you are hooked for life! Unlike other fried chicken recipes, that requires you to do complex steps, this one is basic and with minimal ingredients and the results are just crazy. 

You may ask, how can you say that something can get crispy without those extra steps. Well, we have a hero here! It’s RICE FLOUR, such a game changer!  The marinated chicken is coated in the rice flour..and oh boy!! The chicken always turns out so crispy and delicious that I am salivating just while I type this down.


The marination requires very minimal ingredients, I have used basic ones like soy sauce, you may use light and/ dark soy sauce, completely depends on you. Some people use fish sauce and/ oyster sauce for that added umami flavor, but again it’s optional. All ingredients are almost always available in every Asian Kitchen, this is definitely a must try! 


Ingredients: 


  • 8 pieces Chicken with Skin on
  • 7-8 Garlic Cloves, chopped 
  • Coriander roots ( rinsed well and chopped)
  • 1 tsp Cumin powder/ cumin seeds 
  • 2 tbsp Soy sauce 
  • Rock Salt, as required 
  • 1/4 cup Water
  • 1/4 tsp Red Chilli flakes
  • 1/4 tsp Turmeric powder
  • 1 cup Rice Flour
  • Vegetable Oil for frying

Instructions:

  1. In a chopper, add garlic, coriander roots, cumin powder, soy sauce, rock salt, and water .
  2. Onto the cleaned chicken, add the marinade and add other ingredients like red Chilli flakes and turmeric powder.
  3. Allow to marinate for 30 minutes to 1 hour.
  4. Coat the marinated Chicken pieces in rice flour well and deep fry the Chicken pieces in vegetable oil on medium high flame for around 20 minutes. *
  5. Serve hot garnished with crispy fried shallots, sweet Chilli sauce and rice. 


Notes: *
Do not flip the chicken immediately after adding the chicken to hot oil. Allow it to stay and then flip after 5 mins, so that the coating stays intact.
Keep an eye on the chicken, so you may require to increase/ decrease flame as and when required.


Do try this recipe and don't forget to share your experience/feedback with me here in the comments or feel free to send me a mail. Also, do tag me at #taystedit if you try out my recipes on Facebook, Instagram etc so that I can see when you make it. ♡♡♡♡

 Honey Chilli Crispy Smashed Potatoes


Looking for a recipe that's savory, yet super easy to make to enjoy in this rain? I have got your back! It's been raining 3 days back to back and ordering food is my best bet xD But outside food does get boring and isn't very healthy, so I thought of something that required less dishes to wash and is quick to make and the honey Chilli Smashed Crispy potatoes were born! I have used medium-small potatoes here. I would suggest to get hold of the really tiny ones if possible, gives better texture when bakes. The potatoes are boiled and then smashed which is then baked to crispy perfection. The honey Chilli sauce is like liquid gold. I like to drop a dollop of the sauce over the crispy Smashed potatoes, so that the potatoes stay crispy. These are best enjoyed hot. 

From now on, I plan to write a lot about a particular recipe, if there is a back story etc, otherwie, I plan to keep my blog recipes simple and easy to navigate through. Hope this will help the blog grow in a better way :) 

Now to get back to the recipe.. If you like the sweet and spicy combo, I am sure you will love this one! Let's get to the ingredients...

Ingredients :

  • 1/2 kg Baby potatoes 
  • Salt, as required 
  • 3-4 Garlic cloves, minced
  • Freshly crushed pepper
  • Parmesan Cheese
  • 1 tsp Paprika 
  • 2-3 tbsp Olive oil
  • 1 tbsp Butter
  • 1/4 Red Chilli Flakes
  • 2 tbsp Sriracha Sauce
  • 1 tbsp Honey 
  • 1 tsp Black pepper powder
  • Sesame seeds and Parsley to garnish

Instructions:

  1. Preheat oven to 220 deg C.
  2. Boil the baby potatoes with some salt and place the potatoes on a baking tray lined with parchment paper and space them evenly.

  3. Smash the potatoes gently with a potato smasher and sprinkle, salt, freshly crushed pepper, Parmesan cheese, paprika and a drizzle of olive oil.
  4. Bake for 15 minutes each side, meanwhile, let's make the sauce.
  5. In a saucepan, drop butter, and add the minced garlic to the butter, once fragrant add the red chilli flakes, Sriracha sauce, honey and black pepper powder, a dash of water and allow to come to a boil and set aside.
  6. Onto the piping hot crispy Smashed potatoes, add dollops of the prepared sauce over the potatoes and garnush with sesame seeds and/ parsley.
  7. Serve hot!


Notes:

I have used medium-small potatoes here, I would prefer to use the small tiny ones for better texture.
You may air fry the potatoes too.


Do try this recipe and don't forget to share your experience/feedback with me here in the comments or feel free to send me a mail. Also, do tag me at #taystedit if you try out my recipes on Facebook, Instagram etc so that I can see when you make it. ♡♡♡♡


Tomato Basil Soup 


The perfect soup to warm you up during this winter. It’s the perfect dinner when paired with a slice of butter toasted baguette. The veggies are roasted in the oven, which is then puréed. The aroma from the roasted garlic takes the soup to a next level. You just can’t have enough of this warm hug in a bowl. 🥰

NINJA, a very popular kitchen appliance manufacturer send me their 3 in 1 food processor and I am super impressed with its results. I just love how perfect my soup turned out using the blender! I can’t stress enough about how amazing the blades of the machine are designed and how powerful the Ninja Blender which gives the perfect consistency.

Let’s see how the easy yet umami filled soup fills your tummy, heart and soul!


Ingredients:

  • 6 Garlic cloves/ 1 Garlic Bulb for roasting
  • 3-4 Garlic cloves for sautéing 
  • 1 Carrot, chopped 
  • 4 large Tomatoes, chopped
  • 1 small Onion, chopped 
  • Rock Salt, as required 
  • 1/2 tsp Red Chilli Flakes 
  • Olive oil, to drizzle 
  • 1/2 cup Milk
  • 2 tbsp Olive oil
  • Fresh Basil leaves
  • Red chili flakes and basil leaves for garnish 

Instructions:

  1. Chop your veggies like onion, tomato, carrot in uniform chunks.
  2. In a parchment paper lined baking tray, add your chopped veggies, garlic bulb, season with red Chilli flakes and rock salt.
  3. Roast the veggies for 45 minutes on 200 deg C or until charred.

  4. Blend the roasted veggies and add milk and blend again to make the soup more rich and less tangier.
  5. In a deep bottom vessel, pour olive oil and add in your chopped/ minced garlic cloves. 
  6. Once the raw aroma disappears, add the puréed sauce/ soup to the vessel. 
  7. Add in fresh basil leaves and allow to come a simmer.

  8. Garnish with red Chilli flakes and basil leaves.
  9. Serve hot with butter toasted garlic baguette slices. 


Do try this recipe and don't forget to share your experience/feedback with me here in the comments or feel free to send me a mail. Also, do tag me at #taystedit if you try out my recipes on Facebook, Instagram etc so that I can see when you make it. ♡♡♡♡


 Roman Style Chicken Cacciatore with Bechamel Sauce


I am back! A vacation that I thought would only last 2 weeks turned out to be a long vacation, but exactly the time I needed to myself for self rejuvenation and that bought in so much inspiration. I can't wait to share all the recipes that I have been creating and planning all this while. The vacation has really helped my creative juices flow.

Talking about the Cacciatore, which is originated in Italy and means Hunter/ Hunter's wife. This means it is a dish prepared by the hunter or his wife with the catch from the day, probably a rabbit. But since chicken is widely available, the dish is now commonly prepared with Chicken now days. And the other main ingredients include anchovies and rosemary. But to suit my Asian tastebuds I have played around the ingredients and transformed the garlic-anchovy-rosemary sauce that wouldn't tickle my family's palate. So I transformed the sauce to a garlic-Bechamel-mushroom sauce. This is a combination that is always a winner. This recipe is very much similar to Chicken Fricassee too..😃

As Cacciatore is usually prepared with bone-in chicken pieces, make sure that you fry and cook the chicken well, before adding the chicken to the gravy. The Cacciatore can be paired with pasta, Mashed potatoes, roasted veggies etc. Super easy to prepare yet finger-licking good; Let's get to the recipe!

Ingredients :

  • 250 gms Bone-in Chicken/ drumsticks, skin on
  • Salt, as required 
  • Freshly ground black pepper 
  • 1 box white Button Mushrooms, chopped 
  • 2 tbsp Butter, unsalted 
  • 1 medium Onion, sliced 
  • 1/2 tsp dried Thyme/ Oregano
  • 1/2 cup Chicken Stock 
  • 2 Garlic Cloves, pressed/ minced
  • Salt, as required 
  • 1 tbsp All purpose flour 
  • 3/4 cup Full cream Milk
  • 1/4 cup heavy cream (optional)
  • 1 tbsp Worcestershire Sauce (optional)
  • Mashed Potatoes, Tap here for recipe
  • Steamed Broccoli 
  • Parsley for garnish 

Instructions:

  1. Marinate the chicken drumsticks with salt and crushed black pepper.
  2. In a heavy bottom pan, drop the butter and fry the chicken drumsticks.
  3. Fry on medium high heat for 15-20 minutes and until brown on all sides.

  4. Next, to the same pan, add butter and sauté the sliced onion. Once translucent, add the chopped mushrooms, dried thyme, chicken stock, pressed garlic and salt as required.
  5. To this, add the all purpose flour, mix and add the milk, allow to come to a boil and add the heavy cream and Worcestershire sauce.

  6. Once the sauce comes to a boil, add the fried chicken drumsticks and simmer for around 10 minutes, adjust salt to liking.

  7. Serve with mashed potatoes and steamed broccoli.
  8. Garnish with dried parsley.

Notes:

Make sure to use medium or small chicken drumsticks, so as to ensure that the chicken is cooked well. 

Do try this recipe and don't forget to share your experience/feedback with me here in the comments or feel free to send me a mail. Also, do tag me at #taystedit if you try out my recipes on Facebook, Instagram etc so that I can see when you make it. ♡♡♡♡

 Mumbai Street Food Style Chicken Frankie


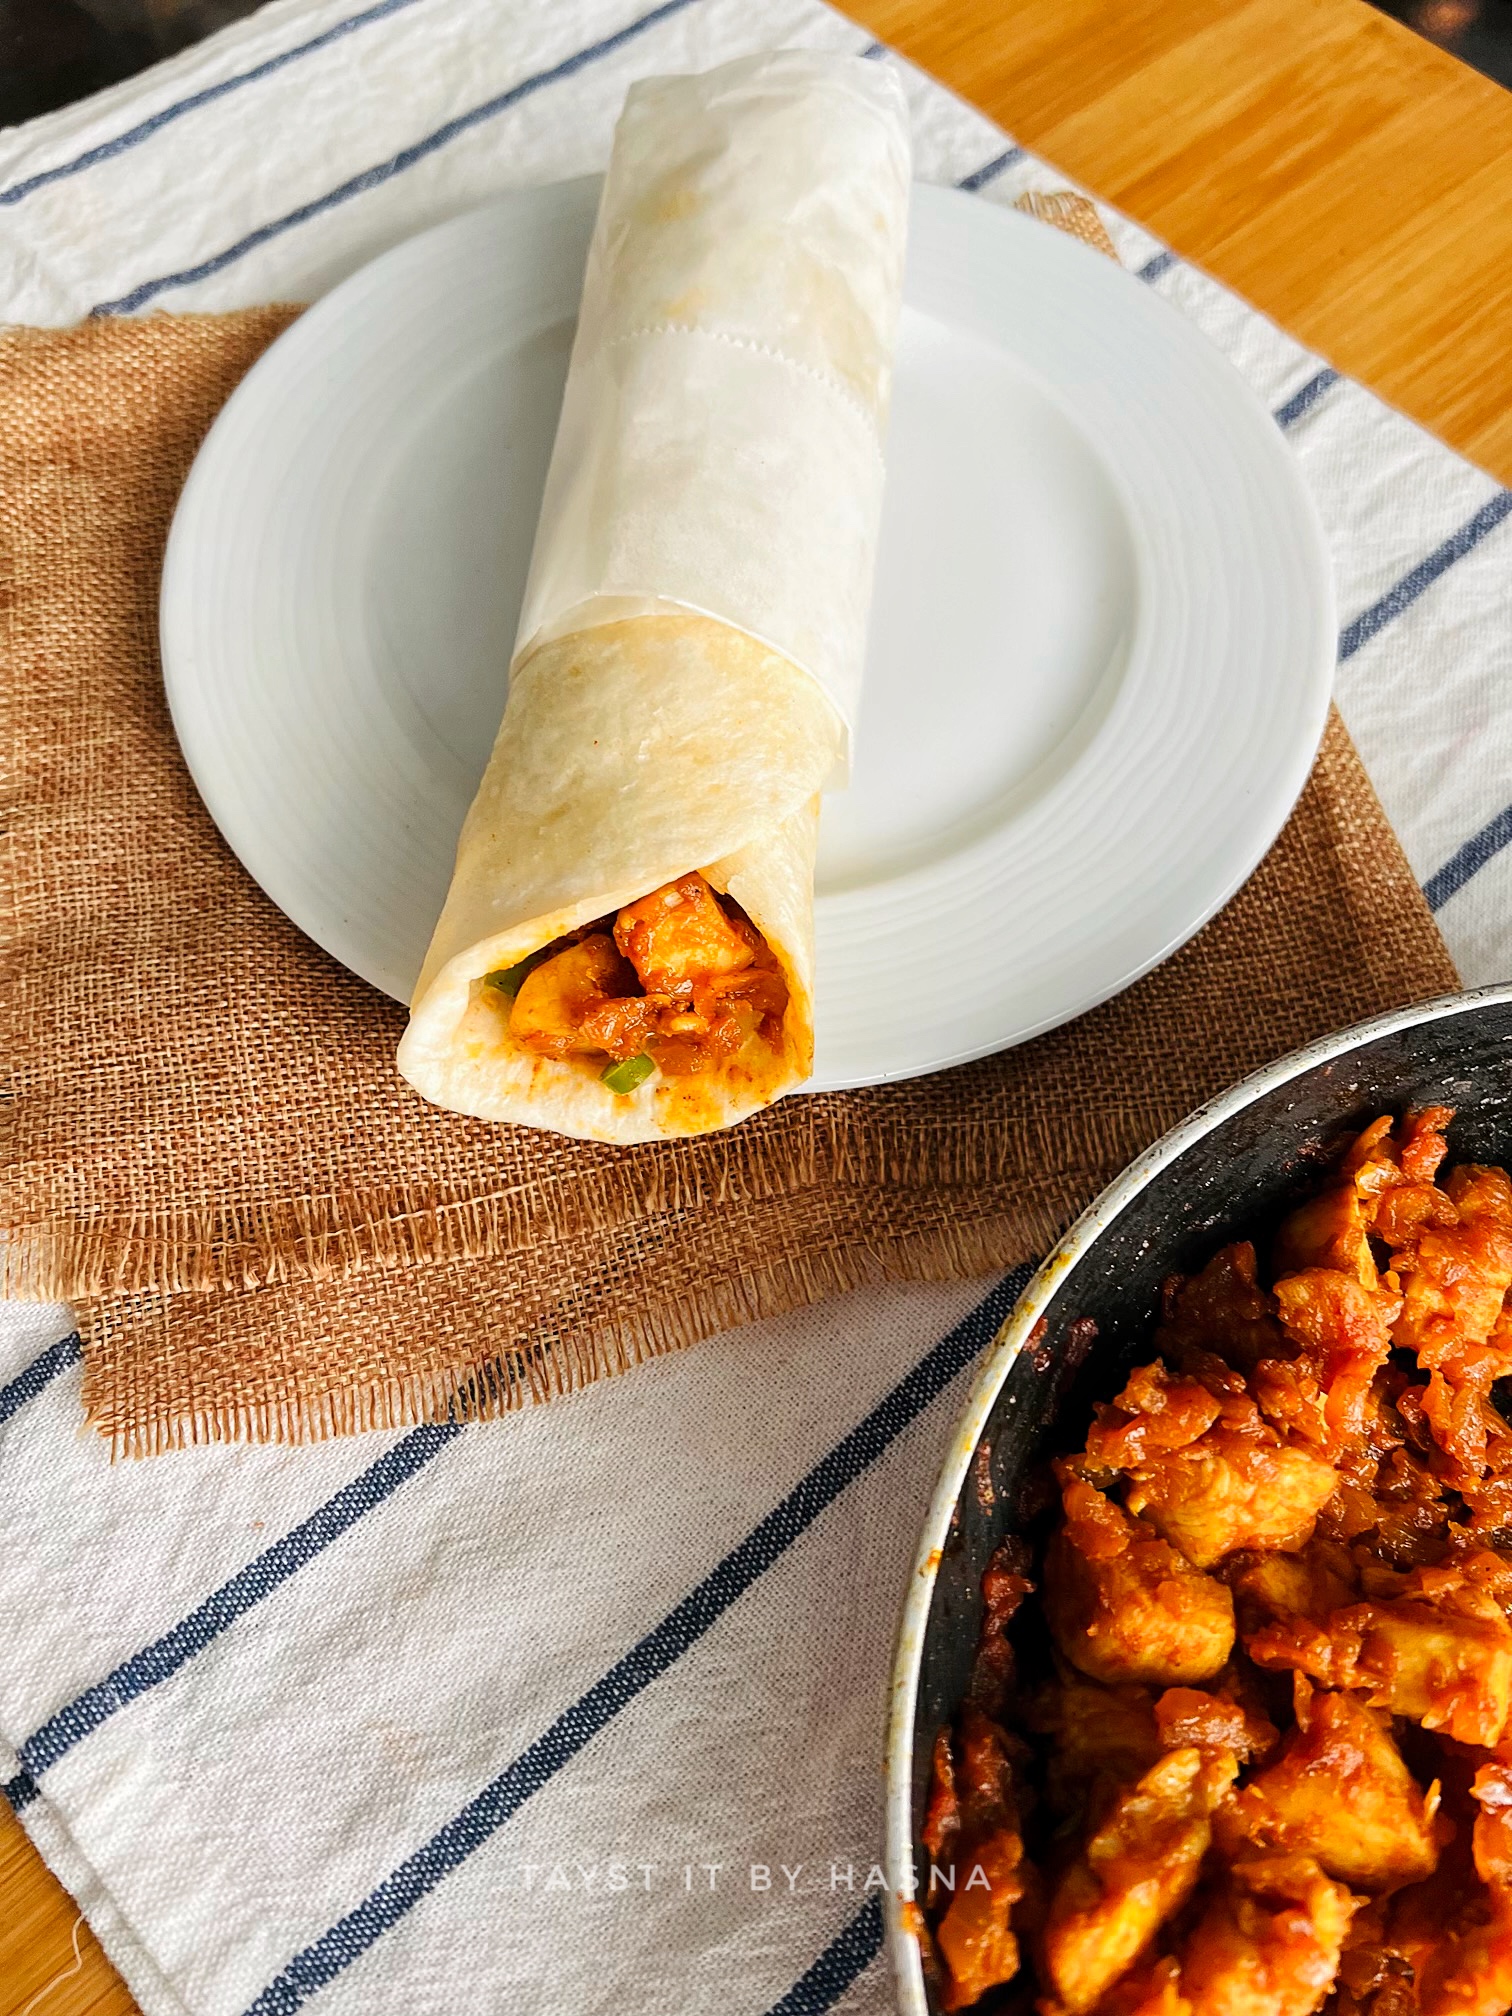
Chicken Frankie is a wrap that consists of an omlette like layer inside the wrap, with a chicken filling inside which is finished off with a dash of pickled onion and green chilli and a sprinkle of Frankie masala powder, unlike other wraps, this one is chatpatta which means it is spicy and tangy.

Frankie is usually made with a roti made from maida dough, I have used here tortilla wraps as it was more accessible to me. I have used tender chicken breasts, you may use boneless chicken thighs, as there is no risk of over cooking chicken thighs. On the other hand, if you overcook breast pieces, it may result in a dry texture, if overcooked.

Preferably prepare the filling a day ahead, as it helps in the flavors of the masala to steep in the chicken pieces and store in the refrigerator overnight. Chicken frankie is very filling and with the omlette inside, makes it a complete meal. So you may have it as a snack or as a meal. I am sure you will fall in love with the flavors.

Ingredients: (makes 3)

  • 4 tbsp White Vinegar
  • 1/2 an Onion, thinly sliced 
  • 2 Green  Chillies
  • Salt, as required
  • 250 gms Boneless chicken, cubed
  • 2 tbsp Vegetable Oil
  • 2 medium Onions, chopped finely
  • Salt, as required
  • 1 tsp Garlic paste
  • 1 tsp Ginger paste 
  • 1/4 Turmeric powder
  • 2 tsp Kashmir Red Chilli powder
  • 1 tsp Coriander powder
  • 1 tsp Cumin Powder
  • 2-3 tbsp Tomato Paste
  • 1/4 cup Water  
  • 2-3 Large Eggs
  • Ready made/ Homemade roti or paratha
  • 2 tbsp Butter 
  • 2 tbsp Frankie masala powder **
  • Butter paper for wrapping the frankie

Instructions:

  1. In a small bowl, add in the sliced onions, chopped green chillies, white vinegar and salt. Mix and set aside.
  2. In a large pan/wok, pour vegetable oil and add in the chopped onions, add salt as required and allow the onions to become translucent.
  3. Next add in the ginger and garlic paste, Sautee until raw aroma disappears.
  4. Next add in the spices and mix well. Add the tomato paste and the chicken cubes,our in a splash of water and allow the chicken to cook well. After 7 minutes, switch off the flame.

  5. In another small bowl, beat an egg with some salt and in a pan, pour vegetable oil, allow to come to a heat, then pour the beaten egg in the pan, once half cooked place in your prepared roti before the egg cooks completely, as the uncooked egg helps to stick onto the paratha/ roti.
  6. Smear the roti with butter, flip and allow to cook. Immediately transfer to a board or a plate and stack the earlier prepared chicken filling to a side of the omlette-roti and add in the pickled onion and green chillies over the chicken filling and sprinkle the frankie masala powder as required. Now slowly roll the frankie from the side and halfway through, roll one of the long ends inward and roll the frankie wrap, now using a butter paper wrap the chicken frankie. 


  7. Serve hot and enjoy with pickled veggies.


**Homemade Frankie Masala powder:
  • 2 tbsp Red Chilli Powder
  • 1 tbsp Coriander Powder
  • 2 tbsp Dry mango powder
  • 1 tbsp Cumin powder
  • 1 tsp Garam Masala powder
  • 1/2 tsp Turmeric powder
  • 1 tbsp Black Salt/ Normal Salt
Mix all spices and store in an air tight container.


Do try this recipe and don't forget to share your experience/feedback with me here in the comments or feel free to send me a mail. Also, do tag me at #taystedit if you try out my recipes on Facebook, Instagram etc so that I can see when you make it. ♡♡♡♡

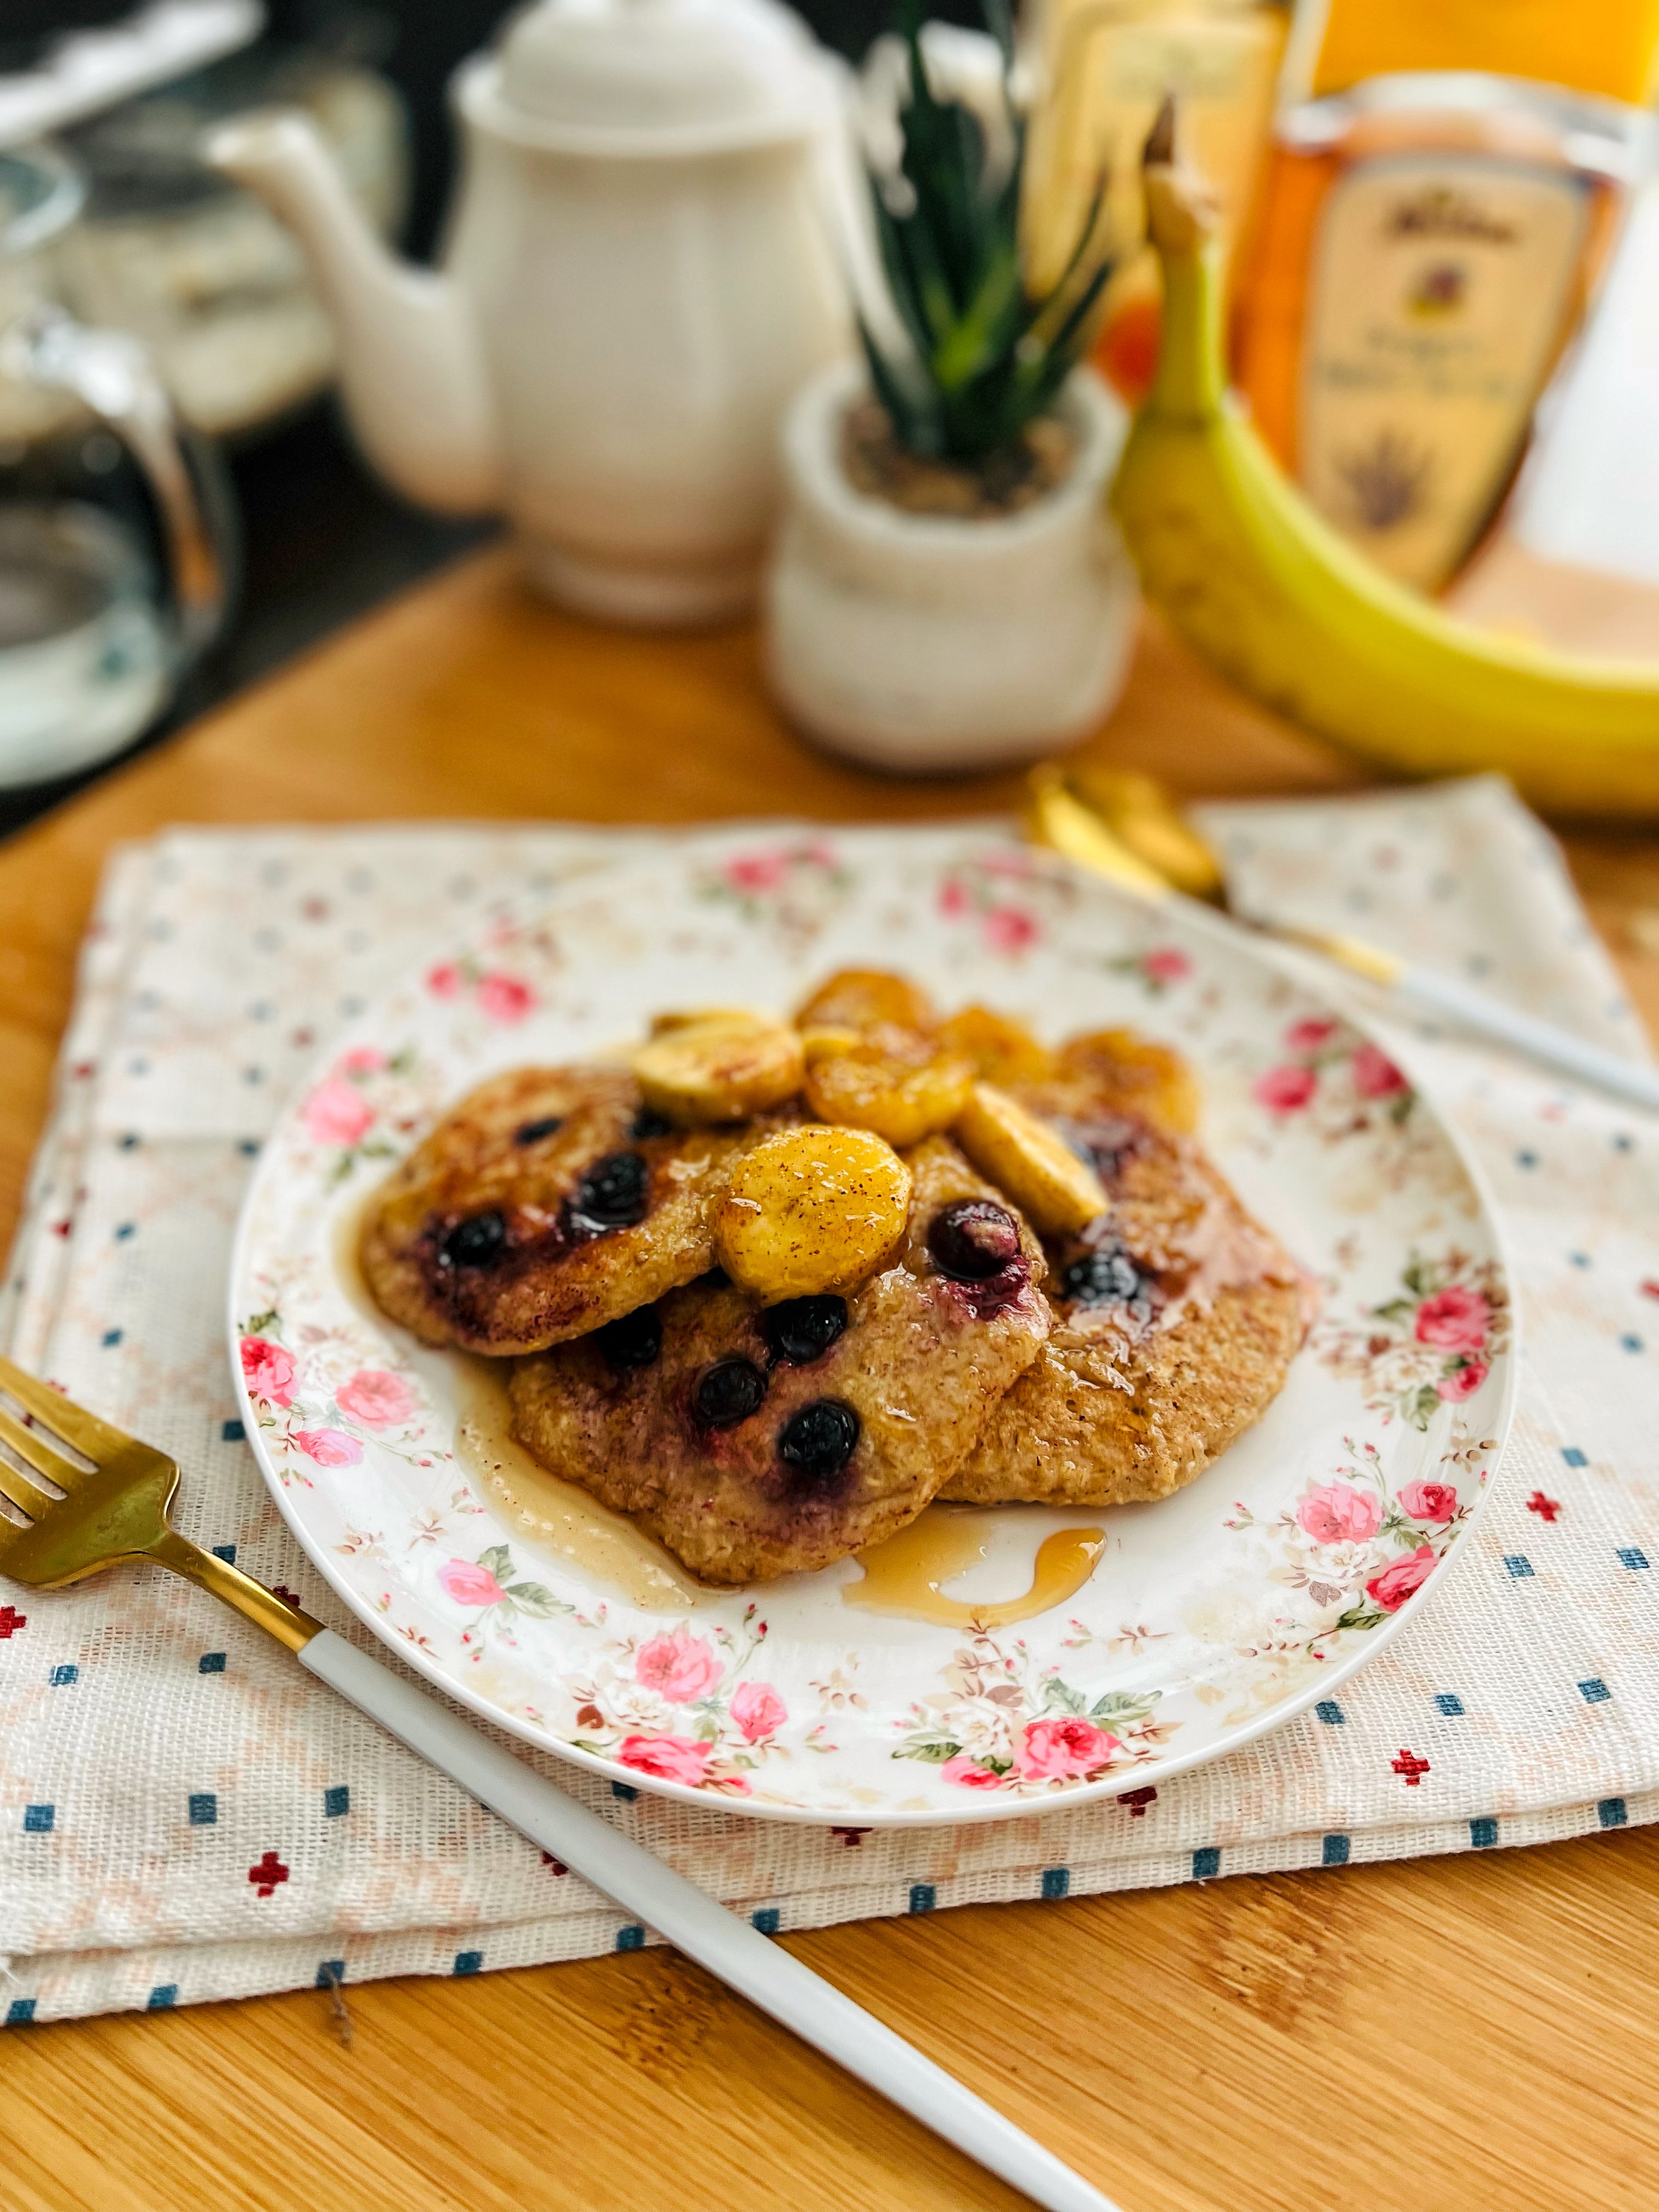
Healthy Oats Pancake 
with Caramelized Cinnamon flavored Banana Slices


Anything healthy and delicious is game for me. I love how easy and versatile this Oats Pancake recipe is. With a handful of basic ingredients found at home, you can easily make these pancakes at home. My favorite add ons are fresh fruits, especially blueberries, strawberries, kiwi and honey while for my girl it's always her favorite chocolate chips with chocolate sauce.

Like I said that these Pancakes are versatile, I added my own touch by caramelizing just ripen robust bananas in a caramel sauce, ohh boyy they are sooo good!! This was completely spontaneous, I usually don't do these extra sauces, unless it's for some special occasion. But this one is such a keeper! I know the pictures don't look that tempting, but the truth is they dont do justice to how yum the sauce is that goes so well with theseoat pancakes.

These pancakes make a great lunchbox idea for kids, they are yummy and healthy too. I was first treated to these yummy goodies when  my friend cum relative invited me to her home for breakfast and I was wowed by how easy yet yummy they were and I couldn't clearly make out that it was prepared using something like oats that is fibrous yet very difficult to convince the kids to eat. Such a great idea! Thanks Buraida for introducing Oats Pancakes to me. <3

If you are in a hurry these pancakes are the best as they can be completely made directly in a blender or made using a hand held blender like I did. So much less dishes to wash and directly pour the batter to the butter greased pan and voila! So easy peesy! Let's see how it's made...


Ingredients :

  • 1 medium ripe or over ripe Robust Banana
  • 1 Egg
  • 1/4 cup Water/ Milk (adjust if more required)
  • 1 tsp Vanilla Essence 
  • 1 1/2 cups Old Fashioned Oats
  • 1/4 tsp Baking powder
  • 1/4 tsp Baking Soda
  • 1 Tbsp Yogurt
  • Salt, a pinch
  • 2 tbsp Unsalted Butter
  • Blueberries, to top
 

For Caramelized Banana Slices

  • 1/2 just ripened Banana slices
  • 2-3 tbsp Honey
  • Cinnamon powder, a pinch
  • Agave Syrup/ Honey

Instructions:

  1. In a bowl add all your Pancake ingredients except for bluberries and blend well using a hand blender or a machine blender.
  2. In a butter greased pan, pour 1/4 cup full of the batter to the pan, making 2-3 pancakes at a time (depending on the size of your pan). Drop a few Blueberries over the pancake and flip. Allow to cook well on both sides.
  3. Place the pamcake on a serving plate.
  4. To the same pan, add butter and drop in your sliced bananas, honey, Cinnamon powder and toss for a few seconds.
  5. Now slide the Caramelized bananas directly over the cooked pancakes and enjoy warm with a glass of fresh juice for a refreshing and delightful day ahead!
 

Do try this recipe and don't forget to share your experience/feedback with me here in the comments or feel free to send me a mail. Also, do tag me at #taystedit if you try out my recipes on Facebook, Instagram etc so that I can see when you make it. ♡♡♡♡

North Indian Style Dal Tadka


I am all about easy recipes that are EASY at the same time COMFORTING. For me, a plate of perfectly cooked rice, dal tadka, and chicken or any seafood fry is something very much that tells me home cooked meal. In North India, this is combination is very popular and is called Dal-Chawal (lentil-rice), a favorite among many.

Dal tadka is something I prepare once a week, it's wholesome, filling and keeps one content. This recipe is so easy and gets done in a jiffy! For lentils, I have used toor dal here. You may use red lentils, masoor dal, a mix or a combination of the lentils. There is no sautéing involved, only a tadka / tempering is prepared to give the dal its oomph!

You can have DAL TADKA with chappati, roti, rice or as a side curry. It will definitely be your family's favorite.

Ingredients :

  • 1/2 cup Toor Dal
  • 1/2 Onion, sliced
  • 1/2 Tomato, chopped
  • 1-2 Green chillies, slit
  • 1/4 tsp Turmeric powder
  • Salt, as required 
  • 3/4 cup Water
  • Coriander leaves, chopped 

Tadka:

  • 2 tbsp Butter
  • 1/2 tsp Cumin seeds
  • 1 tsp Ginger Garlic paste
  • 2 sprig Curry leaves
  • 1 tsp Kashmiri Red Chilli Powder
  • A squeeze of Lemon juice
  • Coriander leaves, chopped 

Instructions:

  1. Wash toor dal well and add to a pressure cooker. 


  2. Pressure cook all the ingredients except for the ingredients under tadka for 1 whistle. Allow the pressure to release naturally.
  3. In a small tadka pan, add in butter, allow to melt. 
  4. Splutter the cumin seeds, add ginger garlic paste, curry leaves, chopped coriander leaves and sauté well. 
  5. Pour the cooked dal, add in the Kashmiri Red Chilli powder, and adjust seasoning if required.
  6. Allow to simmer well. Finally squeeze lemon juice, garnish with chopped coriander leaves and add in a blob of butter.
  7. Enjoy with cooked rice, and your favorite sides like chicken or fried seafood!


Do try this recipe and don't forget to share your experience/feedback with me here in the comments or feel free to send me a mail. Also, do tag me at #taystedit if you try out my recipes on Facebook, Instagram etc so that I can see when you make it. ♡♡♡♡

 Mac n Paneer


Well, Paneer is a form of cheese , isn't it? This is the Indian version of Mac n Cheese :D

I had some Paneer laying in fridge to be used, and I had to quickly whip up something before my girl returns from school. That's when I thought of preparing the Indian Mac n Cheese also known as Mac n Paneer. You can always play with the flavors according your preference, like add other veggies or spices of your choice. 

There is no chopping involved in this recipe. The capsicum is also chopped by pulsing in the mixer jar along with tomato paste and other spices. I have not used green chillies or chilli flakes as my girl does not like her food spicy, you may add as per your choice.

This Fusion version is definitely a must try and loved by all Paneer lovers!

Ingredients :

  • 1 cup Macaroni
  • Boiling water, to cook the pasta
  • Salt, as required
  • A dash of Olive oil
  • 1 Garlic clove, sliced
  • 1 tbsp Olive oil
  • 1 tbsp Butter
  • 3 tbsp Tomato paste
  • 1 tsp Onion Powder
  • 1 tsp Kashmiri Chilli Powder
  • 1/4 Turmeric powder
  • 1/2 tsp Cumin powder
  • 1/4 piece of a large green Capsicum
  • 1/4 tsp Oregano
  • 1/2 cup Paneer cubes
  • Salt, as required 
  • 2 tsp Arrowroot powder
  • 1/2 cup Milk
  • 1/4 Cup Mozzarella Cheese
  • Cheddar Cheese, optional

Instructions:

  1. In a pot, boil the macaroni with salt, and olive oil until al dente.
  2. In a small grinder jar, pulse tomato paste, spices like Onion powder, Kashmiri Chilli powder, turmeric powder, Cumin powder and chopped capsicum.
  3. In a large pan, pour the olive oil and the butter, add the sliced garlic and Sautee for a couple of seconds.
  4. To this, add the pulsed tomato-capsicum paste, a little pasta water, sprinkle oregano and add in the washed Paneer cubes an add salt as required.
  5. Once the Paneer comes to a boil, add the arrowroot powder/ flour, mix and pour the milk.
  6. Check seasoning and add salt if required. Add a generous amount of Mozzarella cheese, close lid and allow cheese to melt.
  7. Finally sprinkle with chopped coriander leaves. Enjoy!


Do try this recipe and don't forget to share your experience/feedback with me here in the comments or feel free to send me a mail. Also, do tag me at #taystedit if you try out my recipes on Facebook, Instagram etc so that I can see when you make it. ♡♡♡♡


Newer Posts
Older Posts

Search This Blog

My name is Hasna Haneef, a mommy to a toddler, hailing from Thalassery, Kerala. Welcome to my humble abode on the Internet; wherein I share all my recipes and experiments. I am glad to have you on board!

TRENDING POSTS

  • Emirati Chebab
  • Kerala Style Squid Roast
  • Chicken Steak with Creamy Mushroom Sauce
  • Kethel's Chicken
  • Yemeni Mutton Haneeth
  • Copy Cat Caesars Mini Pizza

About Me

May peace be with you!

Welcome to my blog.

I am delighted to have you on board. My name is Hasna Haneef, a mommy to a toddler, hailing from Thalassery, Kerala. My homeplace being Dubai, as I am born and brought up here and I am very influenced by the lifestyle and the variety of authentic cuisines I get to try from here, which has made me try anything that comes across me
, click here →

Stay Connected!

Join Our Madness!

Join with Thousands Of Subscribers ! Get Our Latest Recipes Delivered to Your email Inbox!

Powered by follow.it
  • Home
  • About Me
  • Recipes

    • Main Course
    • Desserts
    • Snacks

    Uncategorized

    • Chicken
    • Meat
    • Vegetarian
    • Rice
    • Malabar Food
    • Baking
    • Breakfasts
    • Snacks
    • Drinks
    • Pasta
    • Fish
    • Soups
    • Desserts
  • Contact Me

Featured Post

Triple Chocolate Hazelnut Skillet Cookie

Blog Archive

  • ▼  2026 (3)
    • ▼  September (1)
      • Homemade Cerelac for Babies
    • ►  May (1)
    • ►  April (1)
  • ►  2025 (4)
    • ►  April (2)
    • ►  March (1)
    • ►  February (1)
  • ►  2024 (36)
    • ►  October (4)
    • ►  September (5)
    • ►  July (1)
    • ►  June (2)
    • ►  May (4)
    • ►  April (3)
    • ►  March (10)
    • ►  January (7)
  • ►  2023 (47)
    • ►  December (3)
    • ►  September (2)
    • ►  August (6)
    • ►  July (6)
    • ►  June (9)
    • ►  May (4)
    • ►  April (5)
    • ►  March (6)
    • ►  February (3)
    • ►  January (3)
  • ►  2022 (69)
    • ►  November (4)
    • ►  October (6)
    • ►  September (7)
    • ►  August (9)
    • ►  July (12)
    • ►  June (5)
    • ►  May (5)
    • ►  April (12)
    • ►  March (4)
    • ►  February (2)
    • ►  January (3)
  • ►  2021 (24)
    • ►  November (1)
    • ►  October (2)
    • ►  July (1)
    • ►  June (4)
    • ►  May (6)
    • ►  April (4)
    • ►  February (4)
    • ►  January (2)
  • ►  2020 (82)
    • ►  December (5)
    • ►  November (6)
    • ►  October (4)
    • ►  September (2)
    • ►  August (5)
    • ►  July (10)
    • ►  June (10)
    • ►  May (13)
    • ►  April (12)
    • ►  March (8)
    • ►  February (4)
    • ►  January (3)
  • ►  2019 (22)
    • ►  December (1)
    • ►  November (2)
    • ►  October (6)
    • ►  September (1)
    • ►  August (1)
    • ►  February (3)
    • ►  January (8)
  • ►  2018 (15)
    • ►  December (4)
    • ►  November (6)
    • ►  October (3)
    • ►  September (2)

Subscribe Us

Labels

Bake Biscuits Breakfast Brown rice Burger Cheese Chocolate Dal Egg Emirati Fish Iftar Indonesian Japanese Jeerakashala rice Kerala Keto Kuwait food Lunch Milk Mutton Thai food UAE food afghan cuisine arabic beef biryani bread burnt cheesecake cake chicken cream dessert dinner greek healthy indo chinese lamb malabar prawns pudding puffs quick dinner ideas recipe refreshing drink rice salad sandwich stir fry vegetables vegetarian veggies yemeni

Contact Form


POPULAR POSTS AND PAGES

Emirati Chebab

Emirati Chebab

June 01, 2023
Kerala Style Squid Roast

Kerala Style Squid Roast

June 18, 2020
Copy Cat Caesars Mini Pizza

Copy Cat Caesars Mini Pizza

March 12, 2024
Chicken Steak with Creamy Mushroom Sauce

Chicken Steak with Creamy Mushroom Sauce

November 05, 2018
Kerala Beef Fry/ Nadan beef dry fry

Kerala Beef Fry/ Nadan beef dry fry

October 08, 2019

Pages

  • Home
  • About Me
  • Privacy Policy
  • Contact Me

Copywrite © 2023 TermsFeed®. All rights reserved.

Created By Sora Templates | Distributed By Gooyaabi Templates

Back to top